This tutorial is perfect for anyone who is a fan of Studio Ghibli or Hayao Miyazaki’s work and is looking to create adorable anime illustrations. We will be using essential tools and shapes, the Pathfinder panel, the Brushes panel, and various effects from Adobe Illustrator’s control panel to create a cute graphic of Kiki’s Delivery Service cat, Jiji.
If you already know how to draw in Illustrator, you’ll enjoy this tutorial’s ease. Meow, let’s get started!
What you’ll learn in this Jiji character illustration tutorial
- Who is Jiji the cat?
- How to draw Jiji the cat’s head and body
- How to use basic shapes and effects to create a character
1. Who is Jiji the cat?
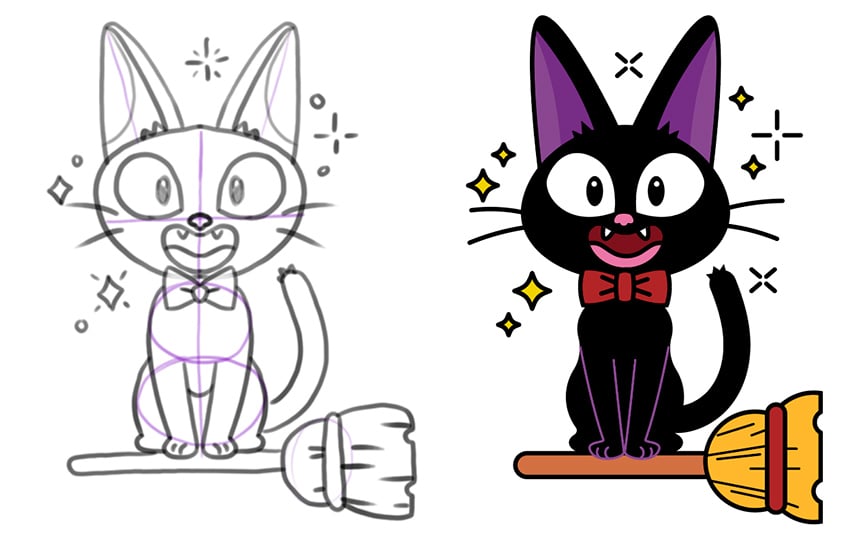
OK, so who is Jiji the cat? Jiji is a chatty black feline, a loyal pet, and companion of Kiki, a young witch, featured in Studio Ghibli’s 1989 Japanese film ‘Kiki’s Delivery Service.’ Jiji is an iconic character in the animation. It appears as a sleek, jet-black cat with large, expressive white eyes and iris purple-colored ears. Jiji is a witch’s pet, and is often showcased wearing a red bowtie and riding Kiki’s delivery service broomstick.
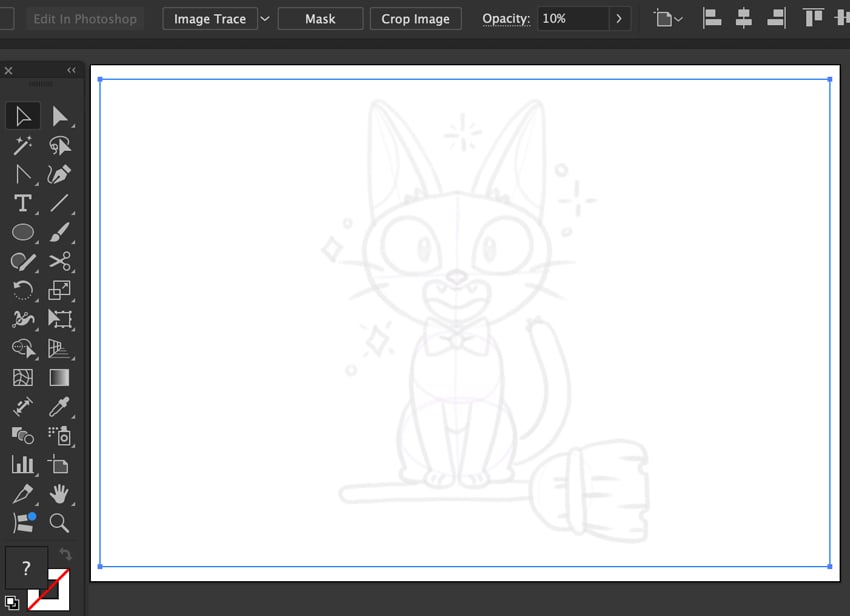
For today’s tutorial, I’ve sketched out the following concept for Jiji, which we will implement in Illustrator. You can do your own research online and sketch out some other Hayao Miyazaki anime inspiration.


2. How to create Jiji the cat’s head shape in Illustrator
Step 1
In this tutorial, we’ll start with Jiji’s head and work our way down its body.
Open Adobe Illustrator and create a new document (File > New). Our artboard will have a 29 cm Width and 20 cm Height. In the new dialogue window, give the file the name ‘Jiji’ and press Create.
Let’s place our sketch in File > Place and position it in the center. With the sketch selected, set the Opacity to 10% in the control panel.


Step 2
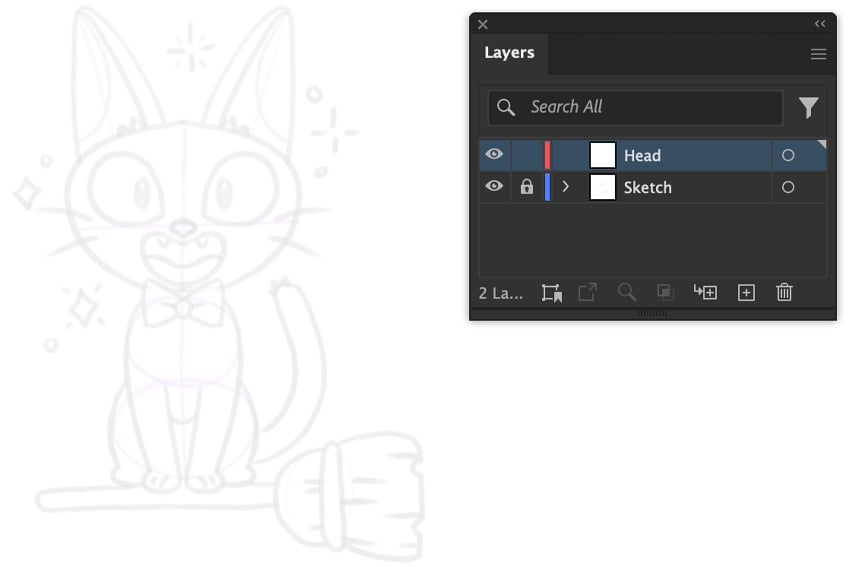
Open the Layers panel (Window > Layers). Lock the layer and label it “Sketch,” and then Create a New Layer on top of the Sketch layer and label it “Head.” File > Save (Command-S) and OK.


Step 3
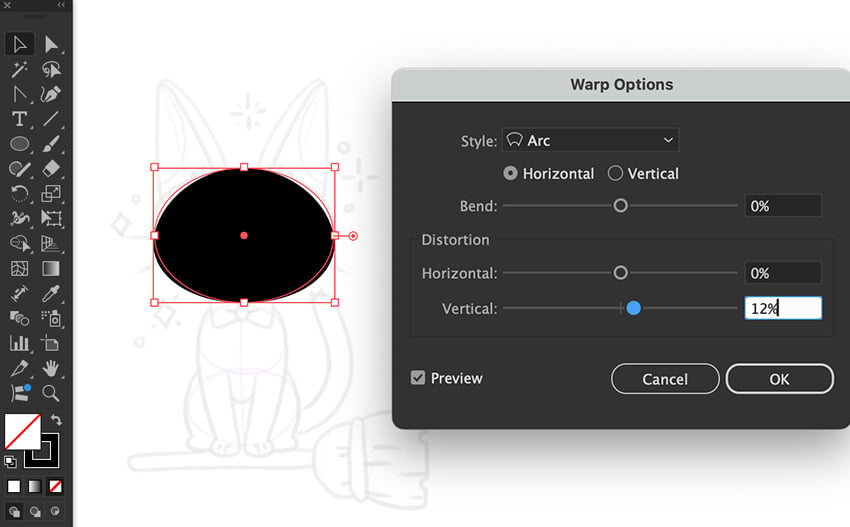
Now, let’s start to create Jiji’s head. Use the Ellipse Tool (L) to draw the head shape with a black Fill. Then let’s give the ellipse a slight bend by applying an Effect > Warp > Arc, at a Horizontal direction with a 12% Vertical Distortion, then OK.
Object > Expand Appearance to turn the effect into a shape.


Step 4
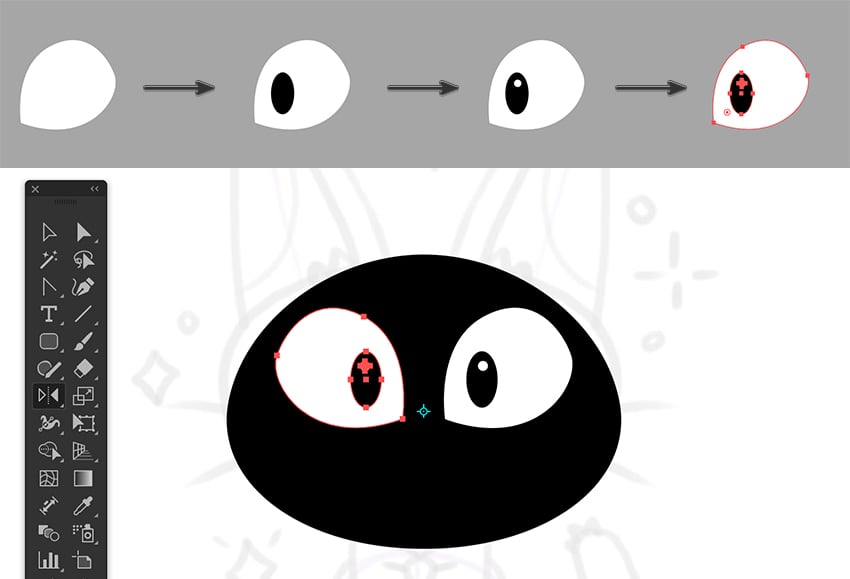
To start drawing anime eyes, grab the Pen Tool (P) with a white Fill and draw a tapered eye. Then, use the Ellipse Tool (L) to add a black Fill pupil and draw a smaller ellipse with a white Fill for shine.
Command-G to Group the eye shapes together and position the Group on the head shape. Then, take the Reflect Tool (O) and set the center reference point in the middle of the head; Option-Shift-Drag and release to mirror across.


Step 5
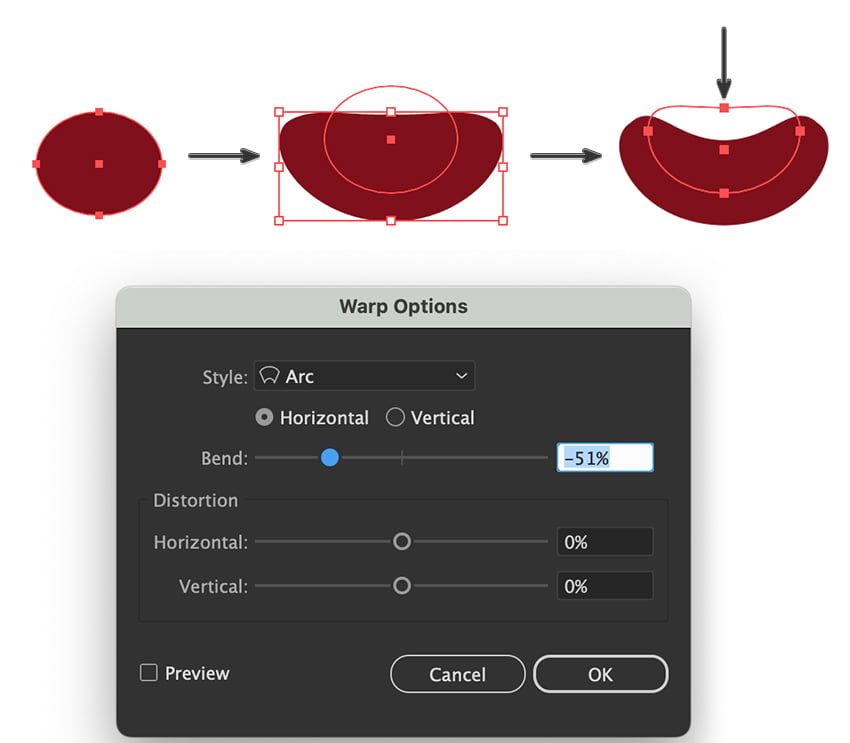
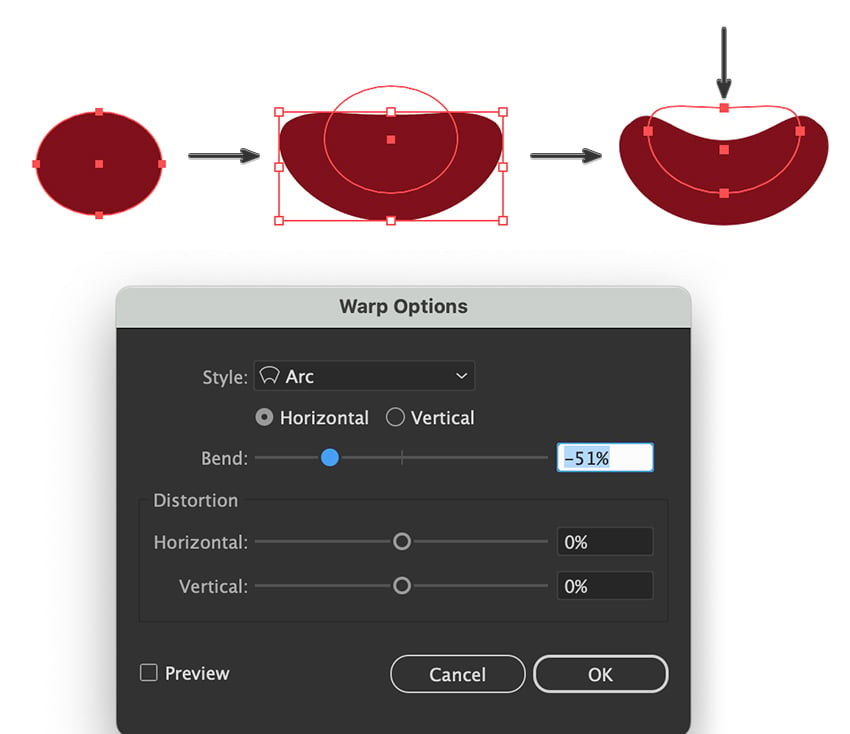
For the mouth shape, draw an ellipse with a red Fill color of R=109, G=24, B=33, and apply an Effect > Warp > Arc with a Horizontal direction and –51% Bend.
Then, grab the Direct Selection Tool (A) to slightly push the mid-anchor point down to bend the mouth. Object > Expand Appearance to turn the effect into a line shape.


Step 6
Let’s add a tongue to the kitty. Grab the Rectangle Tool (M), with the stroke still set at black 4pt Weight. Select a pink Fill color of R=210, G=116, B=163.
Effect > Distort & Transform > ZigZag. Set Size to 0.21 cm with one Ridge per segment, and Smooth points, before clicking OK. Then transform the effect into a shape with Object > Expand Appearance.


Step 7
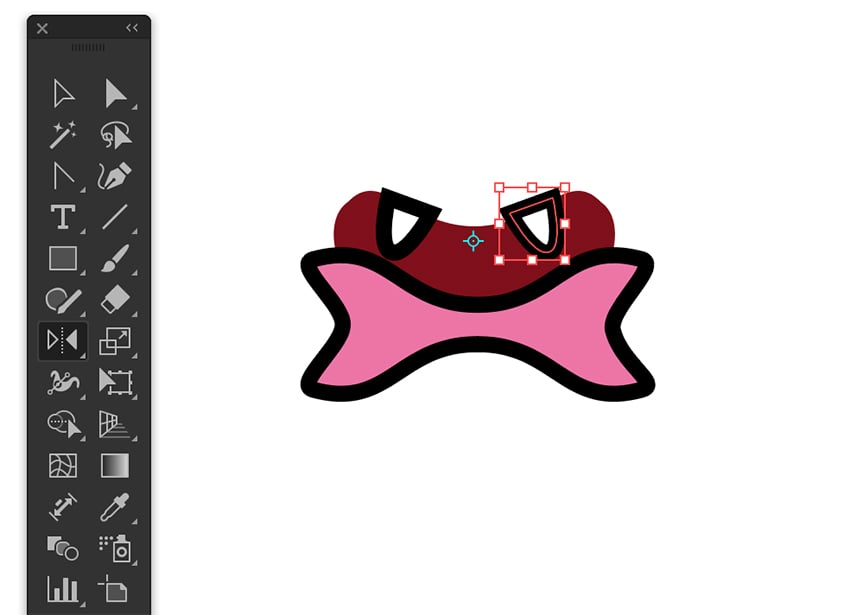
Add little fangs using the Pen Tool (P) with a white Fill and black stroke Weight of 4 pt. Freehand draw one round fang, and then grab the Reflect Tool (O). Set the center reference point in the middle of the mouth; Option-Shift-Drag and release when the tooth is mirrored.


Step 8
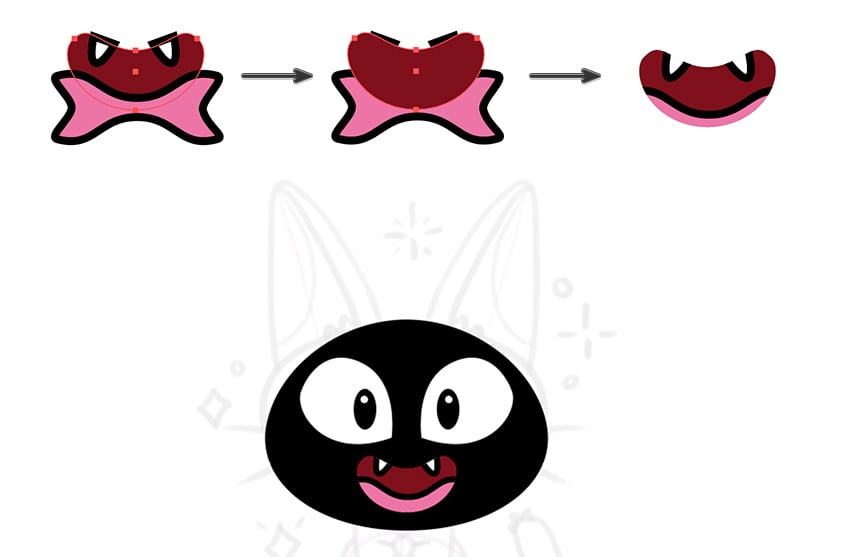
Use the Selection Tool (V) to select the red interior mouth shape and Copy (Command-C). Then grab all the mouth shapes and Command-G to Group.
Once grouped, press Command-F to Paste to Front the mouth shape. Select both the mouth group and the top mouth shape and apply an Object > Clipping Mask > Make. Then, position the mouth on the face.


Step 9
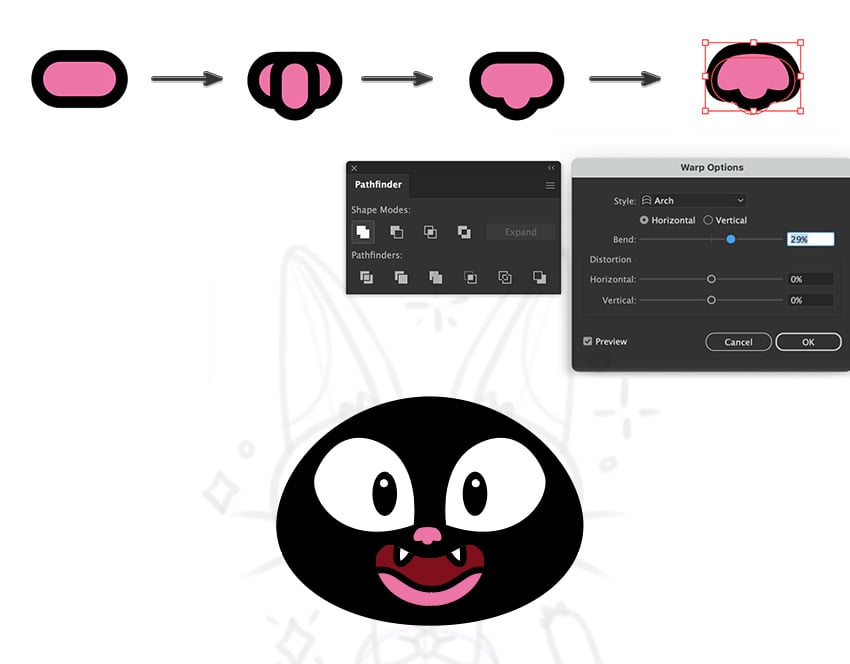
Let’s add a nose. Grab the Rounded Rectangle Tool (located under the Rectangle tool submenu in the Toolbar). Select a pink fill color of R=210, G=116, B=163, and a black 4 pt stroke Weight. Draw two perpendicularly aligned rounded rectangles, as shown below.
Open the Pathfinder panel (Window > Pathfinder) and apply a Unite: Shape Mode.
Then Effect > Warp > Arch with a Horizontal direction and 29% Bend. Object > Expand Appearance and position it on the face.


Step 10
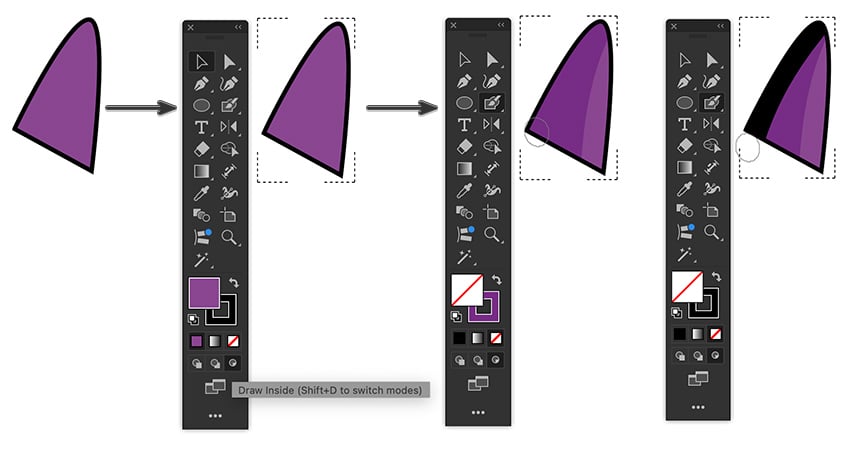
We’ll draw the ears using the Pen Tool (P), with a black stroke and a purple fill color of R=122, G=72, and B=141. Freehand draw a rounded triangular ear shape.
With the shape selected, Switch Modes by clicking the Draw Inside button at the bottom of the toolbar. Choose a darker purple stroke of R=104, G=48, B=130, and the Blob Brush Tool (Shift-B) to draw in a shadow.
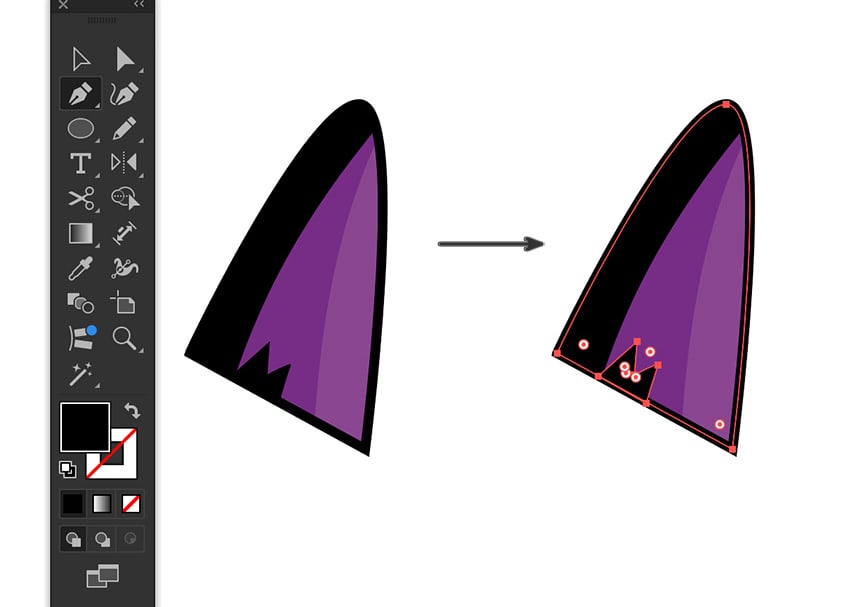
Then, select a black stroke to draw the ear fold, as seen below.


Step 11
Let’s add some ear fuzz. Grab the Pen Tool (P) with a black Fill to draw a mountain-style shape. Select all the ear elements and Group (Command-G).


Step 12
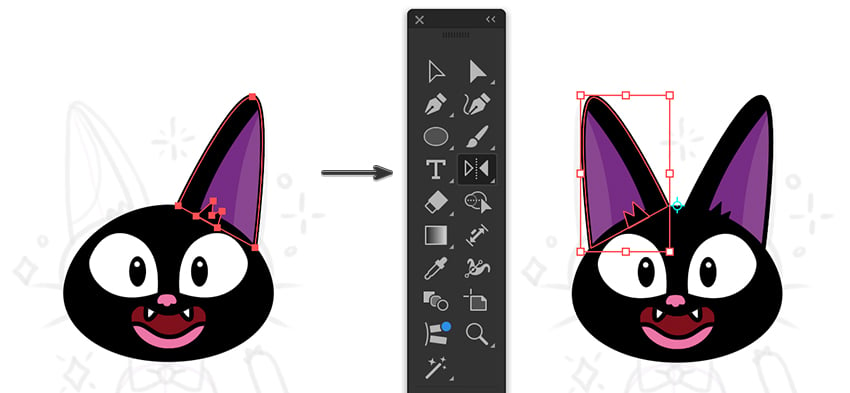
Position the ear on the head, and Send to Back (Command-Shift-[). Then, mirror it across using the Reflect Tool (O). Set the center reference point, Option-Shift-Drag, and release.


Step 13
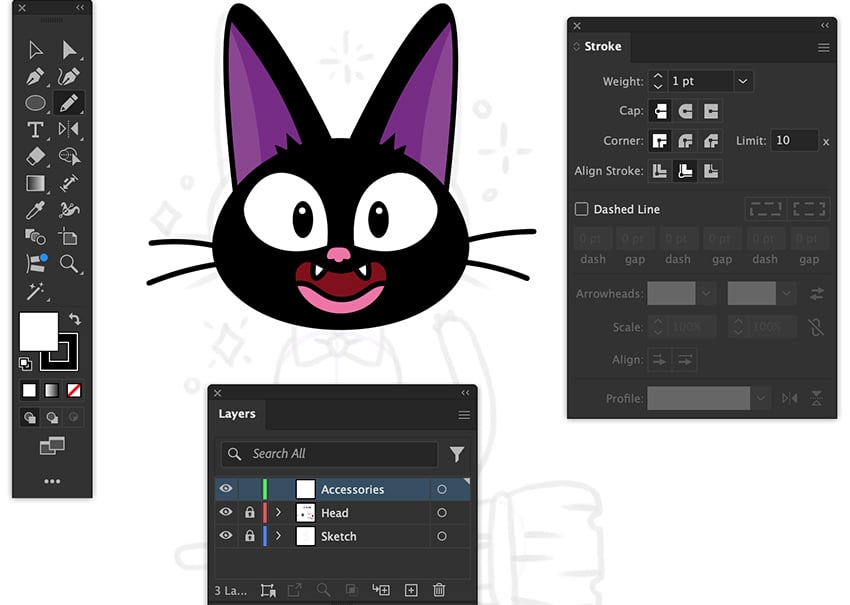
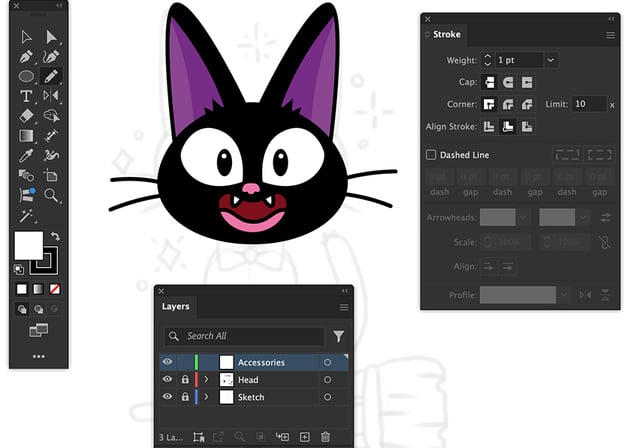
For the final bits, let’s add some whiskers using the Pencil Tool (N), with a 4pt black stroke Weight and Round Cap selected from the Stroke panel.
Next, Create a New Layer from the Layers panel ‘Accessories,’ and then lock the ‘Head’ layer.
3. How to add accessories to Jiji
Step 1
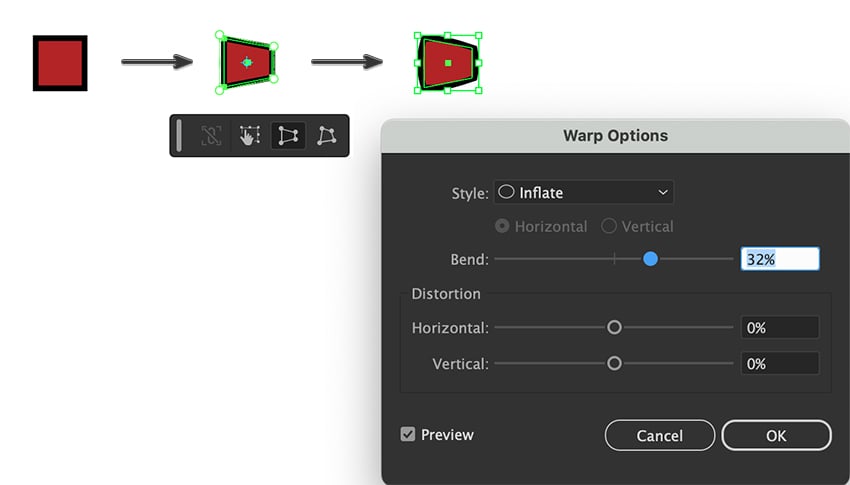
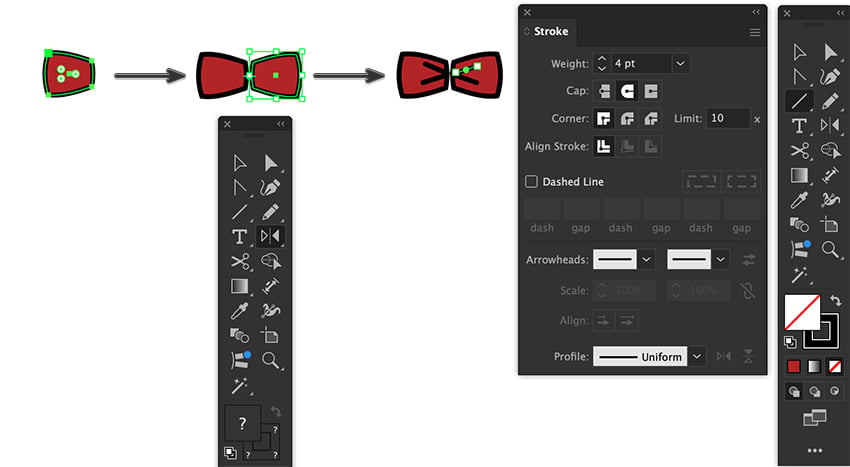
To create Jiji’s signature red bow tie, we need to draw a square using the Rectangle Tool (M) with a Fill of R=153, G=41, B=42, and a 4 pt blackstroke weight. Select the Free Transform Tool (E) and apply a Perspective Distort to reshape our square inwards, like the image below. Then apply an Effect > Warp > Inflate with a 32% Bend and OK.


Step 2
Object > Expand Appearance to turn the effect into a shape, and then use the Reflect Tool (O) to mirror the bow across.
Once you’ve reflected the shape, grab the Line Segment Tool (\), and with a 4 pt stroke, add some creases.


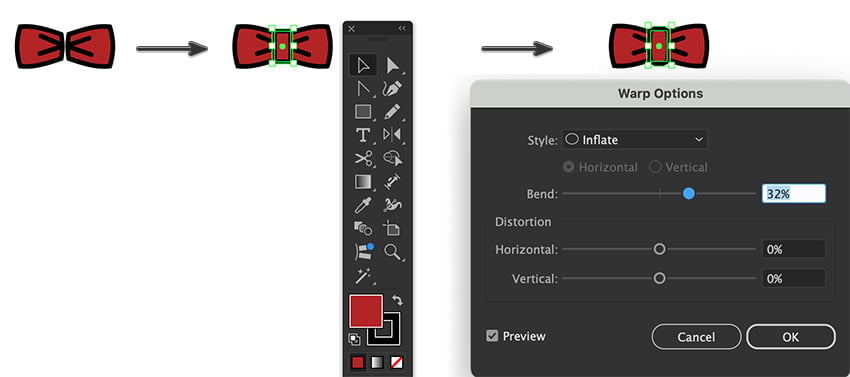
Step 3
Now, let’s add the knot in the center of the center bow. Use the Rectangle Tool (M) with the earlier red color and black 4 pt stroke Weight to draw a small rectangle in the center of the bowtie. Apply an Effect > Warp > Inflate and Bend at 32%, and click OK. Use the Command-G shortcut to Group all the bowtie elements and position them below the mouth.


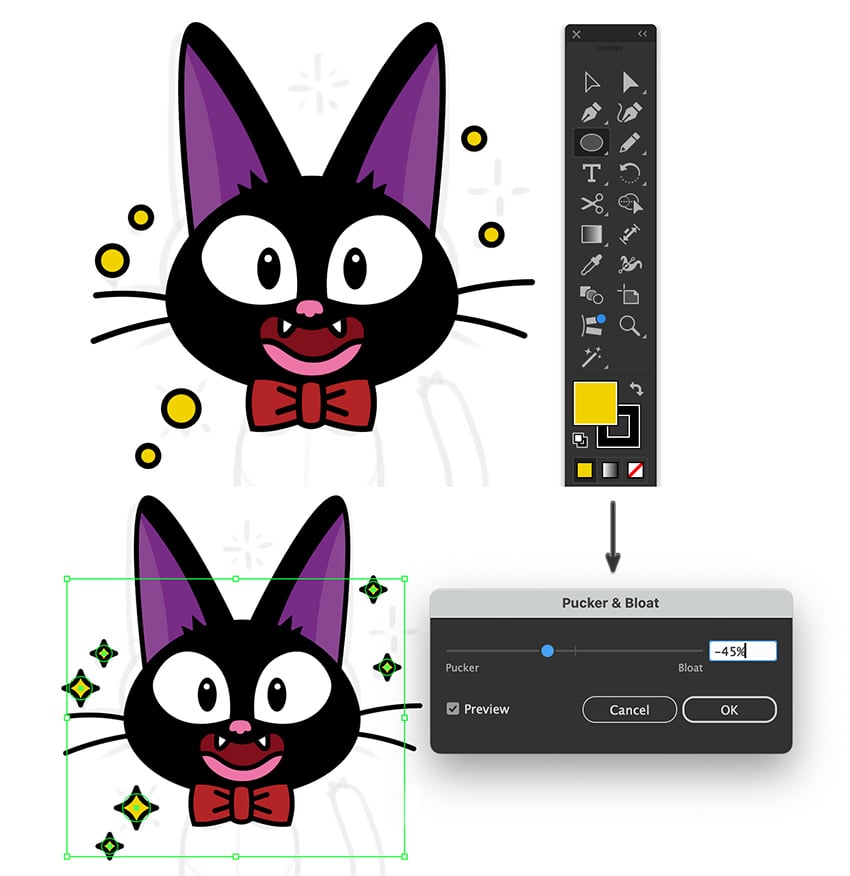
Step 4
Time to add a touch of magic. Grab the Ellipse Tool (L) with a yellow Fill of R=232, G=209, B=45 and a black 4 pt stroke Weight. Draw a few circles around Jiji’s head, holding the Shift key down to constrain the shapes into perfect circles. Make sure the circles are not small.
Then apply an Effect > Distort & Transform > Pucker & Bloat and a Pucker of -45% to create stars.


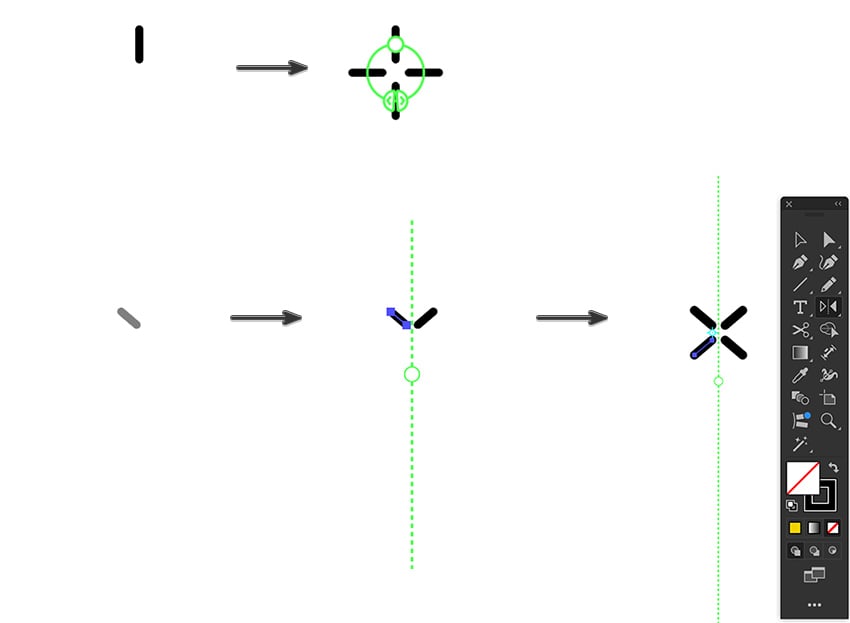
Step 5
Next, select the Line Segment Tool (\), and with a 4 pt Stroke, draw a straight line. Then, to create a sparkle, use Object > Repeat > Radial.
For a second sparkle design, draw a shorter line segment at an angle, and Object > Repeat > Mirror. A mirror axis angle will appear, and you can move it as desired. You can also use the Reflect Tool (O) to mirror the line across.


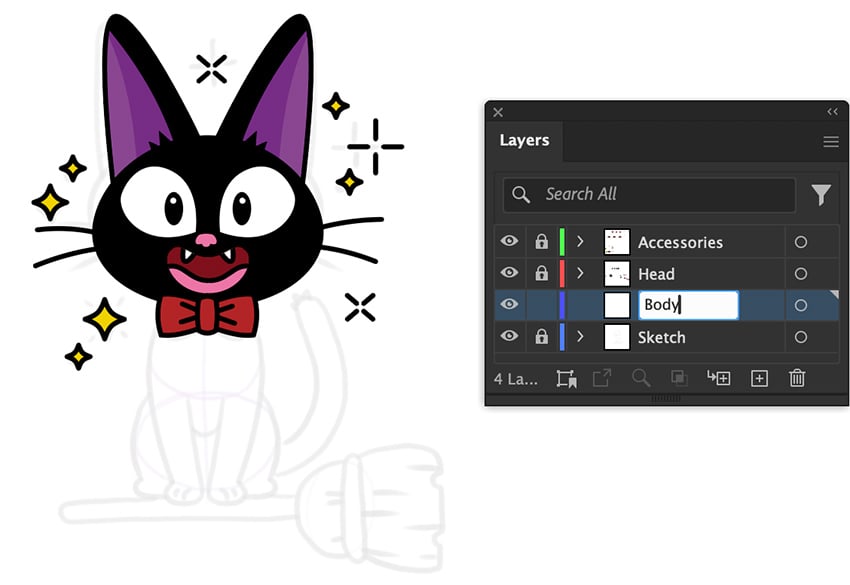
Step 6
Position the sparkles around Jiji’s head, and then Create a New Layer above the ‘Sketch’ layer in the Layers panel, and label it ‘Body’.


4. How to draw Jiji’s body shape
Step 1
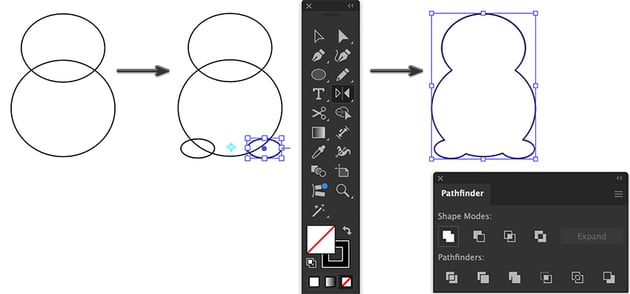
Jiji’s body is sleek and slender, so we will construct it using ellipses. Grab the Ellipse Tool (L) and draw two ellipses on top of each other as if you’re building a snowman.
Then, draw a smaller ellipse for the foot at the base of the snowman shape. Use the Reflect Tool (O) to mirror the foot to the other side.
Select all the body shapes and apply a Unite: Shape Mode from the Pathfinder panel to create a compound shape.


Step 2
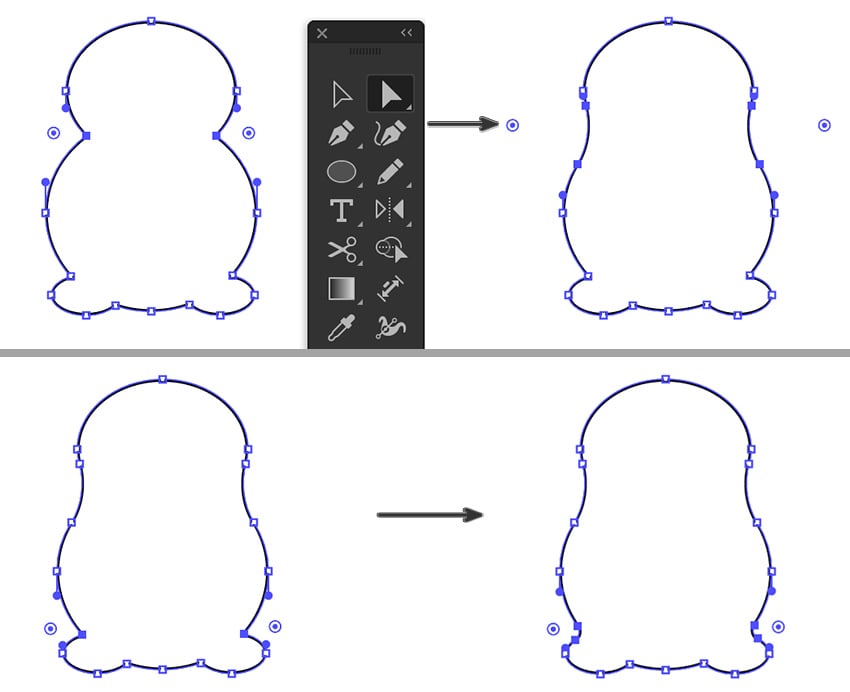
Let’s round the corners to give Jiji a sleeker look. Take the Direct Selection Tool (A) to select the top corner points, and then grab the ‘live corner’ widgets and drag them outwards to create rounded corners.
Repeat this action with the lower corners on the feet, but with a smaller round curve.


Step 3
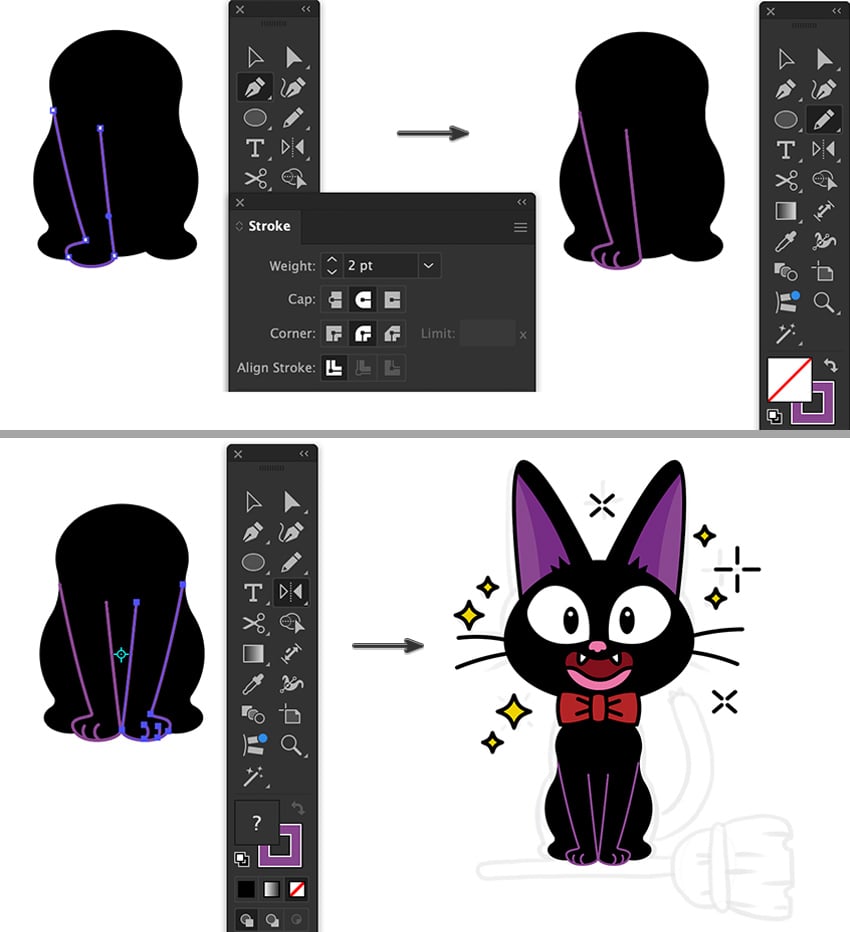
Next, give the body shape a black fill, with a null stroke.
Choose the Pen Tool (P) and apply a 2 pt stroke in purple (R=122, G=72, B=141), with a black fill color. Freehand draw one leg. Then, add the paws using the purple stroke with no color fill.
Group (Command-G) the leg elements together, and then use the Reflect Tool (O) to mirror the other leg across. Position the elements on Jiji’s body.


Step 4
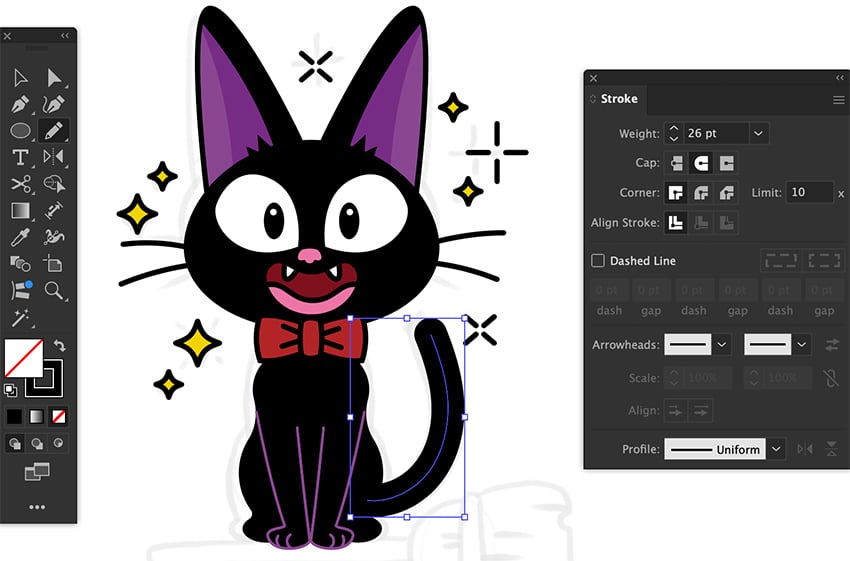
Let’s add a tail. Grab the Pencil Tool (N) and apply a 26 pt black stroke Weight, with a Rounded Cap selected from the Stroke panel, and draw a tail.


Step 5
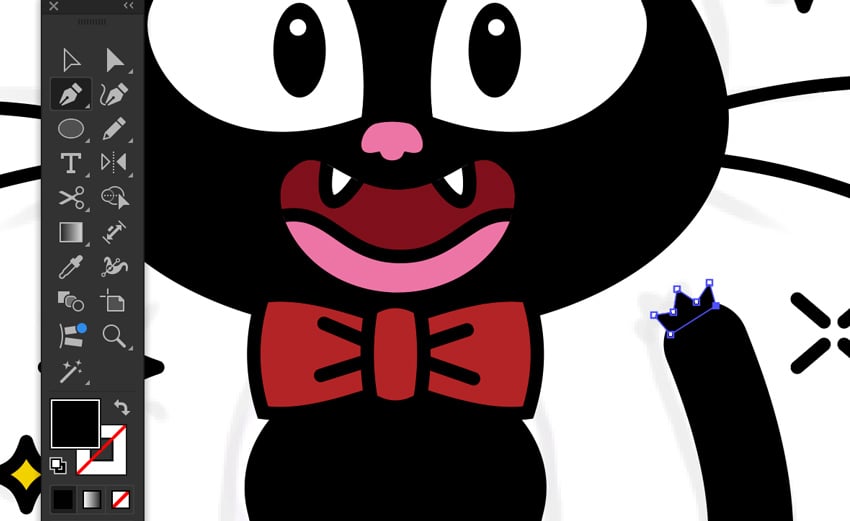
We’ll add a little tail tuft at the end of the tail. Grab the Pen Tool (P) and apply a black fill, then freehand draw a tuft on the tip of the tail.


5. How to draw a broom
Step 1
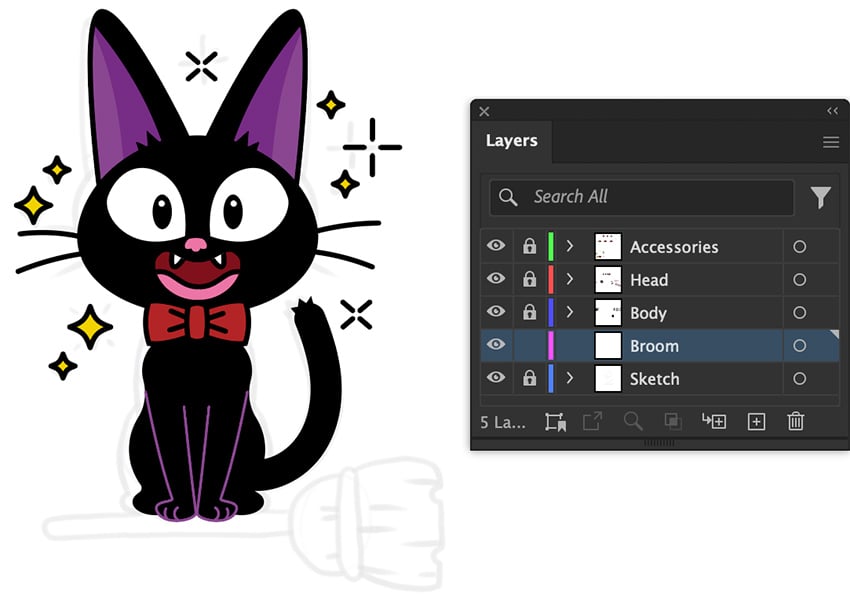
Our last subject to illustrate is the broom Jiji is riding. The broom is placed under the body, so from the Layers panel, Create a New Layer above the ‘Sketch’ layer and label it ‘Broom’.


Step 2
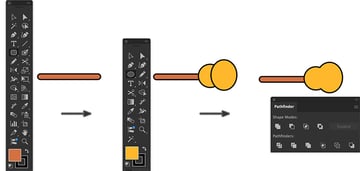
To draw the broomstick, take the Rounded Rectangle Tool and draw a rod with a brown fill color of R=188, G=112, B=70, and a black 4 pt stroke Weight.
Then, change the fill color to R=244, G=183, B=61, and draw two ellipses, as shown below, to create the brush. Apply a Unite: Shape Mode from the Pathfinder panel to create a compound shape.


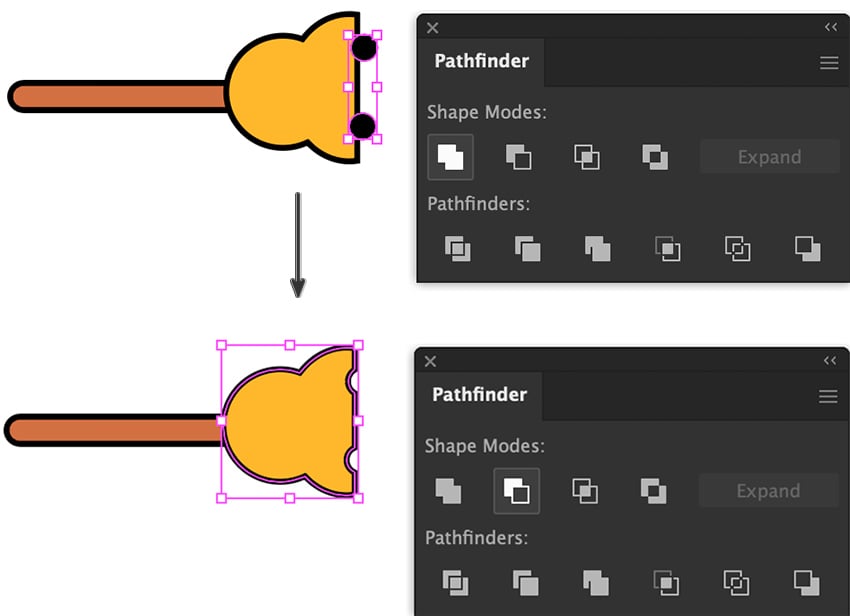
Step 3
Grab the Ellipse Tool (L) and draw to ellipses on the edge of the brush. Then, join the circles by applying a Unite mode from the Pathfinder panel.
After, select both the brush and ellipses and click the Minus Front mode to subtract the shapes from the brush.


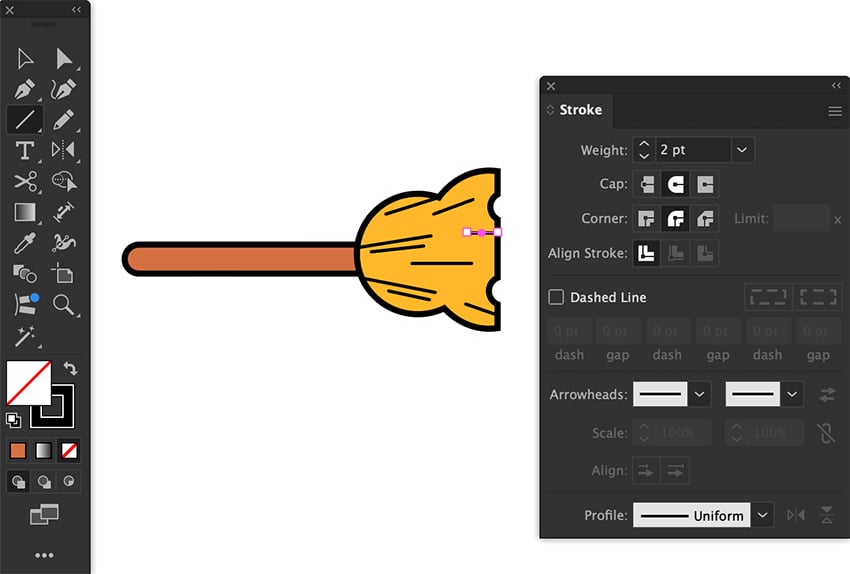
Step 4
Let’s add bristles using the Line Segment Tool (\) with a 2 pt stroke.


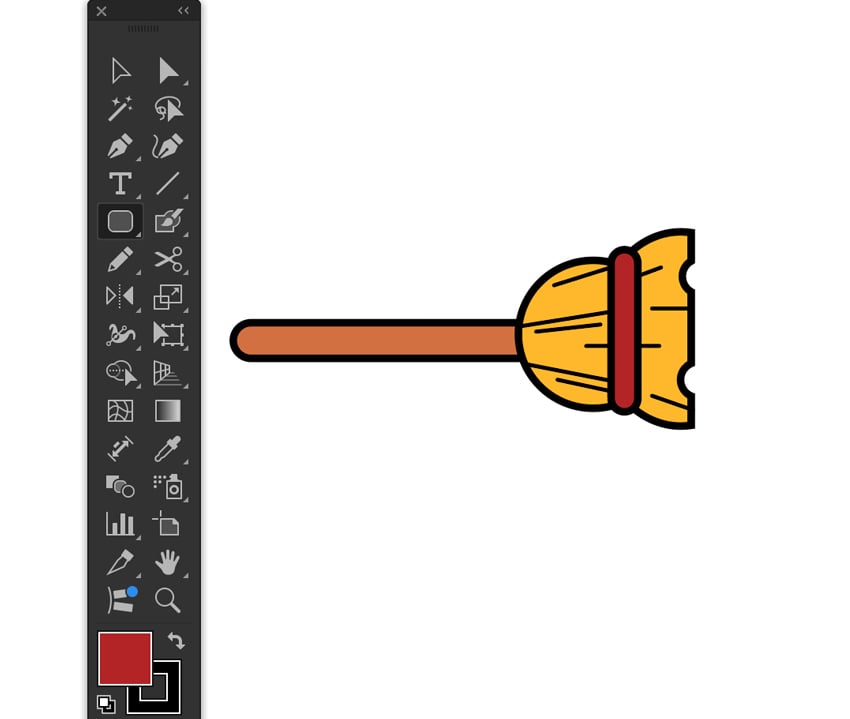
Step 5
Using the Rounded Rectangle Tool, add a binding strip to the broom brush. Fill it with red R=153, G=41, B=42, and a 4 pt black stroke Weight.


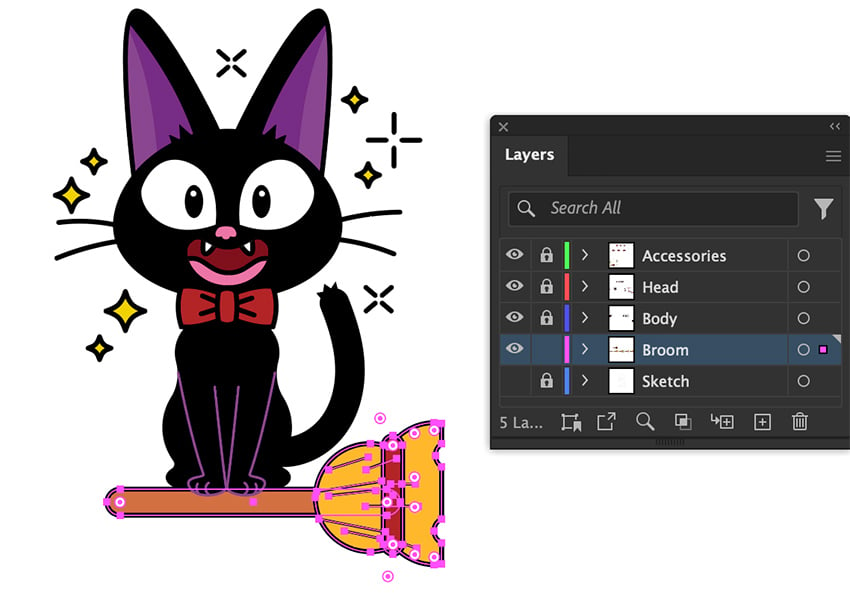
Step 6
Lastly, Group (Command-G) the broom elements and position them under Jiji, and then Hide the ‘Sketch’ layer from the Layers panel.


Meow, congratulations!
Cute! I hope you enjoyed creating Jiji the cat and learned some new things along the way to help you make easy anime drawings in Adobe Illustrator. Thank you for trying out this tutorial on drawing Kiki’s delivery service cat! Now you know how to draw Jiji the cat, and you’ve picked up some new Illustrator skills. Continue to explore other Hayao Miyazaki inspirations and experiment with what you’ve learned today to create your own Studio Ghibli character designs. See you in the following tutorial!


Learn more about how to draw in Illustrator
Envato Tuts+ has many illustration tutorials on diverse topics curated to develop and strengthen your skills. Whether you’re a beginner or already a pro, these tutorials can help you refine your work. Have a look at this selection: