Step 3
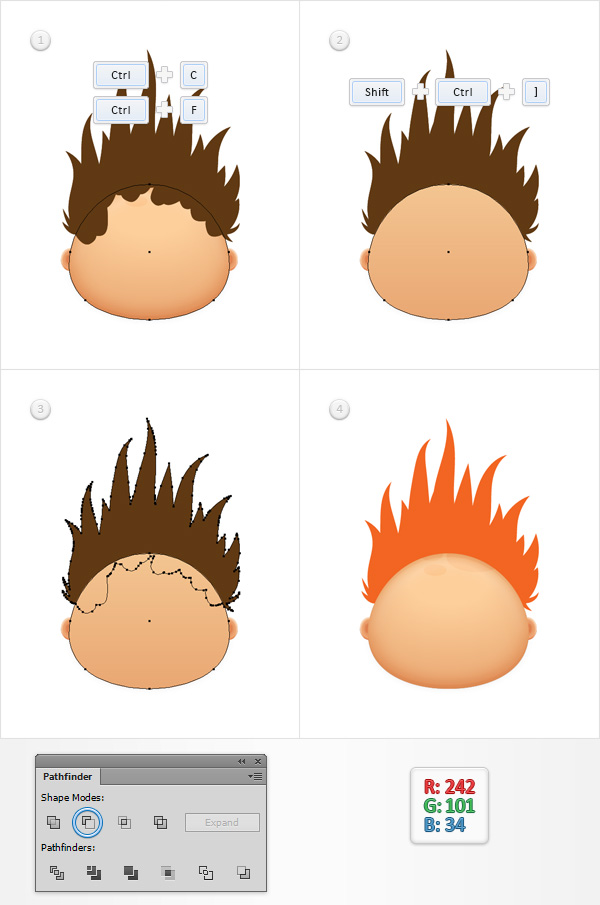
Focus on the Layers panel, open your “Head” group and focus on the existing blend. Select that “headShape” shape, make a copy in front (Control-C > Control-F) and drag it outside the group, in the top of the Layers panel. Select this fresh copy along with the brown shape and click the Minus Front button from the Pathfinder panel. Make sure that the resulting shape is selected and replace the existing fill color with R=242 G=101 B=34.
Step 4
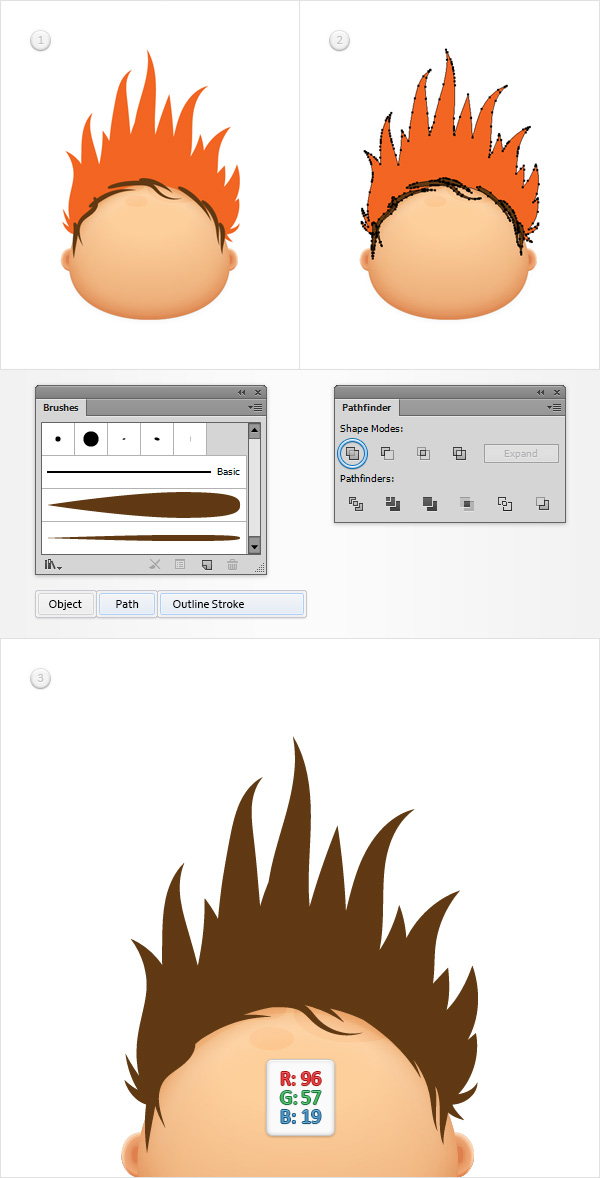
Pick the Paintbrush Tool (B), select the “Thin Brush” art brush from your Brushes panel and draw some simple paths roughly as shown in the first image. Make sure that all these new paths are selected and go to Object > Path > Outline Stroke. Select the resulting shapes along with the orange path and click the Unite button fro the Pathfinder panel. Make sure that the resulting shape is filled with R=96 G=57 B=19 then move to the Layers panel and simply rename it “hair“.
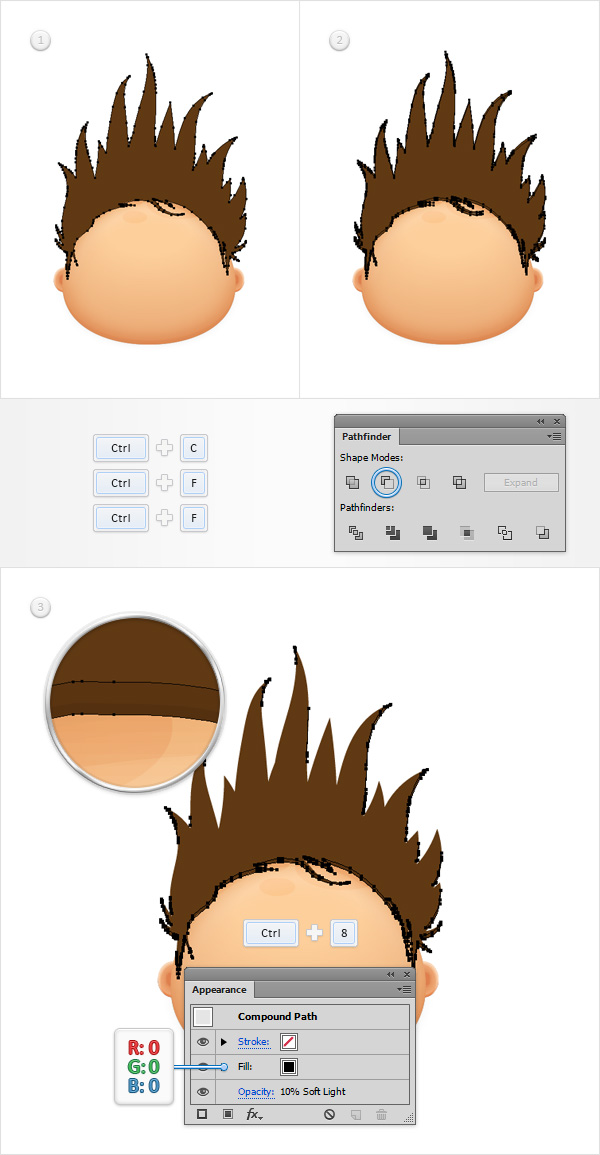
Step 5
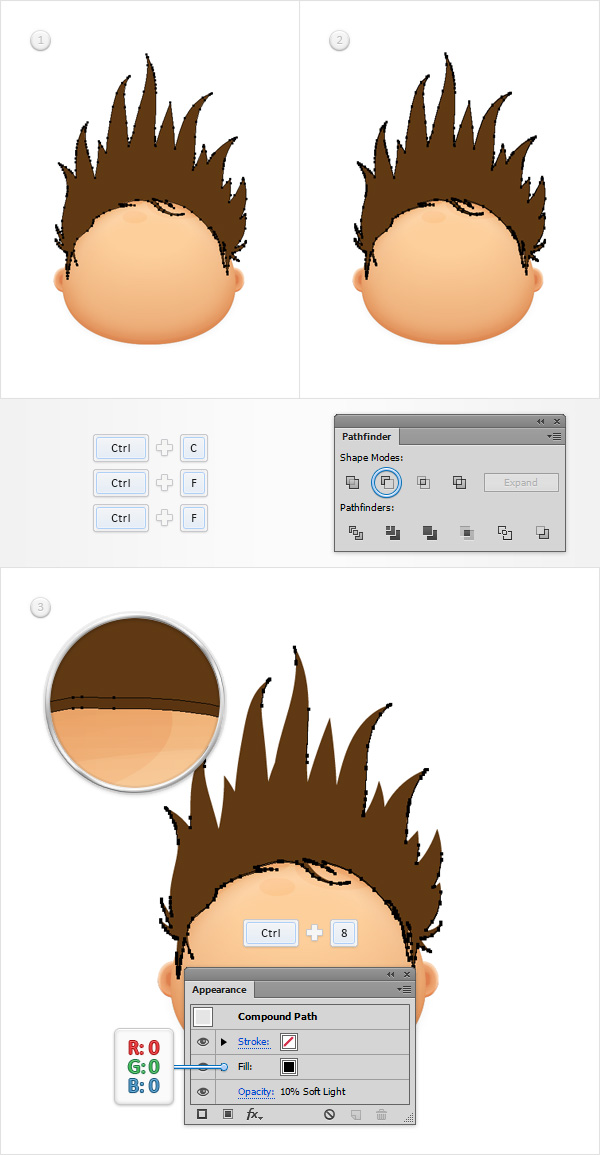
Make sure that your “hair” shape is selected and make two copies in front (Control-C > Control-F > Control-F). Select the top copy and move it 1px up.
Reselect both copies made in this step and click the Minus Front button from the Pathfinder panel. Turn the resulting group of shapes into a compound path (Control-8), set the fill color at black, lower its Opacity to 10% and change the Blending Mode to Soft Light.
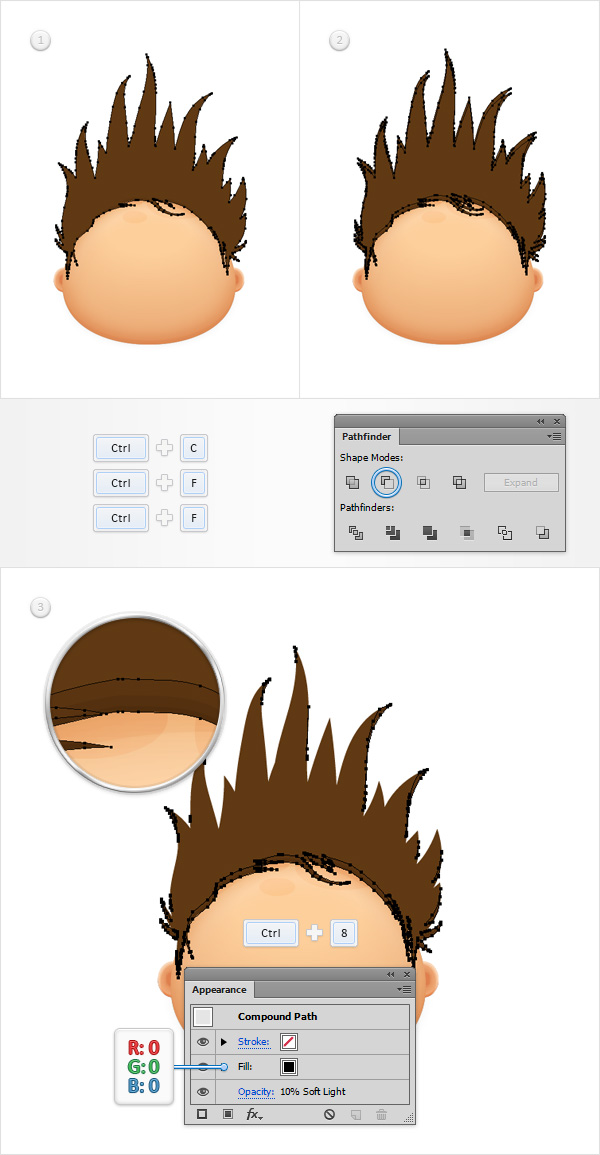
Step 6
Make sure that your “hair” shape is selected and make two copies in front (Control-C > Control-F > Control-F). Select the top copy and move it 3px up.
Reselect both copies made in this step and click the Minus Front button from the Pathfinder panel. Turn the resulting group of shapes into a compound path (Control-8), set the fill color at black, lower its Opacity to 10% and change the Blending Mode to Soft Light.
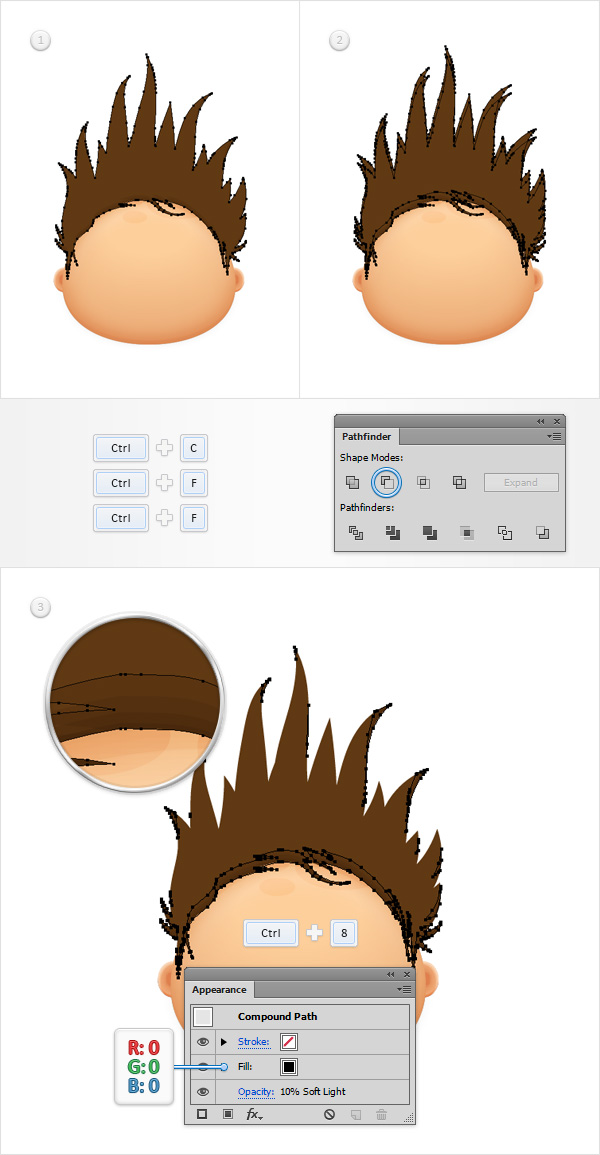
Step 7
Make sure that your “hair” shape is selected and make two copies in front (Control-C > Control-F > Control-F). Select the top copy and move it 6px up.
Reselect both copies made in this step and click the Minus Front button from the Pathfinder panel. Turn the resulting group of shapes into a compound path (Control-8), set the fill color at black, lower its Opacity to 10% and change the Blending Mode to Soft Light.
Step 8
Make sure that your “hair” shape is selected and make two copies in front (Control-C > Control-F > Control-F). Select the top copy and move it 10px up.
Reselect both copies made in this step and click the Minus Front button from the Pathfinder panel. Turn the resulting group of shapes into a compound path (Control-8), set the fill color at black, lower its Opacity to 10% and change the Blending Mode to Soft Light.
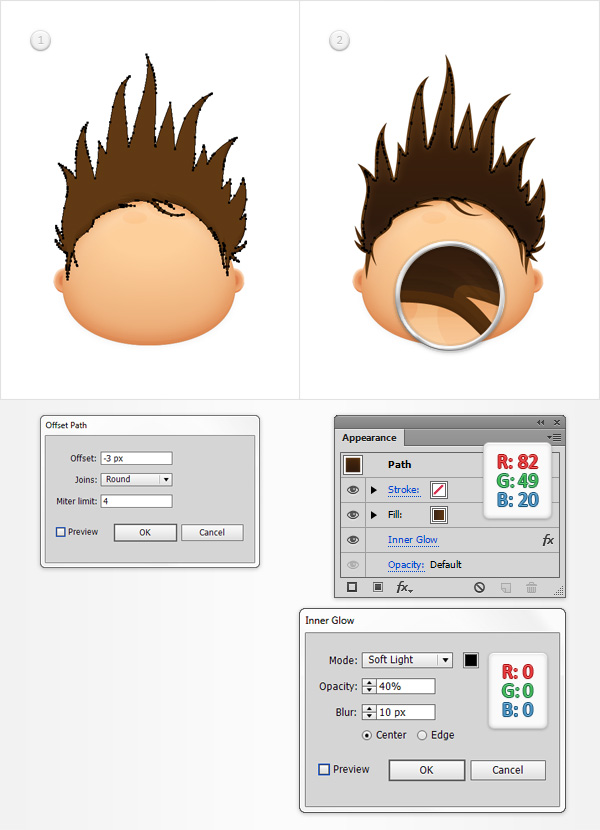
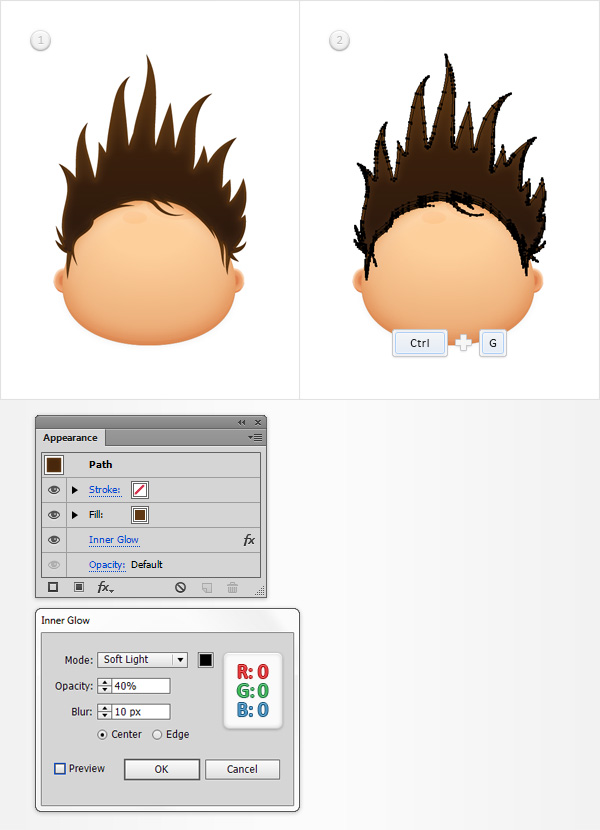
Step 9
Make sure that your “hair” shape is selected and go to Object > Path > Offset Path. Enter a -3px offset, select Round from the Joins drop-down menu then click OK. Select the resulting shape, replace the existing fill color with R=82 G=49 B=20 and go to Effect > Stylize > Inner Glow. Enter the properties shown in the following image and click OK.
Step 10
Reselect your “hair” shape and go to Effect > Stylize > Inner Glow. Enter the properties shown in the following image and click OK. Select all the shapes that make up the hair and Group them (Control-G). Move to the Layers panel and simply rename this new group “Hair“.
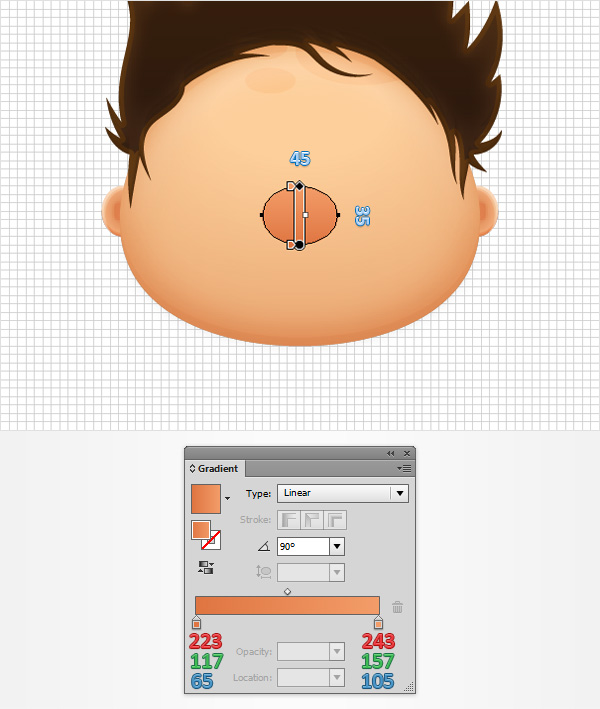
6. Create the Nose
Step 1
Enable the Grid (View > Show Grid) and the Snap to Grid (View > Snap to Grid). Using the Ellipse Tool (L), create a 45 x 35px shape, fill it with the linear gradient shown below and place it as shown in the following image. Move to the Layers panel and rename this new ellipse “nose“.
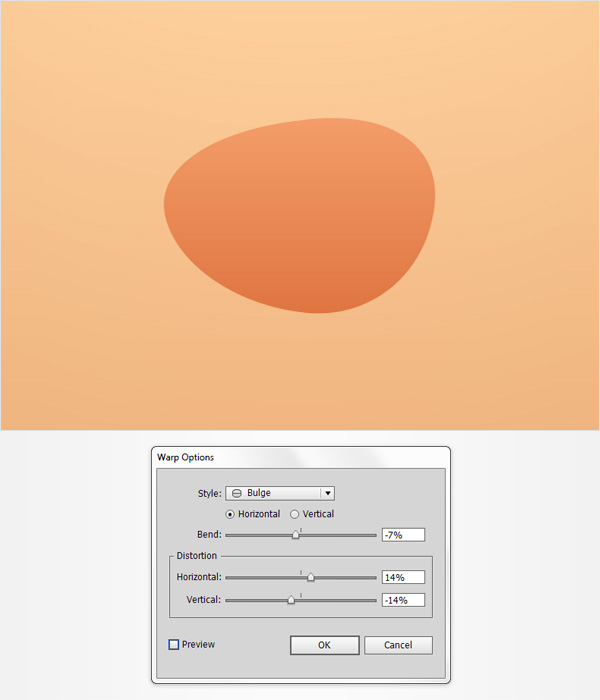
Step 2
Make sure that your “nose” shape is still selected and go to Effect > Warp > Bulge. Enter the properties shown in the following image and click OK.
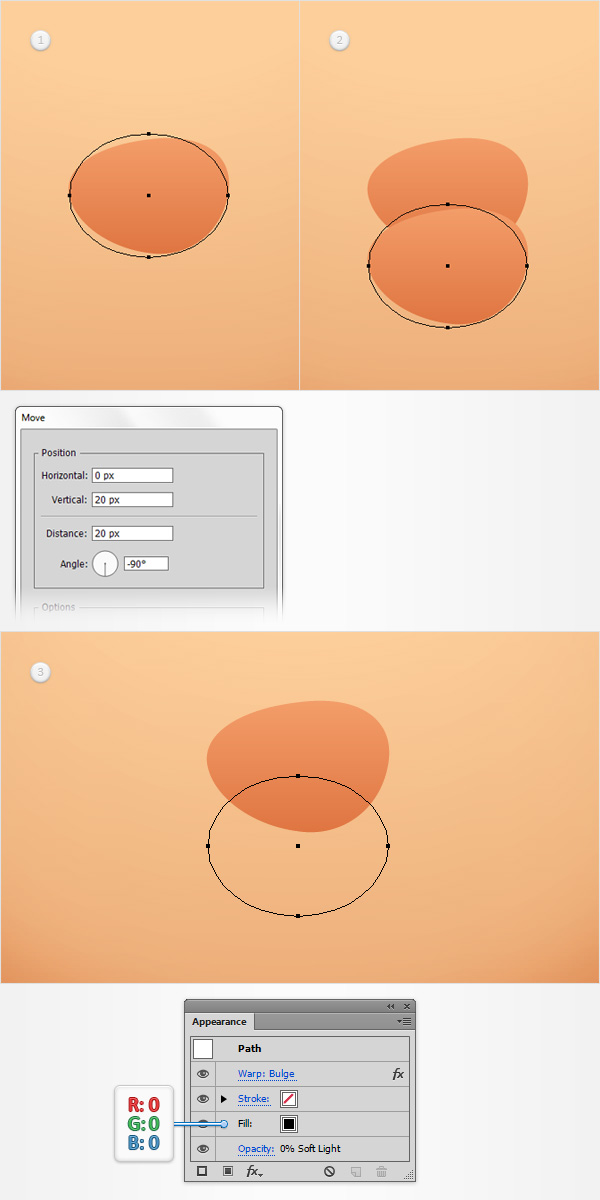
Step 3
Make sure that your “nose” shape is still selected and go to Object > Transform > Move. Enter “20” in the Vertical box then simply click the Copy button. Select the resulting shape and focus on the Appearance panel. Replace the linear gradient used for the fill with a flat black, lower its Opacity to 0% and change the Blending Mode to Soft Light.
Step 4
Make sure that your “nose” shape is still selected and make a copy in front (Control-C > Control-F). Select your new copy and focus on the Appearance panel. Replace the linear gradient used for the fill with a flat black, lower its Opacity to 30% and change the Blending Mode to Soft Light.
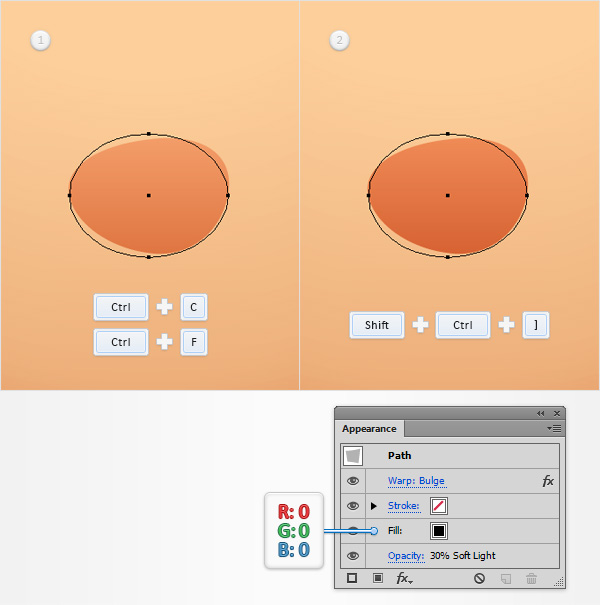
Step 5
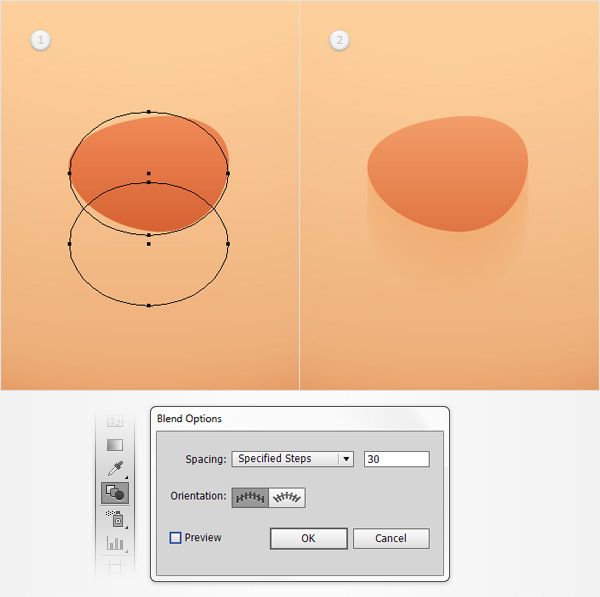
Open the Blend Options window, go to the Specified Steps section and make sure that your blend is set at 30 steps. Reselect the two, black “nose” shapes and simply hit Alt-Control-B. Move to the Layers panel and simply drag the blend made in this step below the remaining “nose” shape.
Step 6
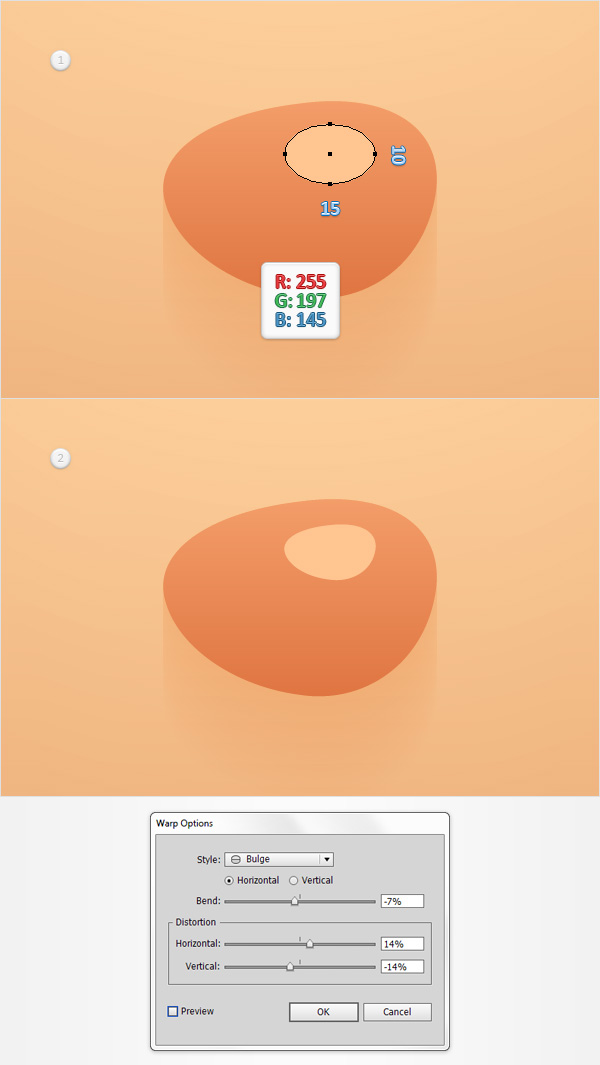
Using the Ellipse Tool (L), create a 15 x 10px shape, set the fill color at R=255 G=197 B=145 and place it as shown in the first image. Make sure that this new shape stays selected and go to Effect > Warp > Bulge. Enter the properties shown in the following image and click OK.
Step 7
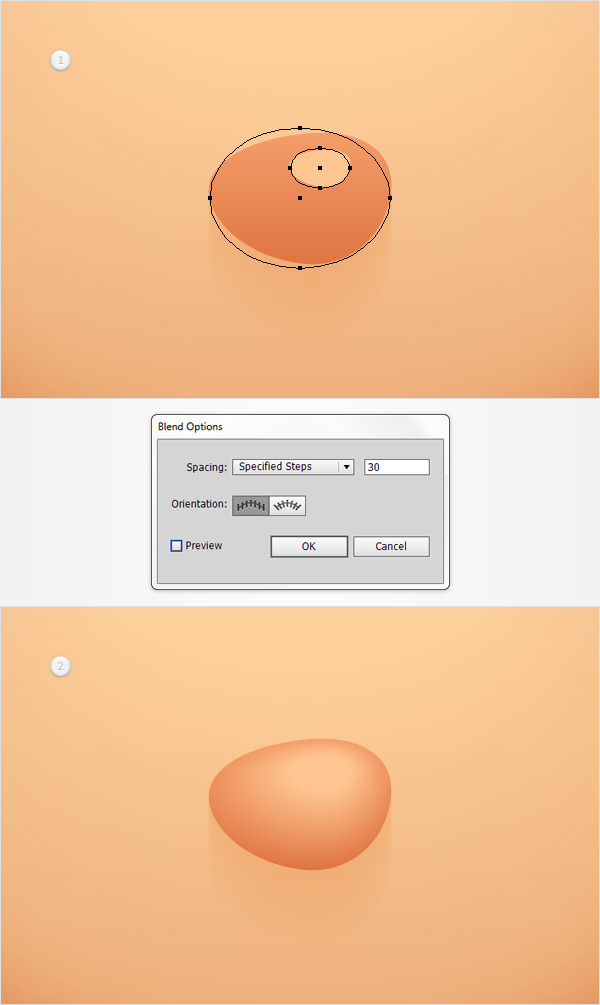
Reselect your “nose” shape along with the tinier shape situated in front if it and simply hit Alt-Control-B to create a new blend. In the end things should look like the second image.
Step 8
Make sure that the blend made in the previous step is still selected and go to Effect > Stylize > Drop Shadow. Enter the properties shown in the top, left window (in the following image), click OK then add the other five Drop Shadow effects shown in the following image.
Once you’re done reselect the two blend that make up the nose and Group them (Control-G). Move to the Layers panel and simply rename this new group “Nose“.

7. Create the Mouth
Step 1
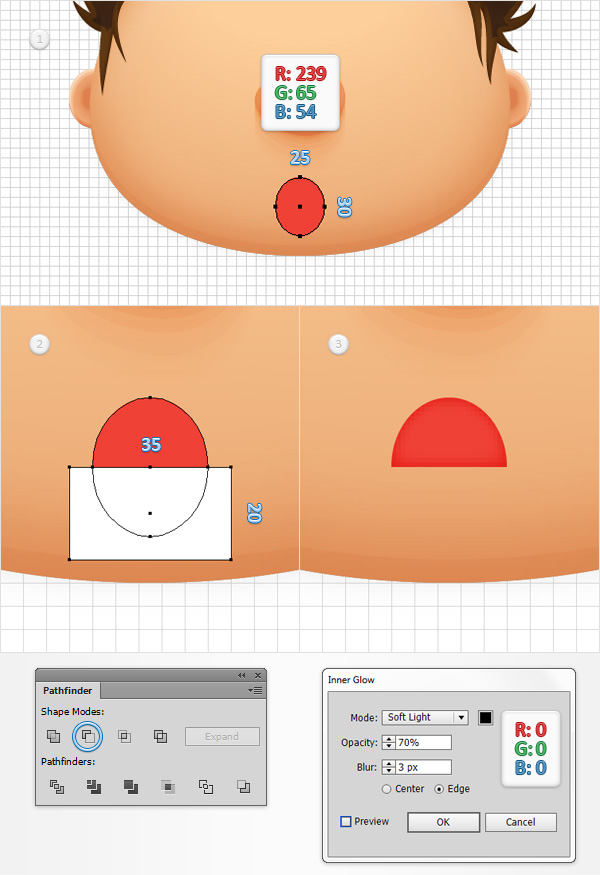
Using the Ellipse Tool (L), create a 25 x 30px shape, set the fill color at R=239 G=65 B=54 and place it as shown in the first image. Switch to the Rectangle Tool (M), create a 35 x 20px shape and place it as shown in the second image.
Reselect both shapes made in this step and click the Minus Front button from the Pathfinder panel. Make sure that the resulting shape is selected and go to Effect > Stylize > Inner Glow. Enter the properties shown in the final image and click OK.
Step 2
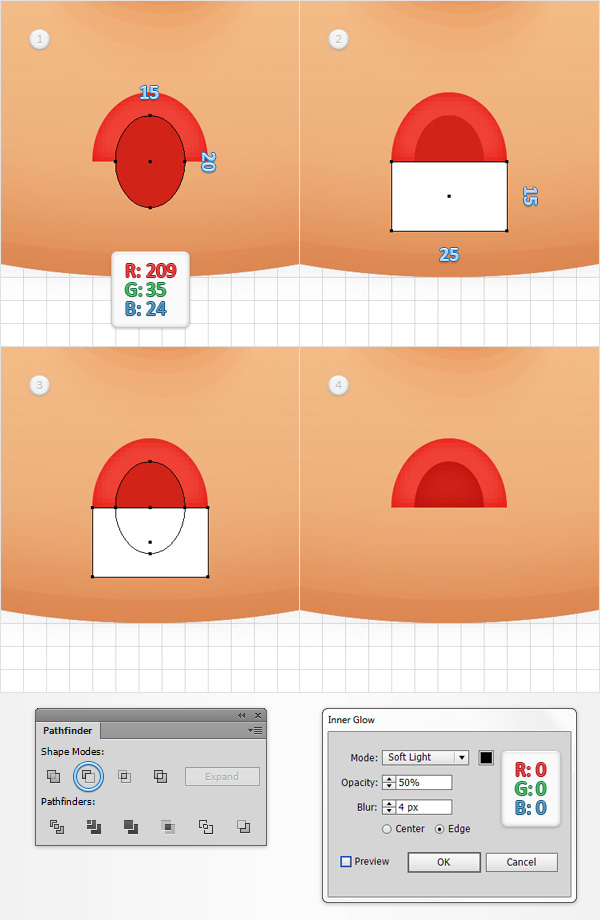
Using the Ellipse Tool (L), create a 15 x 20px shape, set the fill color at R=209 G=35 B=24 and place it as shown in the first image. Switch to the Rectangle Tool (M), create a 25 x 15px shape and place it as shown in the second image. Reselect both shapes made in this step and click the Minus Front button from the Pathfinder panel. Make sure that the resulting shape is selected and go to Effect > Stylize > Inner Glow. Enter the properties shown in the final image and click OK.
Step 3
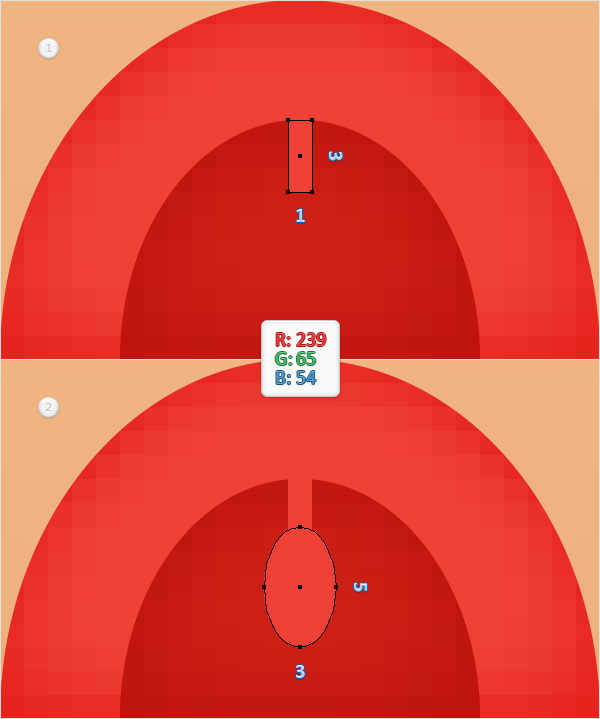
Switch to gridline every 1px, so go to Edit > Preferences > Guides & Grid and enter 1 in the Gridline every box. Using the Rectangle Tool (M), create a 1 x 3px shape, set the fill color at R=239 G=65 B=54 and place it as shown in the first image. Pick the Ellipse Tool (L), create a 3 x 5px shape, use the same fill color and place it as shown in the second image.
Step 4
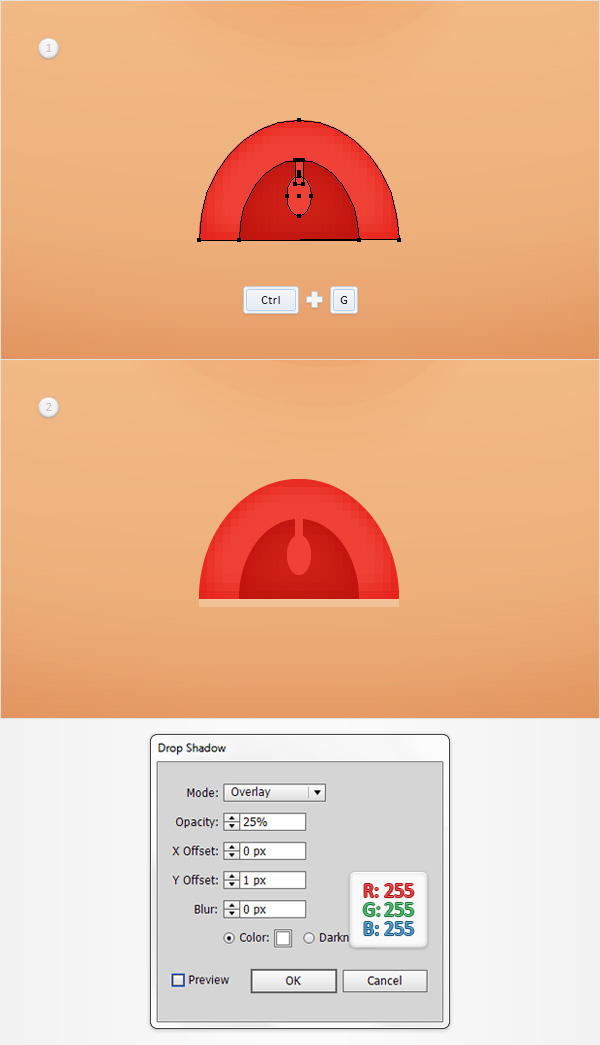
Reselect all the shapes that make up the mouth and Group them (Control-G). Move to the Layers panel and simply rename this new group “mouth“. Make sure that your new group is selected and go to Effect > Stylize > Drop Shadow. Enter the properties shown in the following image and click OK.
8. Create the Eyes and the Eyebrows
Step 1
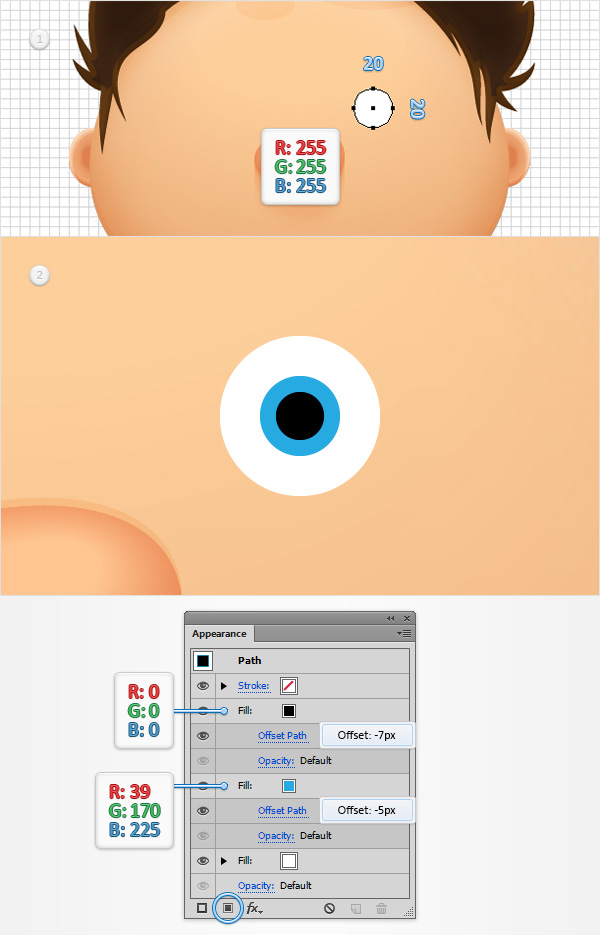
Return to gridline every 5px, so simply go to Edit > Preferences > Guides & Grid and enter 5 in the Gridline every box. Using the Ellipse Tool (L), create a 20px circle, set the fill color at white and place it as shown in the first image.
Move to the Layers panel and rename this new shape “eye“. Make sure that your “eye” shape stays selected, focus on the Appearance panel and add a second fill using the Add New Fill button (pointed by the blue circle in the following image).
Select the new fill, set the color at R=39 G=170 B=225 and go to Effect > Path > Offset Path. Enter a -5px Offset and click OK. Return to the Appearance panel and add a third fill for your “eye” shape using that same Add New Fill button. Select the new fill, set the color at black and go to Effect > Path > Offset Path. Enter a -7px Offset and click OK.