For starters you will learn how to setup a simple grid and how to create two, simple art brushes. Next, using basic tools and effects along with the Blend Tool you will learn how to create the head and the ears of your character. Using those saved art brushes along with some basic effects and blending techniques you will learn how to create the hair.
Moving on, you will create the nose and a subtle shadow using two simple blend and a bunch of Drop Shadow effects. Taking full advantage of the Appearance panel you will learn how to create the eyes and the eyebrows. Using the Pucker & Bloat and the Zig Zag effects along with some neat stroke attributes you will create the tiny, orange bow tie. Finally, you will learn how to add a simple background and a subtle speech bubble.
1. Create a New Document and Set Up a Grid
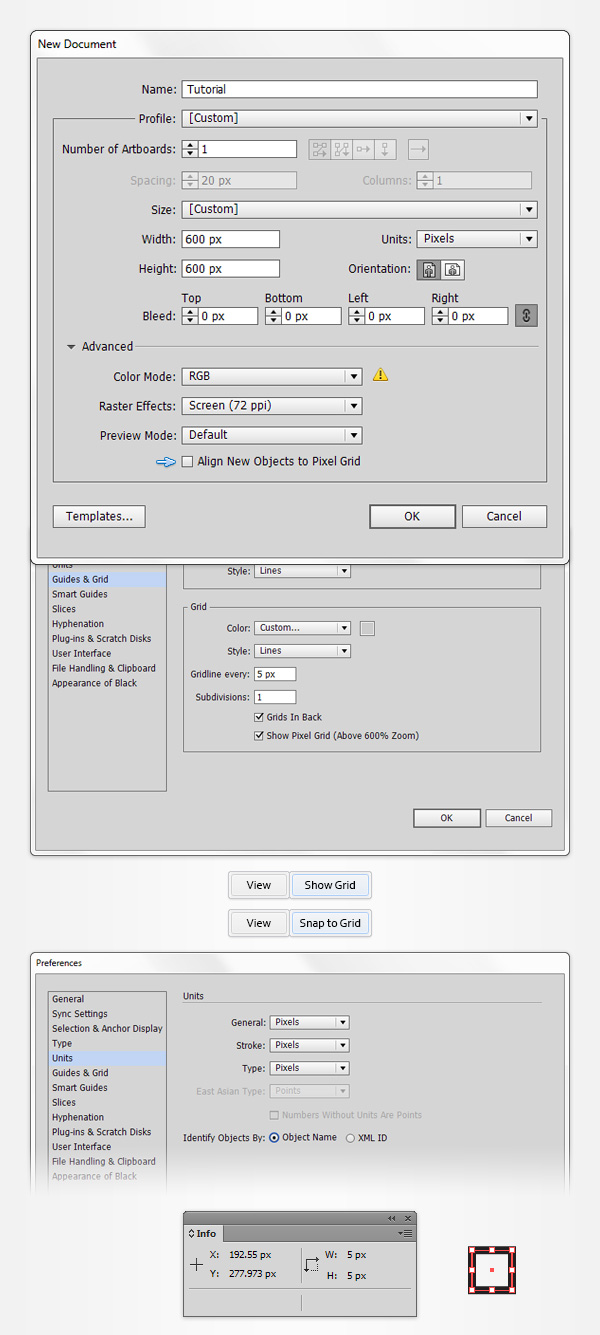
Hit Control-N to create a new document. Select Pixels from the Units drop-down menu, enter 600 in the width and height box then click on the Advanced button. Select RGB, Screen (72ppi) and make sure that the Align New Objects to Pixel Grid box is unchecked before you click OK.
Enable the Grid (View > Show Grid) and the Snap to Grid (View > Snap to Grid). For starters you will need a grid every 5px, so simply go to Edit > Preferences > Guides > Grid, enter 5 in the Gridline every box and 1 in the Subdivisions box. You should also open the Info panel (Window > Info) for a live preview with the size and position of your shapes. Do not forget to set the unit of measurement to pixels from Edit > Preferences > Units > General. All these options will significantly increase your work speed.
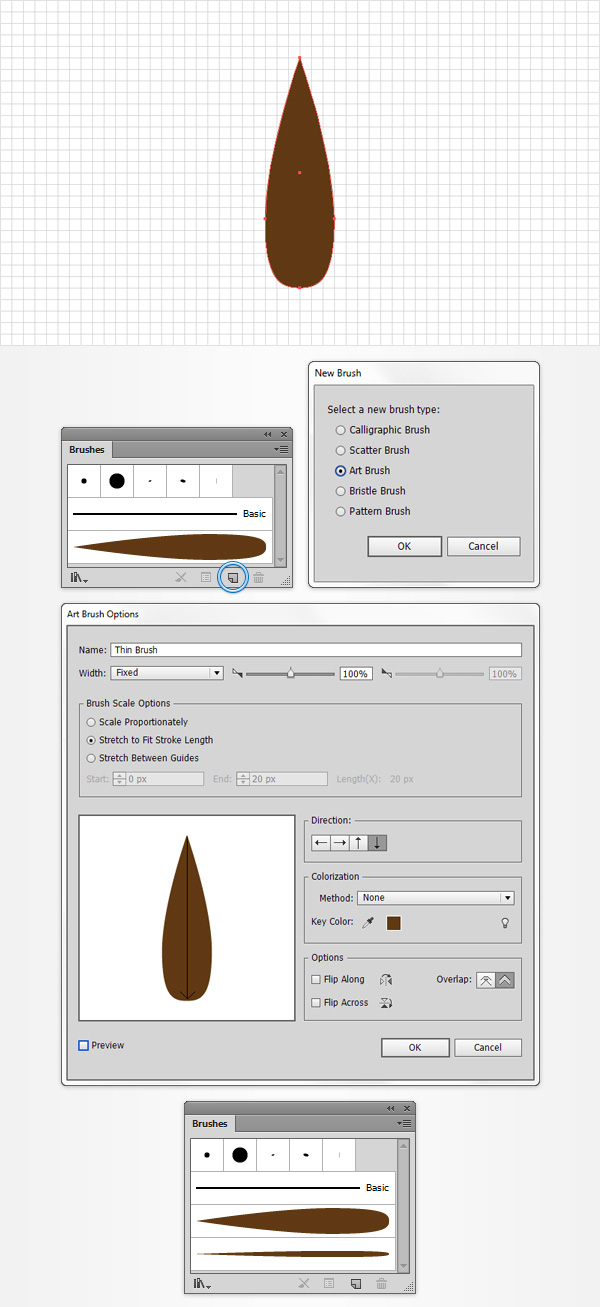
2. Create Two Art Brushes
Step 1
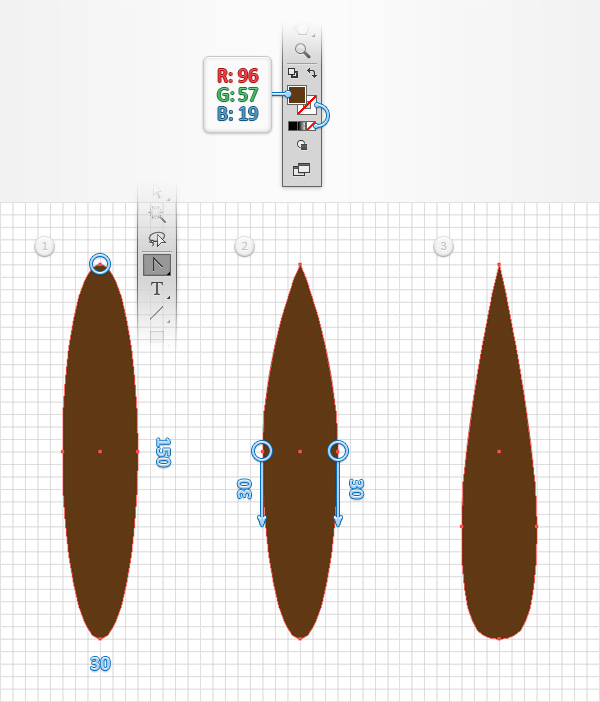
Pick the Ellipse Tool (L) and focus on your Toolbar. Remove the color from the stroke then select the fill and set its color at R=96 G=57 B=19.
Move to your Artboard and simply create a 30 x 150px ellipse, the Snap to Grid should ease your work. Switch to the Anchor Point Tool (Shift-C) and focus on the top side of your shape. Simply click on the existing anchor point and your shape will look like in the second image. Grab the Direct Selection Tool (A), select the two anchor points highlighted in the second image and drag them 30px down. In the end things should look like in the third image.
Step 2
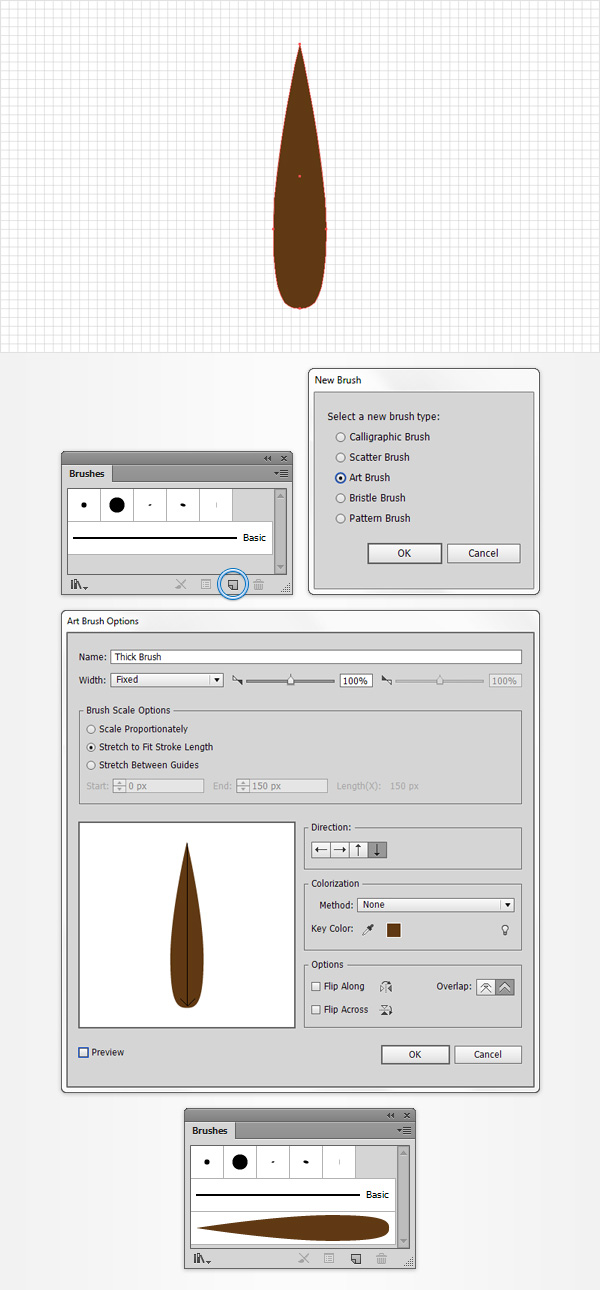
Make sure that your shape is still selected, open the Brushes panel (Window > Brushes) and click the New Brush button. Check the Art Brush box and click OK to open the Art Brush Options window. Enter “Thick Brush” in the Name box, set the attributes shown in the following image then click the OK button.
Once you can see the new art brush inside your Brushes panel you can remove that brown shape from your artboard.
3. Create the Head
Step 1
For this step you will need a grid every 1px, so go to Edit > Preferences > Guides & Grid and enter 1 in the Gridline every box. Using the Ellipse Tool (L), create a 6 x 20px shape and make sure that the fill color is set at R=96 G=57 B=19.
Switch to the Anchor Point Tool (Shift-C), focus on the top side of your new shape and simply click on the existing anchor point. Grab the Direct Selection Tool (A), select the two anchor points highlighted in the second image and drag them 4px down. In the end things should look like in the third image.

Step 2
Reselect your brown shape, go to the Brushes panel (Window > Brushes) and click again the New Brush button. Check the Art Brush box and click OK. Enter all the properties shown in the following image, make sure that your name it “Thin Brush” then click the OK button. Don’t forget to remove the brown shape from your artboard once you can see the new art brush inside the Brushes panel.
Step 3
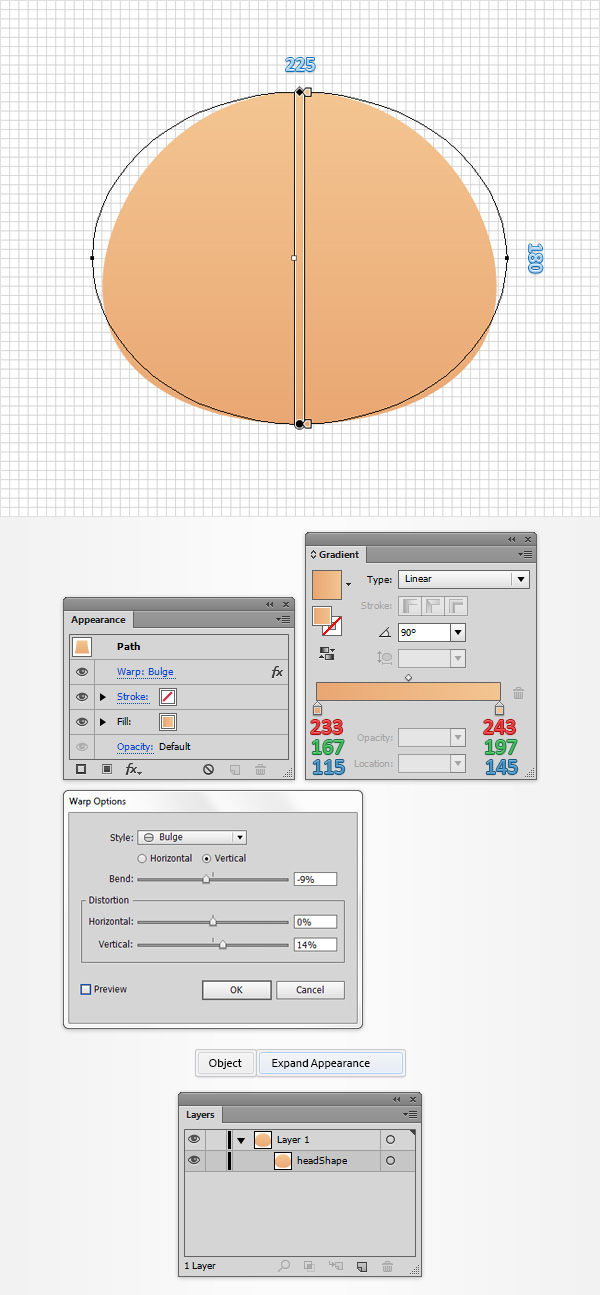
Return to gridline every 5px, so simply go to Edit > Preferences > Guides & Grid and enter 5 in the Gridline every box. Using the Ellipse Tool (L), create a 225 x 180px shape, make sure that it stays selected and focus on the Appearance panel (Window > Appearance). Double check that there is no color set for the stroke then select the fill.
Open the Gradient panel (Window > Gradient) and simply click on the gradient thumbnail to add the default black to white linear gradient. Keep focusing on your Gradient panel, set the Angle at 90 degrees then move to the gradient colors. Select the right slider and set the color at R=243 G=197 B=145 then select the left slider and set the color at R=233 G=167 B=115.
Make sure that the shape made it this step is still selected and go to Effect > Warp > Bulge. Enter the properties shown in the following image, click OK and go to Object > Expand Appearance. Move to the Layers panel (Window > Layers), open your layer, simply double-click on the existing shape and rename it “headShape“.
Step 4
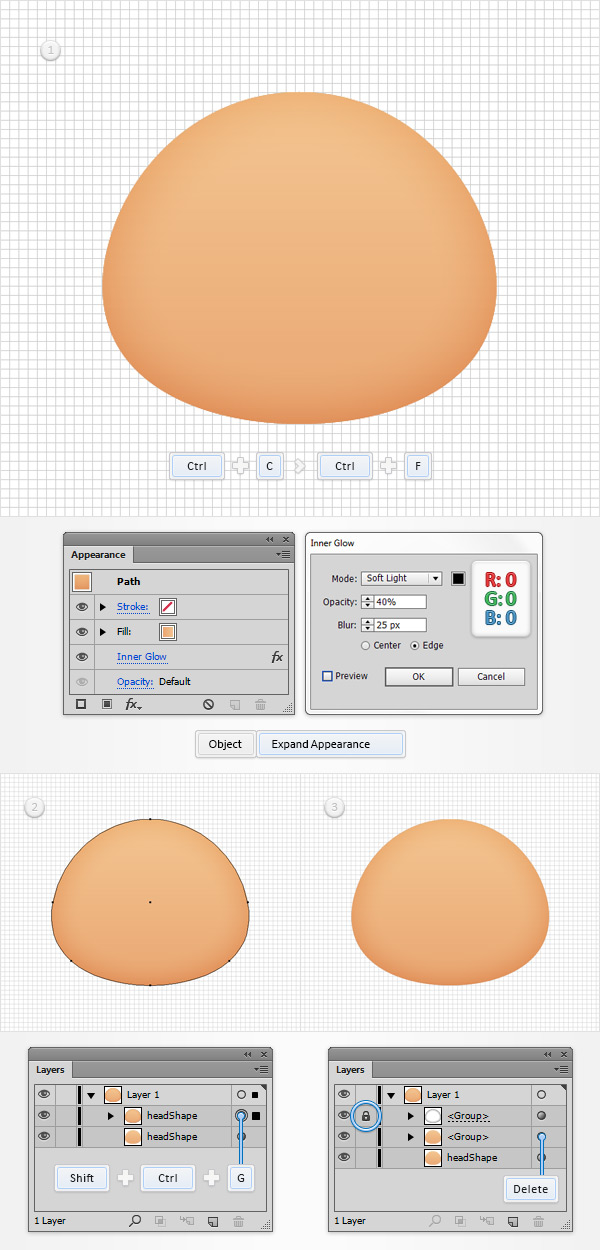
Reselect your “headShape” and make a copy in front (Control-C > Control-F). Select this copy and go to Effect > Stylize > Inner Glow. Enter the properties shown in the following image, click OK and go to Object > Expand Appearance.
Move to the Layers panel, make sure that the newly created group is selected and simply hit Shift-Control-G to Ungroup it. Keep focusing on the Layers panel, select the bottom group and delete it then move to the masked group and lock it to make sure that you won’t accidentally select/move it.
Step 5
Disable the Snap to Grid (View > Snap to Grid) then go to Edit > Preferences > General and make sure that the Keyboard Increment is set at 1px.
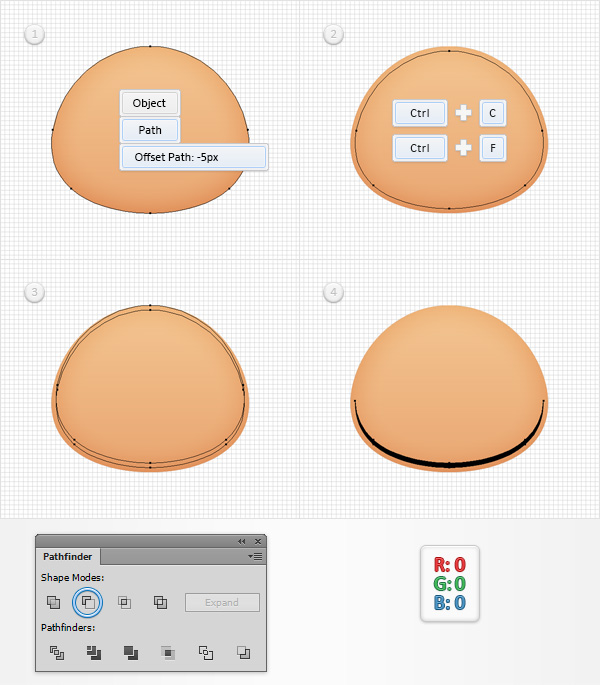
Reselect your “headShape” shape and go to Object > Path > Offset Path. Enter a -5px Offset and click OK. Make sure that the resulting shape is selected and make a copy in front (Control-C > Control-F). Select this copy and hit the up arrow button from your keyboard five times to move it 5px up. Reselect both shapes made in this step, open the Pathfinder panel (Window > Pathfinder) and click the Minus Front button. Fill the resulting shape with a flat black (R=0 G=0 B=0).
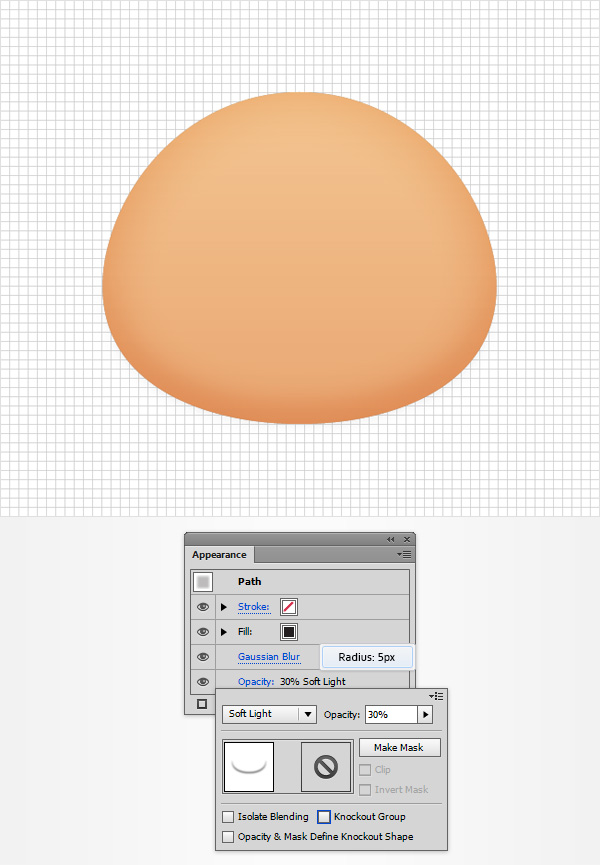
Step 6
Make sure that your black shape is still selected and go to Effect > Blur > Gaussian Blur. Enter a 5px Radius, click OK then move to the Appearance panel and simply click on the “Opacity” piece of text to open the Transparency fly-out panel. Change the Blending Mode to Soft Light and lower the Opacity to 30%. In the end things should look like in the following image.
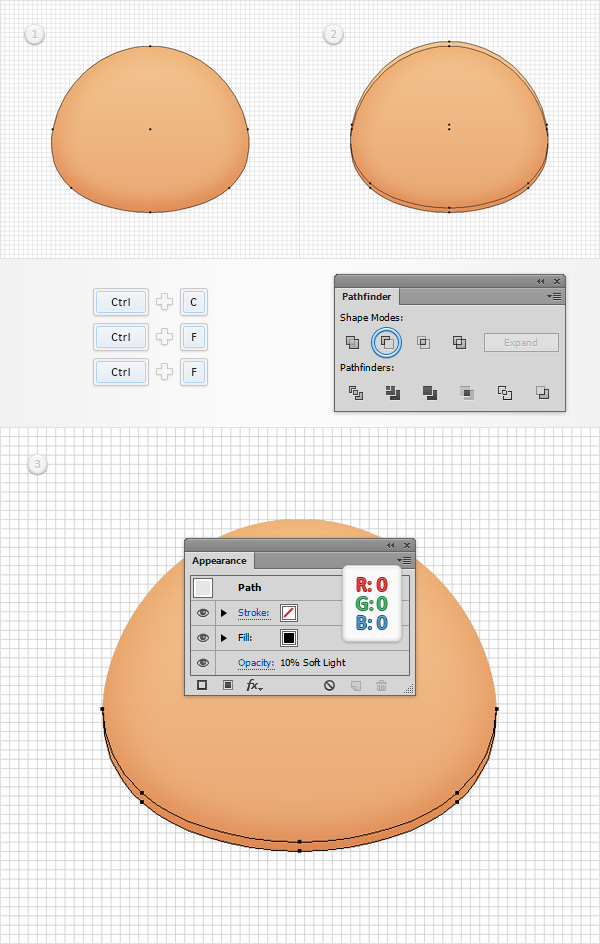
Step 7
Make sure that your “headShape” is still selected and make two copies in front (Control-C > Control-F > Control-F). Select the top copy and simply move it 5px up using the up arrow button from your keyboard. Reselect both copies made in this step and click the Minus Front button from the Pathfinder panel. Fill the resulting shape with black, lower its Opacity to 10% and change the Blending Mode to Soft Light.
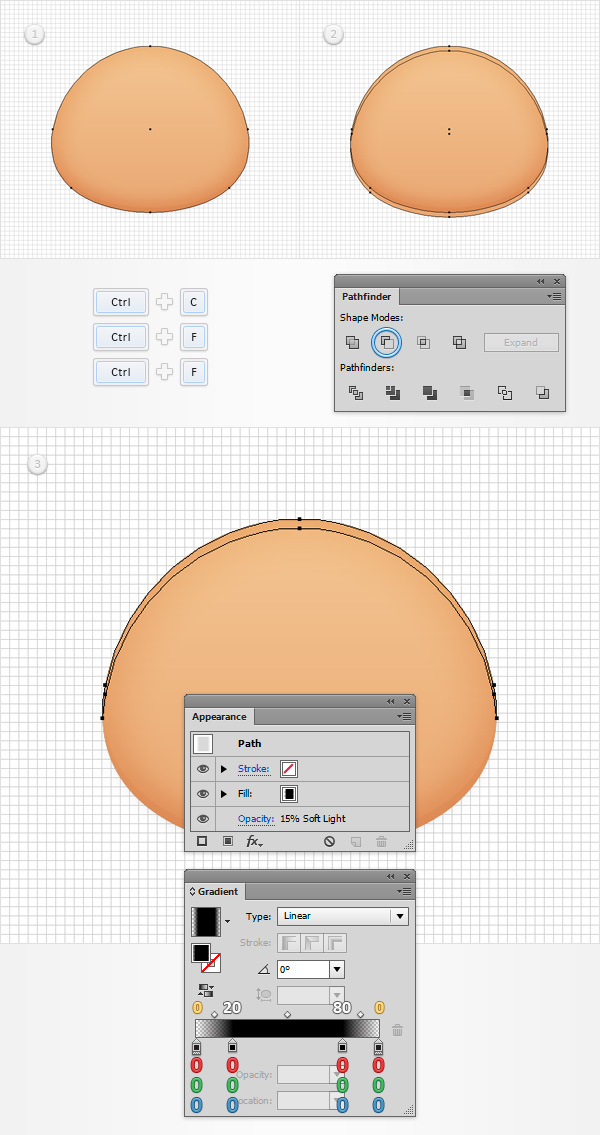
Step 8
Make sure that your “headShape” is still selected and make two copies in front (Control-C > Control-F > Control-F). Select the top copy and simply move it 5px down using the down arrow button from your keyboard. Reselect both copies made in this step and click the Minus Front button from the Pathfinder panel.
Fill the resulting shape with the linear gradient shown in the following image, lower its Opacity to 15% and change the Blending Mode to Soft Light. Keep in mind that the white numbers from the Gradient image stand for Location percentage while the yellow zeros stand for Opacity percentage.
Step 9
Reselect your “headShape” and go to Object > Path > Offset Path. Enter a -10px offset and click OK. Make sure that the resulting shape is selected and make a copy in front (Control-C > Control-F).
Select this copy and move it 5px down using the down arrow button from your keyboard. Reselect both shapes made in this step and click the Minus Front button from the Pathfinder panel. Fill the resulting shape with a flat white (R=255 G=255 B=255).
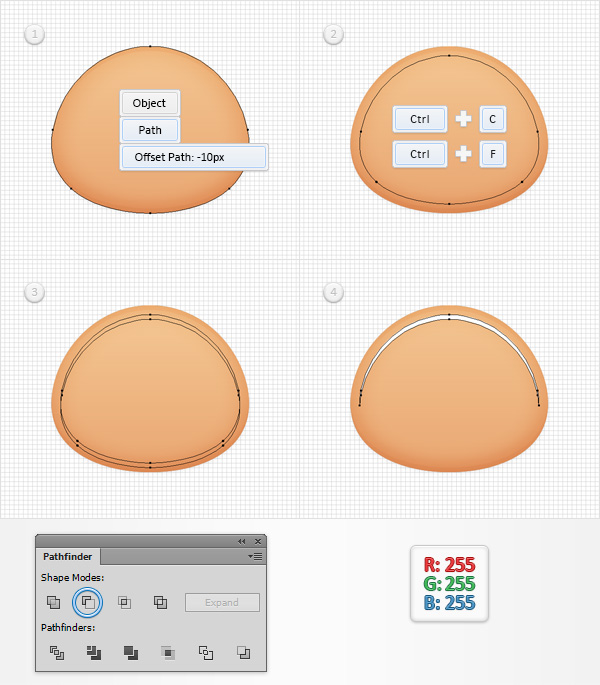
Step 10
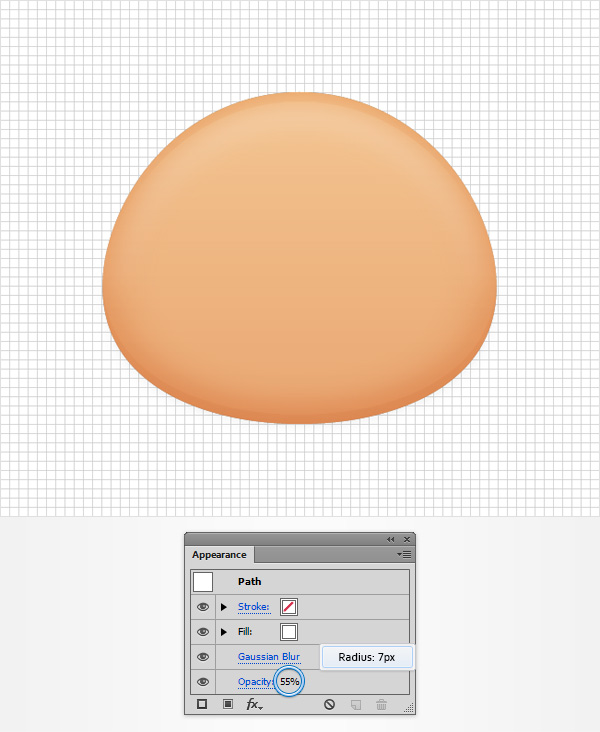
Make sure that your white shape is still selected, lower its Opacity to 55% and go to Effect > Blur > Gaussian Blur. Enter a 7px radius and click OK. In the end things should look like in the following image.
Step 11
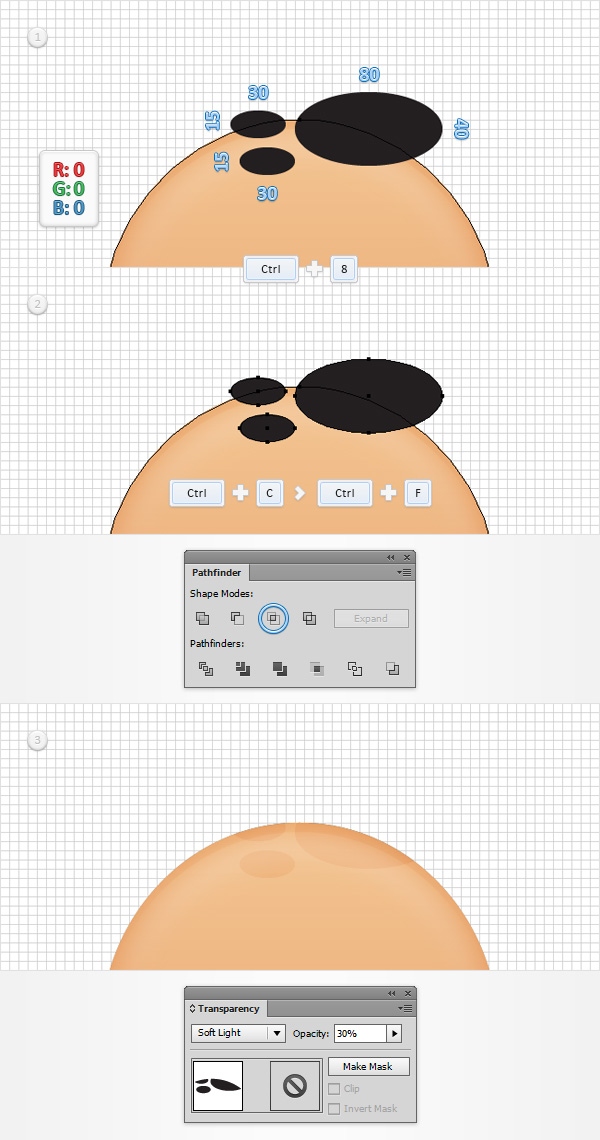
Enable the Snap to Grid (View > Snap to Grid). Using the Ellipse Tool (L), create an 80 x 40px ellipse and two, 30 x 15px shapes. Set the fill color at black and place them as shown in the first image. Make sure that all three shapes are selected and simply hit Control-8 (or go to Object > Compound Path > Make) to turn them into a compound path.
Reselect your “headShape” and make a copy in front (Control-C > Control-F). Select it along with your black compound path and click the Intersect button from the Pathfinder panel. Turn the resulting group of shapes into a new compound path (Control-8), make sure that the fill color is set at black, lower its Opacity to 30% and change the Blending Mode to Soft Light.
Step 12
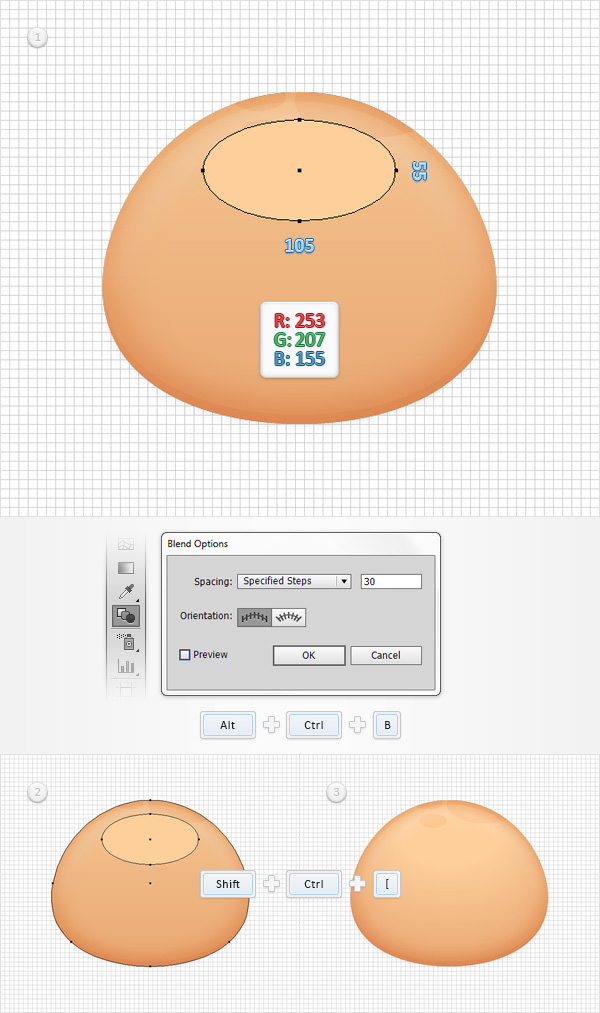
Using the Ellipse Tool (L), create a 105 x 55px shape, set the fill color at R=253 G=207 B=155 and place it as shown in the first image.
Focus on your Toolbar and simply click on the Blend Tool to open the Blend Options window. Select Specified Steps from the Spacing drop-down menu, enter 30 in that white box then click the OK button. Reselect the shape made in this step along with your “headShape” shape and simply hit Alt-Control-B (or go to Object > Blend > Make) to create a new blend. Make sure that your blend is selected and hit Shift-Control- [ to send it to back.
Step 13
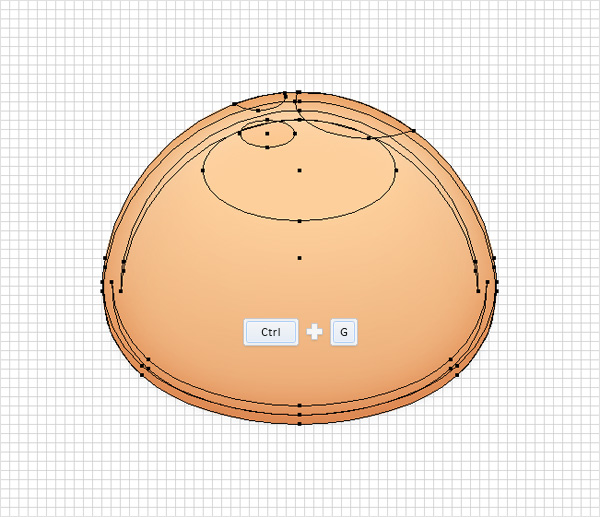
Focus on the Layers panel and unlock that masked group. Select all the shapes made so far and simply hit Control-G to Group them.
Return to the Layers panel, double-click on your new group and rename it “Head“.
4. Create the Ears
Step 1
Using the Ellipse Tool (L), create a 25x 30px shape, set the fill color at R=243 G=177 B=125 and place it as shown in the following image.
Move to the Layers panel and simply rename this new shape “ear“.

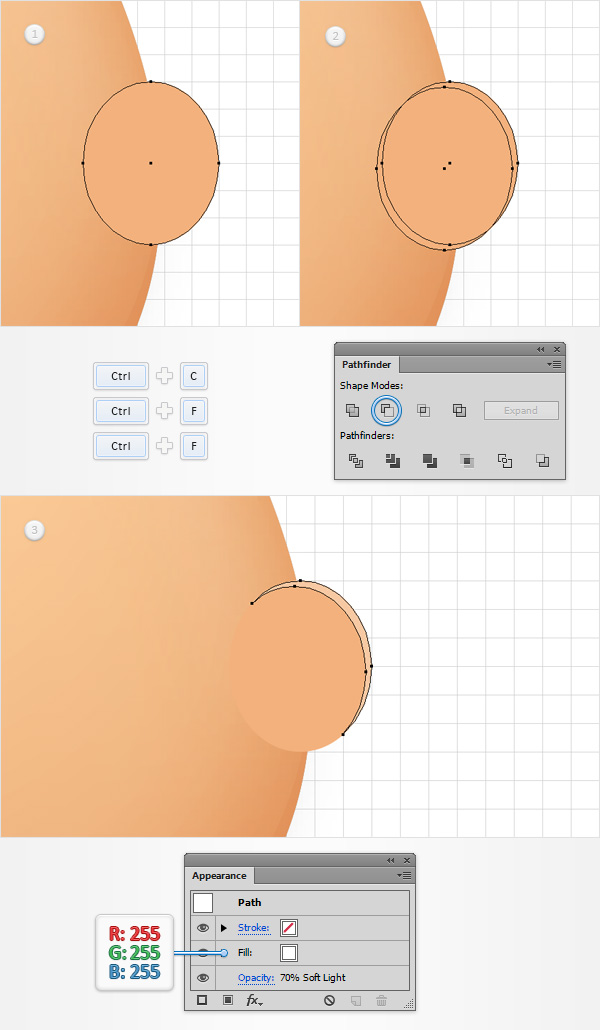
Step 2
Disable the Snap to Grid (View > Snap to Grid). Make sure that your “ear” shape is selected and make two copies in front (Control-C > Control-F > Control-F). Select the top copy and move it 1px down and 1px to the left using the arrow buttons from your keyboard.
Reselect both copies made in this step and click the Minus Front button from the Pathfinder panel. Fill the resulting shape with white, lower its Opacity to 70% and change the Blending Mode to Soft Light.
Step 3
Make sure that your “ear” shape is selected and make two copies in front (Control-C > Control-F > Control-F). Select the top copy and move it 2px down and 2px to the left. Reselect both copies made in this step and click the Minus Front button from the Pathfinder panel. Fill the resulting shape with white, lower its Opacity to 50% and change the Blending Mode to Soft Light.

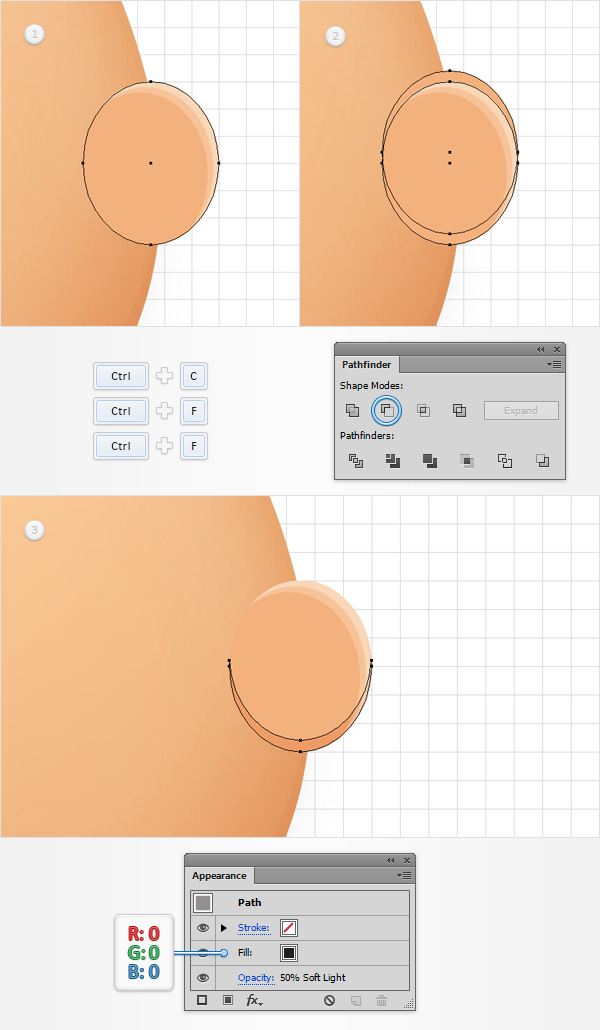
Step 4
Make sure that your “ear” shape is selected and make two copies in front (Control-C > Control-F > Control-F). Select the top copy and move it 2px up. Reselect both copies made in this step and click the Minus Front button from the Pathfinder panel. Fill the resulting shape with black, lower its Opacity to 50% and change the Blending Mode to Soft Light.
Step 5
Make sure that your “ear” shape is selected and make two copies in front (Control-C > Control-F > Control-F). Select the top copy and move it 1px up.
Reselect both copies made in this step and click the Minus Front button from the Pathfinder panel. Fill the resulting shape with black, lower its Opacity to 50% and change the Blending Mode to Soft Light.

Step 6
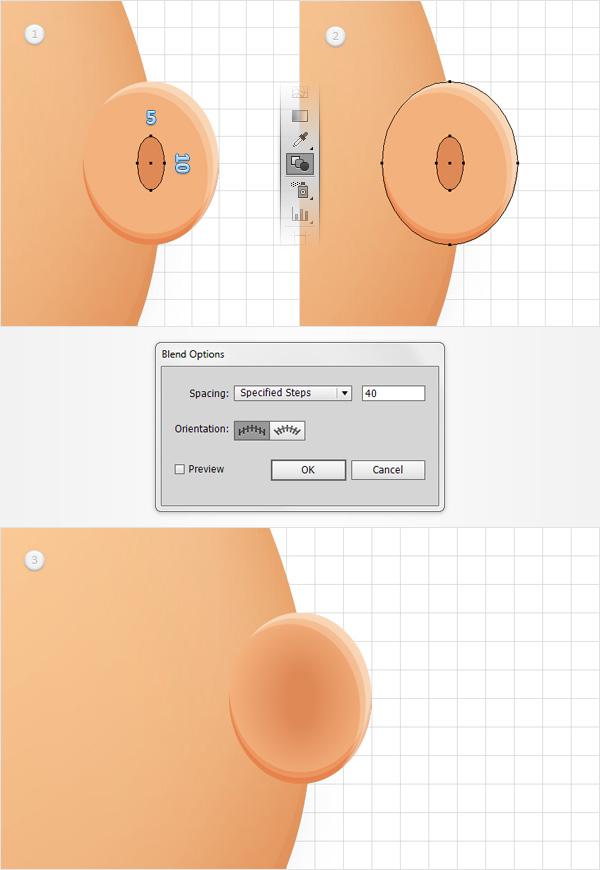
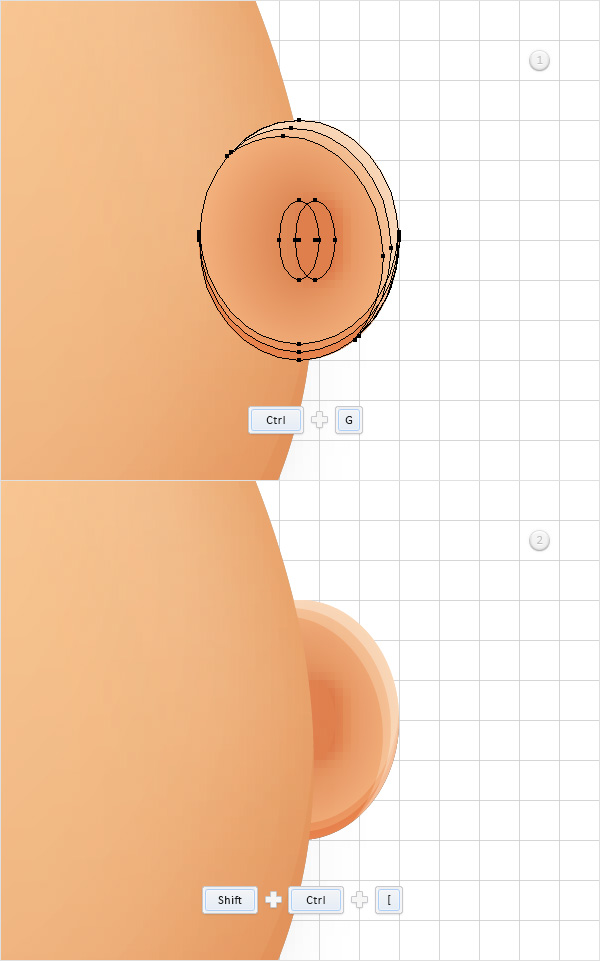
Enable the Snap to Grid (View > Snap to Grid). Using the Ellipse Tool (L), create a 5 x 10px shape, set the fill color at R=223 G=137 B=86 and place it as shown in the first image. Open the Blend Options window, set the Specified Steps at 40 then click the OK button. Reselect the shape made in this step along with your “ear” shape and create a new blend (Alt-Control-B).
Focus on the Layers panel and simply drag this new blend below the set of thin shapes used to highlight it. In the end things should look like in the third image.
Step 7
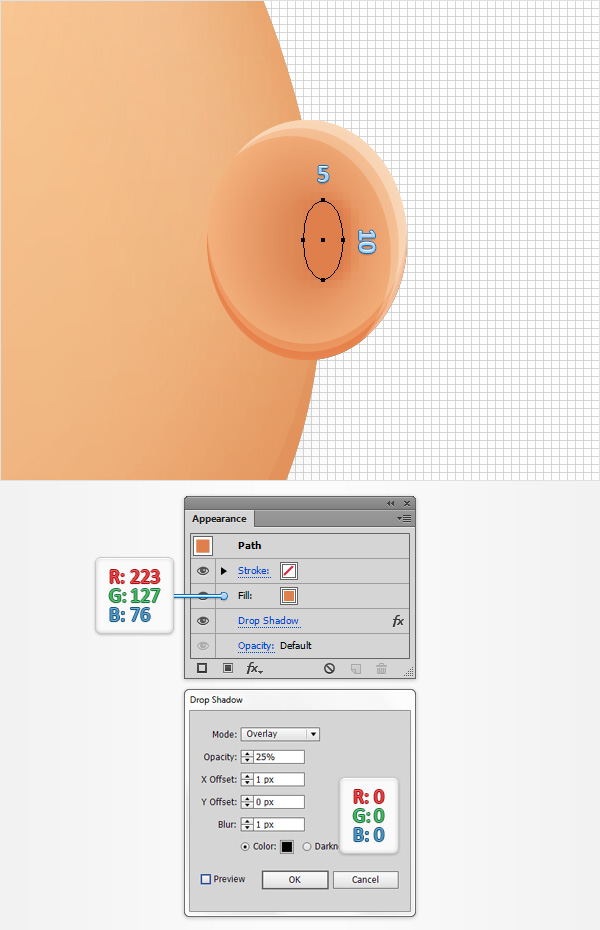
Switch to gridline every 1px, so go to Edit > Preferences > Guides & Grid and enter 1 in the Gridline every box. Using the Ellipse Tool (L), create a 5 x 10px shape, set the fill color at R=223 G=127 B=76 and place it as shown in the following image.
Make sure that your new shape is selected and go to Effect > Stylize > Drop Shadow. Enter the properties shown in the following image and click OK.
Step 8
Return to gridline every 5px, so simply go to Edit > Preferences > Guides & Grid and enter 5 in the Gridline every box. Reselect all the shapes that make up your ear and Group them (Control-G).
Make sure that this new group is selected, send it to back (Shift-Control- [ ) then move to the Layers panel and simply rename it “Ear“.
Step 9
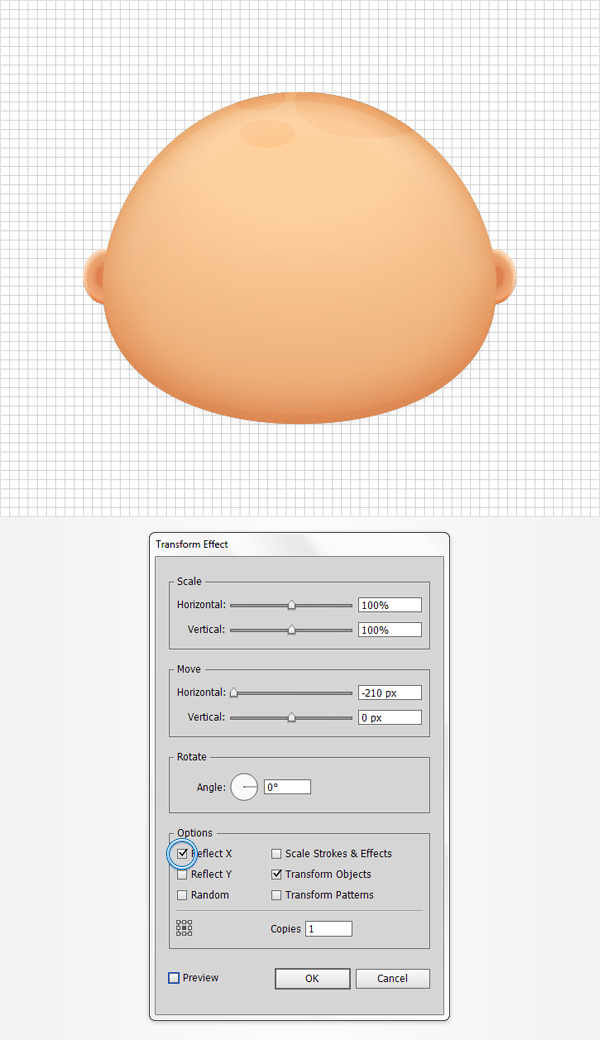
Reselect your “Ear” group and go to Effect > Distort & Transform > Transform. Enter the properties shown below (don’t forget to check the Reflect X box) then click the OK button. In the end things should look like in the following image.
5. Create the Hair
Step 1
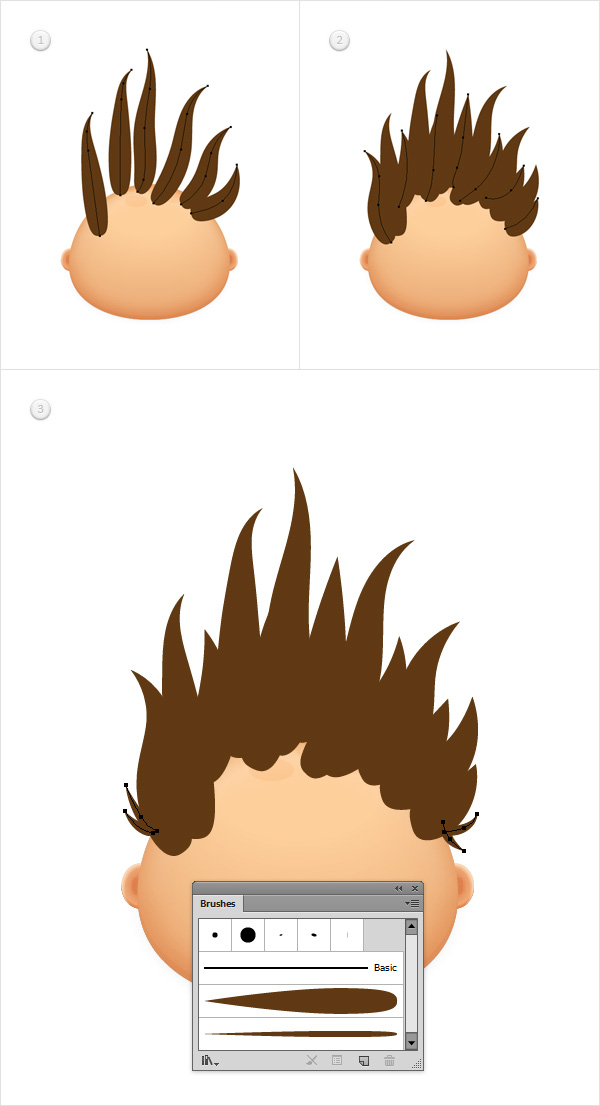
Disable the Grid (View > Hide Grid) and the Snap to Grid (View > Snap to Grid). Pick the Paintbrush Tool (B) and select the “Thick Brush” art brush from your Brushes panel.
Focus on your artboard and draw some simple paths roughly as shown in the first image. Using the same brush draw a new set of path roughly as shown in the second image.
Finally, select the “Thin Brush” art brush from your Brushes panel, make sure that the Paintbrush Tool (B) is still active and draw four tiny paths roughly as shown in the third image.
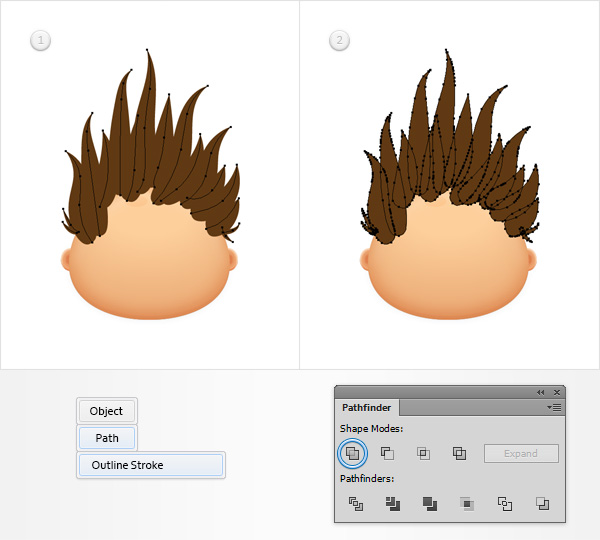
Step 2
Reselect all the paths with the art brushes and go to Object > Path > Outline Stroke. Make sure that the resulting shapes are selected and simply click the Unite button from the Pathfinder panel.