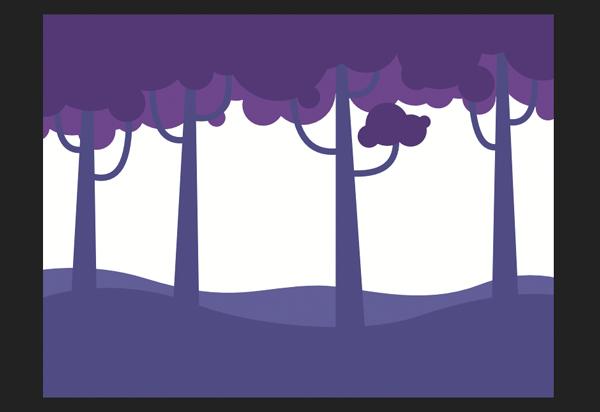
In this tutorial we’ll go through the process of creating a horizontal, tileable background that is perfect for side-scrolling 2D games (action, adventure, hack & slash) for PC, mobile and browsers. We’ll be using the basic vector tools of Affinity Designer, and you’ll see how we can make the image seamless in a fun and convenient way. Let’s begin!
In this particular case we’ll be
designing a stylized forest with a mysterious color scheme, giving it a proper
gloomy atmosphere suitable for mystic adventure games or quests. However, you
can apply these techniques for any other kind of background, whether it is a
sunny meadow or a seaside for casual games, or maybe some dark, deep caves or
even alien planes for a scrolling shooter or platformer. It’s up to you to
decide!
Feel free to gather as much inspiration as you can, and for
this purpose check out the game backgrounds section of Envato Market, which will help you to
find some interesting solutions and original ideas.
1. Build the
Composition
Step 1
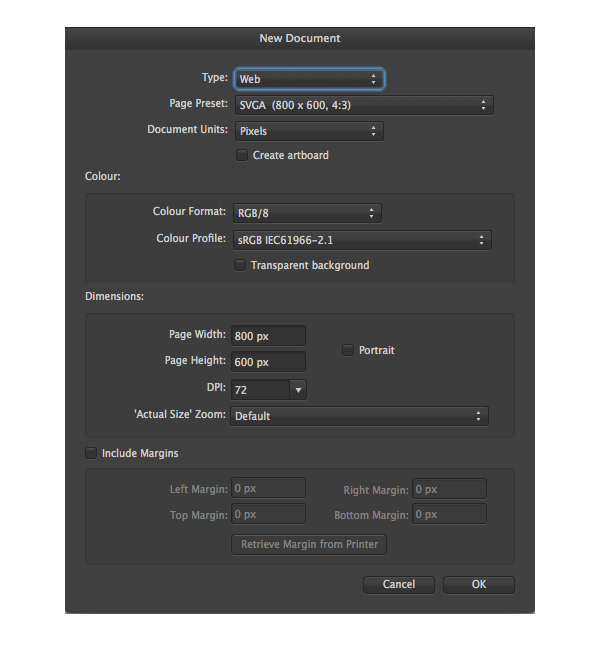
Let’s start by making a New Document. Select the Web Type and find the 800 x 600 px Preset.
Step 2
Here we have our horizontal canvas, and
let’s start filling it up from the top left corner. We’ll start with the trees,
which will cover all the top area of the image with their bushy crowns.
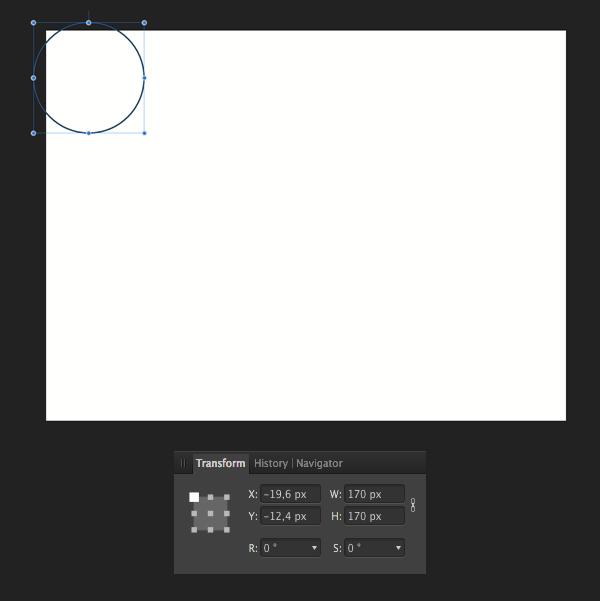
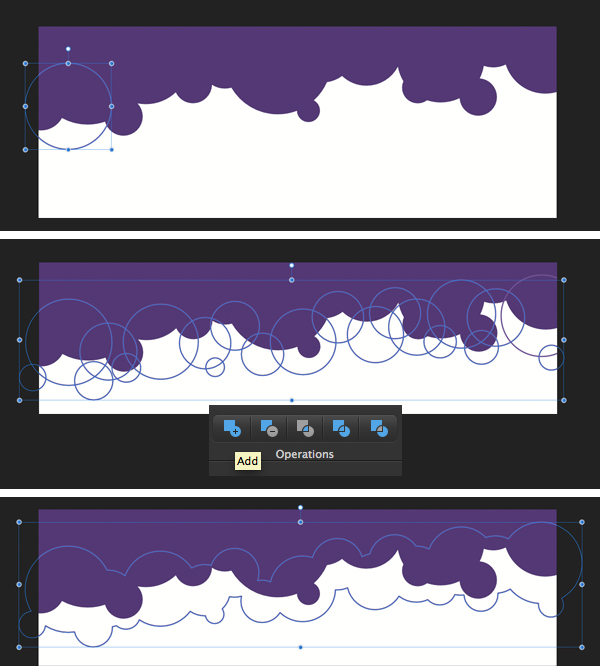
Take the Ellipse Tool (M) and make a 170 x 170
px circle, holding down Shift.
Step 3
Continue holding down Shift and make more circles, varying their sizes from big to tiny,
making them look like foam bubbles.
Select all circles and head to the upper
context toolbar. Use the Add Operation to
merge all the circles into a single shape.

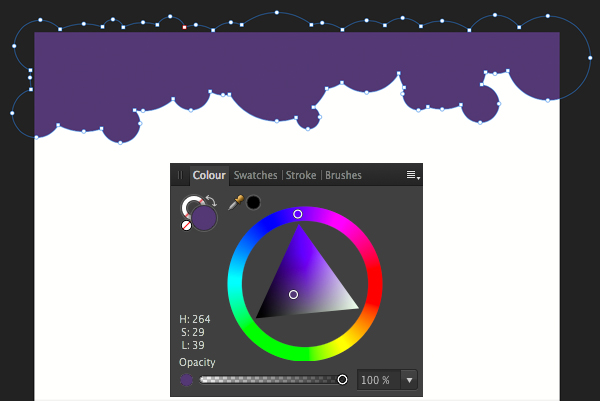
Step 4
Fill the shape with dark-purple color,
using the color wheel in the Colour
panel.
Step 5
Take the Ellipse Tool (M) again and let’s make another layer of circles,
using the same technique and varying sizes. Merge the circles together with the
help of the Add Operation.
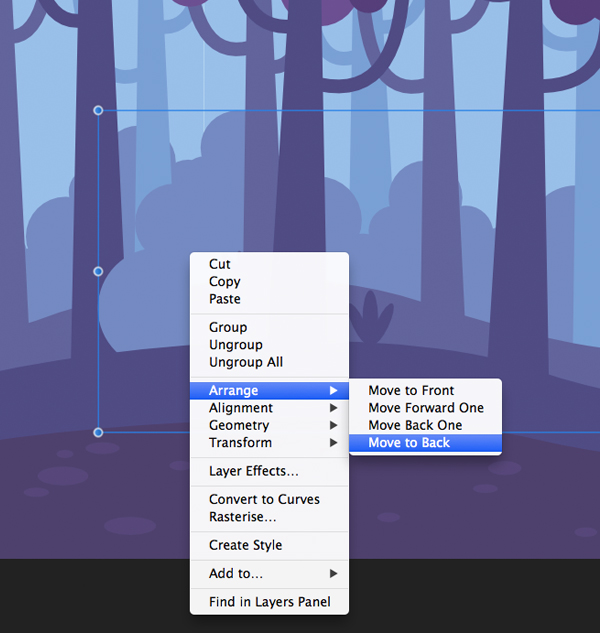
Step 6
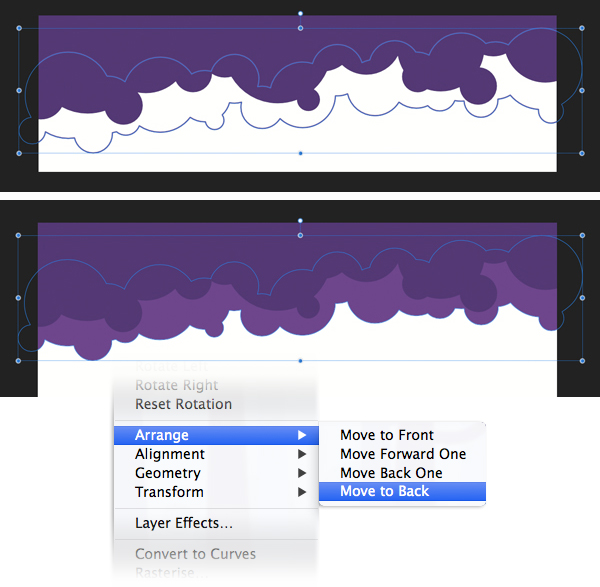
Fill the created shape with lighter purple
color and Move it to Back (Shift-Command-[), beneath the
darker layer.
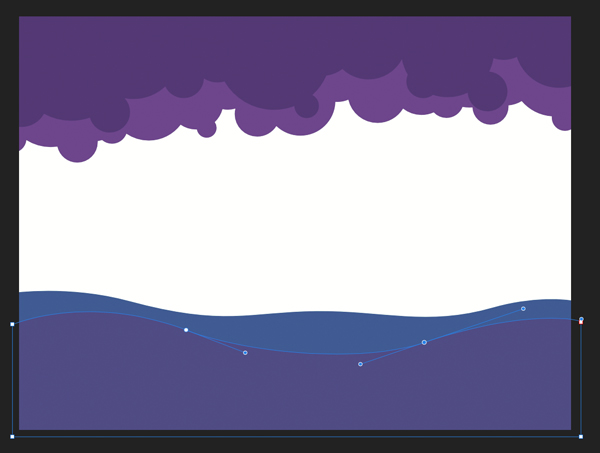
Step 7
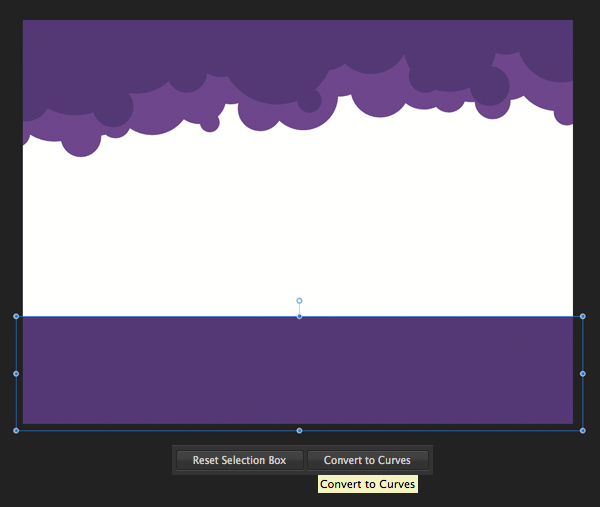
Now let’s move to the bottom part of our
background. Use the Rectangle Tool (M)
to form the dark-purple shape for the ground. Convert it to Curves
from the upper context toolbar. Now we can edit the shape, changing its form.
Step 8
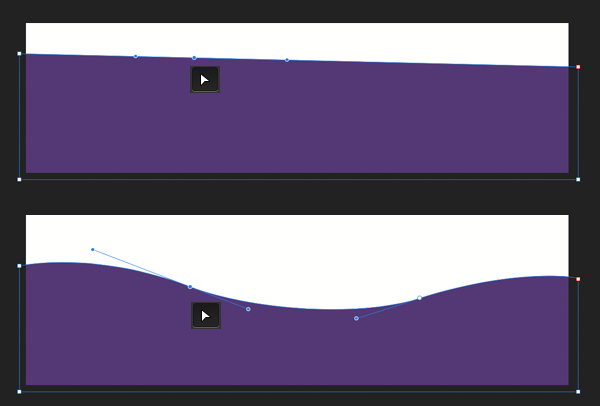
Take the Node Tool (A), select the upper left corner and drag it up a bit,
making a slope. Double-click on the upper edge of the shape to add a new node.
Move the right node handle down to form a light curved line, depicting a smooth
hill. Add another node on the opposite side of the ground, making another hill.
Step 9
Add another shape beneath, forming another
ground shape in the distance. Make this shape a bit lighter. This way we’re
showing the aerial perspective of our image, making it look more three-dimensional.
2. Render the Trees
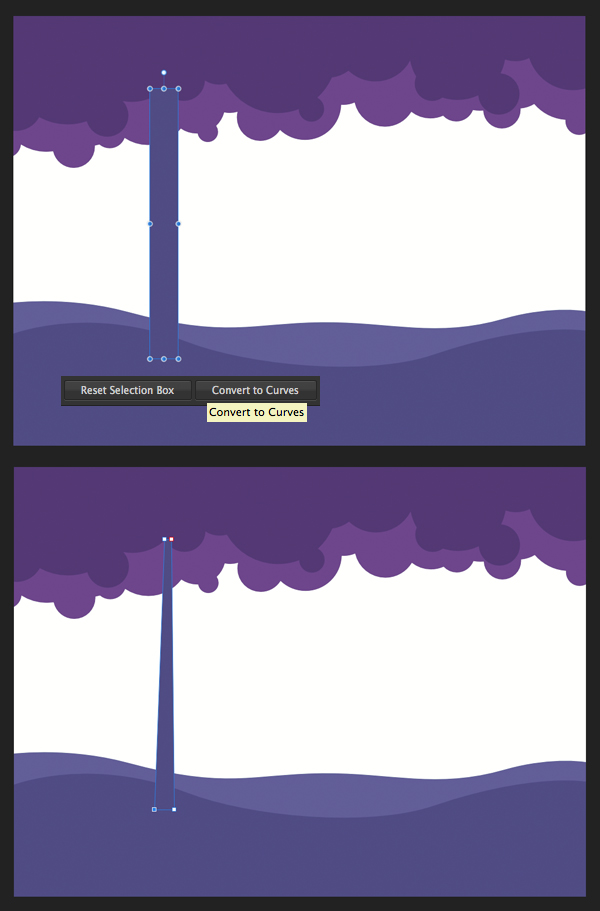
Step 1
Now we’ll start rendering the trees, making
a deep forest. Use the Rectangle Tool
(M) to make a narrow, vertical stripe for the tree-trunk. Convert it to Curves, take the Node
Tool (A) and move the upper nodes closer to each other, making the top of
the trunk much narrower.
Step 2
Let’s add some small
branches at the top of the trunk. Use the Pen
Tool (N) to make a curved line. Set the Width to 10 pt in the Stroke
panel, making the branches somewhat thicker.
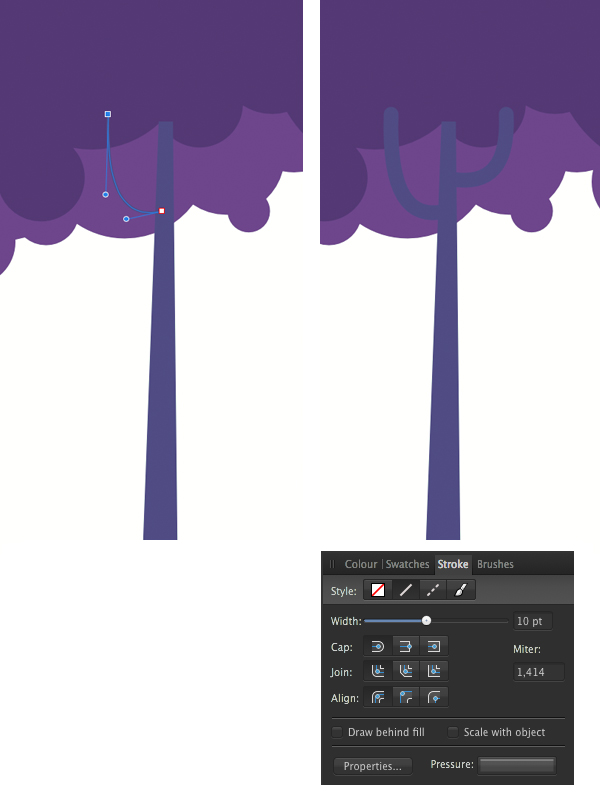
Step 3
Make some more branches
and add a group of smaller dark-purple circles to cover the blank tip of the
branch, forming stylized leaves.
Step 4
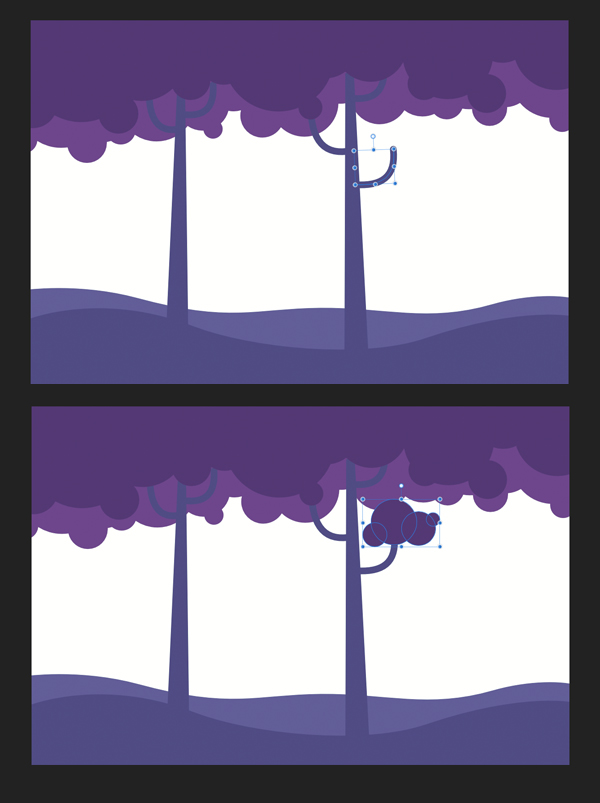
Continue adding trunks,
varying their width and rearranging the branches to make more trees. Remember
to Group (Command-G) similar objects
to make them easier to work with.
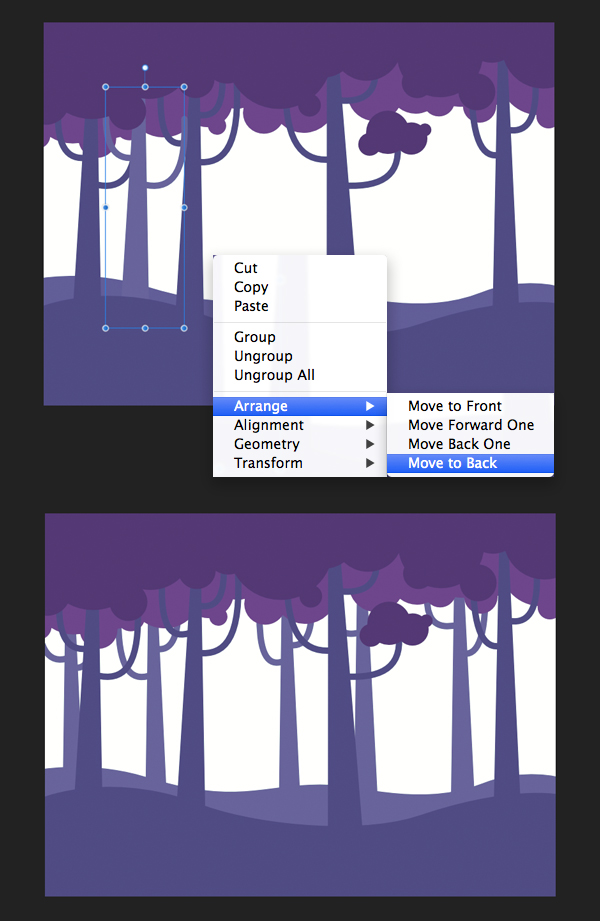
Step 5
Make another tree and
fill it with the same light-purple color as the distant ground layer. Move the light tree to Back (Shift-Command-[), making the
elements blend. This way the tree seems to be farther than the darker trees in
the foreground.
Step 6
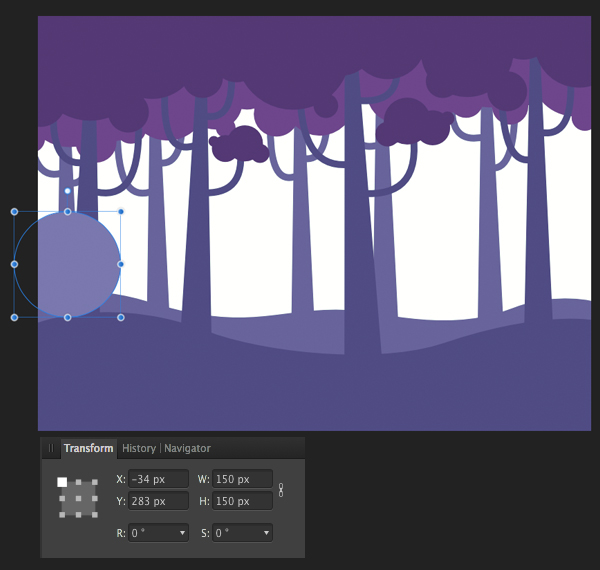
The distant area of our background still looks blank.
Let’s fill it up with some additional elements. Start by making an even 150 x 150 px circle with the Ellipse Tool (M). Make this shape lighter to create some more air
and distance between the objects. This contrast will be noticeable when
we place the new elements in the back a few steps later.
Step 7
Make some smaller circles, creating
a bush, and use the Add Operation to
merge the shapes.
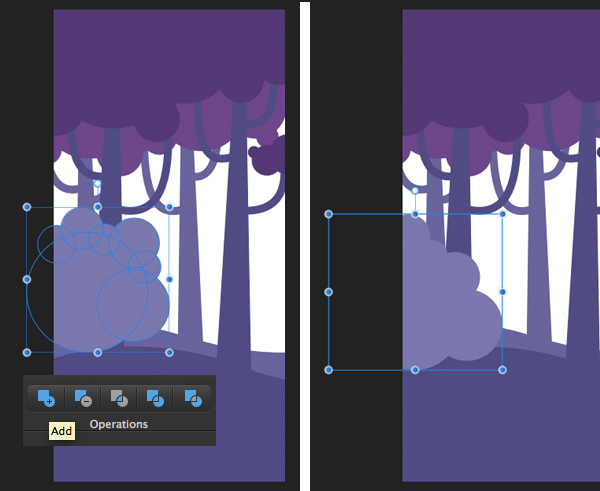
Step 8
Now we can select our bush and Move it to Back (Shift-Command-[), hiding it behind the trees. Add more bushes, forming them from circles, filling the empty spots
of the background.
Step 9
Let’s add some more trees in order to make
the forest thicker and, hence, the whole image more detailed. Make them even
lighter and put some of them in front of the bushes and some of them behind the
bushes, making the composition more balanced and versatile.
Step 10
The white area in the background can be
very distracting, so let’s dim it a bit. Create an 800 x 600 px rectangle and Move
it to Back (Shift-Command-[), at
the very bottom. Fill the shape with greyish-blue color, adding a misty
atmosphere to our fantasy forest.
Step 11
Let’s add some minor elements that will
enliven our forest a bit more. Use the Ellipse
Tool (M) to create tiny wisps of grass or leaves, consisting of three
ellipses each.
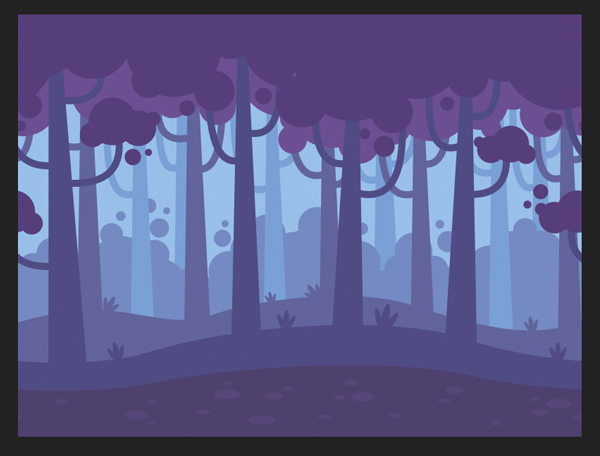
Step 12
What we can also do here to spark the
viewer’s interest is to add even more details. The more detailed the
background is, the more interesting it is for the viewer. Try adding another shape
in the bottom of the image, making a darker layer of ground.
Speckle small ellipses above it, depicting stones and creating an
illusion of the ground being sliced like a pie.
Add more branches or leaves or bushes,
whatever is needed to make the composition more filled and versatile.
3. Make the Background Seamless
Step 1
Now let’s see how can we make our
background seamless and repeating.
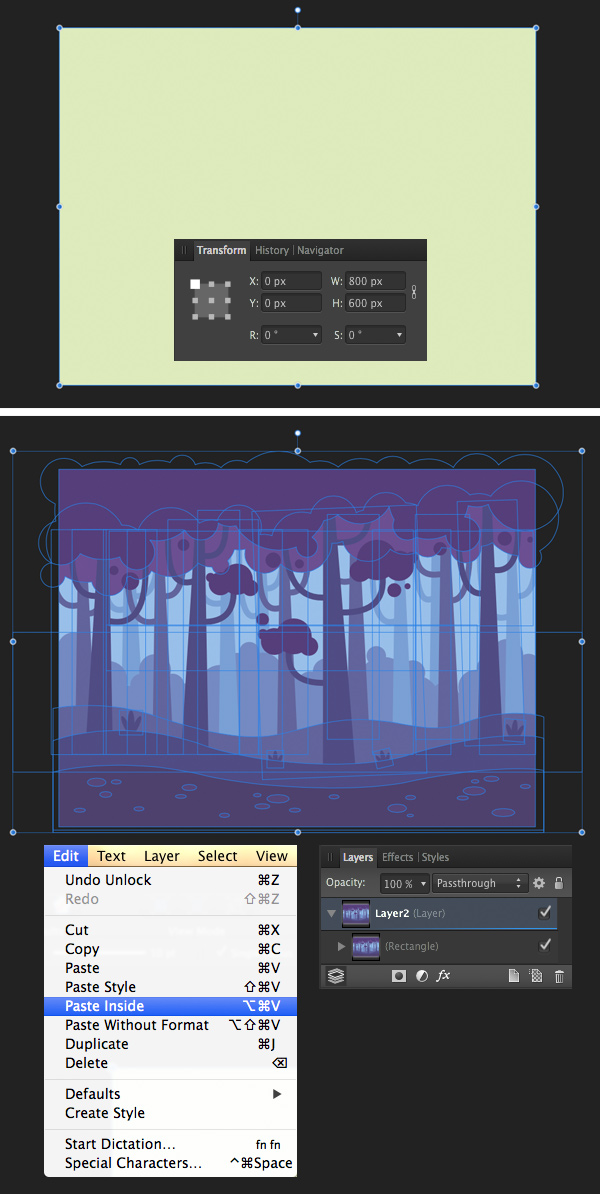
First of all, select everything (Command-A) and Cut (Command-X) it. Make an 800 x 600
px rectangle (of any color). Keeping it selected, go to Edit > Paste Inside. Now we have our
forest framed inside the rectangle, as if inside a clipping mask, which allows
us to move it around easily.
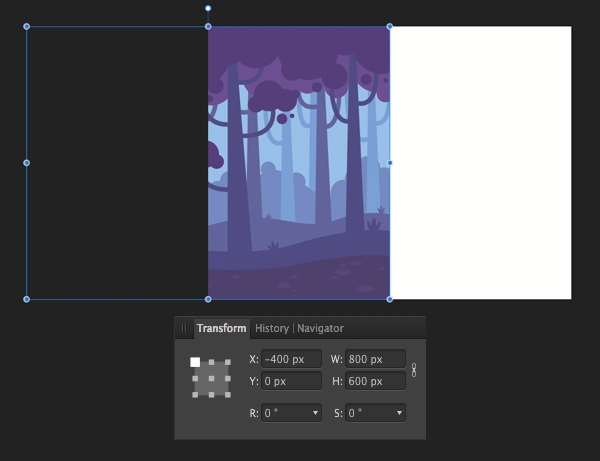
Step 2
Let’s move our image 400 px to the left. To do this, head to the Transform panel and apply the -400
px value to the X axis. The Y axis should be set to 0 px.
Step 3
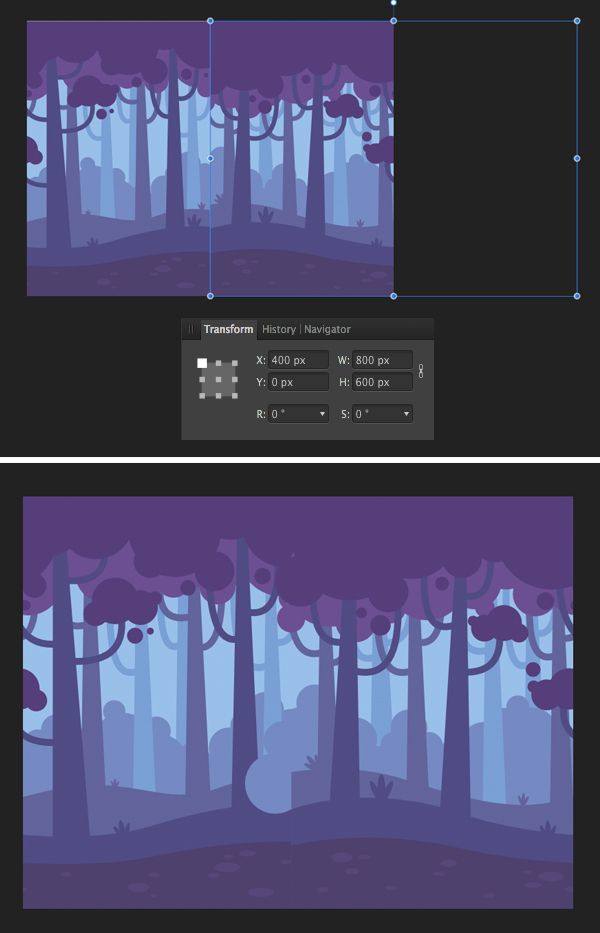
Duplicate the image (Command-C > Command-V) and now we need to move the copy to the
right. Set the X value to 400 px in the transform panel.
Now if you look at your picture, you’ll see
that its left edge matches its right edge. As a result, if we stick
several images together, they will create a long, seamless panoramic image that
can be repeated endlessly. This is so that we can form a scrolling horizontal video-game background.
The only thing we need to do here is to fix
the central part of the image, making both halves match.
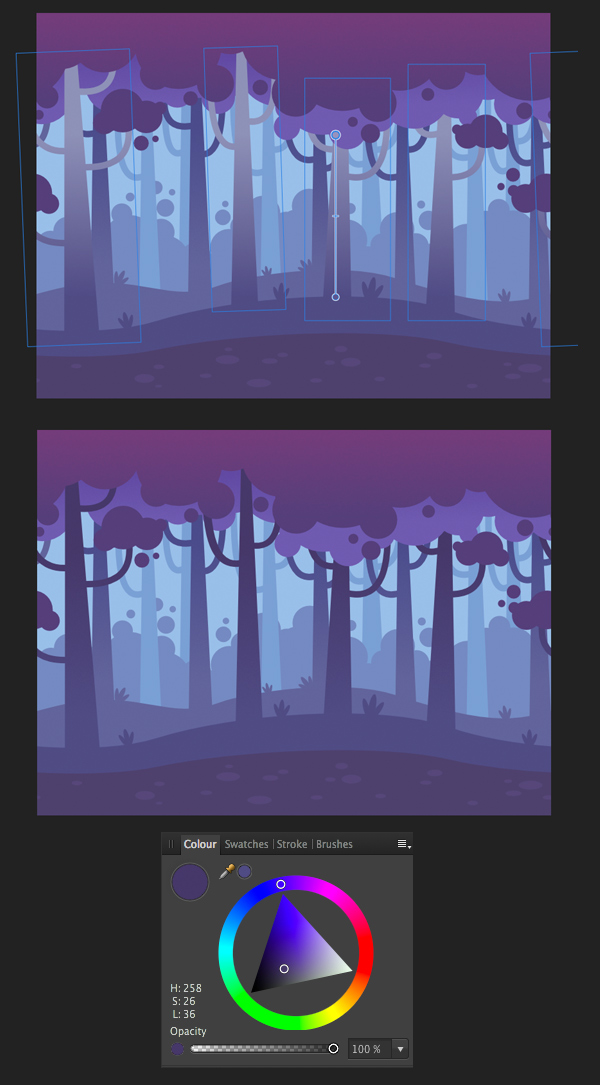
Step 4
Now we can drag both forest groups out of
their mask rectangles in the Layers
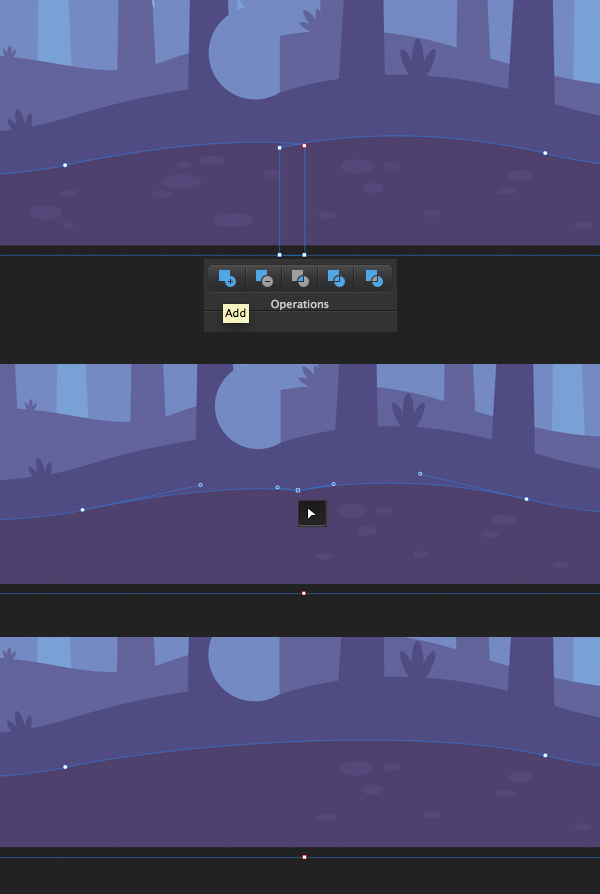
panel. And let’s start combining the darkest bottom layers of the ground.
Select
both shapes and merge them with the Add Operation. Take the Node
Tool (A) and select the dimple that appeared on the upper edge of the
ground. Delete (Backspace) it,
making the shape smooth.
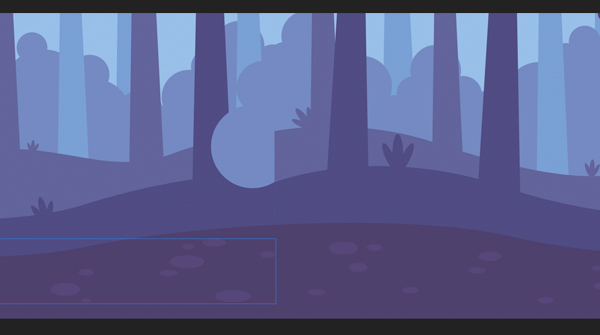
Step 5
If the ground spots on the left side of the
image turned out to be somewhere beneath, find them in the Layers panel and drag them on top.
Step 6
Repeat the same for the next layer of the
ground—select the two halves and use the Add
Operation to merge them. Delete
the unneeded node using the Node Tool
(A).
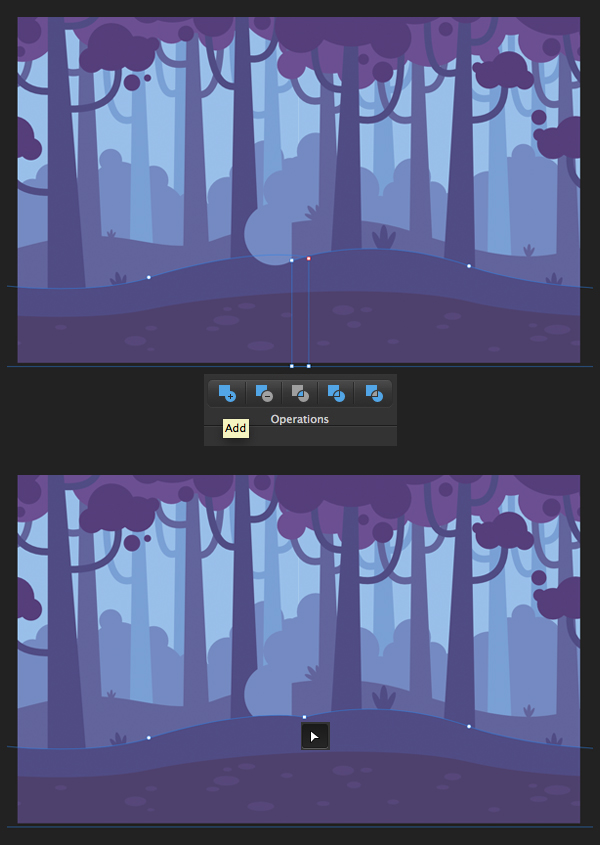
Keep using the same technique for the third layer, creating a single shape with the Add Operation.
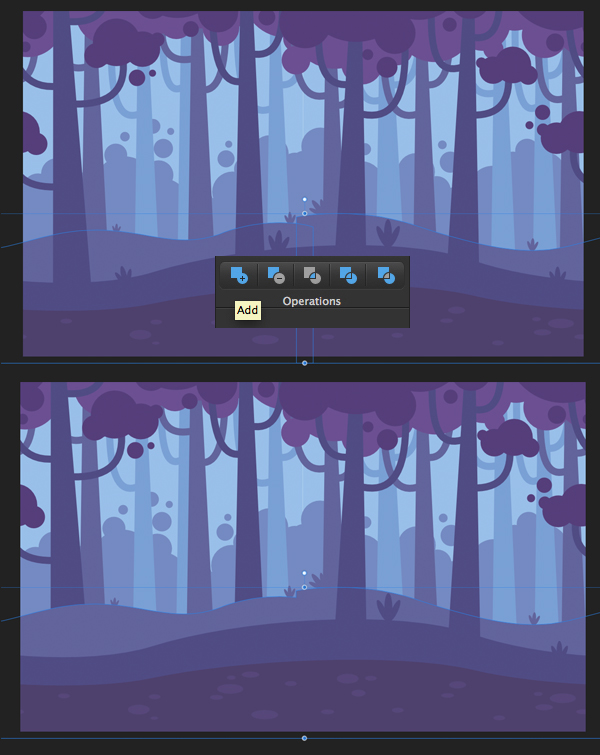
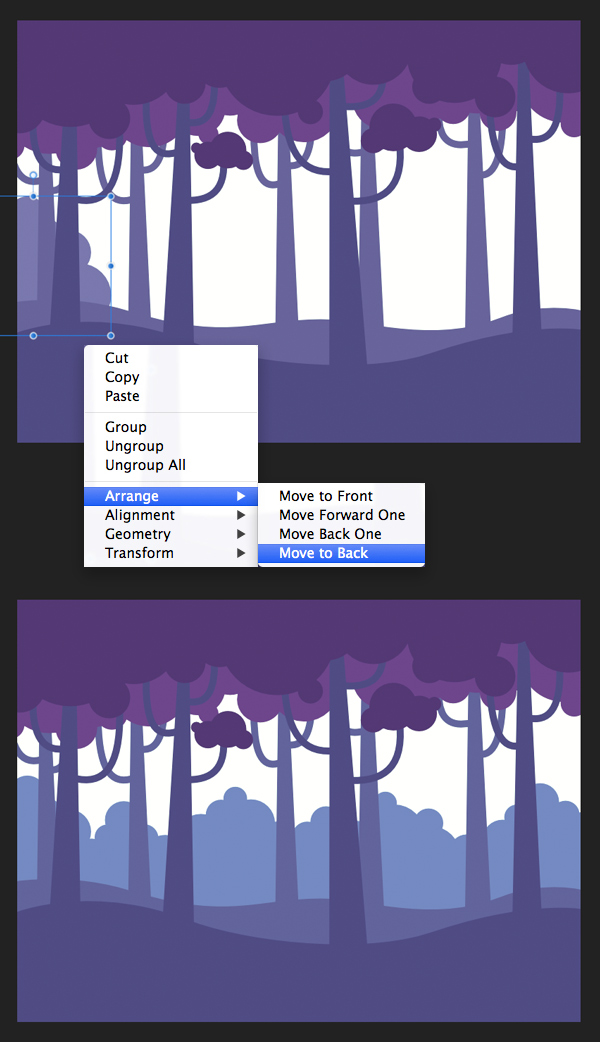
Step 7
Select one of the bushes that popped out in
the foreground and Move it to Back (Shift-Command-[). Then move it one position up, placing it right above the greyish-blue background (Command-]).
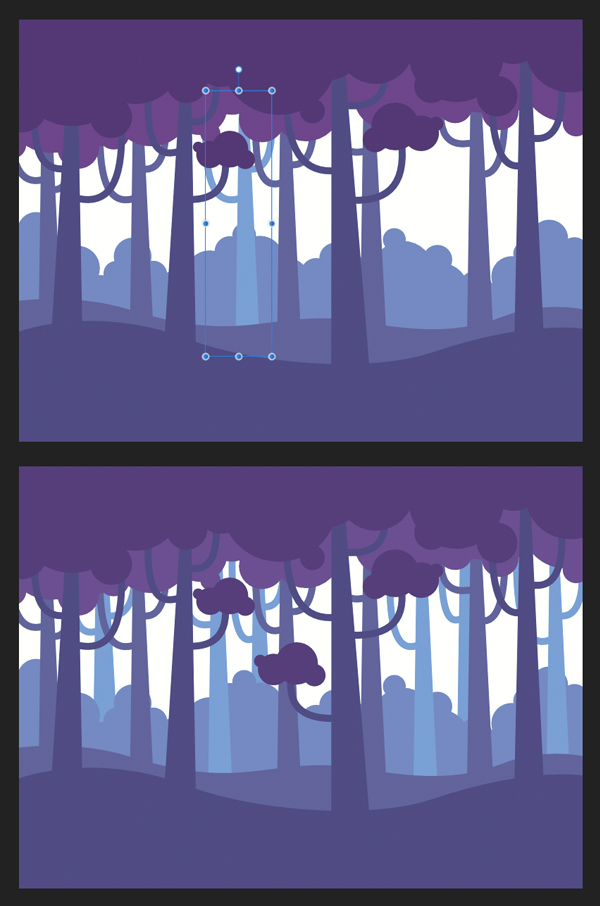
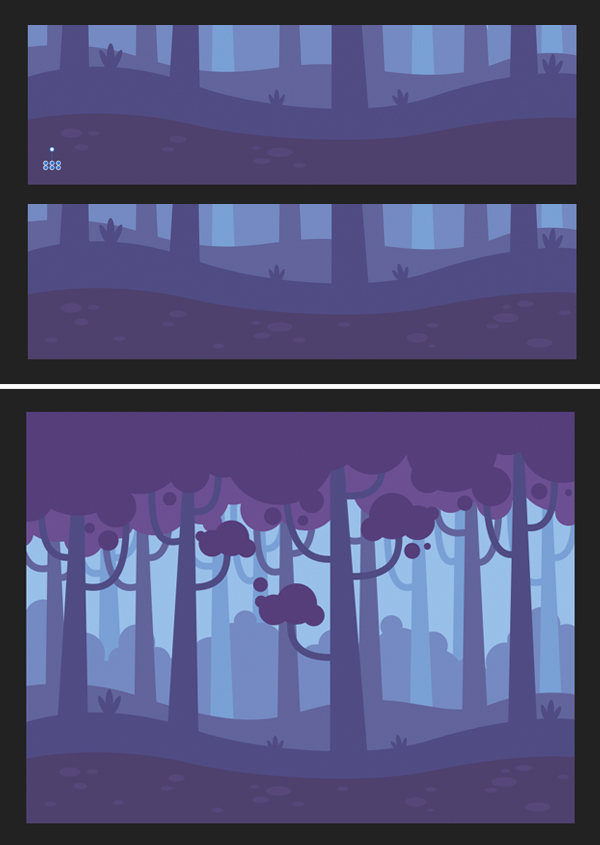
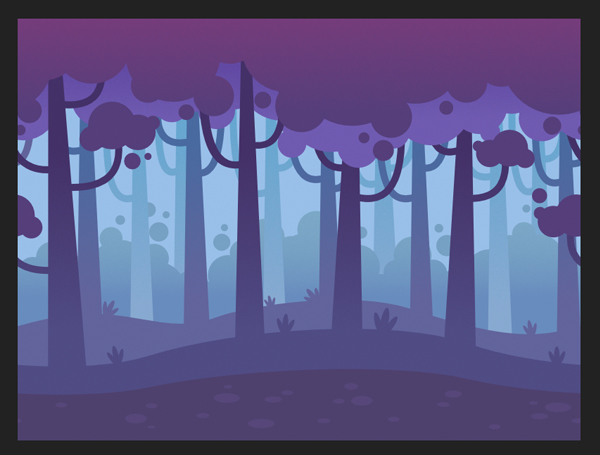
Step 8
Now that we’ve stitched all the parts
together and rearranged the elements, our image should look like this. We can’t
really see the edge between the pictures, which makes it perfectly seamless.
As
you may notice, I’ve added some small circles above the bushes in the
background in order to make the composition more busy and balanced. You can add
more stones in the bottom part or more grass if you feel that you need to
cover any empty spots of the image.
4. Using Gradients to Make the Background
Vivid
Our background is already complete by this
stage, and you can leave it as it is and proceed to export. However, we can tweak
it even more, adjusting the colors and enlivening the whole scene. Let’s go on
and try out the Fill Tool (G)!
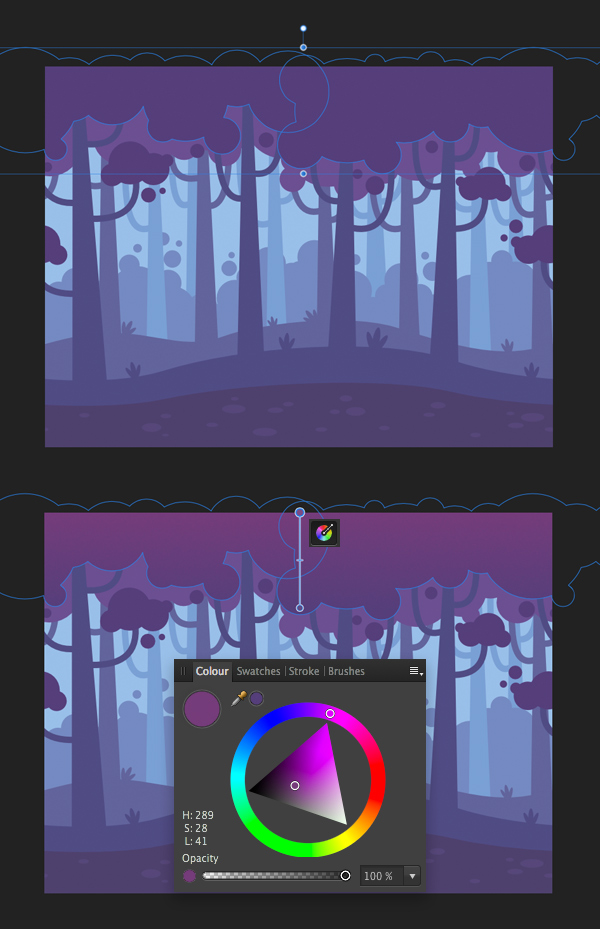
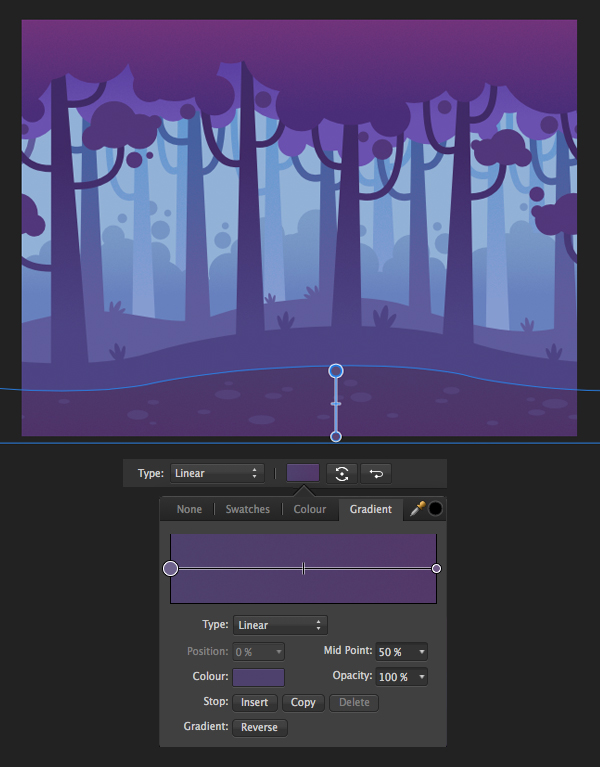
Step 1
First of all, select the top dark-purple
layer of the tree crowns and take the Fill
Tool (G). Click and drag over the object, placing the gradient in a vertical
position.
Now you can select the upper marker of the gradient fill slider (the
circle tip) and set the color you want using the color wheel in the Colour panel. Make the top of the shape
lighter and brighter, applying a pinky-purple color.
Step 2
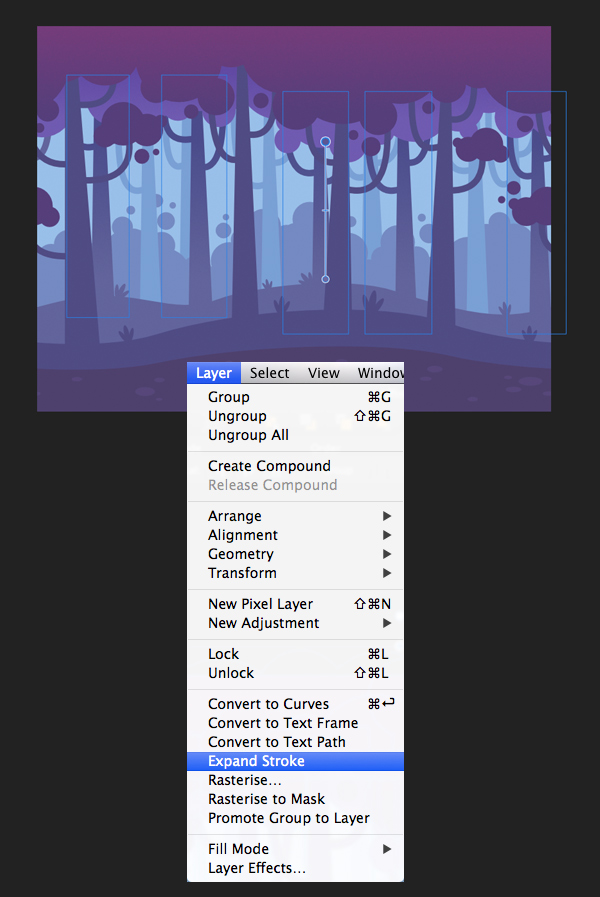
This method works only for the shapes, but
not for strokes and outlines. So if we want to apply a smooth gradient fill to the
trees, first of all we need to turn their branches into shapes. Let’s select
those trees in the background and go to Layer
> Expand Stroke.
Great! Now if you select any expanded
branch and check the Colour panel,
you will see the fill color applied. However, if you face the problem that your
branches are still strokes, then you may need to select the branches inside each tree group, using the Layers
panel. And then expand them. Try both options and see what works for you.
Step 3
Use the Fill Tool (G) to apply a vertical linear gradient to the trees. You
don’t need to apply it to every tree one by one—just select the entire group
in the foreground and drag the slider of the Fill Tool (G). Adjust the colors, making the top of the trees a bit
darker than the bottom.
Step 4
Apply the gradient to the distant bushes as
well, making their top a bit lighter.
Step 5
As for the ground, I’ve decided to apply a
gradient only to the first, darker layer in order not to make the image
overloaded with gradients. Make the difference between the gradient colors of
the ground barely visible, just adding a bit more depth to the picture.
Step 6
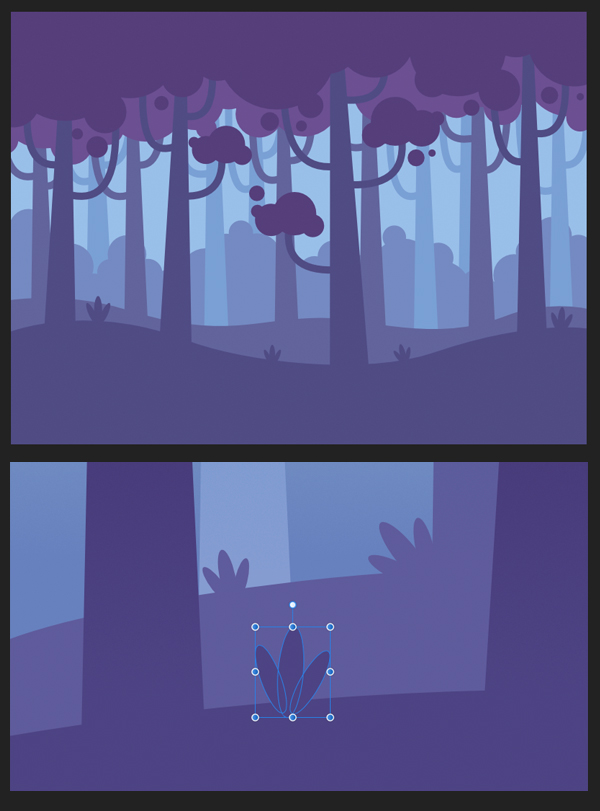
Let’s add a few more details in order to
finish the background. Use the Ellipse
Tool (M) to add a group of circles in the upper part of the image, filling
the top of the tree crowns. Leave some space between the circle groups and keep
them away from the edges, so that the image remains seamless.
Apply a pinky-purple vertical gradient to
the circles, slightly darker than the tree crowns. This will make the trees a
bit more three-dimensional, without making the image overloaded with details.
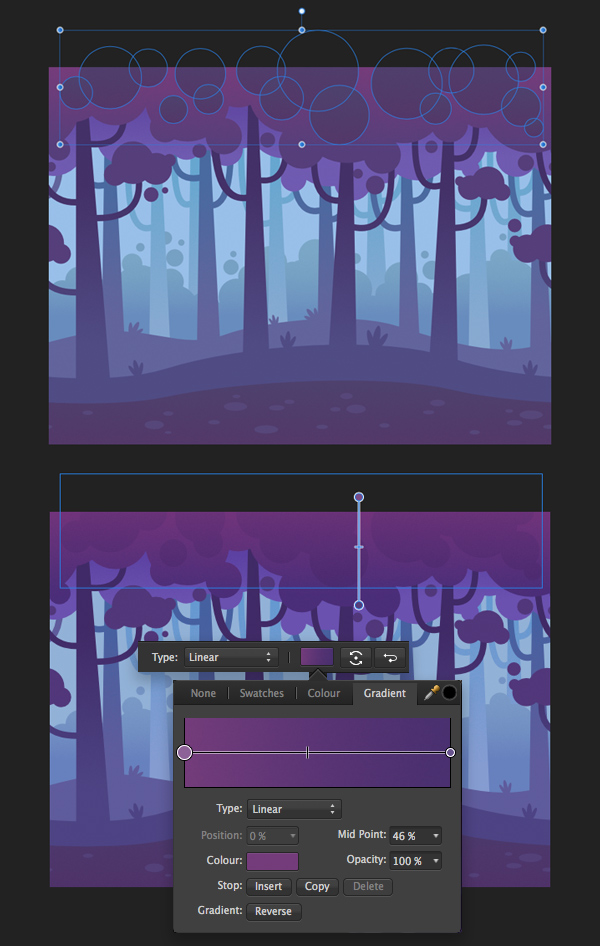
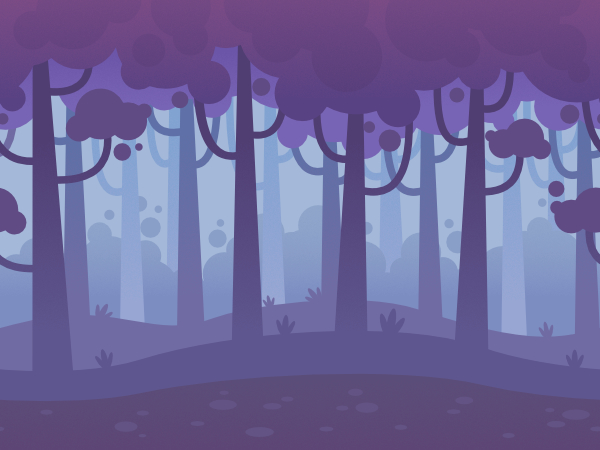
Here’s what you should get.

Step 7
You can File > Export the picture in the desired format and combine several
copies together in order to get a seamless result. Or you can extend the width
of the document in Affinity Designer, using the Document Setup in the upper control toolbar.
Copy the picture and move it 800 px to the left and to the
right, making sure that it is perfectly seamless.
Awesome! Our Seamless Game Background Is
Finished!
We’ve finished designing the
background and did a great job, using basic shapes, gradients and some
simple operations to make a balanced forest composition for a nice, seamless
game background.
Feel free to use these techniques to create various backgrounds, such as green forests, rocky mountains, sandy deserts, or whatever you can imagine.
If you want to get this particular background
in other vector formats, such as EPS, that are ready to be imported in a game
and also include alternative color schemes, then feel free to take a look at
this seamless game backgrounds pack, which might be useful!
Have fun with Affinity Designer, and don’t
forget to share your results!