
This week is dedicated to Russian culture, so I would like to introduce you to the artworks of the famous Russian photographer Sergey Prokudin-Gorsky. He made a large number of color photographs of the early 20th century using his three-image method of photography.
He was able to capture in his photos not only the Russian Empire but also Europe and Asia. Many of his works were used in postcards.
In this tutorial, we’ll create a vintage photo effect inspired by retro postcards of Sergey Prokudin-Gorsky using Adobe Photoshop and retro textures.
Tutorial Assets
The following assets were used during the production of this tutorial:
1. How to Prepare the Document
Step 1
Use Control-N to create a new document and use the following settings: 3000 x 2000 px; 300 dpi.

Step 2
Go to File > Place and put your image inside the document.
Step 3
Resize your image to the borders of the document and hit Enter.
Step 4
Click M to activate the Rectangular Marquee Tool and select the whole canvas of the document.
Step 5
Go to Image > Crop to delete the parts of the photo outside the canvas.
Step 6
After that, Right-Click on the layer and then Convert to Smart Object.
2. How to Create a Vintage Photo Effect
Step 1
Select the smart object, go to Filter > Noise > Median, and use the following settings: Radius: 2 px.
Step 2
Go to Filter > Noise > Add Noise and use the following settings: Amount: 7%; Distribution: Uniform; Monochromatic: On.
Step 3
Double-Click on the icon near the layer to open the smart object.
Step 4
Create three duplicates of your smart object using Right Click > Duplicate.
Step 5
Double-Click on the first duplicate of the layer and Uncheck the Green and Blue channels in the Layer Style panel.
Step 6
After that, Double-Click on the second duplicate and Uncheck the Red and Blue channels.
Step 7
And finally, Uncheck the Red and Green channels on the last layer.
Step 8
Create a new empty layer using Shift-Control-N and put it above the first duplicate.
Step 9
Create two more empty layers and arrange them as shown in the picture below.
Step 10
Select the first copy of the main image and Layer 1 while holding Shift, and then hit Merge Layers.
Step 11
Merge the other copies of the main image with the empty layers, as we did before.
Step 12
Select the main image and then use the Shift-Control-Alt-B key combination to convert the image to black and white.
Step 13
Select Layer 1 and click M. Then select the whole red image with the Rectangular Marquee Tool and press Control-C to copy the layer.
Step 14
Select the main image and go to Channels panel, and then select the Red channel.
Step 15
Press Control-V to paste Layer 1 to the red channel of the main image.
Step 16
Now we need to paste Layer 2 to the Green channel and Layer 3 to the Blue channel of the main image, as we did before.
This is how our image will look after all the manipulations listed above:

Step 17
Select copies of the main image while holding Shift, and then hit the Delete icon.
Step 18
Now let’s add color correction to improve the colors of the image. Select the layer, go to Image > Adjustments > Brightness/Contrast, and use the following settings: Brightness: 125; Contrast: -50.
Step 19
Go to Image > Adjustments > Hue/Saturation and use the following settings: Hue: -25.
Step 20
Afterwards, go to Image > Adjustments > Channel Mixer and use the following settings: Output Channel: Green; Green: +75%; Blues: -25%.
Step 21
Go to Image > Adjustments > Brightness/Contrast and use the following settings: Brightness: 35; Contrast: -15.
Step 22
To create a more realistic vintage look, we could move the color channels a bit. Go to the Channels panel and select the Red channel.
Step 23
Click M and select the whole image.
Step 24
Now click V and move the channel 1 px to the left.
Step 25
After that, select the Green channel and move it to 1 px to the right, as we did before.
3. How to Create a Postcard Photo Effect
Step 1
Close and Save the smart object.
Step 2
Press Alt-Control-C and use the following settings:
Step 3
Resize the smart object (Control-T) to 90% Width and 90% Height.
Step 4
Move the smart object 175 px to the left while holding Shift.
Step 5
Click T and create two text layers with any text you want to use.
Step 6
Press Control-T while holding Shift to rotate each text layer –90°.
Step 7
Move the text layers to the right side of the canvas.
Step 8
Select the text layers while holding Shift and then Right Click > Convert to Smart Object.
Step 9
To create a more realistic vintage text effect, we need to smudge our text layers. Select the smart object, go to Filter > Noise > Median, and use the following settings: Radius: 2 px.
Step 10
Now we can add the textures to our document. Go to File > Place and place two vintage textures above all the layers.
Step 11
Change the Blending Mode of the vintage paper texture to Multiply.
Step 12
Change the Blending Mode of the scratches texture to Screen.
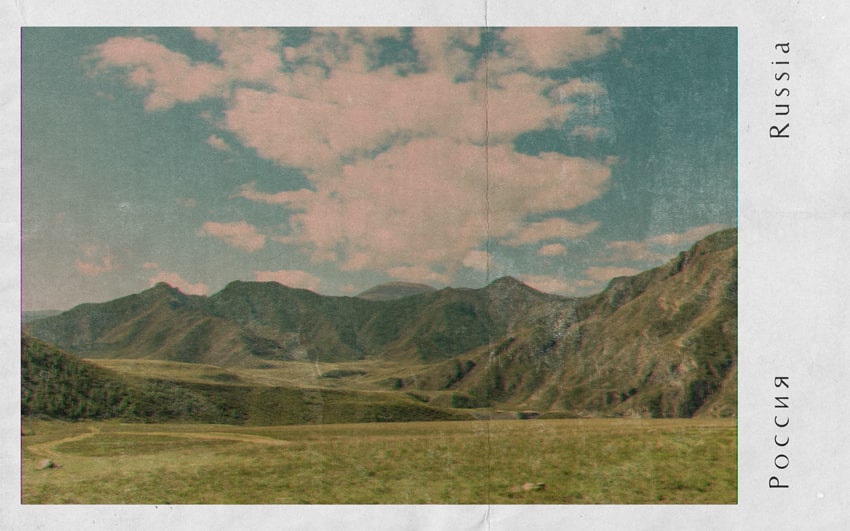
Awesome Work, You’re Now Done!
In this way, we can use Adobe Photoshop to create a vintage postcard in the style of the artworks of Sergey Prokudin-Gorsky using smart objects, color correction, and vintage textures.

I hope you’ve enjoyed this tutorial, and feel free to contact me for any help with the tutorial.

