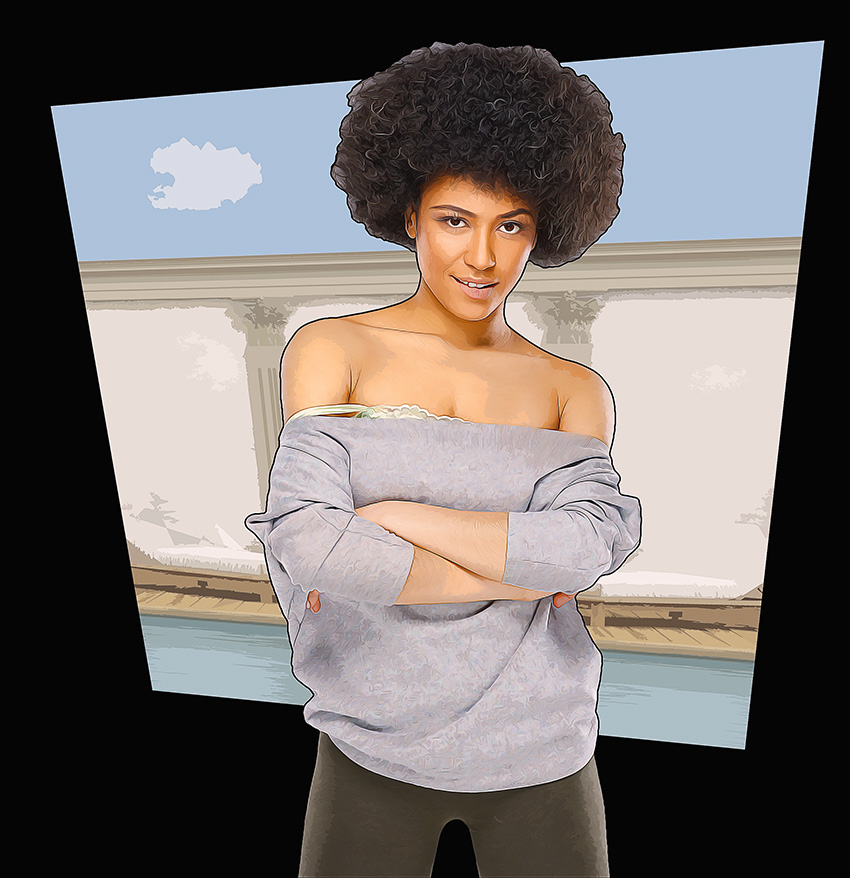
In this tutorial, you will learn how to create an amazing photo effect inspired by the Grand Theft Auto V video game art style. I will explain everything in so much detail that everyone can create it, even those who have just opened Photoshop for the first time.
The effect shown above is the one I will show you how to create in this tutorial. If you would like to create the even more advanced effect shown below that you can also animate if you want, using just a single click and in only a few minutes, then check out my Grandiose 3 Photoshop Action.

What You’ll Need
To recreate the design above, you will need the following resources:
1. Let’s Get Started
Step 1
First, open the photo that you want to work with. To open your photo, go to File > Open, choose your photo, and click Open. Now, before we get started, just check a couple of things:
- Your photo should be in RGB Color mode, 8 Bits/Channel. To check this, go to Image > Mode.
- For best results, your photo size should be 2000–4000 px wide/high. To check this, go to Image > Image Size.
- Your photo should be the Background layer. If it is not, go to Layer > New > Background from Layer.

Step 2
Now we need to expand the canvas on the top so we have more space around the subject on this side. Go to Image > Canvas Size and use the settings below:

2. How to Select the Subject
Step 1
In this section, we are going to make a selection of our subject and then copy the subject to a separate layer. Choose the Quick Selection Tool (W) and select the background of the photo. Use the Shift-Alt buttons on your keyboard to add or subtract areas from the selection. After you’ve made a perfect selection, press Control-Shift-I on your keyboard to invert the selection.

Step 2
Now go to Select > Modify > Smooth and set the Sample Radius to 5 px. Then, go to Select > Modify > Contract and set Contract By to 1 px. After that, go to Select > Modify > Feather and set the Feather Radius to 1 px.

Step 3
Press Control-J on your keyboard to create a new layer using the selection, and name this layer Subject.

3. How to Create the Background
Step 1
In this section, we are going to create the background. Select the Background layer, go to Layer > New Fill Layer > Solid Color to create a new solid color fill layer, name it Background Color, and choose the color #000000 as shown below:

Step 2
Now go to File > Place Embedded, select the image from the second stock image link, and click Place. Then, set the Width and Height of the texture to 180% as shown below, and name this layer Background Image.

Step 3
Right-click on this layer and choose Rasterize Layer. Then, go to Filter > Filter Gallery > Artistic > Cutout, and set the Number of Levels to 8, Edge Simplicity to 10, and Edge Fidelity to 3.

Step 4
Now press Control-A on your keyboard to make a selection of the whole canvas. After that, go to Layer > Layer Mask > Reveal Selection to add a layer mask that reveals the selected area of the photo.

Step 5
Right-click on the layer mask and choose Apply Layer Mask. Then, press Control-T on your keyboard, Right-click anywhere inside the canvas, choose Distort, and transform this layer as shown below:

Step 6
Go to Layer > New Adjustment Layer > Hue/Saturation to create a new hue/saturation adjustment layer and name it BI_Saturation/Brightness.

Step 7
Now press Control-Alt-G on your keyboard to create a clipping mask. Double-click on this layer thumbnail and, in the Properties panel, set the Saturation to -40 and Brightness to +20 as shown below:

4. How to Create the Subject Art Style
Step 1
In this section, we are going to create the subject art style. Select the Subject layer, go to Filter > Sharpen > Unsharp Mask, and set the Amount to 500%, Radius to 1 px, and Threshold to 0 levels.

Step 2
Now go to Filter > Stylize > Diffuse and set the Mode to Anisotropic.

Step 3
Go to Filter > Stylize > Oil Paint, set the Stylization to 2 and Cleanliness to 10, and uncheck the Lighting.

Step 4
Now go to Filter > Sharpen > Unsharp Mask, and set the Amount to 100%, Radius to 3 px, and Threshold to 0 levels.

Step 5
Go to Filter > Stylize > Diffuse and set the Mode to Anisotropic.

Step 6
Go to Filter > Sharpen > Unsharp Mask, and set the Amount to 100%, Radius to 1 px, and Threshold to 0 levels.

Step 7
Go to Filter > Noise > Reduce Noise and use the settings below:

Step 8
Now go to Filter > Blur > Surface Blur, and set the Radius to 2 px and Threshold to 15.

Step 9
Press Control-J on your keyboard to duplicate this layer. Then, go to Filter > Filter Gallery > Artistic > Cutout, and set the Number of Levels to 8, Edge Simplicity to 3, and Edge Fidelity to 3.

Step 10
Now change the Opacity of this layer to 25% and name it Subject_Adjustment.

Step 11
Control-click on this layer thumbnail to make a selection of this layer. Then, go to Select > Modify > Smooth and set the Sample Radius to 5 px.

Step 12
Now go to Layer > New > Layer to create a new layer, and name it Subject Stroke.

Step 13
Choose the Rectangular Marquee Tool (M), set the foreground color to #000000, Right-click anywhere inside the canvas, and choose Stroke. Set the Width to 4 px, Location to Outside, Mode to Normal, and Opacity to 100%.

Step 14
Choose the Rectangular Marquee Tool (M) again, set the foreground color to #000000, Right-click anywhere inside the canvas, and choose Stroke. This time, set the Width to 2 px, Location to Center, Mode to Normal, and Opacity to 100% as shown below:

Step 15
Press Control-D on your keyboard to deselect the selection.

5. How to Make the Final Adjustments
Step 1
In this section, we are going to make final adjustments to the design. Go to Layer > New Adjustment Layer > Photo Filter to create a new photo filter adjustment layer, and name it Photo Tint.

Step 2
Now Double-click on this layer thumbnail and, in the Properties panel, set the Filter to Orange and Density to 15% as shown below:

Step 3
Press D on your keyboard to reset the swatches, go to Layer > New Adjustment Layer > Gradient Map to create a new gradient map adjustment layer, and name it Overall Contrast.

Step 4
Now change the Blending Mode of this layer to Luminosity and set the Opacity to 28%.

Step 5
Go to Layer > New Adjustment Layer > Vibrance to create a new vibrance adjustment layer and name it Overall Vibrance/Saturation.

Step 6
Now Double-click on this layer thumbnail and, in the Properties panel, set Vibrance to +31 and Saturation to +20.

Step 7
Go to Layer > New Adjustment Layer > Levels to create a new levels adjustment layer and name it Overall Brightness.

Step 8
Now Double-click on this layer thumbnail and, in the Properties panel, enter the settings below:

Step 9
Press Control-Alt-Shift-E on your keyboard to make a screenshot, and then press Control-Shift-U to desaturate this layer. Then, go to Filter > Other > High Pass and set the Radius to 2 px.

Step 10
Now change the Blending Mode of this layer to Hard Light and name it Overall Sharpening.

You Made It!
Congratulations, you have succeeded! Here is our final result:

If you would like to create the even more advanced effect shown below, which you can also animate if you want, using just a single click and in
only a few minutes, then check out my Grandiose 3 Photoshop Action.
Using this action, you can transform your photos into amazing GTA inspired art style
with no work at all! Simply fill in your subject with a color and just
play the action. It’s really that simple! The action will do all the
work for you, leaving you fully layered and customizable results. The action also creates 20 preset color looks that you can choose from.
There are also 16 background shape actions, an action to add more elements to the design, an action to create a GTA inspired text effect using your own text, and an action to animate the results included!
It comes with a detailed video tutorial that demonstrates how to use the action and customize the results to get the most out of the effect.
You may also like:
-
![]()
In this tutorial you will learn how to create an amazing text effect inspired by the Grand Theft Auto video game. It’s suitable for Photoshop beginners.
-
![]()
In this tutorial you will learn how to create an amazing, artistic effect inspired by art style of the Grand Theft Auto video game, using Adobe Photoshop.

