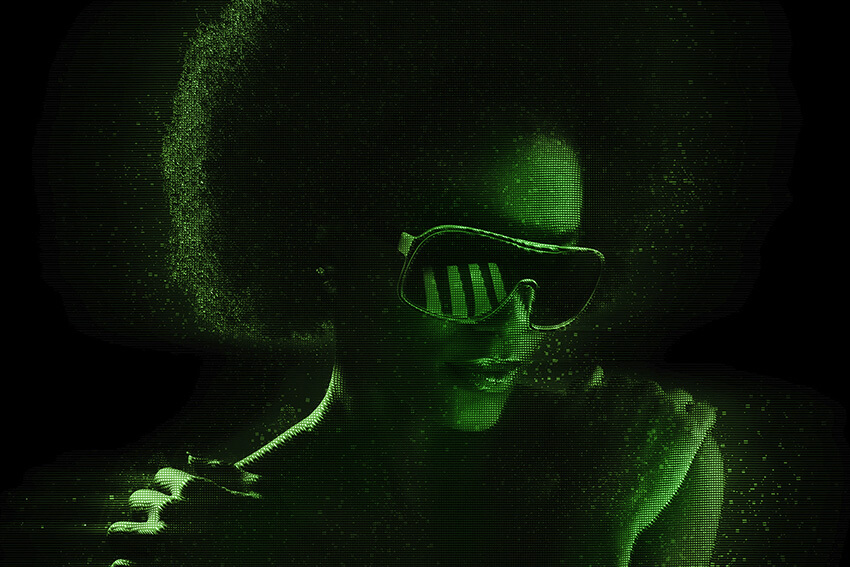
In this
tutorial, you will learn how to make Photoshop portrait actions to create your own Matrix
effects.
I will try
to explain everything in so much detail that everyone can create it, even those
who have just opened Photoshop for the first time.
If you want
to create this Photoshop effects in a single click, giving your portraits a colorful photo effect, you may be interested in this Pixels Photoshop Action from my portfolio on GraphicRiver. With it, you can add an awesome Pixels special effect for pictures in just a few seconds.

What You’ll
Need
To recreate the design above,
you will need the following portrait photo:
1. How to Add a Pattern and Brush to
Photoshop
Step 1
Go to Edit > Presets > Preset Manager… In
the Preset Manager window,
select Preset Type: Patterns and
click Load…
Browse and
select the Matrix.pat file that came with the downloadable
attachment. Then, click Done.
Step 2
Go to Edit > Presets > Preset Manager… In
the Preset Manager window,
select Preset Type: Brushes and
click Load…
Browse and
select the Matrix.abr file that came with the downloadable
attachment. Then, click Done.

2. How to
Set Up Your Document
Step 1
First, open
the photo that you want to work with. To open your photo, go to File > Open, choose your photo, and click Open. Now, before we get started, just check a
couple of things:
- Your photo should be in RGB Color mode, 8 Bits
color. To check these settings, go to Image
> Mode. - Make sure your first layer is the Background layer. If not, go to Layer > New > Background from Layer.
- For
best results, your photo size should be 2000–5000 px wide/high. To check this, go to Image > Image Size.

Step 2
Add a New
Layer above the Background layer. Name
the new layer brush.
Now choose
the Brush Tool (B), pick a soft brush, adjust
the size of the brush, and brush over your main subject. You can use any color;
it doesn’t matter.

3. How to Create the Action
Once our images are placed,
we are ready to start recording our action. We’ll put it in a separate set for
easier management.
Step 1
Go to Window
> Actions or press F9 on the
keyboard to open up the Actions panel. Then, click
the Create new set icon, name the set Matrix
Action, and click OK. We’ll place the action
inside this set.

Step 2
Click the Create
new action icon and name it Matrix. Click Record to
start recording all the subsequent steps in Photoshop.
From this point onwards,
everything you do will be recorded, so please be careful and keep an eye on
the Actions panel. If you make a mistake, click the Stop playing/recording icon, and Delete the
unnecessary step from the Matrix action. Then click the Begin
recording icon again to continue.

4. How
to Create a Displacement Map
Step 1
Hide the brush layer
by toggling the eyeball icon off. Then, press D on
the keyboard to reset the swatches.

Step 2
Select the Background
layer, go to Layer > New > Layer via Copy (Control-J), and then go to Image > Adjustments > Desaturate (Control-Shift-U)
to desaturate this layer.
Go to Filter >
Blur > Gaussian Blur and set it to 4 px.
After that, go to File >
Save As… (Shift-Control-S) and save our
texture as a PSD file. We will need this file in the next steps.

Now you can
remove this layer, so go to Layer >
Delete > Layer.
5. How to Create Horizontal Blurred Lines
Step 1
With the brush layer
selected, right-click on the layer thumbnail, and hit Select
Pixels. Then select the Background layer
and go to Layer > New Fill Layer > Pattern and select the Matrix pattern, set the
scale to 50%, and click OK.

Step 2
Click on this layer mask
thumbnail and go to Filter > Blur > Gaussian Blur…, set the Radius to 25 px, and click OK.

Step 3
Click on
this layer thumbnail, and then go to Select
> Color Range…, select Shadows, and click OK.

Click on the layer
mask and go to Edit > Fill… >
Black and click OK. Now go to Select > Deselect (Control-D).
Step 4
Go to Layer
> Smart Objects > Convert to Smart Object.

Step 5
With the Pattern
Fill 1 layer selected, right-click on the layer
thumbnail, and hit Select Pixels. Then select the Background layer
and press Control-J to Copy the
selection into a New Layer.
Go to Layer >
Rename Layer… to rename the new layer Matrix Pattern.
Now you can remove the Pattern Fill 1
layer, so select the layer and go to Layer
> Delete > Layer.

Step 6
Now make two
copies of the Matrix Pattern layer. Select the layer and go to
Layer > New > Layer Via Copy, repeat the process, and
name the new layers Blurred Lines 1 and Blurred Lines 2.
Drag the Matrix
Pattern layer to the top of the layers in the Layers
panel.

Step 7
With the Blurred Lines 1 layer selected, go to Filter > Blur > Motion Blur… and
enter the settings below:

Step 8
Select the Blurred Lines 2 layer, go to Filter > Blur > Motion Blur…, and
enter the settings below:

6. How to Apply the Displace Filter
Select the Matrix Pattern layer and go to Filter > Distort > Displace… and
use the following settings: Horizontal Scale: 10; Vertical Scale: 10; Stretch To
Fit, then
select our PSD file.

7. How to Create a Pixels Stroke
Step 1
Now we are
going to add a nice floating pixels effect. Go to Layer > New >
Layer to create a new layer and name it Dots.
Then select the brush layer, right-click
on the layer thumbnail, and hit Select Pixels.

Step 2
Select
the Dots layer, Right-click the layer, and choose Create Work
Path. Set the Tolerance value to 1 px and click OK.

Step 3
Choose the Brush Tool (B)
and select the Matrix brush. Then choose the Pen Tool (P), Right-click
the layer, and select Stroke Path using
the Brush Tool. Repeat this
step once again to add more dots.

Step 4
Now we can delete the path. Right-click the layer and choose Delete Path. Change the Blending Mode to
Soft Light.

Go to Image > Adjustments > Invert to invert the dots’ color.
8. How to Create the Background
Select the Background
layer and go to Layer > New Fill Layer > Solid Color to
create a new solid color fill layer, name it Background Color,
and set the color to #000000 as shown below:

9. How to Make the Final Adjustments
Step 1
With the Background layer selected, go to Layer > New
> Layer Via Copy to duplicate the Background
layer and then drag that new layer to the top of the layers in the Layers
panel.
Change the Blending Mode to Hard Light
and drop the Opacity to about 50%.

Step 2
Go to Layer >
New Adjustment Layer > Brightness/Contrast and set
the Brightness to 30 and the Contrast to 35.

Step 3
Go to Layer >
New Fill Layer > Solid Color to create a new solid color fill
layer, name it Background Color, and set the color to #3ab02e as shown below:

Step 4
Change the Blending Mode to
Color.

10. Finish Recording the Action
Finally, we have our action
finished. Hence, in the Actions panel, hit the Stop button
to stop the recording.

You’re Done!
Now that you have this cool photo effect action, you can easily create stunning images in seconds.
I hope that you’ve learned
something useful for your future projects.

If you would like to create
an image effect as shown below, using a single click in just a few seconds, then
check out my Pixels Photoshop Action.

If you liked this color effect for pictures, you might like these: