If you’ve ever thought about creating pixel art, here’s a very quick and easy introduction to one of the most fundamental aspects of it: characters.
We’ll be creating an extremely simple character, but although it will be simple, it will still allow a decent amount of detail, so it will work fine as an avatar for yourself or for representing your favorite movie or TV characters or celebrities.
Can’t think of any inspiration? Perhaps work from a stock image from Envato Market.
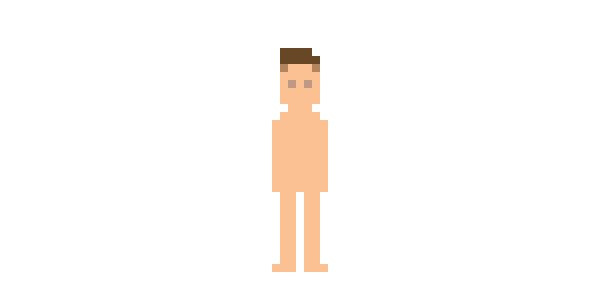
1. Create the Character’s Body
Usually I’d recommend starting with the head, and that’s still a viable starting point, but since this character will be so simple and its proportions will be somewhat realistic, the body will be an equally good place to start.
You’ll need to create a new file in Adobe Photoshop. It could be 100 px by 100 px; the character I made is only 28 px tall.
Step 1
Let’s define a skin color. This is 25˚ in Hue, 40% Saturation and 98% Brightness, but choose what works for you.

Step 2
We’re going to be working with the Pencil Tool with a 1 px point size and under a nice amount of zoom, like 800%.
With our newly created color, draw the legs, which will be 2 px across with one blank pixel between each leg… this’ll work fine unless you’re doing a chubbier character.
The dimensions of the legs will help us define the rest of the character.

You may want to try your own dimensions/proportions, rather than just follow mine, to find what you like best. But if you want your character to look just like mine, then the legs above are 9 px tall, and so is the torso.
Step 3
To finish the extremities, we add arms on the side; they’re simply one extra pixel on the side of the torso. We also add an extra row of pixels at the bottom of the legs with an extra pixel on each side for the feet.
I also added a row of pixels for the shoulders. It’s a little odd to call the shoulders’ corners “rounded” but those missing pixels do give a more rounded—and thus more natural—look in the end.

Step 4
Finally we add the head, also with some “rounded” corners. I made it as wide as the torso and 7 px tall.

2. Add Facial Features
Our character will be very minimal, limited by its small size, but we’ll still be able to add some detail.
Step 1
There’s just enough space on the face to add a pair of eyes.
I chose to make them a slightly darker (about 15% darker) shade than the skin tone. I didn’t want to have too much contrast there as I didn’t think that we should be able to see eye color on such a small resolution.

Step 2
Let’s add some hair. I used a dark brown shade and added an extra row of pixels, so the head grew in size a little bit, because of the hair.

Step 3
Add a bit of hair on the sides of the head. I used a lighter color as if it’s either short or antialiased. To add this color I lowered the Opacity of the Pencil Tool to 50%, which can be done easily by pressing the number 5 while the Pencil Tool is on. Just remember to return it to 100% afterwards (you can press the number 0.) And finally I gave my character a little bit of a pompadour hairdo.
3. Add the Clothes
The clothes will be where we can do most of our customization. This style benefits from not using up any pixels on outlines, so even if the character is tiny, it allows plenty of detail.
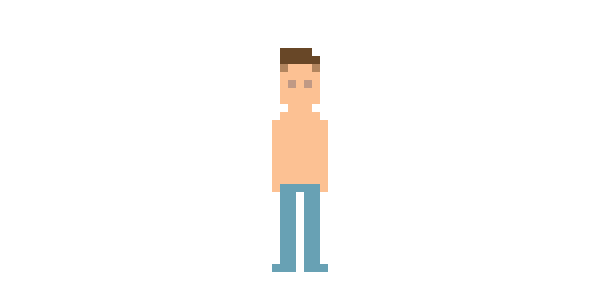
Step 1
Let’s get some pants on the character. The shade here is a low-saturation aquamarine, which I’m using to represent blue jeans. To try variations on colors, I usually Copy the area I’m coloring to a New Layer and open the Hue/Saturation/Lightness panel (Image > Adjustments > Hue/Saturation…) and move the sliders on that panel until I like the result.
Step 2
Add some shoes. I’ll make them sneakers and they’ll be almost white; there’s really not much room to give these detail.
I won’t make them white because I’ll leave the background white. A downside of not using outlines is that if the background and foreground colors are the same, some detail can get lost.

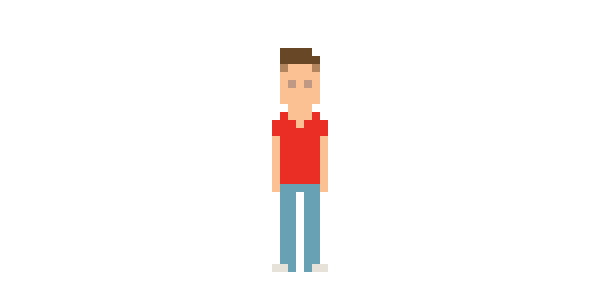
Step 3
Give the character a shirt. I liked how this color went with the pants color. I made the shirt with short sleeves and a V-neck.
Step 4
As I said before, you can add a decent amount of detail—maybe a tie or some graphic in the middle of the shirt. I added some (low contrast) stripes.

Step 5
And finally another layer of clothes: a jacket. If you want, you could also give the character accessories like a vest or a wristwatch or headphones.

4. Shade the Character
Now that all character and clothes details are done, we add a touch of shading that corresponds to the different volumes of the character.
Step 1
Create a New Layer and in it draw your shadows in black.
Some of the shadows here correspond to the head casting a shadow over the neck and to the jacket casting a shadow over the shirt. The rest just correspond to the volumes of the character; the legs aren’t flat, so shading one side conveys extra volume, and the same goes for the right side of the torso.
The arms, I thought, were too small to shade.
Step 2
And to apply the shading, just lower the Opacity of the layer to 15% or somewhere around there. You can do that in the Layers panel or also by pressing 15 on the keyboard, while the Move Tool is selected.

You can then Merge Down (Layer > Merge Down) and export your graphic.
Seen at 100%, the character might be too small to appreciate. So you can Select it, Copy it and Rescale it to 200% or 300% (Edit > Free Transform) with Interpolation set to Nearest Neighbor.
Then Save, preferably as a PNG or GIF, and you’re done!
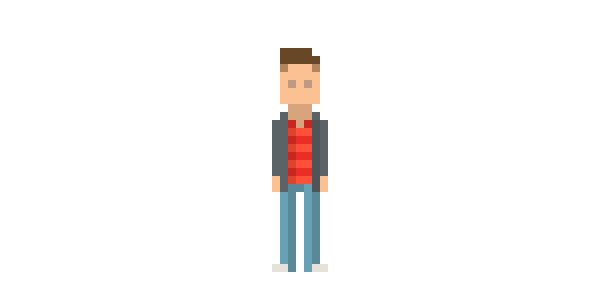
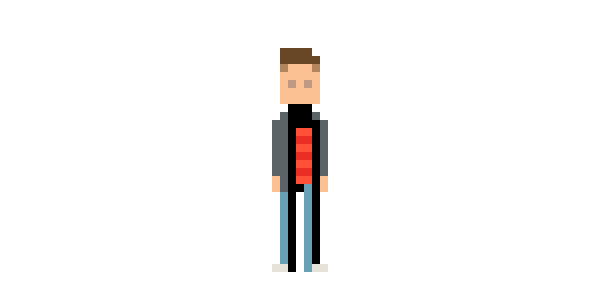
Awesome, Character Complete!
Congratulations! You’ve finished the pixel character.
Of course, now you can make more of these, or tackle something like your favorite rock band or a group of characters you like from TV or film, or pixel yourself or your friends, etc.
