Step 25
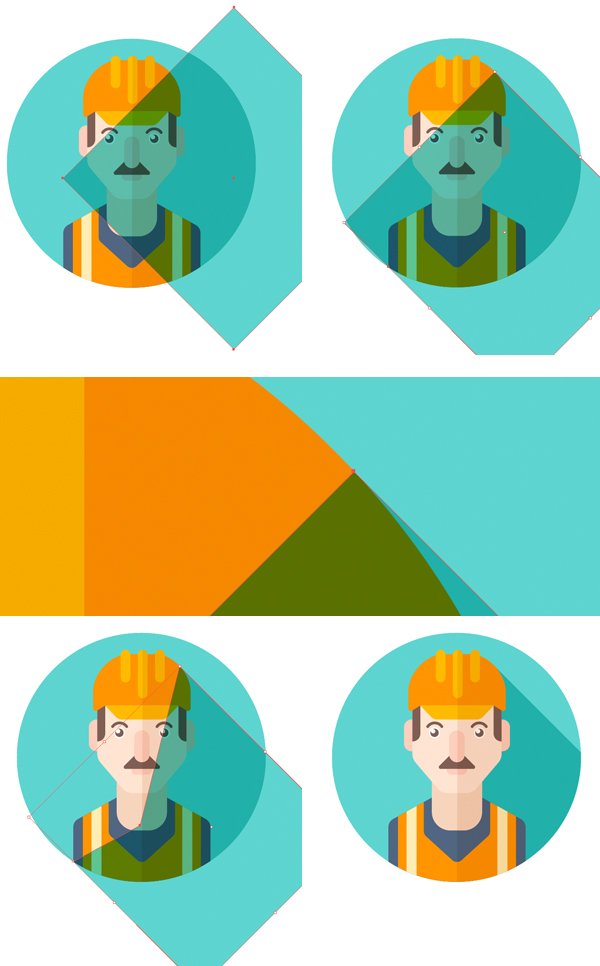
And the last stroke here will be a long, flat-style shadow! Take the Rectangle Tool (M) and make a large rectangle. Switch it to Multiply mode or lower the Opacity to make the shapes beneath it visible. Hold Shift and rotate the shape 45 degrees.
Now you need to make the rectangle fit the silhouette of our worker. Stick its anchor points to the edges of the character. Make additional anchor points with the Pen Tool (P) and move them with the Direct Selection Tool (A), hiding the unneeded parts of the rectangle inside the man’s figure.
When you’re happy with the result, place the shadow inside the Clipping Mask, hiding it beneath the worker (use the Layers panel to drag the shape inside the Mask).
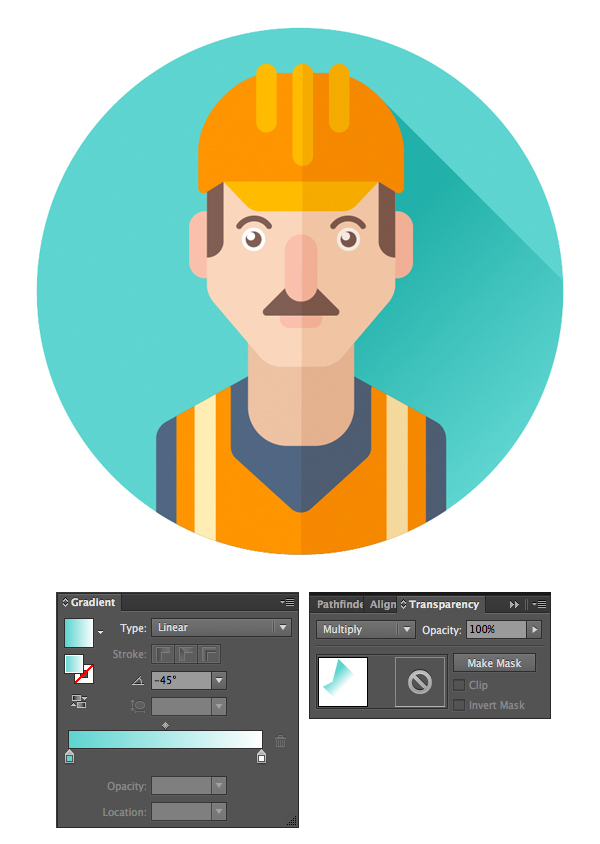
Finally, apply a linear gradient from turquoise to white to the shadow and place it diagonally, using the Gradient Tool (G). Switch the shadow to Multiply mode, making it blend with the background.
And done! Our first profession avatar is ready! Let’s move to the next one!
2. Create a Surgeon Avatar
Step 1
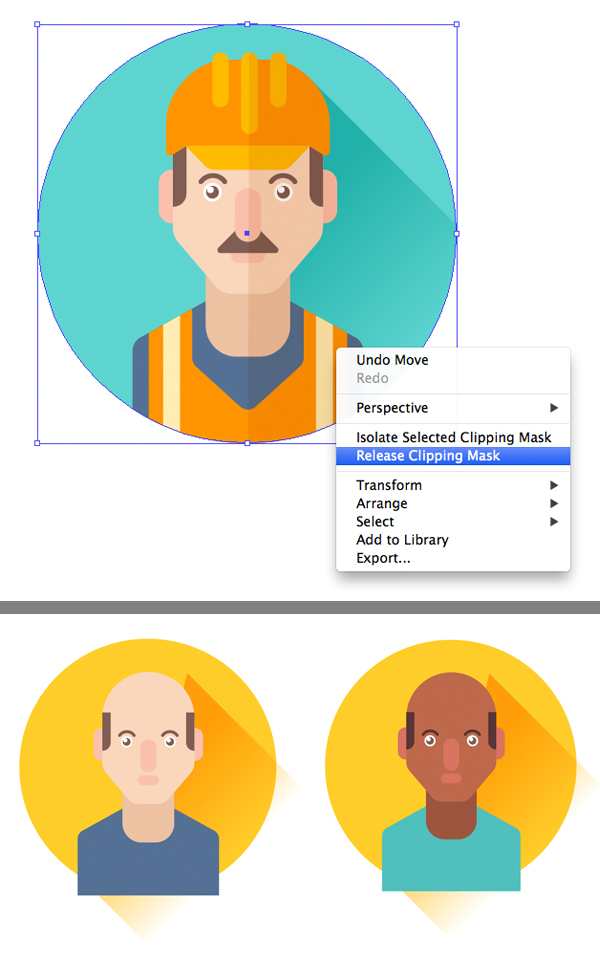
Our next avatar will be a portrait of a surgeon with dark skin tone. We’ll be using the avatar of the worker as a base for the second portrait, so let’s duplicate it, right click and Release Clipping Mask.
Delete the helmet, moustache and the orange worker’s uniform, and recolor the icon base and shadow to yellow colors. Proceed with recoloring the elements, changing the color of the clothes to turquoise and the skin tone to a darker chocolate color. Change the color of the hair and eyebrows to darker brown as well.
Step 2
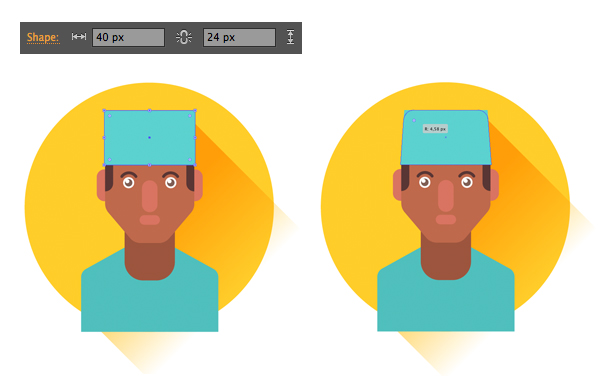
Let’s add a medical hat to our surgeon. Use the Rectangle Tool (M) to make a 40 x 24 px rectangle. Move the upper side anchor points a bit closer to each other, using the arrow keys of your keyboard and making the top of the hat a bit narrower. Use the Live Corners feature to make the upper corners rounded.
Step 3
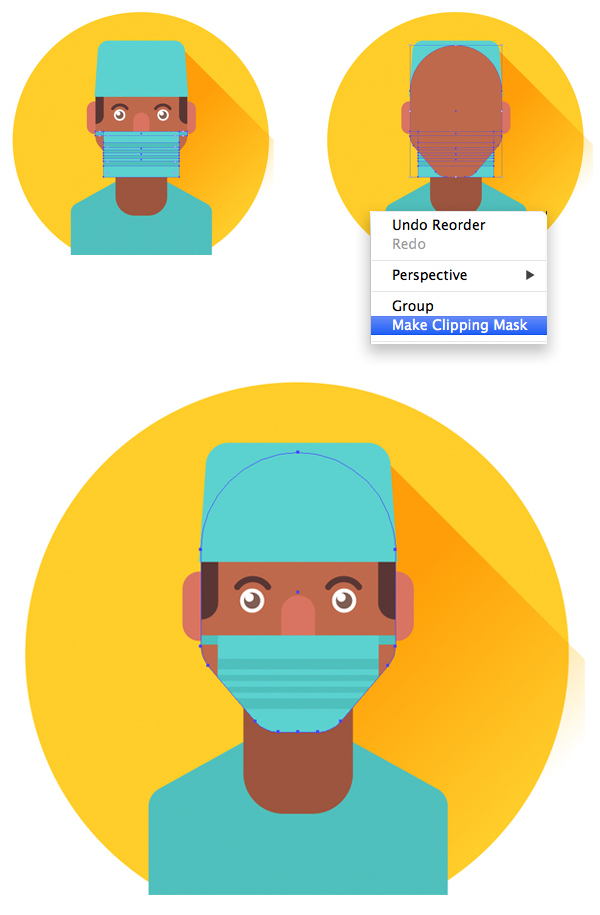
Let’s create a simple surgeon’s mask. Make a 33 x 20 px rectangle. Add a group of darker horizontal stripes above the mask, making it more detailed. And, finally, place a narrow string at the top of the mask and Send it to Back (Shift-Control-[).

Step 4
Now place the mask above the surgeon’s face and let’s hide the unneeded pieces. Duplicate the base of the face and Bring it to Front (Shift-Control-]), placing it above the mask (you may need to drag the copy outside the face group if you’ve grouped the face previously). Select both the face copy and the mask, right click and Make Clipping Mask.
Great! Now it fits the face perfectly.
Step 5
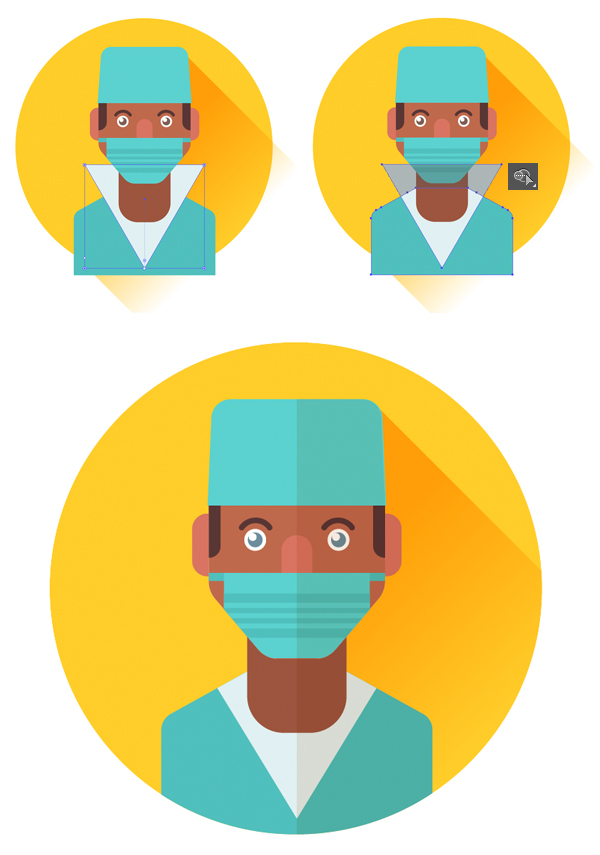
Let’s finish up with the surgeon’s avatar by adding a final detail to his uniform. Use the Polygon Tool to make a triangle and rotate it, turning the shape upside down. Fill the shape with light-grey color. Select both the turquoise shirt and the white triangle and use the Shape Builder Tool (Shift-M) while holding Alt to delete the pieces outside the body, forming a nice V-shaped neck-band.
Darken the right part of the character with the help of a semi-transparent shape in Multiply mode, and hide all parts inside a round Clipping Mask.
We’re ready to move on!
3. Draw a Flight Attendant Avatar
Step 1
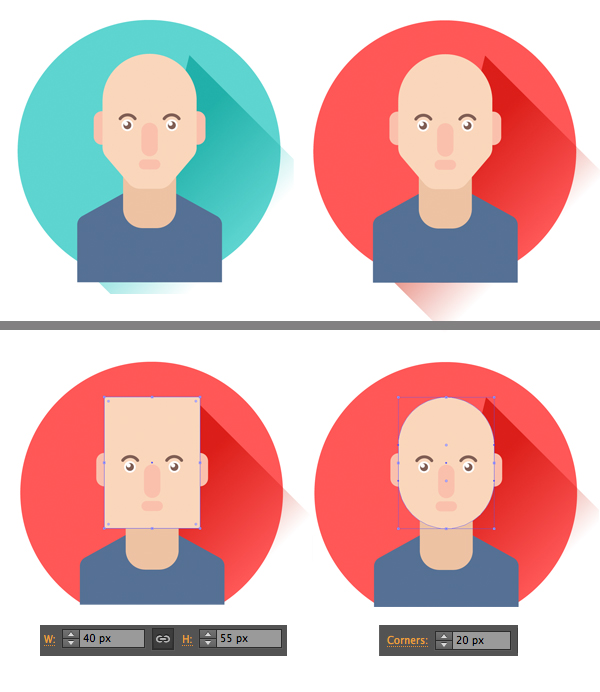
Now it’s time to draw a flight attendant portrait! We won’t be making it from scratch, so let’s transform the first figure instead. Duplicate the worker’s icon and make the base for our future avatar by releasing the Clipping Mask and deleting all the unneeded elements. Recolor the circle icon base to a gentle red color.
The shape of the face seems to be too angled for our new character, so let’s make a new one. Make a 40 x 55 px rectangle and use the Live Corners feature to make the corners fully rounded.
Step 2
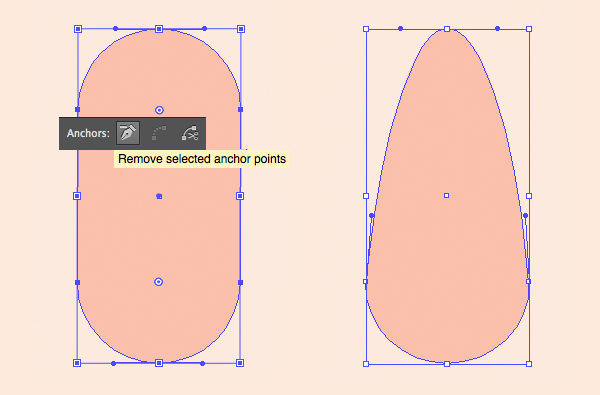
Let’s make the nose shape thinner. Select the two side anchor points at the upper part of the nose and delete them using the Remove selected anchor points function in the upper control panel. This will make the upper part of the nose look more delicate.
Step 3
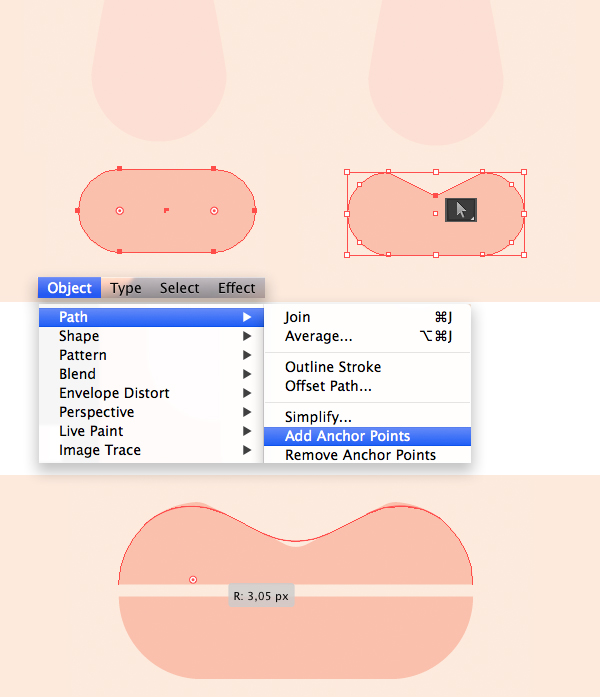
Now let’s move on to the lips. Go to Object > Path > Add Anchor Points. Select the new anchor point in the middle of the upper lip and drag it down using the Direct Selection Tool (A). Use the Live Corners feature to make the shape of the lips more flowing and smooth. And split the lips apart, using the Scissors Tool (C) by clicking the side anchor points.
Step 4
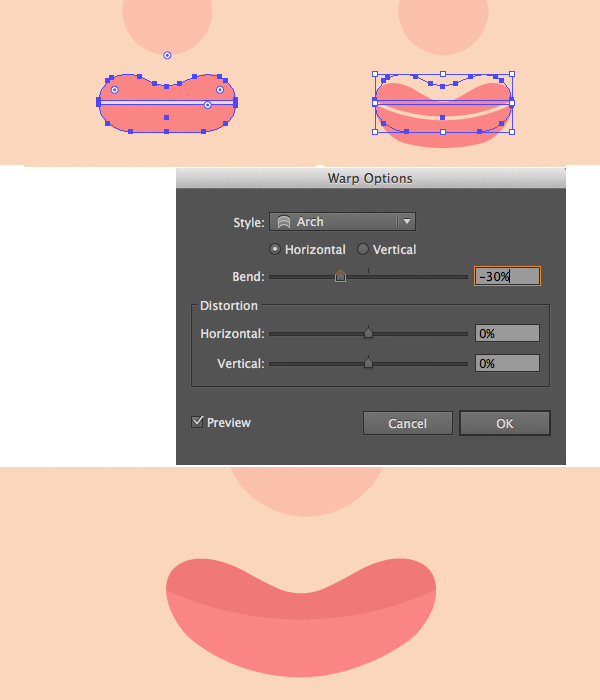
Make the lips brighter, increasing the saturation of the pink color, and let’s make the shape slightly arched. Group (Control-G) both halves of the lips and go to Effect > Warp > Arch. Set the Horizontal Bend value to -30%. Click OK and Object > Expand Appearance to apply the effect, making the mouth smiling. You can also make the upper lip a bit darker in order to separate it from the lower lip, making the mouth more true to life.
Step 5
We’re going to make our woman blonde, so let’s recolor her eyes and brows accordingly. We can also add a thin arched stroke for the eyelashes, making it the same way as we made the brows.
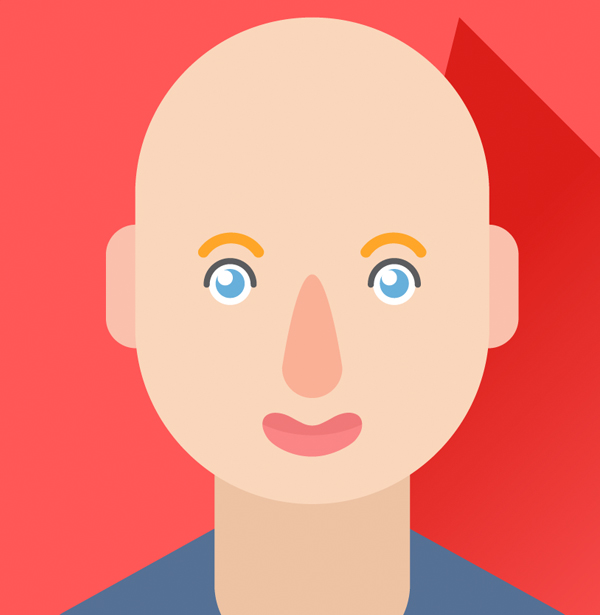
Now let’s form a neat hairdo. Take the Ellipse Tool (L) and place two ellipses above the forehead, making them overlap. Unite the ellipses in the Pathfinder. Use the Shape Builder Tool (Shift-M) to delete the unneeded piece above the head, making the hair slick and tidy.
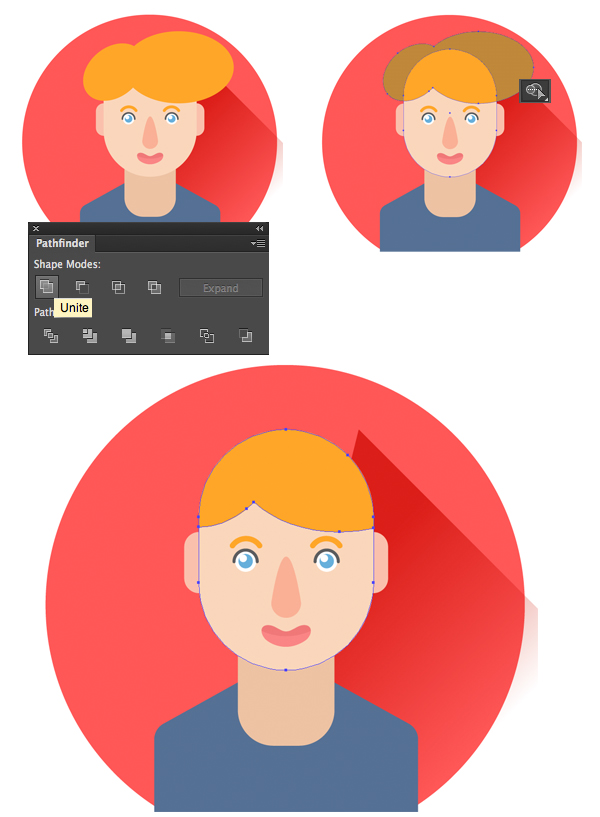
In order to make the character look more subtle, let’s make the neck thinner and more rounded. And we can also modify the face a bit by making it thinner and adding a gentle round blush on the cheeks.

Step 6
Now let’s render the uniform of our flight attendant! We’ll be using the dark-blue shirt base that we already have and just adding more distinctive details. Let’s turn the shirt into a stylish jacket.
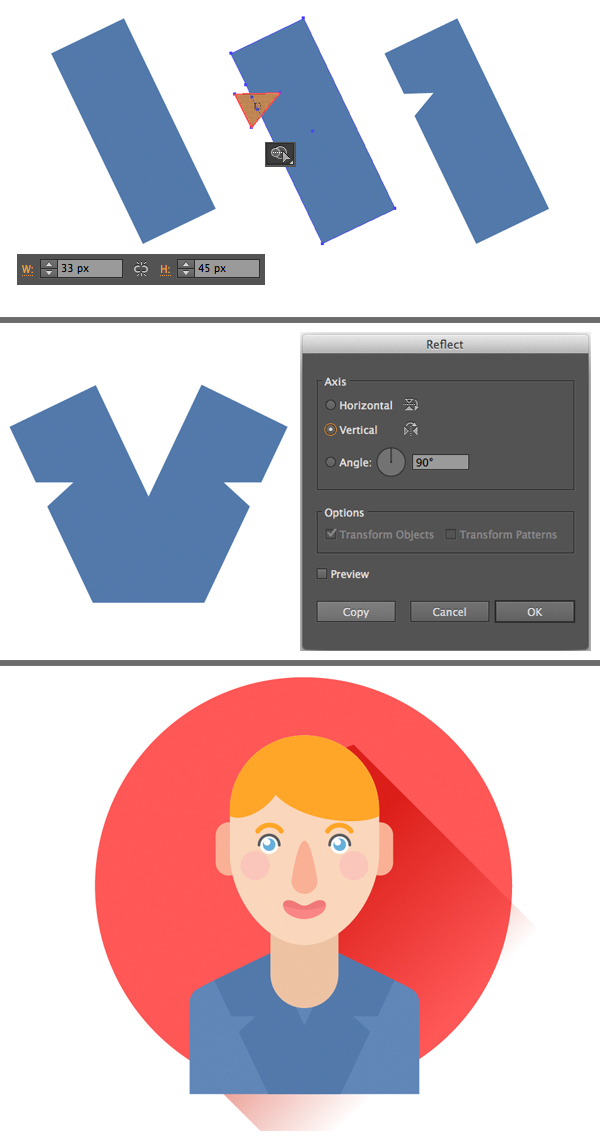
Take the Rectangle Tool (M) and make a 33 x 45 px stripe. Rotate it to about 45 degrees and let’s make a cutout notch closer to its top. Place a tiny triangle, overlapping the main shape. Use the Shape Builder Tool (Shift-M) while holding down Alt to cut out the triangle.
Use the Reflect Tool (O) to make a mirrored copy of the created shape, forming a lapel. You can erase the unneeded pieces in the bottom part using the Eraser Tool (Shift-E) or the Shape Builder Tool (Shift-M) after you place it above the jacket.
Step 7
Form a collar of the white shirt, combining three triangles and making one of the corners of each shape slightly rounded.

Step 8
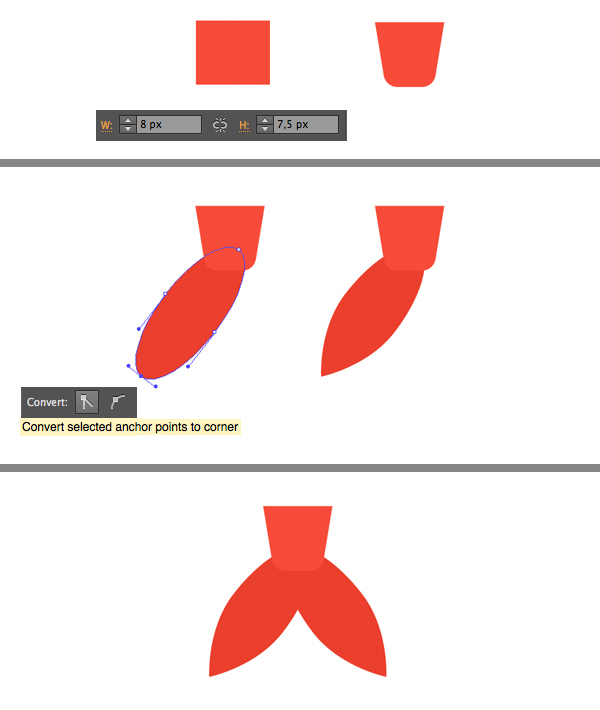
Now we need to render a small red tie, making a distinctive mark of the airlines. Start by making a small 8 x 7.5 px rectangle. Move its bottom anchor points closer to each other, using the arrow keys and making the bottom of the shape narrower. Make those bottom corners rounded, forming the knot of our tie.
Now take the Ellipse Tool (L), make a squashed shape and rotate it about 45 degrees. Select the bottom anchor point, head to the upper control panel and click the Convert selected anchor points to corner button, making the shape pointed. Flip the copy of the shape to the opposite side, making the tie look complete.
Step 9
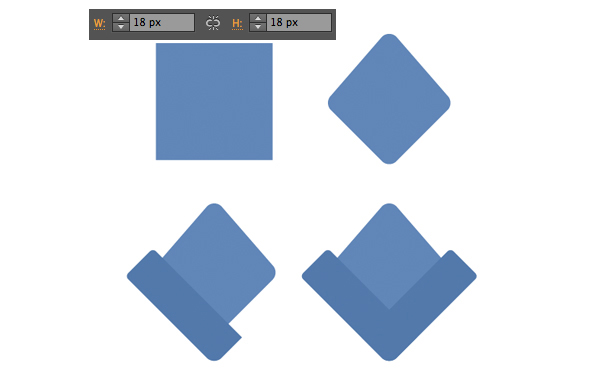
Let’s move to the next element of the flight attendant’s uniform: the cap. Make an 18 x 18 px square of the same dark-blue color as the jacket. Rotate it 45 degrees and squash it a bit, making a diamond shape. Make the corners rounded with the Live Corners feature.
Make a darker blue stripe with rounded corners and attach it to the left side of the first shape. Use the Reflect Tool (O) to flip the copy of the shape horizontally, forming the folding of the cap.
Step 10
Shape a golden airlines emblem, depicting a winged medal from a 4 x 4 px circle, and a group of rounded rectangles for the feathers. Attach the emblem to the cap, aligning it to the center.
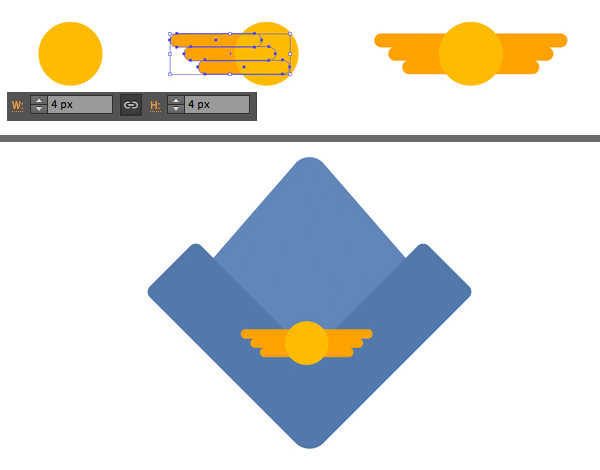
Step 11
Finally, dress up our flight attendant and finish the icon by adding a gentle shadow and hiding everything with a round clipping mask.

4. Create a Police Officer
Step 1
We’ll be using the base of our stewardess avatar, changing her skin tone to a nice chocolate color and the hair to dark brown. Let’s also switch the color of the icon base to bright green.

Step 2
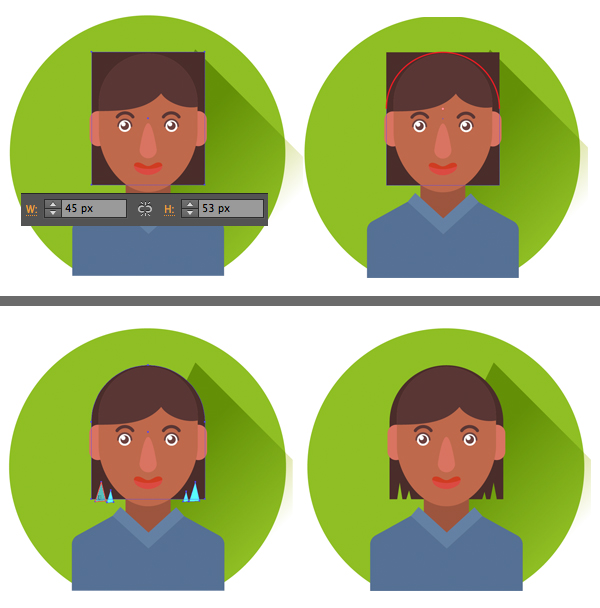
Let’s flip the hair horizontally to make it differ from the previous avatar. And let’s form a short haircut. Make a 45 x 53 px rectangle of a darker brown color and place it beneath the head. Select the upper side anchor points and make the top of the shape fully rounded.
Now let’s depict separate hair locks in the bottom. Form a few tiny triangles and place them at the bottom of the hairdo, making the shapes overlap. Use the Shape Builder Tool (Shift-M), holding down Alt to cut out the triangles.
Add a simple V-shaped collar for our shirt, forming it from two narrow rectangles.
Step 3
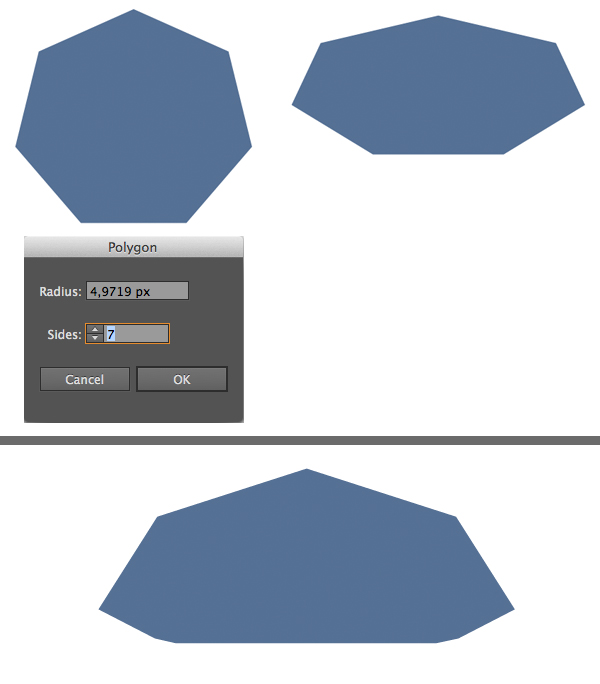
Now let’s create the hat of our police officer. Use the Polygon Tool to make a 7-sided shape about 45 x 45 px size. Squash the shape and modify its bottom part by moving the anchor points farther from each other and making the corners a bit rounded. Move the bottom points of the shape up a bit, making the bottom side flat.
Step 4
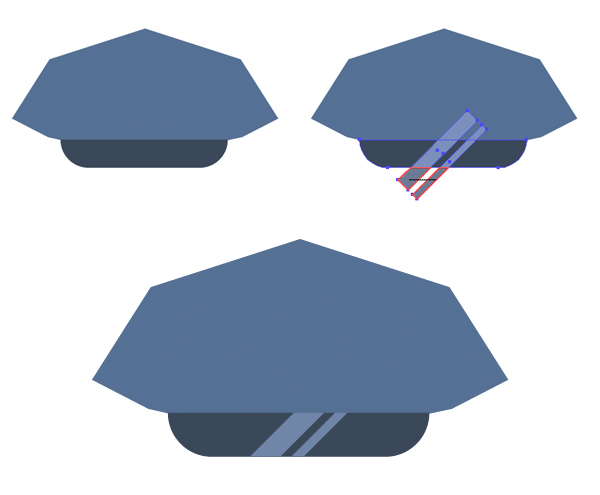
Add a narrow horizontal peak to the hat, using the Rectangle Tool (M) and making its bottom corners rounded.
Let’s make the peak glossy by adding a stylized highlight. Make two narrow stripes, rotate them 45 degrees and place them above the peak. Use the Shape Builder Tool (Shift-M) to delete the unwanted pieces outside the peak.
Step 5
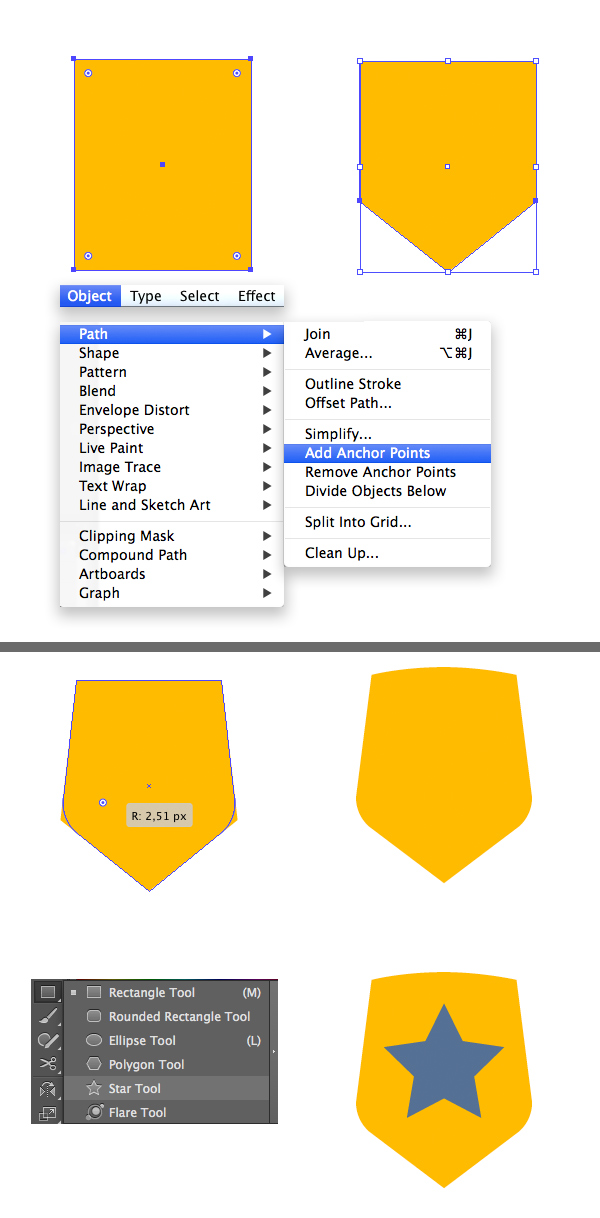
Let’s make the most important element of every police officer: the badge! Make a 10 x 13 px rectangle of a bright-yellow color. Go to Object > Path > Add Anchor Points. Select the bottom side anchor points and move them up, making the shape pointed and looking like a shield.
Use the Live Corners feature to make the sides of the shape smooth. We can also make the top of the shape slightly bend, using the Curvature Tool (Shift-‘).
Finish up with the badge by placing a star above it, using the Star Tool.
Step 6
Dress up our friendly police officer, adding a dark-grey tie and some additional details to the uniform. You can go even further and create some additional accessories, for example, bright trendy glasses, formed from two ellipses with a blue stroke.
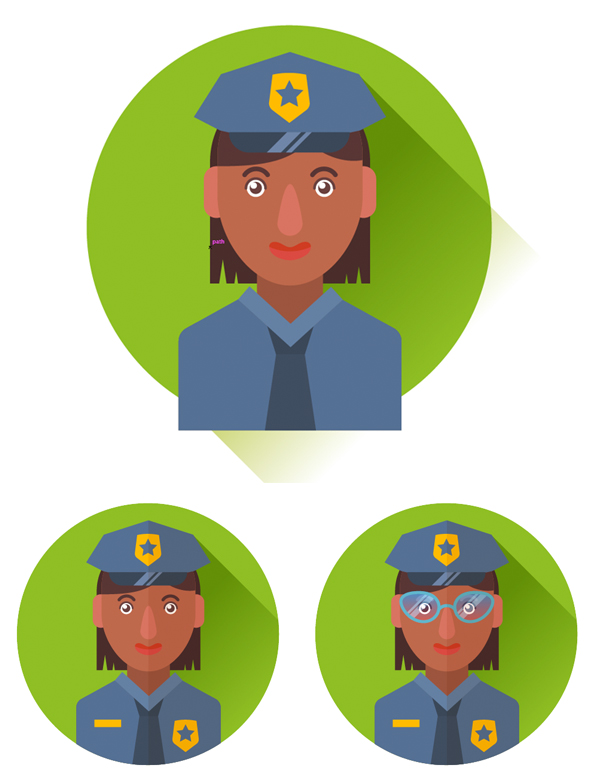
Congratulations! Our Set of Profession Avatars Is Ready!
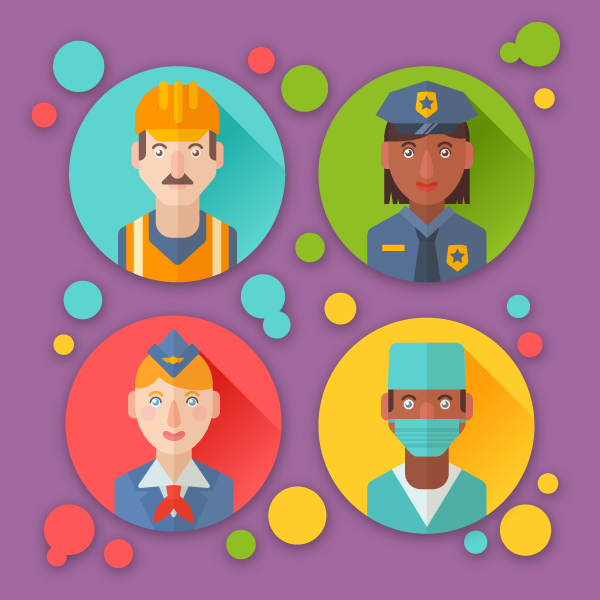
Great job! We’ve successfully created four portraits of people of different occupations that can be used either as avatars or as icons or for any other design project.
If you want to create more professions or to inspect the original file of this tutorial and see how the separate elements were made, then go ahead and get the full set of Flat Professions Avatars with 12 different occupations, each in two skin tones.
I really hope that this tutorial was helpful and you’ve discovered some new tips and tricks that will speed up your work, making it more comfortable.
Have fun and stay tuned for more!

