The JSON data format is widely used across the modern web and it is one of the most common ways to transfer data. Many modern APIs, RESTful web services in particular, support the JSON data format.
In this tutorial, I’ll be showing you how to work with the JSON data format in the Swift programming language on iOS, tvOS, watchOS, and OS X.
Prerequisites
This tutorial requires that you are running at least Xcode 7, which includes version 2 of the Swift programming language. Swift 2 has introduced a number of important additions that we’ll be using in this tutorial, such as error handling and the guard statement.
1. What Is JSON?
Like I mentioned, JSON is a commonly used data format that is used for communication between, for example, clients and servers. It is popular because of it’s usability across virtually any mobile platform such as iOS, Android, Windows Phone, and web browsers.
The following snippet is an example of the JSON data format. This is the snippet that we’ll be using in this tutorial.
{
  "dataTitle": "JSON Tutorial!",
  "swiftVersion": 2.1

  "users": [
    {
      "name": "John",
      "age": 25
    },
    {
      "name": "Mark",
      "age": 29
    },
    {
      "name": "Sarah",
      "age": 22
    }
  ],
}
As you can see, the JSON data format is easy to understand. JSON is structured using two collection types, dictionaries and arrays. Dictionaries contains one or more of key-value pairs and are enclosed by curly braces, {}. Arrays contain a list of ordered items and are enclose by square brackets, []. Almost every programming language defines these collection types, which is why JSON is supported by nearly every every language around.
The following is a list of the supported data types in a JSON object:
- String
- Number (integer, float, double, etc.)
- Boolean
- Array
- Dictionary
Part of the reason why JSON is so popular is because it is easy to read by humans and it can also be easily parsed and serialized by machines. Parsing and serializing is when the machine takes in raw data and turns that into an object useable by the application.
2. Reading JSON Data
Step 1: Create Playground
Fire up Xcode and create a new playground. Give the playground a name and set Platform to iOS.
Step 2: Add JSON Data
Open the Navigator on the left and expand the JSON playground. Right-click the Resources folder and select New File from the menu.
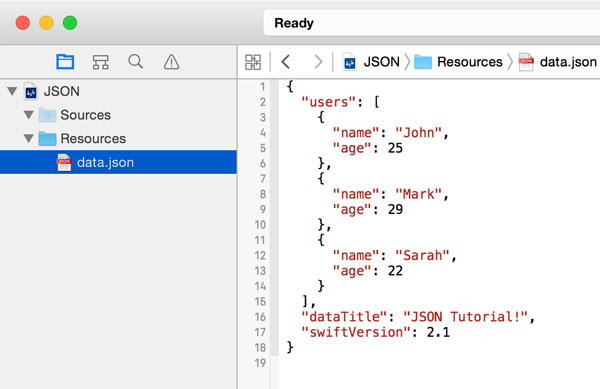
Name the file data.json and populate the file with the following JSON.
{
  "users": [
    {
      "name": "John",
      "age": 25
    },
    {
      "name": "Mark",
      "age": 29
    },
    {
      "name": "Sarah",
      "age": 22
    }
  ],
  "dataTitle": "JSON Tutorial!",
  "swiftVersion": 2.1
}
Step 3: Getting Data
Now that you have a basic understanding of what the JSON data format is, it’s time to begin working with it in Swift. Remove the contents of the playground and add the following three lines of code to it.
import UIKit

let url = NSBundle.mainBundle().URLForResource("Data", withExtension: "json")
let data = NSData(contentsOfURL: url!)
With this code, we get a reference to the JSON file we added to the playground a few moments ago and get its contents as raw data. Note that the URL we create here is a local one to the file on your computer. This could be the URL of a web service or any other URL you may need.
It’s also important to understand that the raw data of a JSON object doesn’t have to be collected in this way. The only essential part is the raw NSData object, which could come from a URL as shown in the example, an API response, or from a range of other sources.
Step 4: Parsing Data
The next step is to parse and serialize this data into an object we can use. Luckily, on iOS and OS X, the Foundation NSJSONSerialization class handles all of the hard work of parsing and serializing for you. Add the following code snippet to your playground.
do {
    let object = try NSJSONSerialization.JSONObjectWithData(data!, options: .AllowFragments)
    if let dictionary = object as? [String: AnyObject] {
        readJSONObject(dictionary)
    }
} catch {
    // Handle Error
}
We first enclose all of our logic in a do-catch statement, because the serialization from JSON data has the potential to throw an error. Next, we call the JSONObjectWithData(_:options:) method of the NSJSONSerialization class, passing in the NSData object and some options. The options that can be passed in are defined by the NSJSONReadingOptions structure:
-
AllowFragmentsThis allows for objects within the first or top level of the JSON data that aren’t arrays or dictionaries to be read. In the JSON data being used in this tutorial, this includes both thedataTitleandswiftVersionvalues. -
MutableLeavesThis option allows for strings being read from the JSON data to be automatically created as instances ofNSMutableString. This option is more relevant to Objective-C development. In Swift, you can ignore this option as strings are a built-in basic data type and are automatically mutable when defined with thevarkeyword. -
MutableContainersThis allows for arrays and dictionaries being read from the JSON data to also be mutable. As with theMutableLeavesoption, in Swift, using thevarkeyword when assigning the array/dictionary to a variable automatically makes it mutable.
Lastly, we check to see if the serialized object is of the expected [String: AnyObject] type and, if so, call the readJSONObject(_:) function. Let’s take a look at the readJSONObject(_:) method.
Step 5: Working With Data
Once the JSON data you have collected has been parsed and serialized, you can interact with it just as you would with any other dictionary. Add the following function to your playground above the do-catch statement.
func readJSONObject(object: [String: AnyObject]) {
    guard let title = object["dataTitle"] as? String,
        let version = object["swiftVersion"] as? Float,
        let users = object["users"] as? [[String: AnyObject]] else { return }
    _ = "Swift (version) " + title

    for user in users {
        guard let name = user["name"] as? String,
            let age = user["age"] as? Int else { break }
        switch age {
        case 22:
            _ = name + " is (age) years old."
        case 25:
            _ = name + " is (age) years old."
        case 29:
            _ = name + " is (age) years old."
        default:
            break
        }
    }
}
As you can see, the serialized JSON data can be interacted with in the exact same way as a regular dictionary or array. The above readJSONObject(_:) function serves as an example of how you can extract the information from a serialized JSON object. Note that I included a switch statement in the function simply to separate the strings in the playground’s output.
Once the playground has finished executing your code, you should see a result in the sidebar similar to the following.
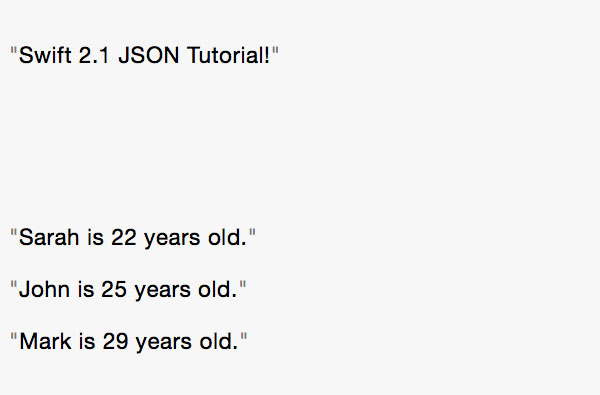
Congratulations. You now know how to fetch JSON data, serialize it, and use it as a normal dictionary in your Swift code. As you can see, the process is very simple thanks to the NSJSONSerialization API, which does most of the hard work for us.
3. Writing JSON Data
In addition to reading JSON data, which you receive from an online source or a local file, it is also important to know how to create your own JSON data. Whether this is to be saved as a local file or, most commonly, to be sent to a web service, the process it just as easy and simple as reading JSON data. Take a look at the following example.
let validDictionary = [
    "numericalValue": 1,
    "stringValue": "JSON",
    "arrayValue": [0, 1, 2, 3, 4, 5]
]

let invalidDictionary = [
    "date": NSDate()
]

if NSJSONSerialization.isValidJSONObject(validDictionary) { // True
    do {
        let rawData = try NSJSONSerialization.dataWithJSONObject(validDictionary, options: .PrettyPrinted)
    } catch {
        // Handle Error
    }
}

if NSJSONSerialization.isValidJSONObject(invalidDictionary) { // False
    // NSJSONSerialization.dataWithJSONObject(validDictionary, options: .PrettyPrinted) will produce an error if called
}
When creating your own JSON data from an object, it is best to first use the isValidJSONObject(_:) method to check whether the object can be converted into a JSON object.
After this initial check, you call the dataWithJSONObject(_:) method, which returns an NSData object if successful. Because we have already checked whether or not the object is valid, the error catch block here is not as important as before but still might be called due to an internal API error when creating the raw data.
The PrettyPrinted option used in this example is the only option available to use with this method and, when used, simply adds in more whitespace to the JSON data to make it easier to read.
// With PrettyPrinted Option:
{
    "name": "John",
    "age": 25
}

// Without PrettyPrinted Option:
{"name":"John","age": 25}
The returned NSData object can then be used however you like. You could save it to a local file or send it to a web service to.
Conclusion
You should now be comfortable working with JSON in Swift. It is clear that the star player is the NSJSONSerialization class, with a little help from a few guard and do-catch statements. As you can see, working with JSON data is very easy. Once the JSON data is parsed and serialized, you can interact with it just as you would with any other regular object.
As always, be sure to leave your comments and feedback in the comments below.