Learn how to create this winter scene in Photoshop. You will learn how to blend photos and textures, create a cold blue photo effect, and more!
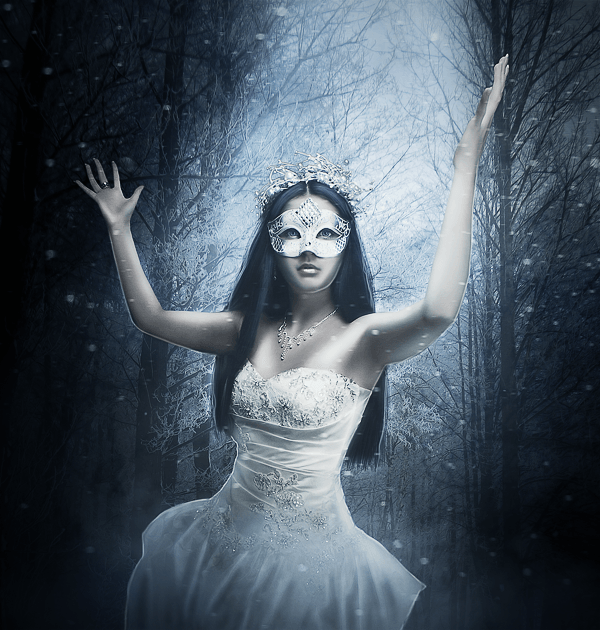
Preview of Final Results

Winter Photomanipulation
Resources
Step 1 – Background
Open the ‘Background 1’ image and let’s crop the part we are interested in.

Duplicate the image and set it to Multiply. Opacity 80%.

Open the ‘Background 2’ image and put it above the other layers. Delete the part with the tree (as you see below).

Set the layer to Soft Light. Opacity 50%. As you can see on top there is a part of the tree that is not well belended. Delete it with the Erase Tool or with a Layer Mask (I prefer this method because it doesn’t destroy the image).

This is what you will have.

Create a new layer. Choose a big round soft brush with low Opacity and pick Black color. Paint a vignette like the one you see in the image below and add Gaussian Blur if you want.

Set the layer to Multiply. Opacity and Fill to 80%.
 b
b
We need to create a kind of ray of light. Create a new layer. You can paint it with a soft brush or use a light beams brush like this.I used this color: #ccdffb (The black background is only to make you see the light, you will not have to do it!)

I left the layer with Normal Blend but I put the Opacity at 80%. Double click on this layer and a window will pop up. Check ‘Outer Glow’. Put the color #ccdffb instead of the preset yellow.

Step 2 – Lady
Extract the Lady and put her above every layer in the position you see below. (I previously worked on her skin with the Smudge Tool and liquified a bit her face).

Add a Hue/Saturation only for the lady’s layer and set the Saturation to -60.

Create a new layer below the one with the Lady. Load the ‘Smoke’ brush and with color #999da3 paint something like the image below.

Set the layer to Linear Dodge with Opacity and Fill at 50% and this is what you’ll have so far.

Create a new layer linked only at lady’s layer (above the hue/sat we created before). Choose a soft brush with low Opacity and Flow. Pick the color #cad7e7 and paint some light at the edges of the lady.

Create a new layer above everything and let’s paint some hair to give it volume.


Create a new layer. Pick a light color from the background and paint some light on the hair.


Step 3 – Snow
Open the ‘Snow Texture’ and put it above everything. Desaturate it and set the layer to Screen with Opacity 50% and Fill 80%. As you can see below I deleted some parts of the image but only because I didn’t like the snow in those places.


Step 4 – Adjustments
Create a new layer. Choose the Smoke brush and paint some smoke at the bottom of the layer with color #e2ecf7. Layer is set to Normal with Opacity 60% and Fill 80%.

Create a new layer. Choose the Gradient Tool (Linear, Color #525869 to Transparent). Paint something like the image you see below.

Set the layer to Multiply.

Create a new layer. Make a texture like the one below (if you are not able get it from my PSD).

Set it to Soft Light with Opacity 80%.

Add a Curve Adjustment layer and choose ‘Medium contrast’ from the presets.


Step 5 – Burn and Dodge
Create a new layer. Fill it with 50% Gray (Edit > Fill) and set the layer to Overlay. Select the Burn Tool, Range > Midtones and Exposure > 10%-20%. With these settings you have to paint some shadows. Below you can see where I painted.


Select the Dodge Tool. Settings same as Burn Tool. There is only one difference. In the image below you’ll see some strokes are whiter. In that case I used Range > Highlights.


Step 6 – Highlights
Create a new layer. Choose a hard round brush (5px) and pick one of the lighter color from the background (I picked #e5edfb). Paint highlight roughly (you can use the Pen Tool if you don’t have a tablet). Then smudge them until they fit arms, dress and face egdes. You can add an additional gaussian blur. Now double click on the layer and in the pop up menu select Outer Glow. Set Opacity to 39% and change the yellow color with the one you picked before (#e5edfb for me). Below you can see where I painted highlights.


With CTRL + J copy the Highlight layer and set it to Overlay. Highlights will be more glowing.

Create a new layer. Pick another light color from the background (not the same you picked before or it would be boring). Paint some highlights on the egdes of the hair (Again you can use the Pen Tool if you don’t have a tablet). Leave the mode to Normal but low Opacity and Fill until you are happy with the result.

Step 7 – Final Adjustments
Create a new layer. Pick the color #999da4 and paint something like the image you see below.

Set the Layer to Linear Dodge with Opacity and Fill at 50%.

Add a Curve Adjustment Layer and choose the ‘Linear Contrast’. Set the Layer to Luminosity.


Merge the whole work with CTRL + ALT + SHIFT + E. Go to Filter > Lens Correction and choose ‘Custom’. In the Vignette Amount put -50.


Duplicate last layer with CTRL + J. Go to Filter > Other > High Pass and put 1px. Set the Layer to Overlay.

Next two Adjustments are both on last Overlay layer. Go to Image > Adjustments > Levels. On the popup window click on ‘Auto’.

Go to Image > Adjustments > Curves. Leave RGB alone and modify the colors curves like below.


Final Results
![final-results[1]](https://cdn.idevie.com/wp-content/uploads/2016/06/final-results1.png "final-results[1]")