In this Halloween tutorial, you’ll explore the process of creating a witch illustration in Adobe Illustrator. You’ll learn how to craft vintage-style spooky designs, work with anchor points, and use the Reflection Tool. Additionally, you’ll discover how to use Warp Effects, basic shapes, and the Pathfinder panel to shape your perfect Halloween vector illustration. The tutorial also covers how to create a pattern brush and a simple flower design, further expanding your Illustrator skills.
Here’s a special little treat for you from Envato! Download this Script Font and add an enchanting touch to your Witch Halloween Illustration tutorial. It’s the perfect finishing touch to bring your magical designs to life—so get it now and get creative!
1. How to create the face of the witch in Illustrator
Step 1
After you’ve opened Adobe Illustrator, create a new document (File > New). Enter 850 px Width and 900 px Height in the new dialogue window, and press OK. This will be your new artboard.
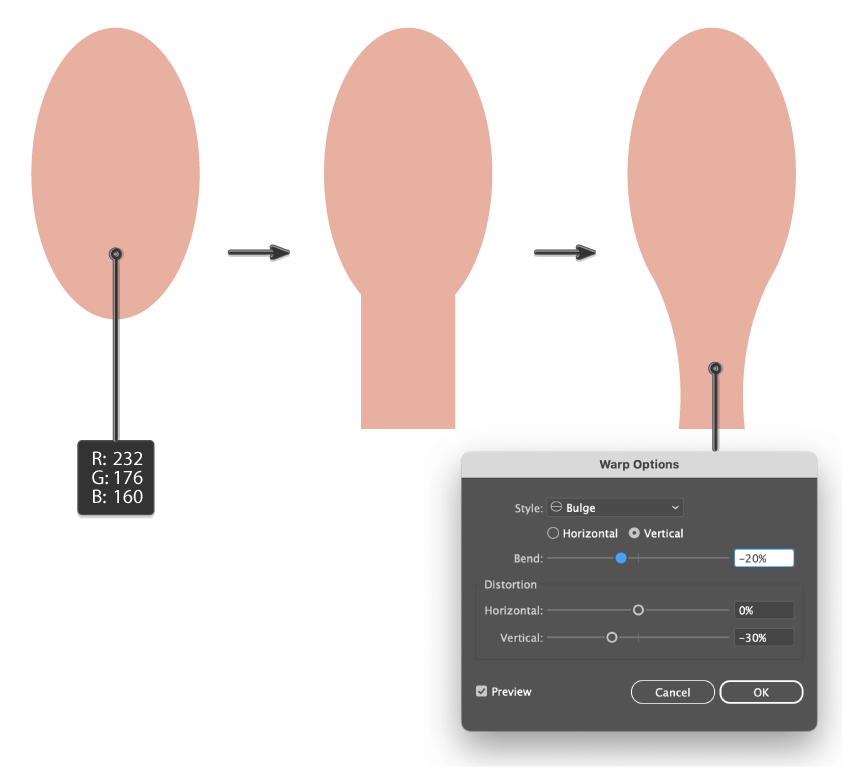
Now, let’s start by drawing the face of the cute witch illustration. Use the Ellipse Tool (L) to draw an ellipse (fill color R=231, G=176, B=160).
After that, draw the neck using the Rectangle Tool (M) with the same fill color. While keeping it selected, go to Effect > Warp > Bulge and, in the new dialogue window, enter the options you see below. Then press OK.
Expand the neck (Object > Expand Appearance).

Step 2
Next, we will create the eyes.
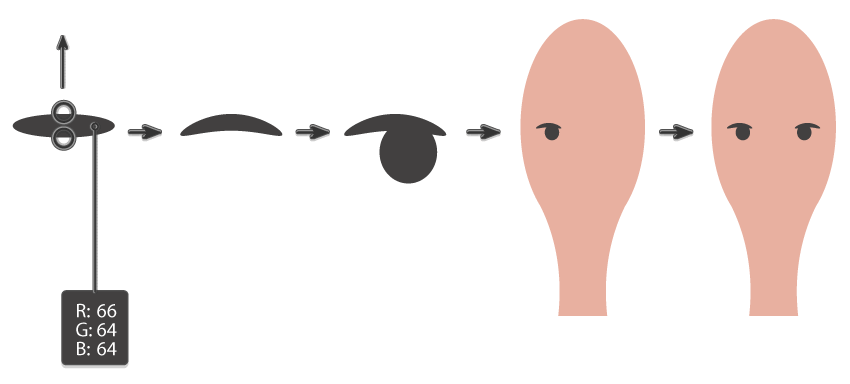
Start by creating an ellipse (fill color R=66, G=64, B=64) using the Ellipse Tool (L). Then take the Direct Selection Tool (A), select the top and bottom anchor points, and drag to move them up.
Then, add an ellipse with the same fill color. That’s the first eye of the Halloween witch illustration.
To create another eye, select the first one, take the Reflection Tool (O), and while holding the Alt button, click in the middle of the witch’s head. A new pop-up window will appear, called Reflect. You want to choose Axis: Vertical, Angle: 90 degrees, and press Copy.
After you’ve created the other eye, make sure to place it symmetrically opposite the other one.


Step 3
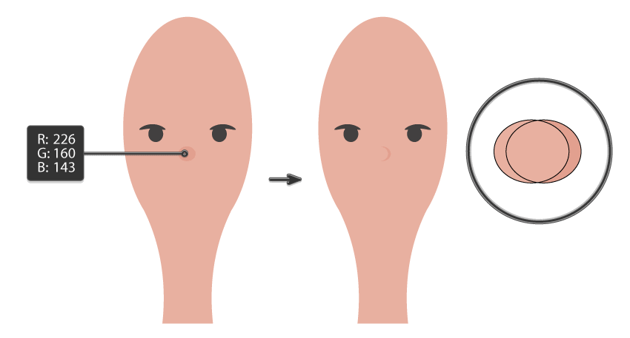
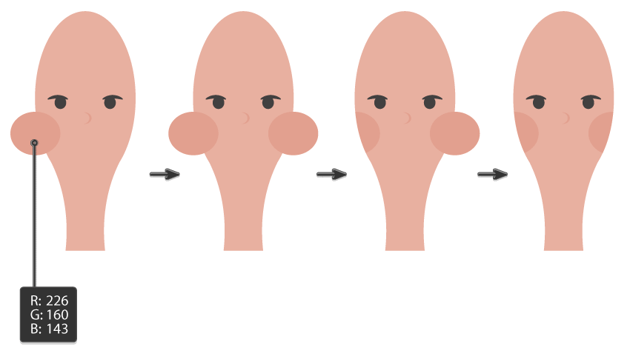
Place a little ellipse (fill color R=226, G=160, B=143) on the face where the nose should be. Then, create a new copy in front (Control-C, Control-F), and move it a little bit to the left.
While keeping the second circle selected, take the Eyedropper Tool (I) and click on the face. Now, your new circle will be the same color as the face. Make sure the two circles overlap so you can only see the crescent shape. The nose of the witch illustration is all finished now.


Step 4
To add some cuteness to the witch, let’s give her some cheeks. Using the Ellipse Tool (L) and the fill color R=226, G=160, B=143, create a small ellipse under the witch’s left eye. It should overlap the edge of the face.
Keep it selected, and while holding the Shift and Alt keys, move it to the right, so that it overlaps the face on the right side. You just created two cheeks. Place them symmetrically opposite one another.
After that, we want to cut off the unnecessary parts of the cheeks. First, select the face and create a copy in front (Control-C, Control-F). Keep the top ellipse and the left cheek selected while holding the Shift button. Then go to the Pathfinder panel (Window > Pathfinder) and click the Intersect button. Only part of the cheek should be left.
Now you should do the same with the right cheek. Once again, create a copy of the face in front. Select the right cheek, and on the Pathfinder panel click the Intersect button. The cute witch illustration now has two adorable cheeks!


Step 5
To draw the mouth, we’ll start with a triangle. So grab the Polygon Tool (if you don’t see it, click and hold on the Ellipse Tool (L) or on the Rectangle Tool (M) until a pop-up menu appears) and click on your canvas. In the new Polygon window, enter Sides: 3 with any Radius and press OK. The fill color should be R=196, G=101, B=95.
Stretch the triangle horizontally. Then, hold the Alt and Shift buttons while moving the triangle to the right. Holding Alt will create a copy, and Shift will move it in a straight line.
After that, create an ellipse under the two triangles as shown in the image below. The length of the ellipse should be approximately the same as the two triangles together.
Select this new ellipse, and sharpen the left and right anchor points by clicking on them using the Convert Anchor Point Tool (Shift-C). Now, your ellipse should have two sharp ends. You just created the witch’s lips!
Deselect the lips and press the Swap Fill and Stroke button (Shift-X), which will change the fill color into the stroke color. Look at the Stroke panel (Window > Stroke). Make the Weight 1 or 2 px and change Cap to Round Cap. Take the Line Segment Tool (\) and draw a horizontal line across the lips. The mouth is now ready.
Group the whole mouth (right-click > Group) so you can move it easily.


Place the mouth in the appropriate place.



2. How to create the hair and witch’s hat in Illustrator
Step 1
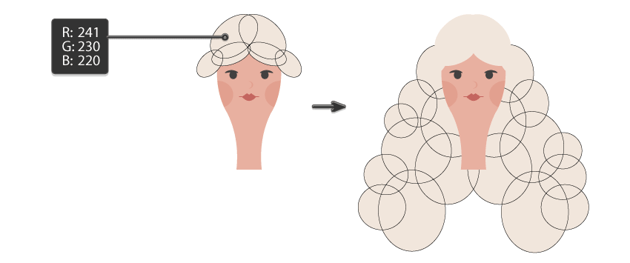
Make the fill color R=241, G=230, B=220 to create the hair for our witch illustration. For this, create a lot of ellipses first in front of the face, and then behind it. To place hair at the back, first cut it (Control-X), and then place it behind the face (Control-B).
Feel free to make any hairstyle you like.


Step 2
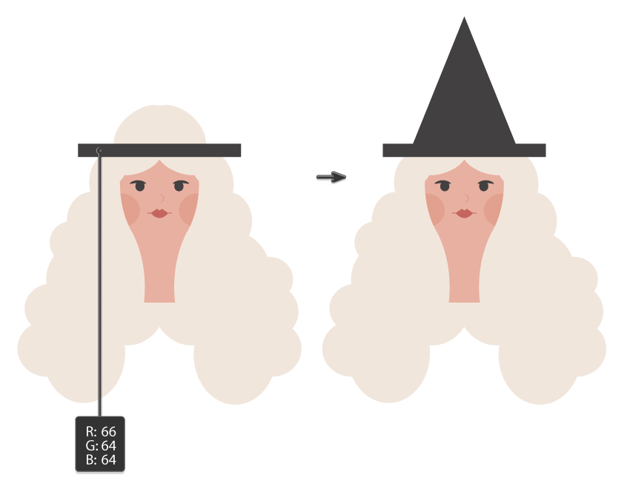
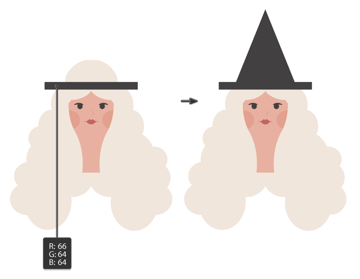
Let’s design a witch’s hat for our cute witch illustration. Set the fill color to R=66, G=64, B=64, and then take the Rectangle Tool (M) and create a thin rectangle on top of the head.
Use the Polygon Tool to create a triangle just as you did for the lips, keeping the fill color the same. You will get a triangle, which you need to elongate.

Step 3
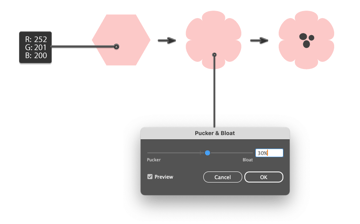
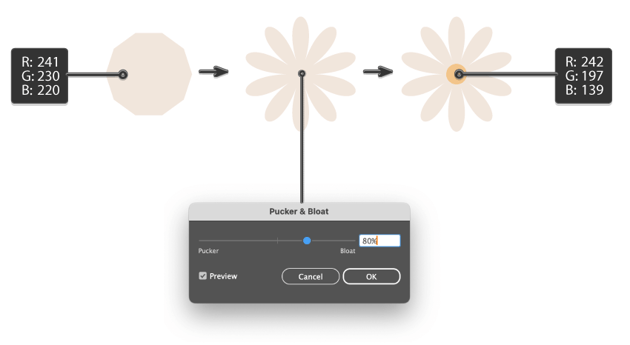
We want our witch to be cute, so let’s adorn her hat with flowers. To create a flower, we’ll need the Polygon Tool again. So grab this tool and click on your artboard. Enter 6 Sides with any Radius, and press OK. The fill color is R=252, G=201, B=200.
While keeping the hexagon selected, go to Effect > Distort & Transform > Pucker & Bloat. Enter the options shown below in the image.
Finally, add three ellipses in the middle. The fill color of the ellipses is the same as the hat—you can use the Eyedropper Tool (I) to get the exact color. The flower is ready!


Step 4
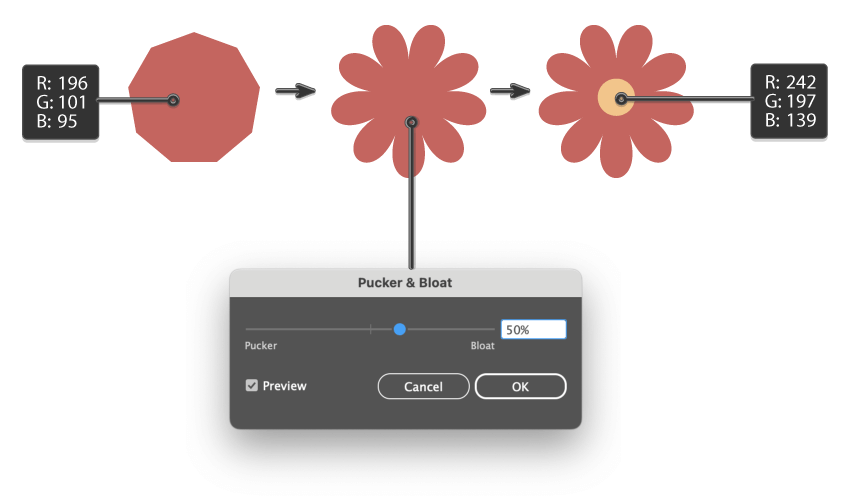
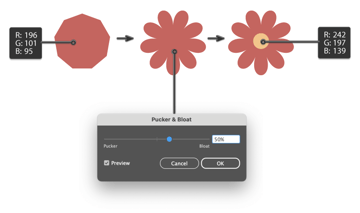
Let’s create another flower. Take the Polygon Tool and, after clicking on your canvas, enter 9 sides (or any number you prefer). Change the fill color to R=196, G=101, B=95.
While keeping the hexagon selected, go to Effect > Distort & Transform > Pucker & Bloat. Enter the options shown below in the image. Then add a yellow (R=242, G=197, B=139) circle in the middle.

Step 5
Now, we’ll create the final flower for our witch illustration. Using the previous method, create a new flower in any style you like, or you can just use the image below as a reference.
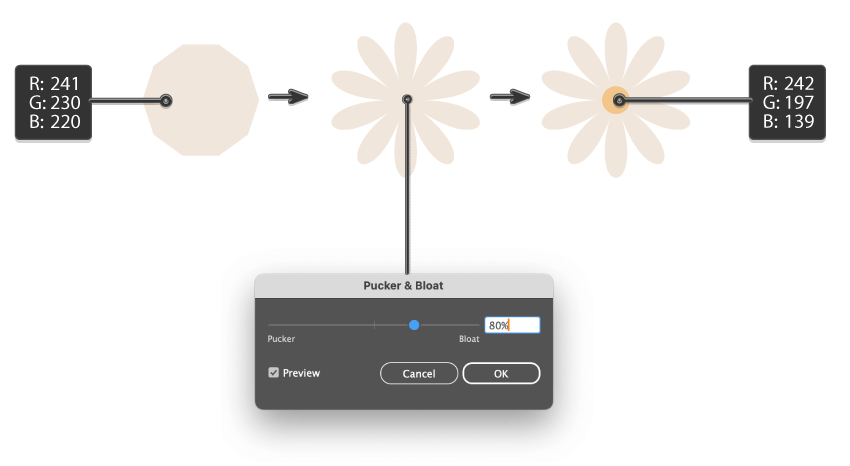
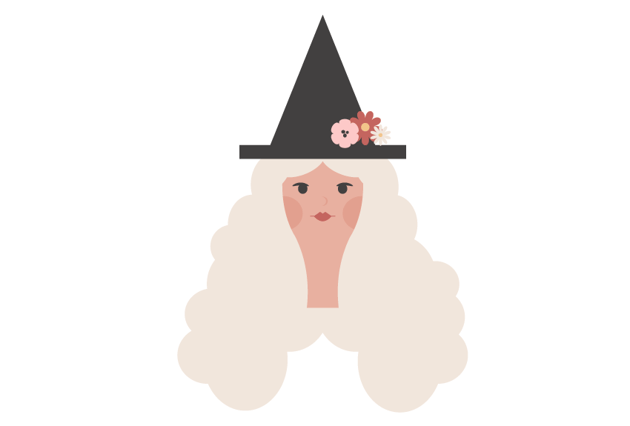
Be sure each flower is grouped separately (right-click > Group), and then place them on the witch’s hat.

Step 6
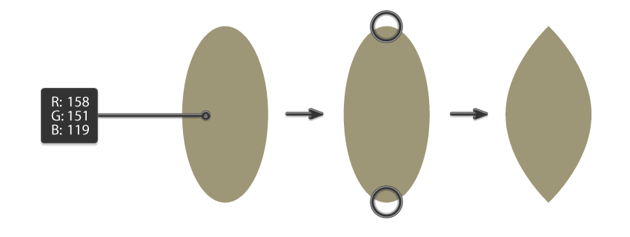
We need one more thing to decorate the witch hat: a leaf. Change the fill color to R=158, G=151, B=119, and use the Ellipse Tool (L) to create an ellipse.
Then, grab the Convert Anchor Point Tool (Shift-C), and click on the top and bottom anchor points of this ellipse. It will make the smooth sides into sharp corners, and that’s exactly what we want.
Now you have a simple leaf. Create a copy of it (Control-C, Control-V) and set it aside—we’ll need it later.


Step 7
Make a few copies of the leaf.
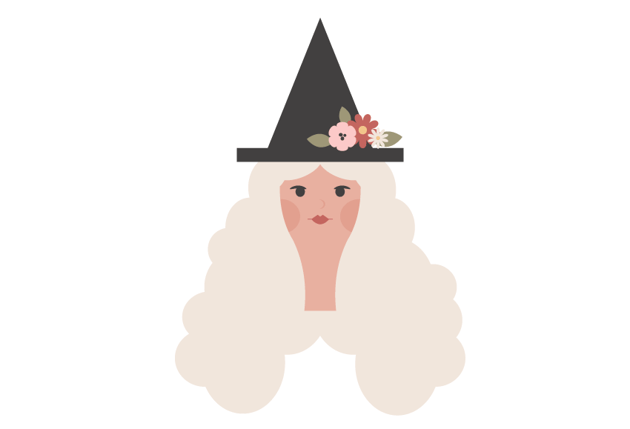
Place them on the witch’s hat, but behind the flowers. One of the easiest ways to do that is to select the flowers, cut them (Control-X), and then place them in front of everything (Control-F).
Look how cute the witch is!


3. How to create the body of the witch in Illustrator
Step 1
As we work on our cute Halloween illustration, we’ll give our witch a vintage Halloween coat to match her style.
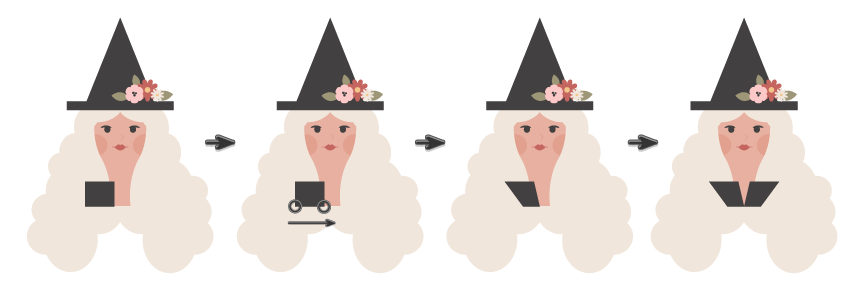
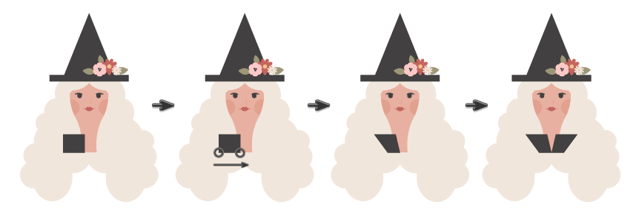
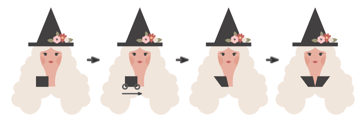
Using the Rectangle Tool (M) and the same fill color as the hat, create a rectangle near the witch’s neck.
Grab the Direct Selection Tool (A), select the two bottom anchor points of this rectangle, and slightly shift them to the right. This is one half of the witch’s collar.
To create the other half, select the first one, take the Reflection Tool (O), and while holding the Alt button, click in the middle of the witch’s neck. A new pop-up window will appear, called Reflect. You want to choose Axis: Vertical, Angle: 90 degrees, and press Copy. The collar of the vintage witch illustration is now complete!
Step 2
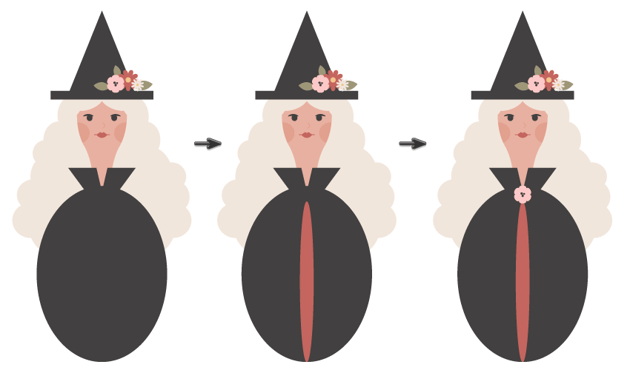
Using the same fill color as the collar and hat, draw an ellipse using the Ellipse Tool (L). It’s the witch’s body.
Using the Eyedropper Tool (I), click on the red flower to get its fill color. Create an ellipse in front of the witch’s body. Make this red ellipse narrow and long. We want to imitate an open coat.
As our witch is cute, add the pink flower as a brooch that’s pinned onto her coat.


4. How to create a ghost scene background in Illustrator
Step 1
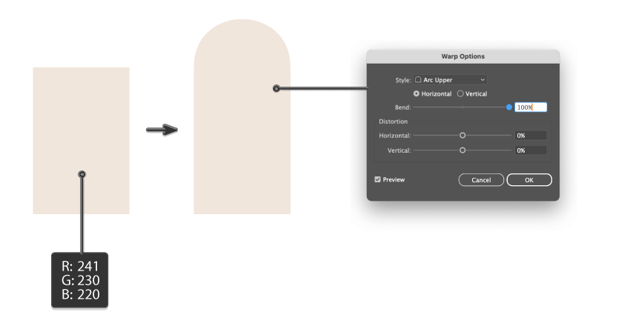
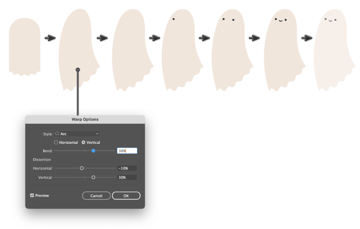
Now, we’ll create a ghost to go in the background of our witch illustration. Using the Rectangle Tool (M), create a rectangle with the fill color R=241, G=230, B=220. To change the shape of this rectangle, go to Effect > Warp > Arc Upper. In the new dialogue window, enter the options you see in the image below and press OK.
Expand this shape (Object > Expand Appearance).


Step 2
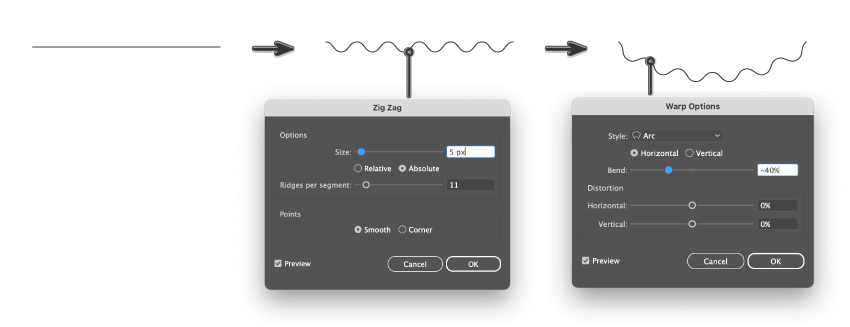
Use the Line Segment Tool (\) to draw a line—the stroke color doesn’t matter. To make the line straight, hold Shift while drawing it.
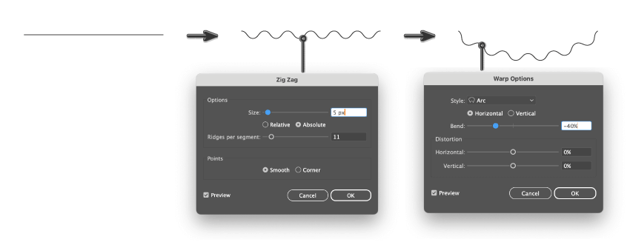
Now we’ll modify this line by going to Effect > Distort & Transform > Zig Zag. In the Zig Zag options window, adjust the Size and Ridges per segment to achieve a similar curve as in the image below. Don’t forget to select Smooth Points. For your convenience, select Preview while adjusting these options.
While keeping this wavy line selected, go to Effect > Warp > Arc. In the new window, adjust the options as shown in the image below. Finally, don’t forget to Expand Appearance (Object > Expand Appearance). We need this Zig Zag curve to cut off the bottom part of the distorted rectangle.
Step 3
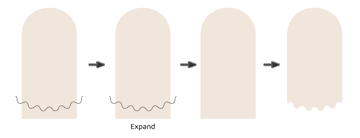
While keeping the Zig Zag curve selected, also select the distorted rectangle and press the Divide button in the Pathfinder panel. The Zig Zag curve should disappear.
Since you now have the two objects grouped, ungroup them: right-click on your mouse and hit Ungroup.
Now you can simply delete the bottom part to create the ghost shape.


Step 4
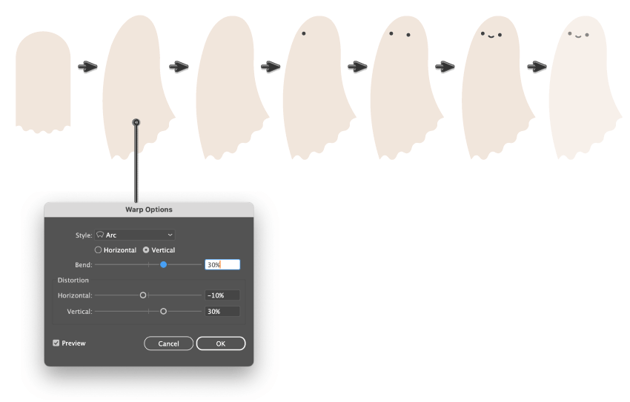
Next, while keeping this ghost shape selected, go to Effect > Warp > Arc. In the new window, adjust the options as shown in the image below.
Then expand this shape: Object > Expand Appearance. After this, use the Direct Selection Tool (A) to adjust the anchor point handles of the ghost shapes, allowing you to create a smoother form.
Let’s create eyes for our ghost. Using the Eyedropper Tool (I), take the fill color from the witch’s hat. Hit the Ellipse Tool (L) and draw a tiny circle. To create an even circle, hold the Shift key while creating it.
While holding Shift and Alt together, move this eye to the right. You just created another eye.
Then, press the Swap Fill and Stroke button (Shift-X), which will change the fill color into the stroke color. Look at the Stroke panel (Window > Stroke). Make the Weight 1 or 2 px and change Cap to Round Cap. Take the Arc Tool (it’s hidden under the Line Segment Tool (/)) and draw an arc as a mouth. Notice how the eyes and mouth are positioned on the left side of the ghost.
Finally, go to the Transparency panel (Window > Transparency) and while the whole ghost (with eyes and mouth) is selected, reduce its Opacity to 60%.
Group the ghost (right-click > Group).

5. How to create the background in Illustrator
Step 1
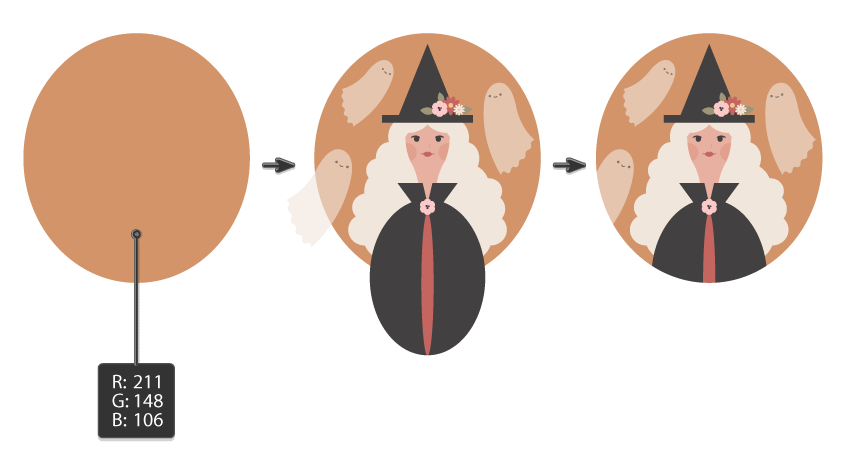
Change the fill color to R=211, G=148, B=106, and draw an ellipse. We’re creating a frame for our illustration of a witch.
Place the witch in front of this ellipse. You can cut (Control-X) and then place her in front (Control-F).
Place the ghost in front of this ellipse as well. Create two more copies of the ghost, and place them close to the witch. You can make the ghost look in the opposite direction using the Reflect Tool (O). Some ghosts can overlap the ellipse, as we will cut it off later.
Select the ellipse and make a copy of it in front (Control-C, Control-F). Now this ellipse is in front of the original ellipse, but we want to place it in front of everything. So cut it (Control-X), and then place it in front (Control-F).
Keep the selection and, while holding the Shift key, select all the shapes that are overlapping this ellipse. Go to Object > Clipping Mask > Make (Control-7). Your result should be similar to the image below.


Step 2
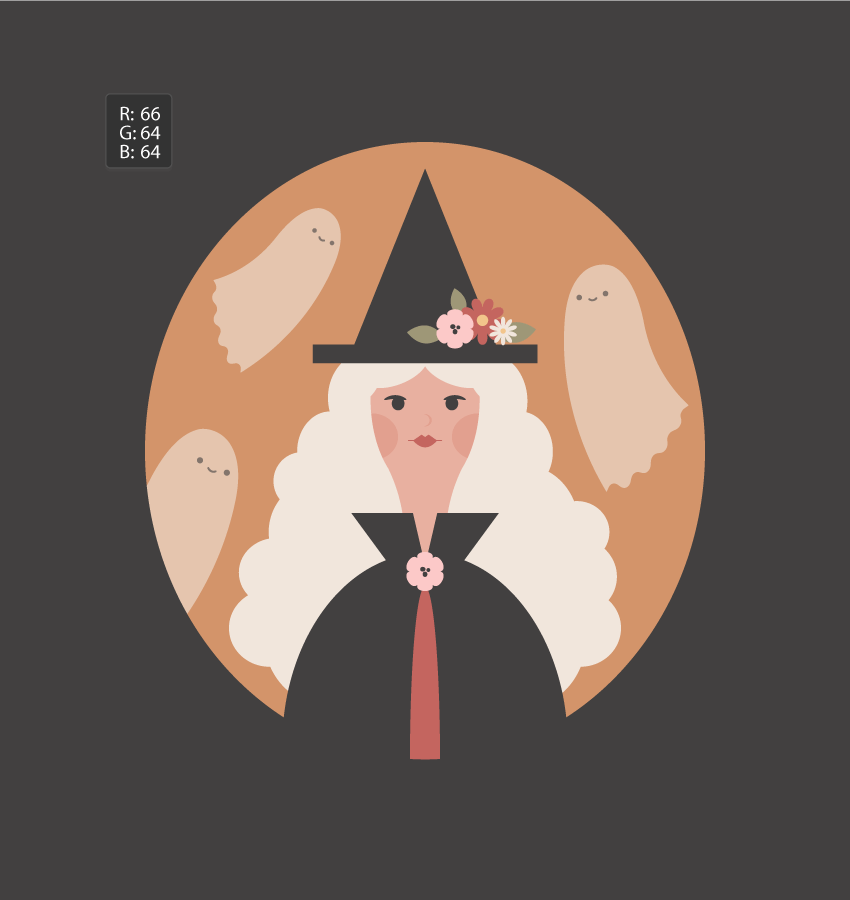
Grab the Rectangle Tool (M) and click on your artboard. In the new dialogue window, enter 850 px Width and 900 px Height, and press OK. Change the fill color to R=66, G=64, B=64. This will be our background. Be sure to place it symmetrically on the artboard and behind everything.
If you want to place the rectangle exactly in the middle of the canvas, go to the Align panel and check Align to: Align to Artboard (bottom right corner). Now, any items that you choose to align will be aligned to your artboard. Now you need to select the object that you want to align (in this case, your dark rectangular background). In the Align Objects section, press Horizontal Align Center and Vertical Align Center. This is how you put any object exactly in the middle of your canvas or artboard.


Step 3
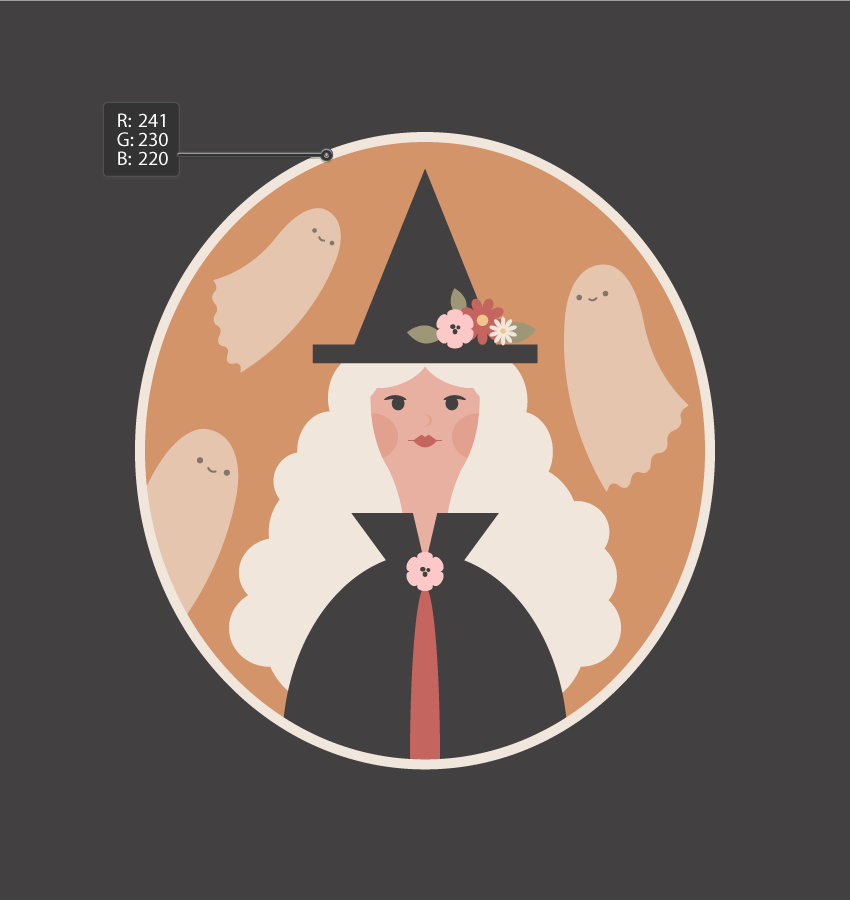
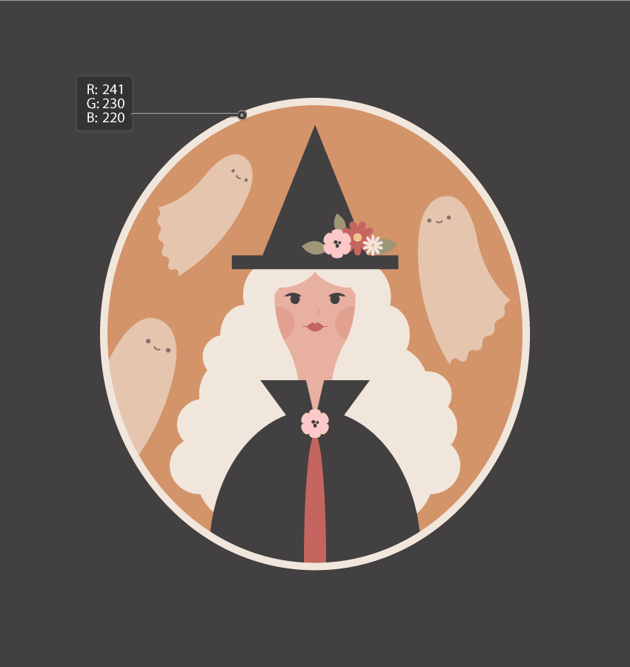
Now we’ll create the frame. While keeping the dark orange ellipse selected, go to Object > Path > Offset Path… In the new dialogue window, enter Offset: 10 px, Joints: Miter, Miter limit: 4, OK. You’ll get a new ellipse aligned perfectly behind the previous one. Change its fill color to R=241, G=230, B=220.

Step 4
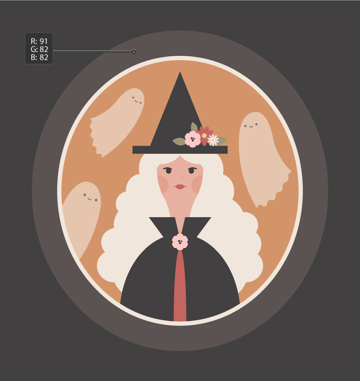
Continue to make the frame for our Halloween illustration. Keep the newly created ellipse selected, and again go to Object > Path > Offset Path… In the new dialogue window, enter Offset: 60 px, Joints: Miter, Miter limit: 4, OK. Change its fill color to R=91, G=82, B=82.


Step 5
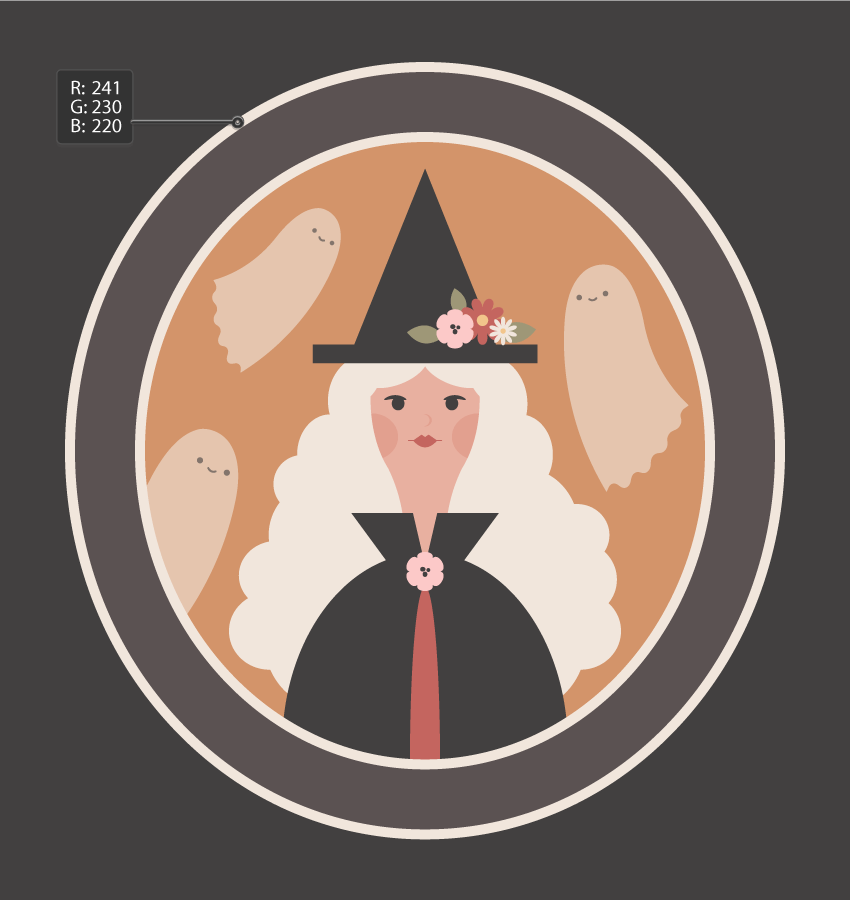
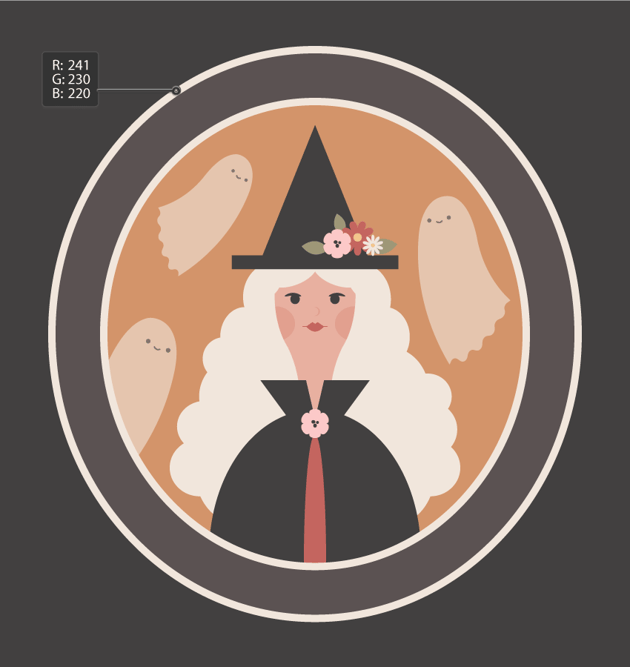
Keep building the frame for our vintage Halloween illustration. Keep the newly created ellipse selected, and again go to Object > Path > Offset Path… In the new dialogue window, enter Offset: 10 px. Change its fill color to R=241, G=230, B=220.

6. How to create a pattern brush in Illustrator
Step 1
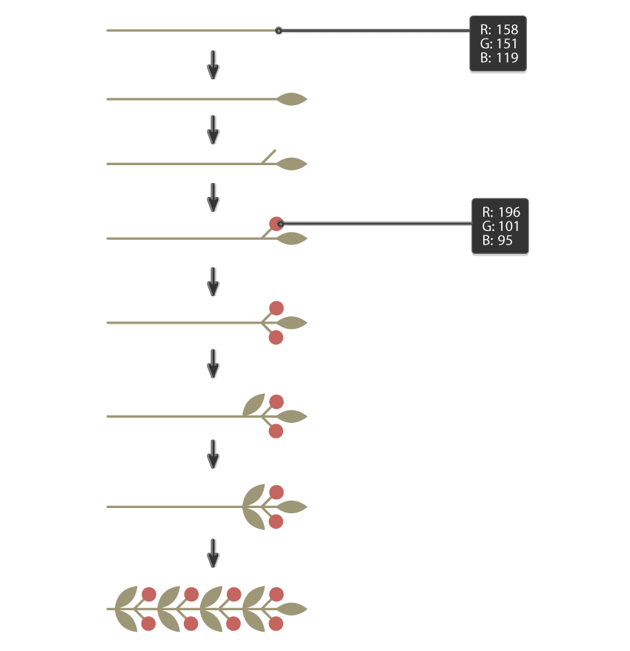
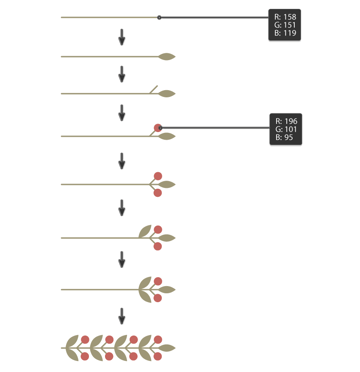
Our goal is to make our Halloween vector illustration adorable, so we’re creating a cute pattern brush to apply to the frame. First, we want to create a branch with berries. To do that, draw a horizontal line using the Line Segment Tool (\). Set the stroke color to R=158, G=151, B=119. Make sure that you select Round Cap on the Stroke panel.
Remember the green leaf we set aside earlier? Take it and place it on the right side of the line horizontally.
Again using the Line Segment Tool (\) and while holding the Shift button, draw a diagonal line as a small stalk that branches out from the main stalk.
Then draw a small circle as a berry. Change its fill color to R=196, G=101, B=95.
Select the small diagonal stalk that branches out from the main stalk as well as the berry. Using the Reflection Tool (O), and while holding the Alt button, click in the middle of the main stalk. A new pop-up window will appear, called Reflect. You want to choose Axis: Vertical, Angle: 90 degrees, and press Copy. Be sure to place it symmetrically.
Create a copy of a leaf and place it diagonally after the berries.
Create a reflection of this leaf on the other side of the main stalk.
Select the two berries on the stalks and the two diagonal leaves. Holding the Shift and Alt buttons, move them to the left side of the main stalk to create a copy. After that, keep pressing Control-D a few times, as it will repeat your last movement. At the end, you should have a branch with berries.

Step 2
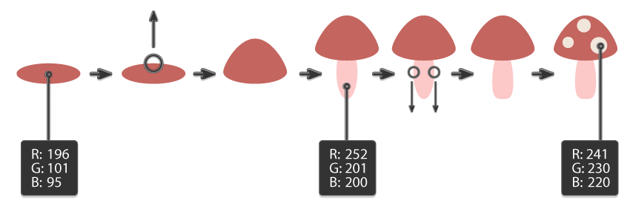
The second part of the pattern brush is a mushroom, so let’s create a cute tiny red mushroom. First, we need the same fill color as the red flower on the witch’s hat. Take it using the Eyedropper Tool (I), or just enter the RGB number you see in the image below. Then, create a red ellipse.
Using the Direct Selection Tool (A), select its top anchor point and move it upwards. Do you see a mushroom cap now?
Change the fill color to R=252, G=201, B=200 (or take the fill color from the pink flower on the witch’s hat) and draw an ellipse as the mushroom stem. Place it behind the mushroom’s cap.
Using the Direct Selection Tool (A), select the right and left anchor points on the mushroom’s stem. Move them down.
Add a few light circles on the mushroom’s cap. The fill color is R=241, G=230, B=220.
Group the whole mushroom for easy moving.


Step 3
Rotate the mushroom exactly 90 degrees (the Shift button will help you) and place it next to the branch with berries.
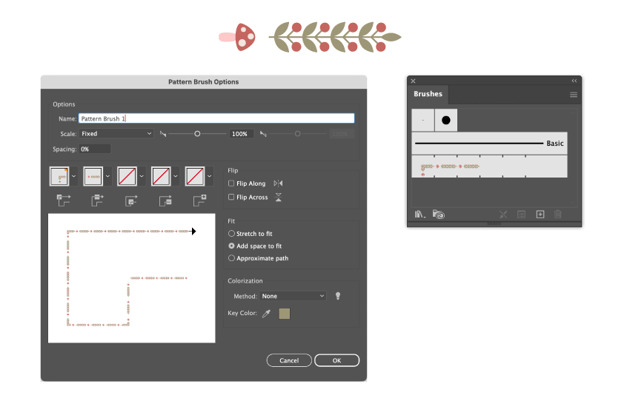
Move the berry branch and the mushroom to the Brushes panel (Window > Brushes). A new pop-up window will appear called New Brush. You should check Pattern Brush and press OK.
Again a new window will pop up, called Pattern Brush Options. You can see what you need to enter in the image below. After you’ve entered everything you need, your new brush will appear in the Brushes panel.


Step 4
Now we want to apply the newly created pattern brush to the frame. First, keep the light ellipse closest to the orange one selected, and go to Object > Path > Offset Path… In the new dialogue window, enter Offset: 30 px. Give it any stroke color and no fill color.

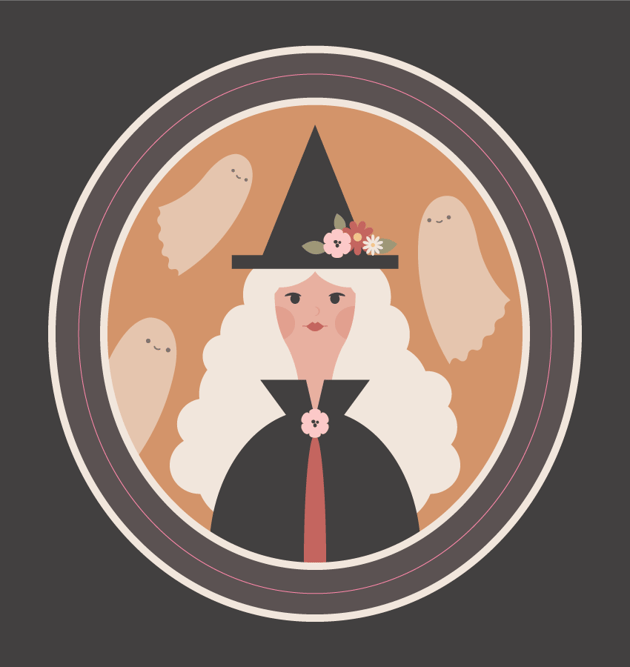

While keeping it selected, go to the Brushes panel and select your pattern brush. Now you should have a cute frame with berry branches and mushrooms. If you see that the new berry and mushroom frame is too big, you can adjust the stroke Weight on the Stroke panel.

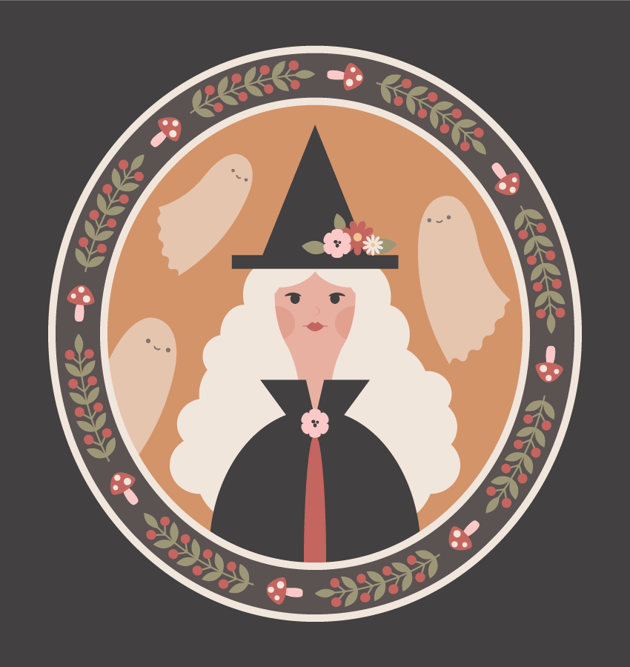

Well done!
You did a fantastic job! Congratulations to everyone who followed along with this tutorial. You’ve learned how to create a cute and vintage witchy illustration in Adobe Illustrator by adjusting anchor points, working with the Reflection Tool, using Warp Effects, and using the Pathfinder panel. Plus, you’ve mastered creating pattern brushes for your future projects. See you in my next tutorial!


Discover awesome tutorials and resources
Envato Tuts+ provides step-by-step guides and video lessons to help both beginners and professionals improve their skills in design, coding, photography, video, and more. Taught by industry experts, these tutorials cover various tools and techniques, offering valuable resources for mastering software or exploring creative projects.