In the previous tutorial, we talked about the Model View Presenter pattern, how it is applied on Android, and what its most important advantages are. In this tutorial, we explore the Model View Presenter pattern in more detail by implementing it in an Android application.
In this tutorial:
we build a simple application using the MVP pattern
we explore how to implement the MVP pattern on Android
and we discuss how to overcome some difficulties caused by Android’s architecture
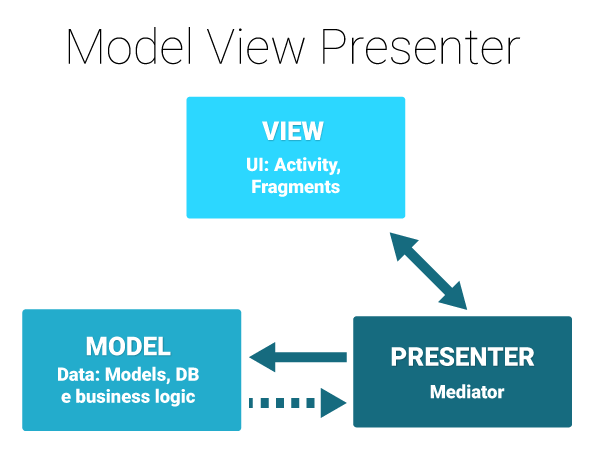
1. Model View Presenter
The Model View Presenter pattern is an architectural pattern based on the Model View Controller (MVC) pattern that increases the separation of concerns and facilitates unit testing. It creates three layers, Model, View, and Presenter, each with a well defined responsibility.
The Model holds the business logic of the application. It controls how data is created, stored, and modified. The View is a passive interface that displays data and routes user actions to the Presenter. The Presenter acts as the middleman. It retrieves data from the Model and shows it in the View. It also processes user actions forwarded by the View.
2. Project Planning & Setup
We are going to build a simple notes application to illustrate MVP. The app allows the user to take notes, save them in a local database, and delete notes. To make it simple, the app will have only one Activity.
In this tutorial, we concentrate primarily on the implementation of the MVP pattern. Other functions, such as setting up a SQLite database, constructing a DAO, or handling user interaction, are skipped. If you need help with any of these topics, Envato Tuts+ has some great tutorials about these topics.
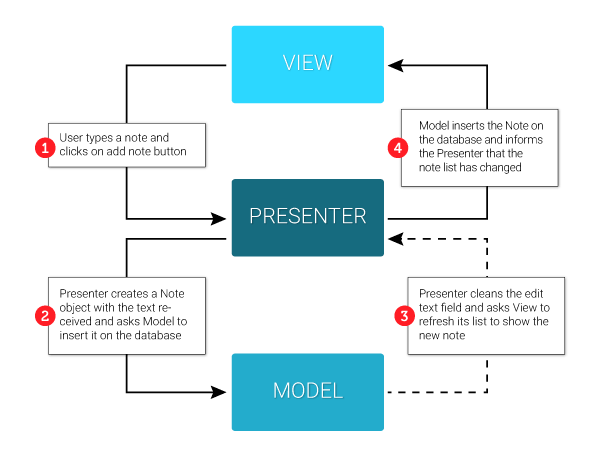
Action Diagram and MVP Layers
Let’s start with the creation of a new note. If we break this action into smaller operations, then this is what the flow would look like using the MVP architectural pattern:
The user types a note and clicks the add note button.
The Presenter creates a Note object with the text entered by the user and asks the Model to insert it in the database.
The Model inserts the note in the database and informs the Presenter that the list of notes has changed.
The Presenter clears the text field and asks the View to refresh its list to show the newly created note.
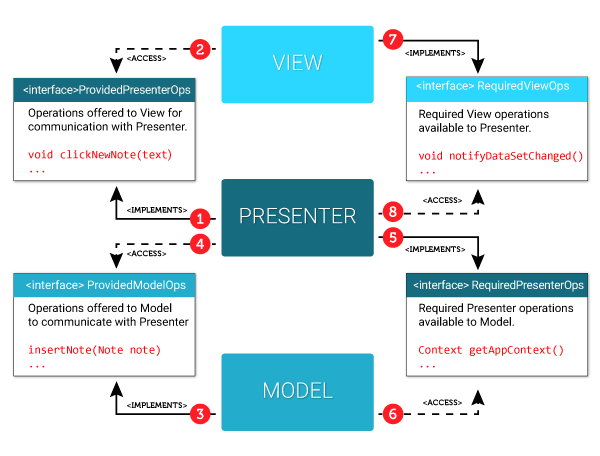
MVP Interfaces
Let’s now consider the operations needed to achieve this action and separate them using MVP. To keep the various objects loosely coupled, the communication between the layers takes places by using interfaces. We need four interfaces:
RequiredViewOps: required View operations available to Presenter
ProvidedPresenterOps: operations offered to View for communication with Presenter
RequiredPresenterOps: required Presenter operations available to Model
ProvidedModelOps: operations offered to Model to communicate with Presenter
3. Implementing MVP on Android
Now that we have an idea of how the various methods should be organized, we can start creating our app. We simplify the implementation by only focusing on the action to add a new note. The source files of this tutorial are available on GitHub.
We use only one Activity with a layout that includes:
EditText for new notes
Button to add a note
RecyclerView to list all notes
two TextView elements and a Button inside a RecyclerView holder
Interfaces
Let’s begin by creating the interfaces. To keep everything organized, we place the interfaces within a holder. Again, in this example we focus on the action to add a new note.
public interface MVP_Main {
    /**
     * Required View methods available to Presenter.
     * A passive layer, responsible to show data
     * and receive user interactions
     */
    interface RequiredViewOps {
    	// View operations permitted to Presenter
		Context getAppContext();
        	Context getActivityContext();
		void notifyItemInserted(int layoutPosition);
        	void notifyItemRangeChanged(int positionStart, int itemCount);
    }

    /**
     * Operations offered to View to communicate with Presenter.
     * Processes user interactions, sends data requests to Model, etc.
     */
    interface ProvidedPresenterOps {
       	// Presenter operations permitted to View
		void clickNewNote(EditText editText);
            // setting up recycler adapter
            int getNotesCount();
            NotesViewHolder createViewHolder(ViewGroup parent, int viewType);
            void bindViewHolder(NotesViewHolder holder, int position);
    }

    /**
     * Required Presenter methods available to Model.
     */
    interface RequiredPresenterOps {
       	// Presenter operations permitted to Model
		Context getAppContext();
        	Context getActivityContext();
    }

    /**
     * Operations offered to Model to communicate with Presenter
     * Handles all data business logic.
     */
    interface ProvidedModelOps {
        	// Model operations permitted to Presenter
            int getNotesCount();
            Note getNote(int position);
		int insertNote(Note note);
        	boolean loadData();
    }
}
View Layer
It’s now time to create the Model, View, and Presenter layers. Since MainActivity will act as the View, it should implement the RequiredViewOps interface.
public class MainActivity
        extends AppCompatActivity
    implements View.OnClickListener, MVP_Main.RequiredViewOps {

    private MVP_Main.ProvidedPresenterOps mPresenter;
    private EditText mTextNewNote;
    private ListNotes mListAdapter;

    @Override
    public void onClick(View v) {
        switch (v.getId()) {
            case R.id.fab:{
                // Adds a new note
                mPresenter.clickNewNote(mTextNewNote);
            }
        }
    }
    @Override
    public Context getActivityContext() {
        return this;
    }

    @Override
    public Context getAppContext() {
        return getApplicationContext();
    }
    // Notify the RecyclerAdapter that a new item was inserted
    @Override
    public void notifyItemInserted(int adapterPos) {
        mListAdapter.notifyItemInserted(adapterPos);
    }
    // notify the RecyclerAdapter that items has changed
    @Override
    public void notifyItemRangeChanged(int positionStart, int itemCount){
        mListAdapter.notifyItemRangeChanged(positionStart, itemCount);
    }
    // notify the RecyclerAdapter that data set has changed
    @Override
    public void notifyDataSetChanged() {
        mListAdapter.notifyDataSetChanged();
    }
    // Recycler adapter
    // This class could have their own Presenter, but for the sake of
    // simplicity, will use only one Presenter.
    // The adapter is passive and all the processing occurs
    // in the Presenter layer.
    private class ListNotes extends RecyclerView.Adapter<NotesViewHolder>
    {
        @Override
        public int getItemCount() {
            return mPresenter.getNotesCount();
        }

        @Override
        public NotesViewHolder onCreateViewHolder(ViewGroup parent, int viewType) {
            return mPresenter.createViewHolder(parent, viewType);
        }

        @Override
        public void onBindViewHolder(NotesViewHolder holder, int position) {
            mPresenter.bindViewHolder(holder, position);
        }
    }
}
Presenter Layer
The Presenter is the middleman and needs to implement two interfaces:
ProvidedPresenterOps to allow calls from the View
RequiredPresenterOps to receive results from the Model
Pay special attention to the View layer reference. We need to use a WeakReference<MVP_Main.RequiredViewOps> since MainActivity could be destroyed at any time and we want to avoid memory leaks. Also, the Model layer hasn’t been set up yet. We do that later when we connect the MVP layers together.
public class MainPresenter implements MVP_Main.ProvidedPresenterOps, MVP_Main.RequiredPresenterOps {

    // View reference. We use as a WeakReference
    // because the Activity could be destroyed at any time
    // and we don't want to create a memory leak
    private WeakReference<MVP_Main.RequiredViewOps> mView;
    // Model reference
    private MVP_Main.ProvidedModelOps mModel;

    /**
     * Presenter Constructor
     * @param view  MainActivity
     */
    public MainPresenter(MVP_Main.RequiredViewOps view) {
        mView = new WeakReference<>(view);
    }

    /**
     * Return the View reference.
     * Throw an exception if the View is unavailable.
     */
    private MVP_Main.RequiredViewOps getView() throws NullPointerException{
        if ( mView != null )
            return mView.get();
        else
            throw new NullPointerException("View is unavailable");
    }

    /**
     * Retrieves total Notes count from Model
     * @return  Notes list size
     */
    @Override
    public int getNotesCount() {
        return mModel.getNotesCount();
    }

    /**
     * Creates the RecyclerView holder and setup its view
     * @param parent    Recycler viewGroup
     * @param viewType  Holder type
     * @return          Recycler ViewHolder
     */
    @Override
    public NotesViewHolder createViewHolder(ViewGroup parent, int viewType) {
        NotesViewHolder viewHolder;
        LayoutInflater inflater = LayoutInflater.from(parent.getContext());

        View viewTaskRow = inflater.inflate(R.layout.holder_notes, parent, false);
        viewHolder = new NotesViewHolder(viewTaskRow);

        return viewHolder;
    }

    /**
     * Binds ViewHolder with RecyclerView
     * @param holder    Holder to bind
     * @param position  Position on Recycler adapter
     */
    @Override
    public void bindViewHolder(final NotesViewHolder holder, int position) {
        final Note note = mModel.getNote(position);
        holder.text.setText( note.getText() );
        holder.date.setText( note.getDate() );
        holder.btnDelete.setOnClickListener(new View.OnClickListener() {
            @Override
            public void onClick(View v) {
                clickDeleteNote(note, holder.getAdapterPosition(), holder.getLayoutPosition());
            }
        });

    }

    /**
     * @return  Application context
     */
    @Override
    public Context getAppContext() {
        try {
            return getView().getAppContext();
        } catch (NullPointerException e) {
            return null;
        }
    }

    /**
     * @return  Activity context
     */
    @Override
    public Context getActivityContext() {
        try {
            return getView().getActivityContext();
        } catch (NullPointerException e) {
            return null;
        }
    }

    /**
     * Called by View when user clicks on new Note button.
     * Creates a Note with text typed by the user and asks
     * Model to insert it in DB.
     * @param editText  EditText with text typed by user
     */
    @Override
    public void clickNewNote(final EditText editText) {
        getView().showProgress();
        final String noteText = editText.getText().toString();
        if ( !noteText.isEmpty() ) {
            new AsyncTask<Void, Void, Integer>() {
                @Override
                protected Integer doInBackground(Void... params) {
                    // Inserts note in Model, returning adapter position
                    return mModel.insertNote(makeNote(noteText));
                }

                @Override
                protected void onPostExecute(Integer adapterPosition) {
                    try {
                        if (adapterPosition > -1) {
                            // Note inserted
                            getView().clearEditText();
                            getView().notifyItemInserted(adapterPosition + 1);
                            getView().notifyItemRangeChanged(adapterPosition, mModel.getNotesCount());
                        } else {
                            // Informs about error
                            getView().hideProgress();
                            getView().showToast(makeToast("Error creating note [" + noteText + "]"));
                        }
                    } catch (NullPointerException e) {
                        e.printStackTrace();
                    }
                }
            }.execute();
        } else {
            try {
                getView().showToast(makeToast("Cannot add a blank note!"));
            } catch (NullPointerException e) {
                e.printStackTrace();
            }
        }
    }

    /**
     * Creates a Note object with given text
     * @param noteText  String with Note text
     * @return  A Note object
     */
    public Note makeNote(String noteText) {
        Note note = new Note();
        note.setText( noteText );
        note.setDate(getDate());
        return note;

    }
}
Model Layer
The Model layer is responsible for handling the business logic. It holds an ArrayList with the notes added to the database, a DAO reference to perform database operations, and a reference to the Presenter.
public class MainModel implements MVP_Main.ProvidedModelOps {

    // Presenter reference
    private MVP_Main.RequiredPresenterOps mPresenter;
    private DAO mDAO;
    // Recycler data
    public ArrayList<Note> mNotes;

    /**
     * Main constructor, called by Activity during MVP setup
     * @param presenter Presenter instance
     */
    public MainModel(MVP_Main.RequiredPresenterOps presenter) {
        this.mPresenter = presenter;
        mDAO = new DAO( mPresenter.getAppContext() );
    }

     /**
     * Inserts a note on DB
     * @param note  Note to insert
     * @return      Note's position on ArrayList
     */
    @Override
    public int insertNote(Note note) {
        Note insertedNote = mDAO.insertNote(note);
        if ( insertedNote != null ) {
            loadData();
            return getNotePosition(insertedNote);
        }
        return -1;
    }

     /**
     * Loads all Data, getting notes from DB
     * @return  true with success
     */
    @Override
    public boolean loadData() {
        mNotes = mDAO.getAllNotes();
        return mNotes != null;
    }
     /**
     * Gets a specific note from notes list using its array position
     * @param position    Array position
     * @return            Note from list
     */
    @Override
    public Note getNote(int position) {
        return mNotes.get(position);
    }

    /**
     * Get ArrayList size
     * @return  ArrayList size
     */
    @Override
    public int getNotesCount() {
        if ( mNotes != null )
            return mNotes.size();
        return 0;
    }
}
4. Tying Everything Together
With the MVP layers in place, we need to instantiate them and insert the necessary references. Before we do, we need to address a few issues that are directly related to Android.
Instantiating the Layers
Because Android doesn’t permit the instantiation of an Activity, the View layer will be instantiated for us. We are responsible for instantiating the Presenter and Model layers. Unfortunately, instantiating those layers outside the Activity can be problematic.
It is recommended to use a form of dependency injection to accomplish this. Since our goal is to concentrate on the MVP implementation, we will take an easier approach. This isn’t the best approach available, but it is the easiest to understand. We’ll discuss MVP and dependency injection later in this series.
instantiate the Presenter and Model in the Activity using local variables
set up RequiredViewOps and ProvidedModelOps in the Presenter
set up RequiredPresenterOps in the Model
save ProvidedPresenterOps as a reference to use in the View
/**
* Setup Model View Presenter pattern
*/
private void setupMVP() {
     // Create the Presenter
     MainPresenter presenter = new MainPresenter(this);
     // Create the Model
     MainModel model = new MainModel(presenter);
     // Set Presenter model
     presenter.setModel(model);
     // Set the Presenter as a interface
     mPresenter = presenter;
}
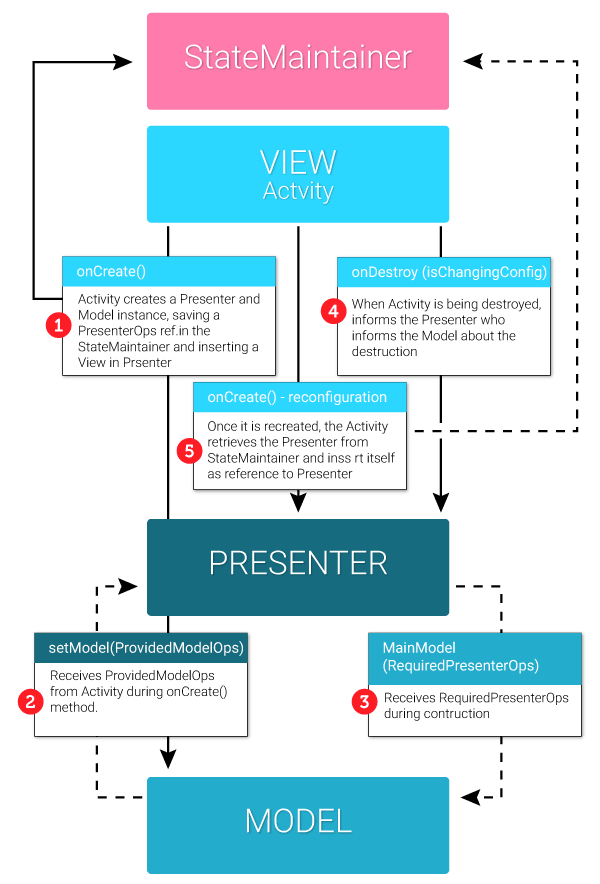
Handling Configuration Changes
Another thing we should consider is the Activity’s lifecycle. Android’s Activity could be destroyed at any time and the Presenter and Model layers could also be destroyed with it. We need to fix this by using some kind of state machine to save state during configuration changes. We should also inform the other layers about the Activity’s state.
To accomplish this, we’ll use a separate class, StateMaintainer, that contains a Fragment that maintains its state and uses this fragment to save and retrieve our objects. You can take a look at the implementation of this class in the source files of this tutorial.
We need to add a onDestroy method to the Presenter and the Model to inform them about the Activity’s current state. We also need to add a setView method to the Presenter, which will be responsible for receiving a new View reference of the recreated Activity.
public class MainActivity
        extends AppCompatActivity
    implements View.OnClickListener, MVP_Main.RequiredViewOps
{
    // …
    private void setupMVP() {
        // Check if StateMaintainer has been created
        if (mStateMaintainer.firstTimeIn()) {
            // Create the Presenter
            MainPresenter presenter = new MainPresenter(this);
            // Create the Model
            MainModel model = new MainModel(presenter);
            // Set Presenter model
            presenter.setModel(model);
            // Add Presenter and Model to StateMaintainer
            mStateMaintainer.put(presenter);
            mStateMaintainer.put(model);

            // Set the Presenter as a interface
            // To limit the communication with it
            mPresenter = presenter;

        }
        // get the Presenter from StateMaintainer
        else {
            // Get the Presenter
            mPresenter = mStateMaintainer.get(MainPresenter.class.getName());
            // Updated the View in Presenter
            mPresenter.setView(this);
        }
    }
    // …
}
Conclusion
The MVP pattern is capable of solving some issues caused by Android’s default architecture. It makes your code easy to maintain and test. Adopting MVP may look difficult at first, but once you understand the logic behind it, the whole process is straightforward.
You are now able to create your own MVP library or use a solution that is already available, such as Mosby or simple-mvp. You should now better understand what these libraries are doing behind the scenes.
We’re almost at the end of our MVP journey. In the third and last part of this series, we’ll add unit testing to the mix and adapt our code to use dependency injection with Dagger. I hope to see you there.