
So, today I’ve brought a very interesting clean, flat stylized text effect in Photoshop. We will learn how to use and implement interesting tools and techniques to achieve our desired text effect. We’ll use a variety of patterns, styles, and blending options to achieve the final outcome.
Resources:
Let’s have a look at our final design before we start.

(Download the finished, layered PSD file.)
Step 1:
Open up Photoshop and create a new file with a 1000px width and a 600px height. Or, you can adjust the sizing as you like.

Step 2:
Now we will start with the background, so create a new layer. Then, select the paint bucket tool and fill the background with color #006d68.

Step 3:
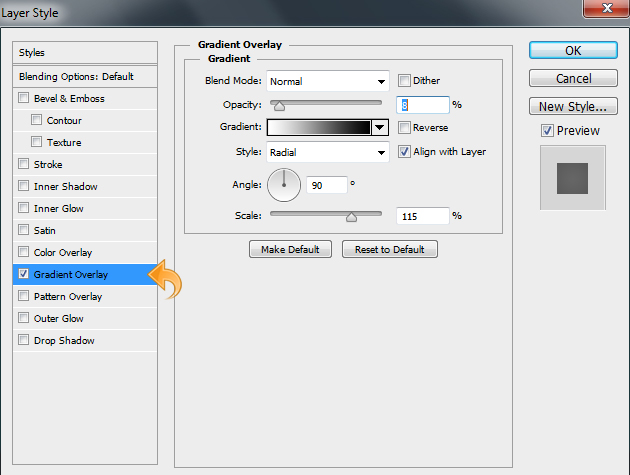
Select the background layer and click on “Layer” > “Layer styles” > “Gradient overlay” (or, double-click on the selected layer) and add a “black 7 white” gradient. Reduce the opacity to 8% and set the scale to 115%.
Step 4:
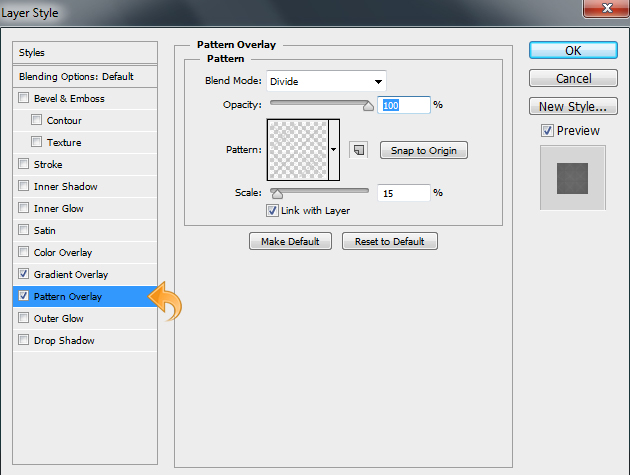
Select the background layer and click on “Layer” > “Layer styles” > “Pattern overlay” (or, double-click on the selected layer) and add one of the subtle patterns from the resources above. Change the blending mode to “Divide” and set the pattern scale to 15%.
Step 5:
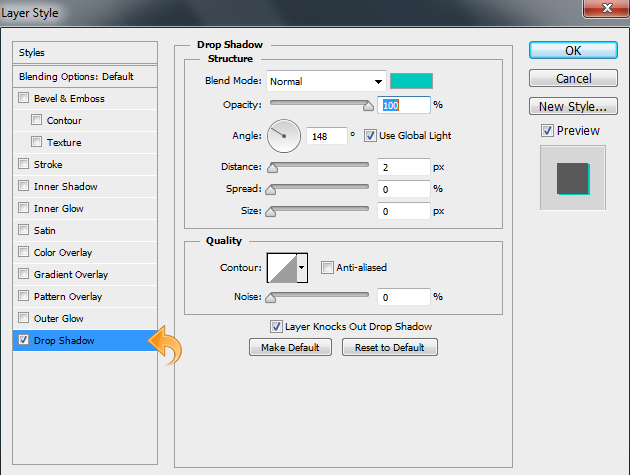
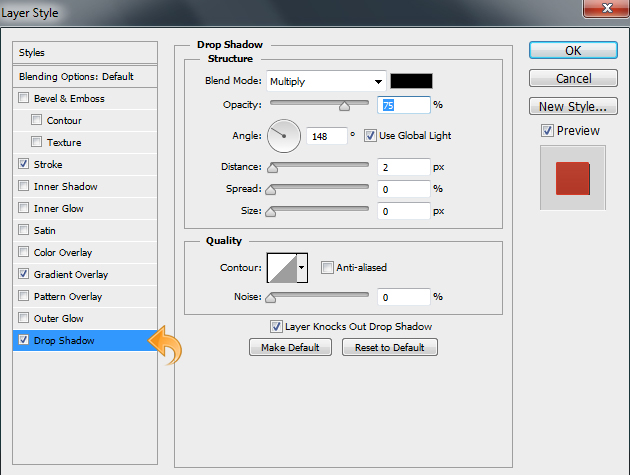
Now, click on the type tool and add the desired text with color #070707. Then, click on “Layer” > “Layer styles” > “Drop shadow” (or, double-click on the selected layer) and add a shadow with the settings shown in the image below.
Step 6:
Repeat the same process and add additional text using the same color. Then, click on “Layer” > “Layer styles” > “Drop shadow” (or, double-click on the selected layer) and add shadow to the text with the same settings used above.

Step 7:
Again, select the type tool and add text using color #161d21. Then, move the text to the left side.

Step 8:
Repeat the same process and add the rest of the text and move it once again to the left.

Step 9:
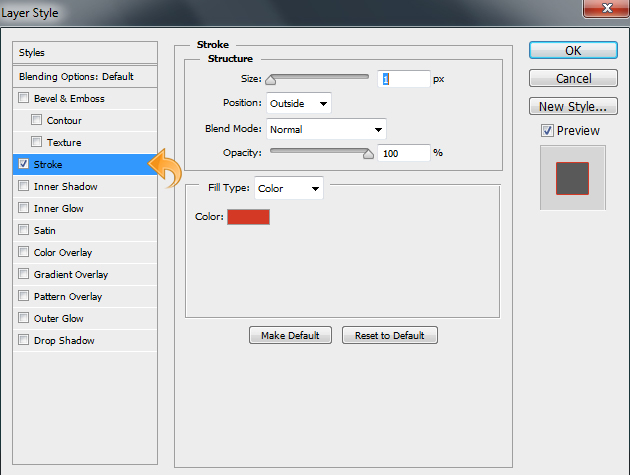
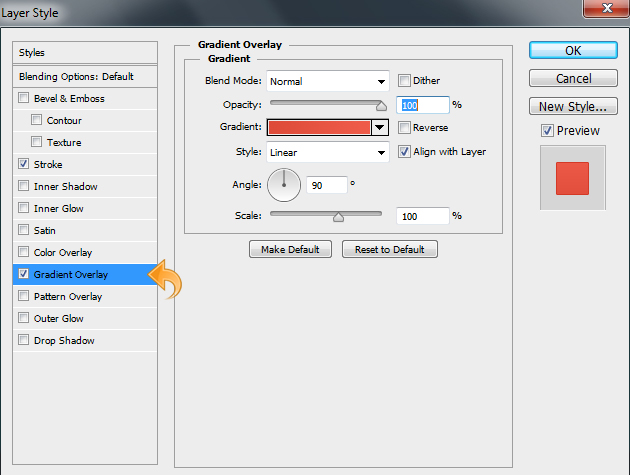
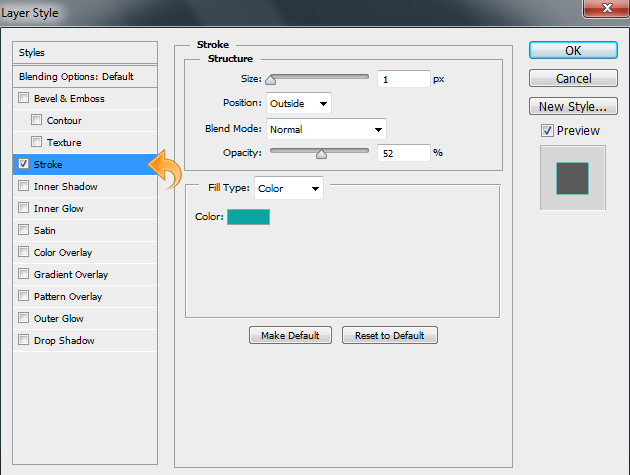
Select the type tool and add text using color #bc4232; make sure you slightly decrease the text size. Then, move the text slightly to the left side. Select the text layer and click on “Layer” > “Layer styles” > “Stroke” (or, double-click on the selected layer) and add some 1px stroke using color #d43926. Keep the settings same as shown in the image below.
Once again, click on “Layer” > “Layer styles” > “Gradient overlay” (double-click on the selected layer), keep the settings the same as shown in the following image.

Then, click on “Layer” > “Layer styles” > “Drop shadow” (double-click on the selected layer), reduce the opacity to 75% and keep the rest of the settings the same as shown in the image below.
Step 10:
Repeat the same process and add the rest of the text and move it the left. Then, click on “Layer styles” to add stroke, gradient, and drop shadow using the same settings shown above.

Step 11:
Again, select the type tool and add text; make the text size smaller than the previous one. Then, select move the text slightly to the left side. Select the text layer and click on “Layer” > “Layer styles” (or, double-click on the selected layer) to add stroke, gradient, overlay, and drop shadow.
Add stroke using the following settings:

Add gradient using these settings:
Finally, add drop shadow using the settings below.

Step 12:
Now, duplicate the main text layer and reduce the fill to 0%. Then, click on “Layer” > “Layer Styles” > “Pattern overlay” and add one of the subtle pattern from the resources above. Adjust the opacity to 43% and scale to 25%.

Step 13:
Now we will add some dark shading to the text, so create a new layer, then click on the pen tool, create a simple path, right-click on the path, and click on “Make selection”.
Now, select the paint bucket tool and fill the selection with color #000000. Then, reduce the layer opacity to 20%.

Step 14:
Again, repeat the same process using the pen tool to make the selection and create dark shading on all of the remaining text.

Step 15:
Now, let’s add some elements to our background and text. Select the line tool and add few lines with a 3px weight and #161d21 as your chosen color.

Step 16:
Repeat the same process and add more lines using the line tool again, this time using color #bb4231.

Step 17:
Once again, create some more lines, this time with widely variated lengths using color #0e1111. Then, click on “Layer” > “Layer styles” to add a bit of stroke. Keep the settings same as shown in the image below.
Step 18:
Select the ellipse tool and add small circles using color #161d21. Then, click on “Layer” >” Layer styles” > “Stroke”. Use the settings shown below.

Step 19:
Now let’s create the shadow; we will play with the shadow placement, so create a new layer and select the pen tool to create the shadow path. Click on “Make selection” and fill it with color #161d21.

Step 20:
Now, reduce the shadow opacity to 30% and we are done.
Our shaded, stylized text effect is ready. I hope you guys enjoyed the process. I’ll be back with some more. Until then, take care!