As a developer, you want to build fast, modern, progressive web applications (PWAs) that reach as many users as possible. That’s the goal—and it’s a good one. But if accessibility isn’t part of that process, you could be unintentionally leaving people behind. Accessibility (a11y) is essential to creating inclusive experiences and is a hallmark of thoughtful, user-centered development. In most cases, it’s also a legal requirement.
Let’s talk about how to build apps that are both fast and accessible—because you shouldn’t have to choose.
In this post, I’ll show you how combining the intelligent defaults from a framework like Next.js with specialized tools like Deque’s axe DevTools enables you to create a tech stack that not only sets you up for success—but also helps you prove that your application works for everyone.
I’m choosing to focus on Next.js because of how it encourages accessible development by default. From semantic HTML to ARIA roles, it’s clear accessibility wasn’t an afterthought—it’s built into the framework. And because accessibility isn’t just about clean markup (it’s about real-world usability), we’ll go beyond the basics that a framework like Next.js provides to explore how integrating axe DevTools makes it possible to validate and prove your app is truly accessible—in practice.
Why build accessibly in the first place?
Before we dive deeper into frameworks and tools, let’s ground ourselves in why accessibility matters:
- Accessibility is essential to good UX. It ensures that your app works for everyone—including users with disabilities.
- It’s about function, not just form. That means your app should be navigable by keyboard, readable by screen readers, and free of blockers like broken flows or unclear interactions.
- It’s also the law. Depending on your industry or region, you may be required to meet accessibility standards and laws like WCAG, the ADA, or the European Accessibility Act. Inaccessible sites can (and do) lead to legal action.
But compliance isn’t the end goal. Building accessibly leads to better structure, improved performance, and more thoughtful user experiences. Semantic HTML, readable content, and smooth keyboard navigation benefit everyone—not just people using assistive technology.
Frameworks like Next.js help you start strong, but tools like axe DevTools help you validate that your app is truly accessible in practice. Because best practices are only the beginning—true accessibility requires testing, iteration, and visibility into how your app performs for real users.
Challenges developers face
Understanding that you need to build accessibly is one thing—knowing where to start is another. If you’re new to accessibility, the learning curve can feel steep. WCAG can be dense, and assistive technologies like screen readers may be unfamiliar. And when you’re trying to ship fast, accessibility can feel like yet another thing to tack on before a deadline.
But the earlier you build a11y into your workflow, the easier it is to manage—and the less it costs to fix.
That’s why frameworks like Next.js are so helpful: they surface accessibility issues as you code, reminding you when something needs attention. And with tools like the axe DevTools Browser Extension, you can run automated tests and follow guided workflows to identify and fix real accessibility barriers—early, and with confidence.
Want to check it out in action? Request a demo of axe DevTools Browser Extension today!
Four ways Next.js framework assists in accessible development
Next.js includes several built-in features that make it easier to create accessible applications—without adding complexity to your workflow. In this section, we’ll look at four practical ways the framework helps you build for everyone:
- Routing and announcements: Built-in support for screen reader announcements during page transitions improves navigation for assistive technology users.
- Head management: The next/head component lets you dynamically manage page titles and metadata, improving accessibility and SEO.
- Component accessibility: The component supports keyboard and screen reader interactions out of the box and boosts performance.
- Linting: Integrated accessibility linting flags issues like missing alt text and invalid markup early—so you can catch and fix problems before launch.
Let’s get started.
Routing and announcements
On the topic of screen readers and HTML markup, Next.js does an excellent job of announcing page changes during server-side rendering—and it carries that same accessibility consideration into client-side transitions. Screen readers and other assistive technology announce the page’s title each time a new page loads so users understand that the state of the webpage has changed.
Next.js includes a built-in route announcer that works by default, looking first at the document.title, then the page’s <h1> element, and finally, the URL path to determine what should be announced. Because of this hierarchy, each page must have a well-structured and descriptive title and heading. This feature is also fully supported when using the next/link component, which handles client-side navigation seamlessly. Routing in vanilla React can be clunky and unintuitive, but Next.js handles it well. That alone is a huge improvement on accessibility.
Head management
The <head> tag plays a critical role in both a11y and search engine optimization (SEO). It provides essential context for search engines and ATs, helping them understand a page’s purpose and content. Next.js makes managing this simpler with a built-in next/head component.
You can import it into any page and dynamically set things like the page <title>, meta descriptions, and more—keeping your app accessible and well-structured:
import Head from 'next/head';

export default function BlogPost({ title, description }) {
  return (
    <>
      <Head>
        <title>{title} | My Blog</title>
        <meta name="description" content={description} />
        <meta property="og:title" content={title} />
      </Head>
      <main>
        <h1>{title}</h1>
        <p>{description}</p>
        {/* blog content here */}
      </main>
    </>
  );
}
Another benefit of using next/head is that it automatically clears out previous head content when navigating between pages. This ensures your metadata is accurate per page and doesn’t carry over information from other routes. Whether you’re optimizing for screen readers or search engines, this kind of precision matters.
<Link> component accessibility
The Next.js component is more than a convenience for routing. Behind the scenes, it prefetches the destination page’s code (via the href) and data in the background, so the response is significantly faster when a user clicks or navigates via the keyboard. This kind of speed is more than a UX upgrade—it makes a tangible difference for users who may be on a slower network or those who use older devices.
From an accessibility standpoint, the component supports keyboard navigation out of the box. It can receive focus and be triggered by Enter or Space, and it works seamlessly with screen readers. Each is also fully compatible with tabIndex, making it easier to manage keyboard focus in custom layouts or navigation menus.
If you’re building out custom navigation or want to be confident your keyboard accessibility actually works in practice, tools like the axe DevTools browser extension include Intelligent Guided Tests (IGTs) that walk you through common patterns—like link navigation—to help validate focus order, interaction, and screen reader behavior.
Here’s an example of rendering navigation links dynamically—while keeping everything accessible:
import Link from 'next/link';

const menuItems = [
  { label: 'Home', href: '/' },
  { label: 'Blog', href: '/blog' },
  { label: 'Contact', href: '/contact' },
];

export function NavigationMenu() {
  return (
    <nav aria-label="Main Navigation">
      <ul>
        {menuItems.map(({ label, href }) => (
          <li key={href}>
            <Link href={href}>{label}</Link>
          </li>
        ))}
      </ul>
    </nav>
  );
}
This setup improves page load time and ensures that your navigation is focusable, readable, and screen reader–friendly without adding extra overhead. The goal here isn’t to reinvent how links work but to ensure they behave reliably for all users, regardless of how they interact with your application.
Linting
One of the most practical accessibility features Next.js offers out of the box is integrated linting with eslint-plugin-jsx-a11y. For those unfamiliar, a linter is a static code analysis tool that scans your source code for issues ranging from stylistic errors to broken patterns. In this case, it’s scanning for a11y issues before you even run your app.
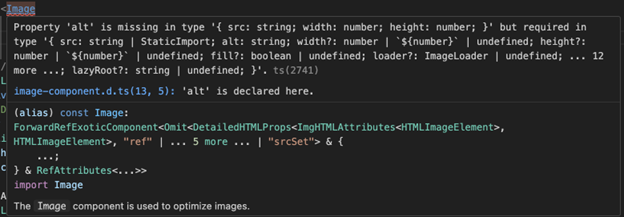
Because Next.js includes this plugin by default, it starts flagging things like missing alt attributes (see images below), misused ARIA roles, unsupported elements, and incorrect semantic markup from the jump. You don’t have to think about configuring it, and since you’re being flagged during development, it’s already helping you write better code.

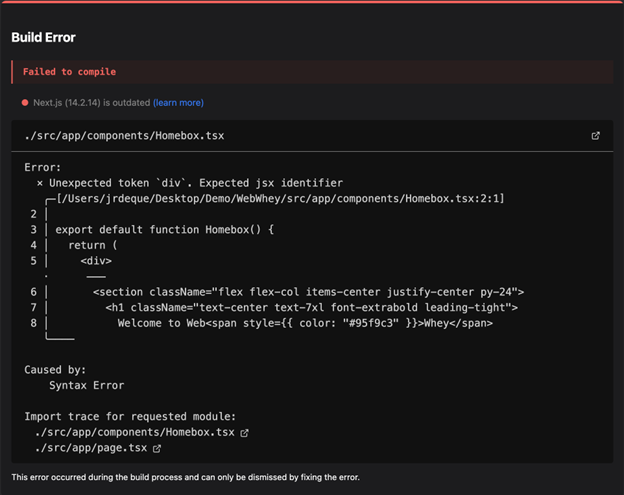
If you add two <h1> elements to a single page (see the following image) and run the application in a browser, Next.js will throw a full-screen build error that blocks you from continuing and nudges you toward better semantic structure, which is especially important for users navigating with ATs.
This kind of immediate feedback changes the way you think about markup. You’re not writing code that looks good. You’re writing semantic code that communicates meaning—clearly and consistently. For users relying on screen readers or keyboard nav, that distinction is everything and clearly impacts how that information is displayed to those users.
But what if you need more than just the basics?
While Next.js helps catch common issues in the IDE, Deque’s axe DevTools Linter takes it further—with professional-grade coverage, customization, and CI/CD integration designed for real-world dev teams.
Here’s what axe DevTools Linter adds beyond framework defaults:
- Custom component linting: Map your design system or component library to enforce accessibility usage patterns automatically.
- Pre-commit hooks: Catch issues before code gets shared with your team.
- Pull request checks: Block inaccessible code from being merged and give reviewers actionable fix guidance.
- CI/CD integration: Scan and enforce standards across GitHub, Jenkins, SonarQube, and more.
- IDE support: Use it directly in VS Code, IntelliJ, or WebStorm with visual issue reporting and in-line feedback.
- Broad framework support: React, Vue, Angular, HTML, React Native—and beyond.
Whether you’re writing code in your IDE, reviewing a pull request, or shipping to production, axe DevTools Linter meets you where you work and enforces the standards your team agrees on. Combining the built-in help of frameworks like Next.js with tools like axe DevTools Linter means accessibility isn’t just encouraged—it’s enforced, from first commit to final deployment.
Build accessibility into every phase of development
If you’re building with Next.js, you’re already off to a good start—its built-in features help guide developers toward more accessible outcomes by default. However, accessible development doesn’t stop with semantic HTML or helpful linting. To truly deliver experiences that work for everyone, you need the ability to test, validate, and enforce accessibility throughout your team’s workflow.
That’s where the tools in the axe DevTools suite come in. Together, they give you the visibility and control to catch what frameworks can’t, ensuring your app isn’t just fast and modern, but also usable by everyone.
- Use the axe DevTools Browser Extension to test live pages in your browser and catch accessibility issues in real time.
- Add the axe DevTools Linter to your IDE or CI pipeline to catch issues earlier in development—even in custom components.
- Encourage your team to treat a11y as a shared responsibility.
Up next:
Stay tuned for Part Two of this post, where we’ll dive deeper into inclusive development practices, including how to structure your components, manage focus, and support real-world usability across a range of devices and assistive technologies.
Because building accessibly isn’t just about tools—it’s about building for everyone, by design.