Learn how to create Photoshop text effects in this beginner’s tutorial. You’ll be shown how to create a Photoshop action for your text effect and more.
This text effect that we are going to create is part of Super Bundle Styles. This is a collection of 146 unique styles and is the first bundle of the series.

Tutorial Assets
The following assets were used during this tutorial:
- Soviet Program font
- Image inside the zip file attached to this tutorial (optional)
1. How to Create the Text Effect
Step 1
Create a new 850 x 500 px 72 dpi document and name it Glass Text Effect. Then place an image that you’d like to use as the background.
I’m going to use an abstract image that I created. This image is attached to this tutorial.

Step 2
Go to Window > Character to open the Character panel. Then change the font to Soviet Program, the text size to 130 pt, and the color to white #ffffff, and turn Faux Bold On.
After that, pick the Horizontal Type Tool (T) and write GLASS.

Step 3
Select the text layer and change the Fill Opacity to 0%. Then go to Layer > Layer Style > Blending Options to open the Layer Style panel.

Step 4
To create this text effect, we need two layers. So let’s first create a border with a simple shadow.
Add a Drop Shadow with these settings:
- Blend Mode: Normal
-
Color:
#000000 - Opacity: 100%
- Use Global Light: Off
- Angle: 120°
- Distance: 5 px
- Spread: 21%
- Size: 9 px
- Contour: Linear
- Anti-aliased: Off
- Noise: 0%
- Layer Knocks Out Drop Shadow: On

Step 5
Add a Stroke with these settings:
- Size: 4 px
- Position: Outside
- Blend Mode: Normal
- Opacity: 78%
- Overprint: Off
- Fill Type: Gradient
- Reverse: Off
- Align with Layer: On
- Style: Linear
- Angle: 75°
- Dither: Off
- Scale: 100%
Click on the gradient bar to create a new gradient.
Note that we have to add stops above (Opacity) and below (Colors) the gradient bar.
Let’s first add stops for opacity:
- Stop 1: Location: 0% Opacity: 0%
- Stop 2: Location: 4% Opacity: 100%
- Stop 3: Location: 26% Opacity: 0%
- Stop 4: Location: 43% Opacity: 100%
- Stop 5: Location: 64% Opacity: 0%
- Stop 6: Location: 85% Opacity: 100%
- Stop 7: Location: 100% Opacity: 0%
Then add stops for the colors below the gradient bar with these settings:
-
Stop 1: Location: 0% Color:
#ffffff -
Stop 2: Location: 6% Color:
#ffffff -
Stop 3: Location: 7% Color:
#194962 -
Stop 4: Location: 41% Color:
#ffffff -
Stop 5: Location: 42% Color:
#194962 -
Stop 6: Location: 84% Color:
#e0e0e0 -
Stop 7: Location: 85% Color:
#194962
Then name it Glass Gradient and click on New to add this gradient to the presets, we are going to use it later.

Step 6
Now add a Bevel & Emboss with these settings:
- Style: Stroke Emboss
- Technique: Smooth
- Depth: 1000%
- Direction: Down
- Size: 1 px
- Soften: 0 px
- Use Global Light: Off
- Angle: 86°
- Altitude: 21°
- Gloss Contour: Cove – Shallow
- Highlight Mode: Screen
-
Highlight Color:
#ffffff - Highlight Opacity: 75%
- Shadow Mode: Multiply
-
Shadow Color:
#000000 - Shadow Opacity: 29%
Then activate the Contour option of Bevel & Emboss with these settings:
- Contour: Linear
- Anti-aliased: On
- Range: 50%

Step 7
Now add an Inner Glow with these settings:
- Blend Mode: Normal
- Opacity: 75%
- Noise: 0%
-
Color:
#fdfdfd - Technique: Softer
- Source: Edge
- Choke: 0%
- Size: 2 px
- Contour: Linear
- Anti-aliased: Off
- Range: 50%
- Jitter: 0%

Step 8
Add an Outer Glow with these settings:
- Blend Mode: Normal
- Opacity: 72%
- Noise: 0%
-
Color:
#b0f1ff - Technique: Softer
- Spread: 91%
- Size: 4 px
- Contour: Linear
- Anti-aliased: On
- Range: 100%
- Jitter: 0%
After that, click OK.

Step 9
Press Control-J to duplicate the text layer, and then rename this copy Glass 2. After that, Double-Click the layer Glass 2 to open the Layer Style panel.
Add a Gradient Overlay with these settings:
- Blend Mode: Normal
- Dither: Off
- Opacity: 100%
- Reverse: Off
- Style: Linear
- Align with Layer: On
- Angle: 90°
- Scale: 100%
Click on the gradient bar and create a new gradient with these settings:
-
Stop 1: Location: 0% Color:
#40006e -
Stop 2: Location: 51% Color:
#b900ce -
Stop 3: Location: 100% Color:
#40006e

Step 10
Now add a Color Overlay with these settings:
- Blend Mode: Color
-
Color:
#ff003c - Opacity: 100%
The Color Overlay will make it easier for you to change the color of the text effect later.

Step 11
Now let’s make the text effect look glossy.
Add a Bevel & Emboss with these settings:
- Style: Inner Bevel
- Technique: Smooth
- Depth: 317 %
- Direction: Up
- Size: 43 px
- Soften: 0 px
- Use Global Light: Off
- Angle: 90°
- Altitude: 37°
- Gloss Contour: Rolling Slope – Descending
- Highlight Mode: Screen
-
Highlight Color:
#ffffff - Highlight Opacity: 16%
- Shadow Mode: Multiply
-
Shadow Color:
#000000 - Shadow Opacity: 4%

Step 12
Add an Inner Shadow with these settings:
- Blend Mode: Vivid Light
-
Color:
#baf3ff - Opacity: 100%
- Use Global Light: Off
- Angle: 120°
- Distance: 0 px
- Choke: 0%
- Size: 18 px
- Contour: Linear
- Anti-aliased: Off
- Noise: 0%

Step 13
Add a Stroke with these settings:
- Size: 3 px
- Position: Center
- Blend Mode: Normal
- Opacity: 78%
- Overprint: Off
- Fill Type: Gradient
- Gradient: Glass Gradient (the one we created)
- Reverse: Off
- Style: Linear
- Align with Layer: On
- Angle: 78°
- Dither: Off
- Scale: 150%

Step 14
Add an Inner Glow with these settings:
- Blend Mode: Normal
- Opacity: 100%
- Noise: 0%
-
Color:
#000000 - Technique: Softer
- Source: Edge
- Choke: 59%
- Size: 3 px
- Contour: Linear
- Anti-aliased: On
- Range: 100%
- Jitter: 0%

Step 15
Add a Drop Shadow with these settings:
- Blend Mode: Multiply
-
Color:
#0076a2 - Opacity: 71%
- Use Global Light: Off
- Angle: 120°
- Distance: 3 px
- Spread: 7 %
- Size: 2 px
- Contour: Linear
- Anti-aliased: Off
- Noise: 0%
- Layer Knocks Out Drop Shadow: On
After that, click OK.

2. How to Create the Action
Now that we have the styles complete, we are going to create an action to make it easier to apply the effect to anything we want.
Step 1
Select the first text layer (glass) on the Layers panel, and then go to Window > Styles to open the Styles panel.
After that, click on the little Create New Style icon on the Styles panel, name it Glass – A, and click OK.

Do the same for the second text layer (glass 2), naming it Glass – B.

Step 2
Go to Window > Actions to open the Actions panel. Then click on Create new set, name it Glass Text Effect, and click OK.

Step 3
Before we start recording the new action, go to the Layers panel and click to select the first text layer.
Then go back to the Actions panel, and click on the Create New Action icon. Name it Red Glass Text Effect, and click on Record.

Step 4
Go to the Styles panel and click on the Glass – A style.

Step 5
Now press Control-J to duplicate the layer, and rename it glass TOP.
After that, go to the Styles panel again and click on the Glass – B style. And finally, go to the Actions panel and click on the Stop Recording icon.

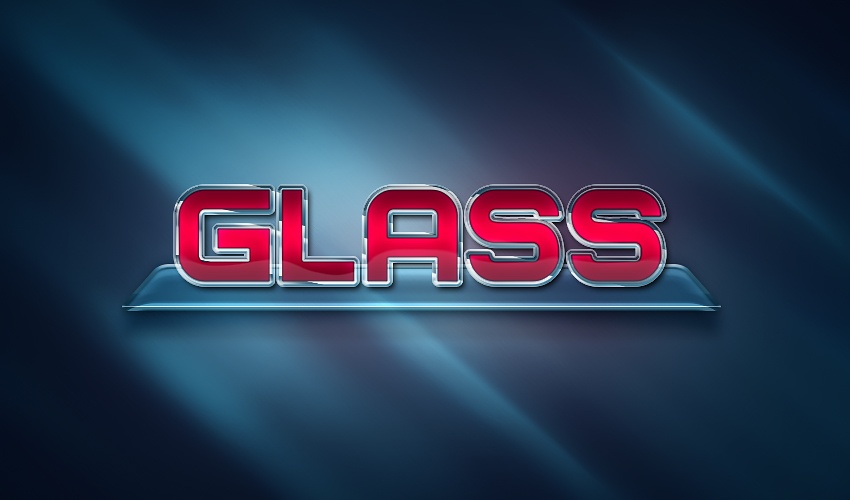
And We’re Done!
To apply the effect to some text, you have to select the Red Glass Text Effect action in the Actions panel and then click on Play.
The action will automatically duplicate the layer and apply both styles correctly.

In this tutorial, you learned how to create a glass effect using a simple gradient. You also learned how to use two layers to create a single text effect. Then you learned how to create an action to apply the effect to anything you want with a single click.