Do you have a fascinating dinner event in mind and wish to kick off the celebration with a catchy restaurant menu design? Great! There are many software packages available to enable you to design flyer templates, but today we will be using Adobe Illustrator in a step-by-step guide to custom designing a Valentine’s Dinner Menu flyer!
Don’t have the time? You can also find restaurant flyer templates, event flyers, and menu templates on GraphicRiver.
1. The Fonts You Need to Design Your Flyer Menu
Let’s jump-start the project by setting up our menu flyer template. You’ll need to download the following font files from Font Squirrel:
Install the fonts on your system, and let’s get started with our flyer template!
2. How to Set Up the Flyer Menu Design
Open Adobe Illustrator.
Click ‘Create New‘, and select ‘Print‘. First, we are going to customize the size of our flyer template. Set up the document to the following:
- Name: Val_Flyer_Menu
- Number of Artboards: 1
- Orientation: Portrait
- Width: 13.80 cm
- Height: 21.10 cm
Select More Settings and set Bleed: 0.2 cm. Once you Create Document, the bleed lines will appear as red lines around the artboard. These lines indicate how far the artwork can extend so when cutting the flyers, no white edges will appear.

3. How to Design the Menu Flyer Background
Step 1
We begin by setting up our layers from the Layers panel: Window > Layers.
Rename ‘Layer 1’ to ‘BACKGROUND’.
Click the Create New Layer option from the Layers panel, and create another two layers, ‘GRAPHICS’ and ‘TYPE’.
Move on to the ‘BACKGROUND’ layer to start.

Step 2
Turn on the Smart Guides (Command-U).
Then select the Rectangle Tool (M) with a color fill of #EE3138, and draw a rectangle to cover the artboard from one bleed line edge to the other, using the Smart Guides.

Step 3
Next, let’s create a polka-dot pattern for the design template.
Open the Swatches panel: Windows > Swatches. Choose a color fill of #F48c93 and then select the Ellipse Tool (L). Hold down the Shift key and draw a 0.06 x 0.06 cm ellipse.
With the ellipse selected, Object > Pattern > Make.
The Pattern Options dialog box will appear. Set the options to:
- Tile Type: Brick by Row
- Width: 0.5 cm
- Height: 0.5 cm
The new polka-dot pattern will appear instantly in the Swatches panel. You can delete the ellipse after the pattern is created.

Step 4
Let’s duplicate the red background rectangle.
Copy (Command-C) and Paste in Front (Command-F) to duplicate the same rectangle on top of the original, and apply the polka-dot pattern we created as a fill.
Then select the Rectangle Tool (M) with a white fill and draw a rectangle of about 10.7 x 18.6 cm.
Open the Align panel: Windows > Align.
Select Align to Artboard from the Align To drop-down menu, and Horizontal & Vertical Align Center the rectangle.

Step 5
Select the white rectangle with the Direct Selection Tool (A), and the Live Corner widgets will appear next to each corner on the rectangle.
Drag the corner to round about 0.62 cm.
Then, with the shape still selected, Object Path > Offset Path:
- Offset: -0.25cm
- Joins: Round
- OK

Step 6
Open the Stroke panel (Window > Stroke). Give the new offset rectangle a null fill, Stroke Weight of 2.5 pt, and color of #F48284.
Now let’s duplicate our artboard to create the back side of our design.
Open the Artboards panel: Windows > Artboards.
Select the New Artboard icon from panel to duplicate the design of the first artboard. Give the offset inner rectangle a stroke color of #525627.
Lock the ‘BACKGROUND’ layer from the Layers panel and move on to the ‘GRAPHICS’ layer.

4. How to Illustrate the Valentine’s Menu Flyer Graphics
Step 1
Let’s move on to creating some graphics to support the theme of our flyer. I want to create a heart-shaped plate with a knife and fork.
Select the Pen Tool (P) from the Tools panel. Choose a fill color of #F9BCC7, null stroke, and draw half a heart shape.
Take the Selection Tool (V) to select the heart shape. Copy (Command-C) and Paste in Front (Command-F), to duplicate the shape on top of the original.
Then take the Reflect Tool (O). Set the blue center reference point at the center, as shown below; Option-Shift-Drag and release when the half heart is mirrored into position.
Select both halves, and then open the Pathfinder panel: Windows > Pathfinder.
Click the Shape Modes: Unite icon from the Pathfinder panel, to make a compound shape.

Step 2
Select the heart, position it on the upper side of the first artboard, and Horizontal Align Center from the Align panel.
Object > Path > Offset Path, with these settings:
- Offset: -0.4 cm
- Joins: Miter
- Miter Limit: 4
- OK
Give the offset heart a Stroke Weight 2 pt, null fill, and stroke color of #FACCD7 .

Step 3
Next, let’s create a knife and fork for our dinner menu theme.
Select the Pen Tool (P), and with the use of Smart Guides, draw a polygon-shaped knife and fork, with a fill color of #F16777.
Then take the Direct Selection Tool (A). Select the fork’s neck top and handle to curve its Live Corner widgets, as shown below.
Round them to the highest possible point, which will be highlighted in red.
Then select the knife and round all Live Corner widgets to the highest point.

Step 4
To create the fork prongs, select the Rounded Rectangle Tool, and draw a long, vertical rectangle with a white fill. Use the Drag-Drop action to duplicate the rounded rectangle shape across, as shown below. Select the rounded rectangle, hold the Shift and Alt keys, and drag the object across with the Selection Tool (V). This will create a duplicate. Transform Again (Command-D).
From the Pathfinder panel, Shape Modes: Unite the rounded rectangles.
Then select both the fork and the three rounded rectangle shapes and Shape Modes: Minus Front.
Now we have a fork!

Step 5
Place the knife and fork at the base of the heart-shaped plate.
Object > Transform > Rotate the fork by 60° and the knife by -55°.
Align them as you see fit.

Step 6
Let’s place a heart between the fork and the knife.
Drag and drop to duplicate the heart, hold down the Shift-Alt keys, and Drag down to duplicate. Scale it down using the Free Transform Tool (E), while holding the Shift-Alt keys. Give the new heart a golden fill color of #E0BD6f.
Then select the Rectangle Tool (M) with a fill color of #525627 and add a strip banner of about 14 x 2.5 cm from one bleed line edge to the other.

Step 7
Now let’s add some minor graphics to align our text space on the flyer design. We will create ribbon ends for the ‘Flyer Date’, and bar brackets for the catchy offer.
Take the Rectangle Tool (M), and draw a 1 x 1 cm square with the golden fill color #E0BD6f.
Object > Path > Add Anchor Points. Select the center left anchor and drag it inwards to create a ribbon effect.
Use the Reflect Tool (O) to mirror the ribbon. Set the blue center reference point at the center, as shown below; Option-Shift-Drag and release into position.
Group (Command-G) the two ribbon ends and from the Align panel, Horizontal Align Center.

Step 8
For the bars, it’s super easy. Use the Rectangle Tool (M), and draw an approx 0.14 x 1.60 cm bar, with the golden fill color #E0BD6f.
Use the Reflect Tool (O) to set the blue center reference point and Option-Shift-Drag and release into the mirrored position.
Group (Command-G) the bars and Horizontal Align Center from the Align panel.

Step 9
For the back side of the flyer template, we will keep it simple with one header ribbon and a heart underneath.
Use the Rectangle Tool (M) to draw a 6.44 x 0.88 cm rectangle with a golden fill color #E0BD6f.
Object > Path > Add Anchor Points and tweak the ends inwards.
Then select the golden little heart from the front artboard, drag and drop to the back artboard, and scale down using the Free Transform Tool (E), with the Shift and Alt keys pressed.
Select the ribbon and heart and from the Align panel, Horizontal Align Center.

5. How to Add Type & Lay Out the Flyer Menu Template
Step 1
Lock the ‘GRAPHICS’ layer from the Layers panel, and move on to the ‘TYPE’ layer.
Now we can add type to our menu flyer. Let’s add the words ‘Happy ValenDine’s Day’, under one another, on top of the heart-plate.
Open the Character panel: Window > Type > Character
Select the Type Tool from the Tools panel. We are going to create point text, not a bounding box, for the first word ‘Happy’.
Click on the top center of the heart shape and type in ‘Happy’ with Font: Nickainley set at Font Size 49.6 pt. Choose Align Center from Paragraph on the top menu.
Select a fill and stroke color of #D91F32, Stroke weight set at 1 pt.
Use the same setting but click at the base-center of the heart shape and type in ‘Day’. Now let’s add ‘ValenDine’s’ between the two pieces of text. Remove the stroke color.
Type ‘ValenDine’s’, and from the Character panel:
- Font: Grand Hotel
- Font Size: 89.19 pt
- Tracking: -25

Step 2
Next, let’s add a slight arc to the type.
Select the ‘ValenDine’s’ text and Effect > Warp > Arc at 28°. You can reposition this text by using the Selection Tool (V) to drag it down slightly.
Select the ‘Happy’ text and Effect > Warp > Arc at 10°.
Then select all three pieces of text and Horizontal Align Center from the Align panel.

Step 3
Next, let’s add the date of our event flyer. Select the Type Tool, and draw a type bounding box between the ribbon ends.
Type in ’14 FEB’ with fill color #EE3138, using the Character panel settings:
- Font: Passion One (Bold)
- Font Size: 36 pt
- Tracking: 25
And below draw another type bounding box, aligned from one ribbon end to the other.
Type in the catchy offer of ‘FREE GLASS OF BUBBLY’ with fill color #E0BD6F, using the Character panel settings:
- Font: Josefin Sans (Semi Bold)
- Font Size: 14.24 pt
- Tracking: -75

Step 4
Now let’s add our main offer for the evening… a ‘3 Course Meal for 60$’.
Take the Type Tool and create a point text, on the side of the left bar.
From the menu, select Paragraph > Align Right.
Type in ‘3’ with Fill color #EE3138, using the Character panel settings:
- Font: Passion One (Bold)
- Font Size: 67.15 pt
Then create a type bounding box between the gold bars. Select Paragraph > Align Right.
Type in ‘3’ with Fill color #525627, using the Character panel settings:
- Font: Montserrat
- Font Size: 20 pt
- Leading: 24 pt
- Tracking: 54

Step 5
Next, let’s add our dinner’s special cost.
With the Type Tool, create a point type text, on the side of the right bar. Select Paragraph > Align Right
Type in ’60$’ with fill color #EE3138, using the Character panel settings:
- Font: Passion One (Bold)
- Font Size: 55.55 pt
- Tracking: 25
Then we need to add the location of our restaurant underneath.
Create a type bounding box aligned between the gold bars. Select Paragraph > Align Center.
Type in the dummy location (# Street, Town, City) with fill color #F16777, using the Character panel settings:
- Font: Passion One (Bold)
- Font Size: 15.18 pt
- Tracking: 50

Step 6
Next, let’s add a dotted line leading to the 60$.
Select the Pen Tool (P), with null fill and stroke color #F16777.
From the Stroke panel, set the following:
- Stroke Weight: 5 pt
- Cap: Round Cap
- Corner: Round Join
- Check Dashed Line
- Dash: 0 pt
- Gap: 10 pt

Step 7
Let’s finish off the menu flyer’s front side, by adding our Restaurant + Website + Booking Info on the bottom of the flyer template.
With the Type Tool, create a point text, within the green bar.
From the menu bar, select Paragraph > Align Center.
Type in ‘Restaurant’ with a white fill color and the Character panel settings:
- Font: Grand Hotel
- Font Size: 42.45 pt
Underneath, create another point text center aligned, with white fill, and add the website ‘www.restaurant.com‘.
Type in ‘Restaurant’ with white fill color and the Character panel settings:
- Font: Montserrat (Light)
- Font Size: 14.42 pt
- Tracking: 160
Finally, type ‘ADVANCED BOOKING REQUIRED’ with fill color #525627, with the settings:
- Font: Montserrat
- Font Size: 12.58 pt

Step 8
Let’s move on to the second artboard for the back of the flyer.
Take the Type Tool and create a type bounding box, within the golden ribbon. Select Paragraph > Align Center.
Type in ‘SPECIAL MENU’ with white fill color and the Character panel settings:
- Font: Montserrat
- Font Size: 21 pt

Step 9
For the final bits, we will create our special dinner menu layout.
We have three sections: the appetisers, main dishes, and dessert. So we need to create three sections with a Title bounding box, followed by three dishes and the description of each plate.
So let’s take the Type Tool and create a type bounding box in the top center, the width of the ribbon for the title.
With a fill color of #F16777, Paragraph > Align Center, type in temporarily ‘Title’ with the settings:
- Font: Grand Hotel
- Font Size: 24.57 pt
Slightly below, add a point text with fill color #525627, Paragraph > Align Center, and type in temporarily ‘PLATE’ with the settings:
- Font: Montserrat (Light)
- Font Size: 12.28 pt
For the menu plate descriptions, use a grey fill color #969696, Paragraph > Align Center, and type in the dummy text ‘Lorem ipsum dolor sit amet, consectetur adig et elit’ with the settings:
- Font: Josefin Sans (Light Italic)
- Font Size: 9 pt

Step 10
Take the Selection Tool (V) and select the ‘Plate’ text and description. Hold the Shift and Alt keys, and drag and drop about 1 cm down.
Transform Again (Command-D) so we have three plates on our menu flyer.

Step 11
Then select the ‘Title’ and the three plates with their respective descriptions. Hold the Shift-Alt keys, and drag and drop about 5 cm down.
Transform Again (Command-D) or manually drag and drop with the help of Smart Guides.

Step 12
Now that the layout is done, all you need to do is fill out the menu items for the flyer, using the Type Tool.
File > Save As. Save it in two formats: one in (.ai)” file format by selecting Adobe Illustrator from the Format drop-down menu in the Save As dialog box, and another Save As Adobe PDF format.

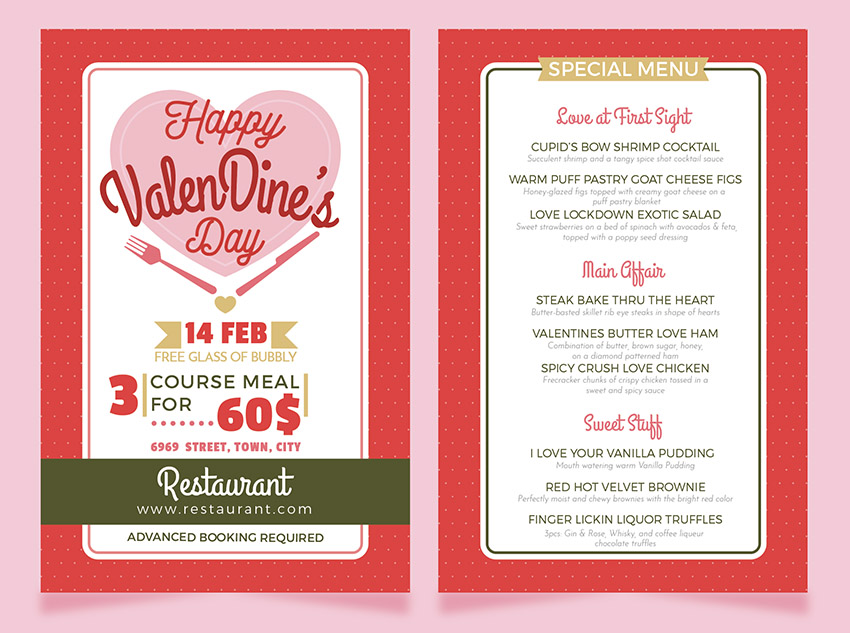
Congratulations! Your Restaurant Menu Flyer Is Done!
Here’s how your restaurant menu flyer should look.
I hope you were able to expand your skillset and are able to apply these techniques to future flyer template designs. Feel free to adjust the final menu design in your own style, and don’t forget to share your results in the comments section below!
Catch you in my next tutorial.
