In the modern work world, a simple resume is often not enough. Sure, it’s imperative to send it along with any job application, but if you truly want to stand out you need to go a step further.
And nothing makes you stand out more than a personal website that showcases your education and experience, just like a standard resume would.
However, there are a few reasons why personal resume websites are far better than traditional resumes.
In today’s article, I’ll explain the benefits of having a personal resume website and walk you through the steps of how to make your own personal resume website, with help from premium WordPress resume themes.
Why Having a Personal Website Is Better Than a Resume Alone
A personal website is the most important asset of your professional career. It’s your home on the Internet and you can include as much or as little information as you want.
You can present it in a visually appealing way that reflects your personality. Also, you can use it in addition to your traditional resume.
Here are four reasons why a personal resume website is better than using just a standard resume on its own:
1. A Website Is More Dynamic
Most resumes follow a traditional one-page format. It goes without saying that it’s crucial to be concise and include only the most relevant information, which doesn’t paint the most accurate picture.
Your website on the other hand can be more elaborate and include much more information.
You can go into more detail about specific experiences as well your education. Most importantly, it’s a lot easier to update your website as you acquire new skills than it is to update a resume that’s been sent off to a company.
2. Your Website Makes You More Discoverable
It’s not unusual for many HR managers, recruiters, and employers to search for your name online once your resume lands in their inbox. By having a personal website, you are easier to find.
It also minimizes the chances of employers stumbling onto someone who has a similar (or even the same) name as you but they are in a completely different field.
3. A Personal Resume Website Improves Your Credibility
It’s a lot easier to include examples of your past work or any past project on a website than it is on a resume. It also allows you to use a different medium to showcase the true extent of your skills. From photos to videos or even audio posts, you are only limited by your imagination.
4. It Shows Your Willingness To Continually Improve
There is a lot that goes into creating and maintaining your website, not to mention marketing it and promoting it. That’s a whole new skillset that you can now add to your resume and it might just give you a leg up when it’s decision-making time.
Now let’s look at how to make a personal resume website—covering basic WordPress setup first:
How to Setup Your Resume Website Using WordPress
Now that you know why a personal resume website trumps a traditional resume, let’s get down to setting up your website with WordPress.
Step 1. Purchase a Domain Name
The first step towards creating your own personal website is buying the domain name.
Since this website is all about you, the obvious choice would be to use your own name, preferably with a .com extension. You can opt for:
- firstnamelastname.com
- lastnamefirstname.com
- firstinitiallastname.com.
Or get creative and consider including your middle name in the mix.
Step 2. Choose a Hosting Plan
Once you have your domain name, you will need to purchase hosting for your website. You can purchase hosting for as little as $5/month and in most cases, you can even buy your domain name and your hosting from the same provider. Be sure to choose a hosting provider that offers customer support so you can get immediate assistance should you need it.
Step 3. Install WordPress
Most hosting providers nowadays have one-click installers for WordPress. While WordPress itself is quite easy to install manually, the one-click setup speeds up the process considerably. Regardless of which host you chose, the process is relatively the same.

Once you’ve purchased a hosting plan, your hosting company will send you a welcome email that will contain all the important information about your hosting. This usually includes a link to login to your cPanel or your hosting dashboard, as well as your username and your password for the cPanel.

- To begin installing WordPress, simply click on the link they sent you and login to your cPanel with the provided username and password.
- Once you’re logged in, look for Website Installers or Fantastico Installer or Softaculous Installer. There might even be a link that says Install WordPress or something similar to that. Click on the WordPress icon and then click on Install button. You will be asked to provide a username and password and select the domain where to install WordPress. Write down or copy the username and password as you will be needing it soon.
- Click on the Install button once more to finish the installation process.
When the installation process is complete, you will be notified on the screen, along with a link to your WordPress dashboard. It will look something like this:
http://www.yoursite.com/wp-admin
Go ahead and click on it and then enter the username and password you created during the WordPress installation process to log into your brand new WordPress website.
Step 4. Choose a Professional WordPress Theme
Your personal website is slowly coming together. You have a domain, you’ve purchased hosting, and you also installed WordPress. The next step on our list is to choose a theme for your website.
WordPress has many themes, both free and paid, however, not all themes are created equal. If you’re serious about creating a professional resume website, the only reasonable choice is a premium WordPress theme.

By opting for a premium theme, you can rest assured your website follows the best WordPress practices and you can even get support from the theme’s developers if you need help in setting it up.
On top of that, a resume WordPress theme will also have features necessary to showcase your education, your skills, past experience, and examples of your past projects.
What’s more, you can even include achievements and awards, as well as testimonials from past employers or your college professors to demonstrate your expertise.
Discover great resume WordPress themes:

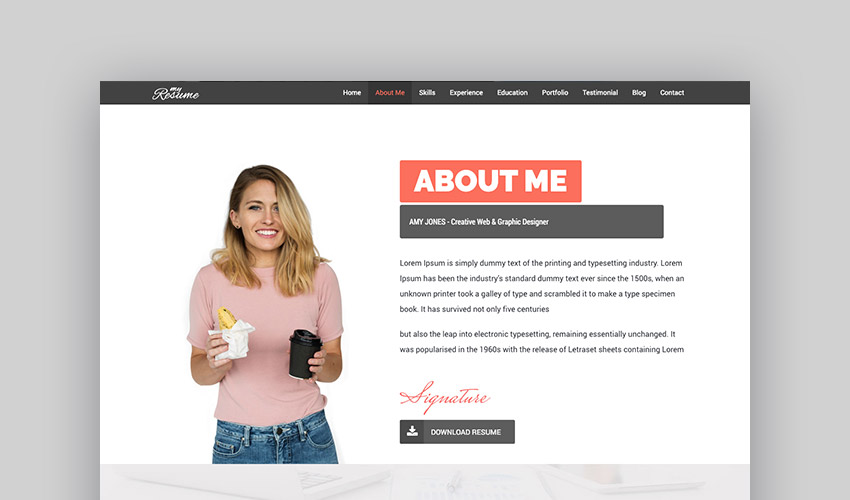
For this tutorial, I’m using the ResumeX WordPress theme from ThemeForest. It’s a one-page theme that includes all the relevant sections mentioned above.

On top of that, it’s also completely responsive to display perfectly across various screen sizes. It also includes a button which allows anyone to download a printable version of your resume with a single click.
Let’s go over the steps of setting up the theme:
How to Setup Your Theme
Here’s a rundown of how to make a personal resume website, where we cover the basic steps to setup the ResumeX theme.
Step 1. Install The Theme
Once you have selected and purchased the theme, log in to your WordPress dashboard and navigate to Appearance > Themes. Then click on Add New > Upload theme.

Step 2. Upload The Zip File to Your Website
Click on Choose File and upload the zip file of the purchased theme, then click on Install theme.
Step 3. Activate the Theme
Once your theme is uploaded, click on Activate to make the theme live on your website.
Step 4. Install Required Plugins
Once the theme is active, it will give you a notice that it requires additional plugins to be installed.
Go ahead and click on Begin Installing Plugins. On this screen, simply select all the plugins and click on Install in the drop down menu.
After that, navigate to Plugins > Installed Plugins and select all the plugins that you just installed and this time select Activate from the drop-down menu.

Step 5. Create a New Blog Page
Go to Pages > Add New and then enter “Blog” as title and keep the content field blank. Now select Blog Page as page template from the right side page template dropdown menu, then click on Publish.

Step 6. Create a Home Page
Create a homepage page with a title “Home Page” and keep the content blank. Simply click on Add New in the Pages section and assign it the Landing Page page template from the right side page template dropdown menu. Then click on Publish.
Step 7. Set Your Front Page and Your Blog Page
Go to Settings > Reading. From the “Front Page Settings” section, click on static page, and select your previously created home page and blog page from the dropdowns as shown in the picture below. Then click Save Changes.

Step 8. Customize Your WordPress Resume Website
If you take a look at your website now, you’ll see that it’s populated with some content. The only thing left to do now is to customize the theme to your liking and to replace the information with your own.
Here you can see we’ve switched out the main images with some of our own. That simple change has completely altered the aesthetic.

The ResumeX theme comes with a very friendly admin panel which allows you to customize the colors and fonts and reorder the sections to best fit your resume style.

Each of the sections has its own settings where you can change the title, the order in which it appears, and fine tune the details for that particular section.
Step 9. Add Your Own Information
To replace the information with your own, simply click on the corresponding section in the sidebar menu. For example to add a new experience simply click on Experiences > All Experiences.
On the following screen, you can either click on one of the existing experience posts to edit the title and replace the information with your own, or you can delete all of them and enter your own from scratch.
And with that last step, your resume website is complete. Now, let’s go over some tips that will allow you to take your personal resume website to the next level.
How to Make The Most of Your Personal Resume Website
Creating your resume website is only the beginning. You still have to make sure it makes a positive impression and that you let the world know it’s live. Here are a few tips that will help you make the most out of your resume website:
1. Include a Button to Download Your Resume
Even though your website is always available and always up to date, you should still include a button or a link that lets anyone download a printable version of it. It makes it easier for job recruiters and employers to download your resume and have it on hand as they go through the vetting process. They can also download it, print it, share it with other team members, and more.
2. Promote Your Website In Your Email Signature
This is perhaps the easiest method of all to promote your website. Simply include a link to it in your email signature.
From now on, every email you send is a small promotional message that will help your resume website get seen. And you never know if someone from your inner circle might click on it and forward the link to a potential employer.
Read this article, for email signature design tips and resources:
3. Regularly Add New Blog Posts
By adding new blog posts on a regular basis, you’re helping your website’s search engine rankings. On top of that, you’re also showcasing your knowledge and expertise as well as sharing your unique outlook on the world and your particular field.
4. Consider Including Video or Audio
To stand out from the crowd, consider adding a video on the homepage. You can use it to showcase your work process in action or simply to introduce yourself and guide visitors around your website. Audio posts can also add another dimension which allows you to be seen as a creative individual that wants to make a positive impression.
5. Include Your Achievements, Awards, or Any Other Accomplishments
Since a website is a lot more forgiving in terms of allowed space, consider adding any relevant achievements or awards to your resume. You could also add any volunteer work or community involvement that’s related to your industry as it shows your human side.
Create Your Personal Resume Website Today
Creating a personal website is not as hard as you may think. With a little free time and the right resume WordPress theme for the job, you could have your website up and running in no time. So take the first step to promote your career and start working on your personal resume website today.
Learn How to Use WordPress
Are you new to using WordPress? Learn how to use WordPress in our complete guide. This guide will take you through the full process, from the basics of creating posts and pages right through to installing and customising your first WordPress theme and setting up plugins for security and performance.