The checkout page is one of the most important pages on any eCommerce website. All the effort that you put into your website content, design and marketing will amount to nothing if your customers keep abandoning their carts and never complete the checkout process. Some statistics show that cart abandonment rate can vary in range form 64% to around 90% depending on the industry in which you are selling products.
The WooCommerce WordPress plugin automatically creates a checkout page for your website visitors to complete their order by filling out a form. However, it is a general-purpose form meant to cover all bases and not optimized for your specific use-case. This means that your cart abandonment rates are likely to be high. Reducing the abandonment rate can be the difference between just getting by or making decent amount of profit to further expand the business.
In this tutorial, we will show you how to customize the checkout page in WooCommerce for free using plugins and a little bit of code.
Tips for Improving Checkout Process
There are a few things that you can change on the checkout page to improve your conversion rate.
You should consider keeping the number of fields required to be filled to complete an order as low as possible. This helps for two reasons. First, people are usually unwilling to share extra information about them due to privacy concerns. Second, filling out a form takes time and not everyone will be willing to spend theirs filling out unnecessary details.
Another thing that you can do to improve your conversion rate is build customer confidence. You can do that by adding a customer testimonial on the checkout page. Also try to convey that the payment process is handled in a secure manner on your website. Making all common payment methods available also helps.
One of the primary reasons for abandoned carts is additional unexpected checkout fees due to high shipping charges or some other reason. Make sure that customers don’t see any extra charges on the checkout page and provide legitimate explanations for charges that you cannot avoid. The discount coupons should also work as expected on the checkout page.
Customizing the Checkout Page
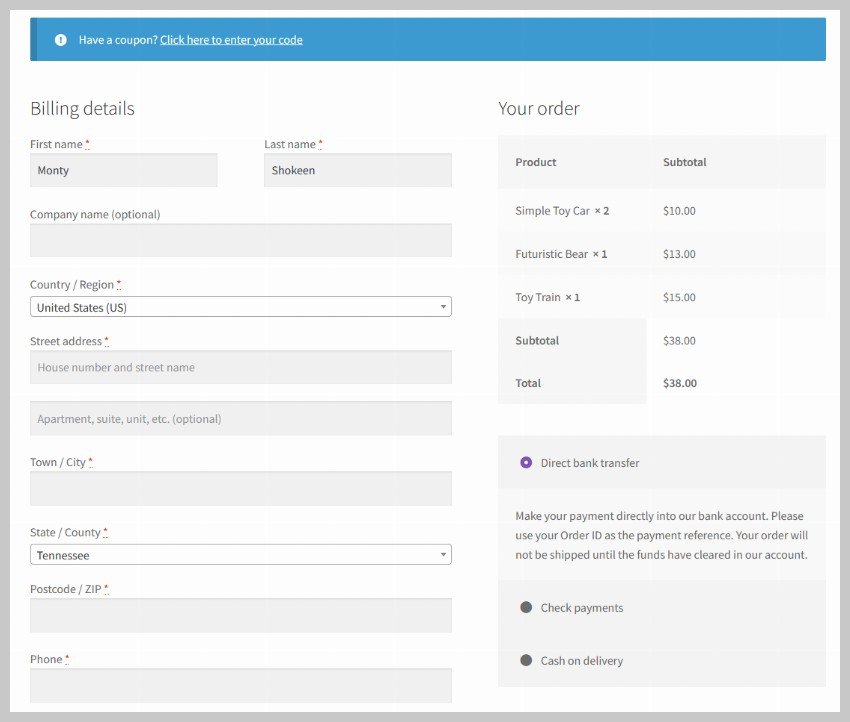
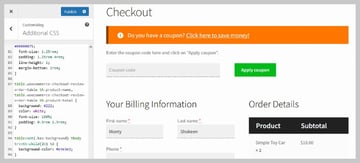
We will now incorporate some of these tips to customize our own WooCommerce checkout page. The following image shows what the checkout page looks like in its default form for the Storefront theme.


Removing and Rearranging Fields
As you can see, there are a couple of extra fields like Company Name that we don’t want our customers to fill out. We will get rid of them and arrange the remaining fields in a different order like bringing the phone and email address field close to the name input.
Begin by installing Checkout Field Editor for WooCommerce from the WordPress plugin directory. Once you have installed and activated the plugin, navigate to WooCommerce > Checkout Form from the dashboard menu.
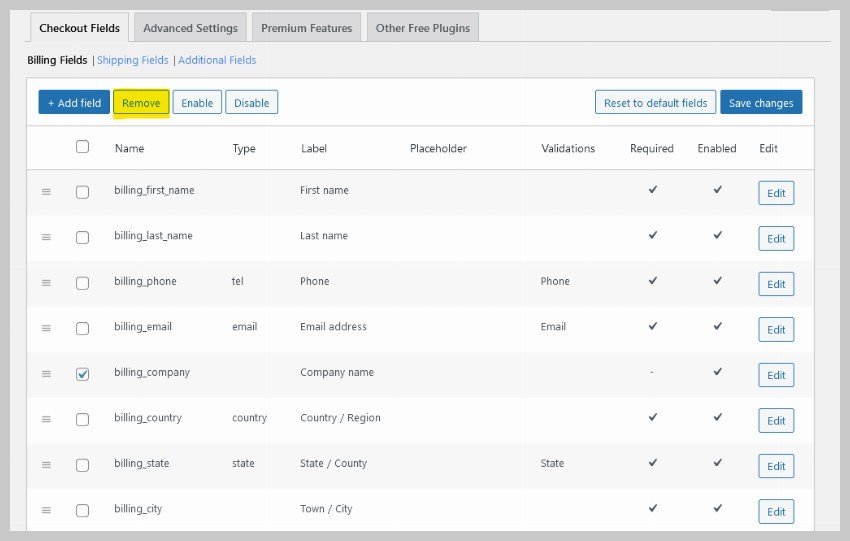
Drag and the fields around to place them in any order that you prefer. After that, select the billing_company field and click on the Remove button as shown below. Finally click on the Save changes button and you will see the changes reflected on the checkout page on reload.


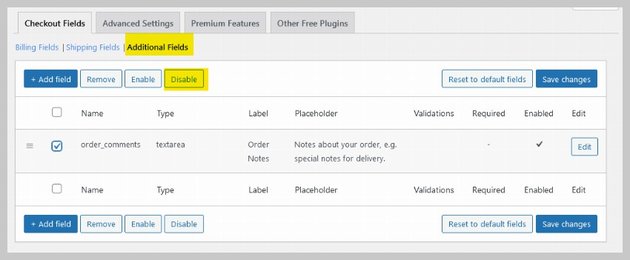
You might have noticed that there was no option to remove the Order notes field in the settings. You will find it by switching the tabs to Additional Fields and the top of plugin settings. Please note that you probably won’t be able to remove the Order notes field by selecting it and clicking on the Remove button. This is because it is the only field under that tab. Another way to get rid of it is to click on the Disable button and then Save changes.


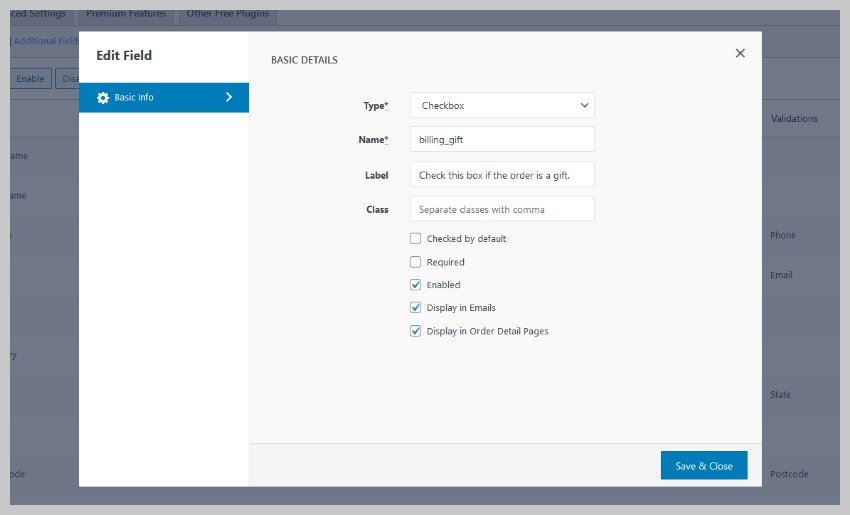
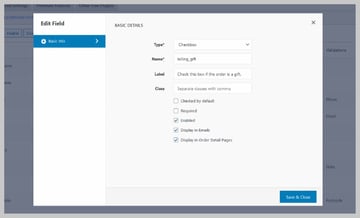
You can also add extra fields to the checkout form based on your specific business needs. For this example, I am adding a checkbox to let us know that the order is a gift. First we click on the Add Field button and then select Checkbox from the dropdown menu. Once you have filled out all other information like the image below. Click on the Save & Close button.

Updating Text Content
The Checkout Field Editor provided us an easy way to add, remove or rearrange fields in the checkout form. Now we will use another plugin called StoreCustomizer to make changes to the text on the checkout page. This plugin allows us to make changes to different pages in our WooCommerce store. We used it earlier in the tutorial about customizing the WooCommerce shop page.


Once you have installed the plugin, navigate to Appearance > Customize > StoreCustomizer > Checkout Page. You should now see a bunch of options under different headings.
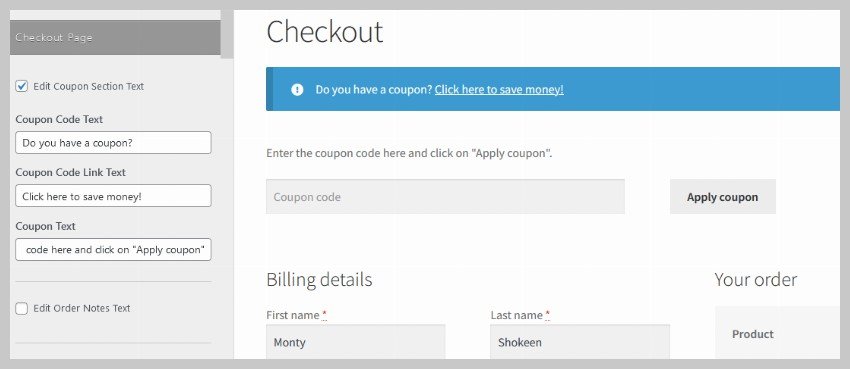
We will begin by checking the box for Edit Coupon Section Text. Replace the default text with anything that is appropriate for your business. Once you are done, hit the Publish button to apply changes.

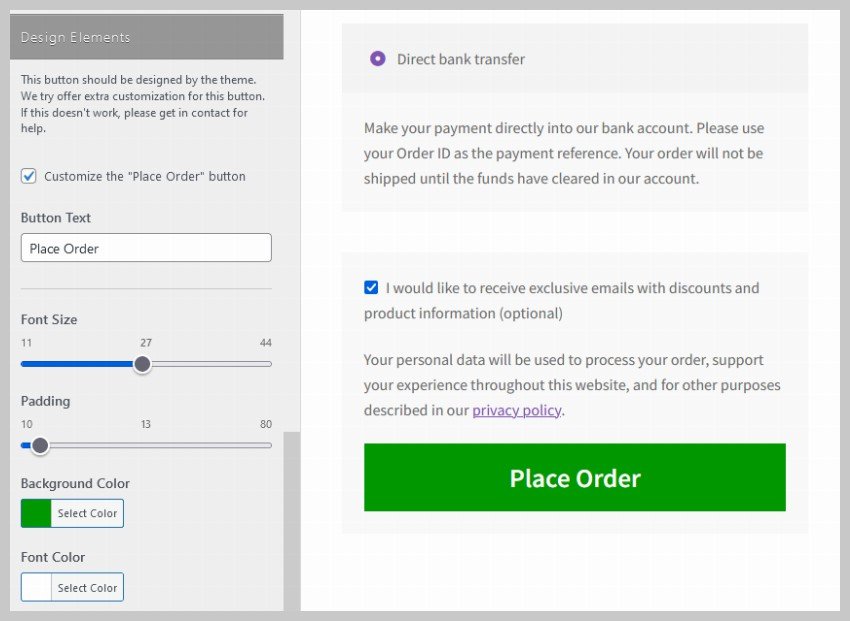
Scroll down a bit within the StoreCustomizer checkout page settings and you will find another subsection titled Design Elements. You can tweak the settings here to customize the Place Order button. Change the text, font size, padding and color values to something that goes well with your overall website design.


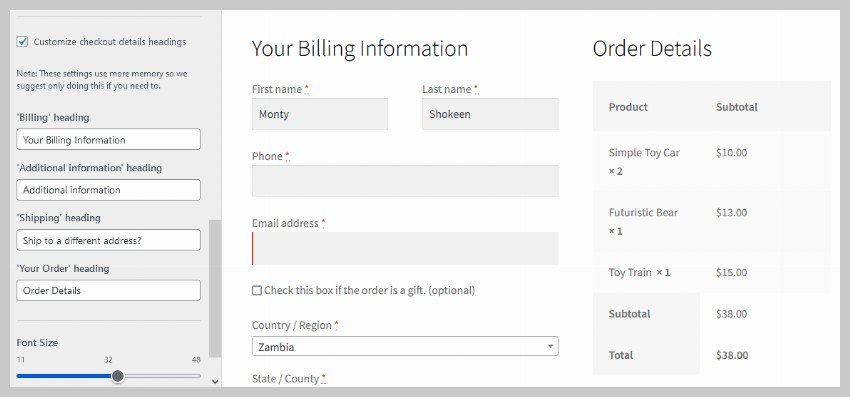
You can also change the heading for different sections by checking the box for Customize checkout details headings. It will also allow you to change the font size and color. I have made the text slightly bigger by setting the font size to 32 pixels. I have also set the color to black.
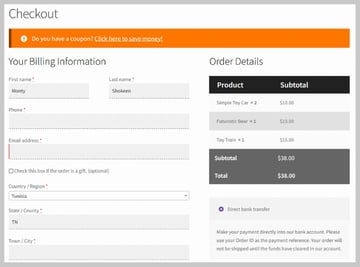
Updating the Appearance with CSS
We were able to make some changes to the appearance of different elements on the checkout page using the StoreCustomizer plugin. However, the plugin only has limited options for any styling related changes.
Our best bet is to use custom CSS that we can place inside Appearance > Customize > Additional CSS. In this case, we will modify the look of the coupon section as well as the order summary table. Some other minor changes include the addition of borders under input fields.
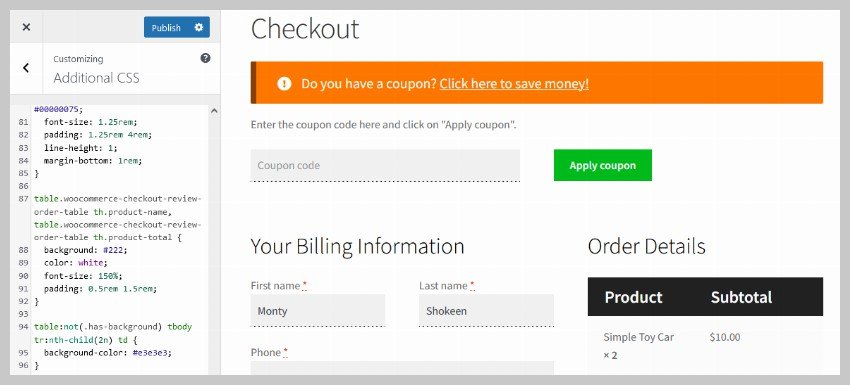

You can find the selectors for different elements using the style inspector in the respective browsers. Here is the CSS that I am going to use for our checkout page.
input[type="text"], input[type="number"], input[type="email"], input[type="tel"], input[type="url"], input[type="password"], input[type="search"], textarea, .input-text {
    background-color: #f1f1f1l;
	box-shadow: none;
	border-bottom: 1px dashed black;
}

.woocommerce-info, .woocommerce-noreviews, p.no-comments {
  background-color: #ff7800;
  border-left: 0.5rem solid #00000075;
  font-size: 1.25rem;
  padding: 1.25rem 4rem;
  line-height: 1;
  margin-bottom: 1rem;
}

table.woocommerce-checkout-review-order-table th.product-name, table.woocommerce-checkout-review-order-table th.product-total {
  background: #222;
  color: white;
  font-size: 150%;
  padding: 0.5rem 1.5rem;
}

table:not(.has-background) tbody tr:nth-child(2n) td {
  background-color: #e3e3e3;
}

table:not(.has-background) th, tfoot tr td {
  background-color: #666;
  color: white;
  font-size: 1.2rem;
  padding: 0.75rem 1rem;
}

.button {
  background-color: #00bc1d;
  color: #fff;
}

.button:hover {
  background-color: #37960c;
  color: #fff;
}
Click on the Publish button now and you will have a checkout form that looks like the image below.


Adding Content Using Hooks
This last section requires you to have at least a little bit of familiarity with coding. Any wrong steps could potentially make your site inoperable until you fix the errors. Please be careful and make extra changes only if you know what you are doing. We will be updating the functions.php file of your current theme here. Make a copy of the file before proceeding.
A lot of developers integrate hooks within their plugins so that others can customize the plugin functionality according to their own needs. These hooks allow you to make changes within the plugin at specific pre-defined points. WooCommerce also has a lots of hooks of its own that are mentioned on their website. However, you might prefer to see it all laid out visually. Take a look at this visual guide for WooCommerce checkout page hooks.
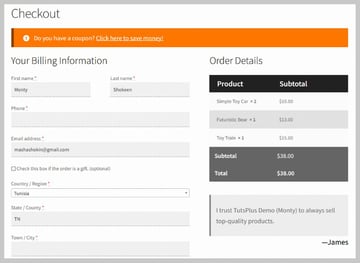
Lets say you want to add a customer testimonial before the payment methods. The visual chart shows us that we will have to use the hook woocommerce_review_order_before_payment to add the testiomonial there. Add the following code to the functions.php file.
add_action( 'woocommerce_review_order_before_payment', function() {
    echo '<figure class="testimonial">
    		<blockquote>
        		<p>I trust TutsPlus Demo (Monty) to always sell top-quality products.</p>
    		</blockquote>
    		<figcaption>—James</figcaption>
		  </figure>';
});
You can also use some CSS to make the testimonial blend in with the rest of the layout. Place the following CSS inside Appearance > Customize > Additional CSS like we did in the previous section.
figure.testimonial {
    margin: 2rem 0;
}

figure.testimonial blockquote {
	margin: 0;
	font-size: 1.3rem;
	font-style: normal;
	border-left: 5px solid #888;
	background: #efefef;
	padding: 2rem 1rem 0.1rem 1rem;
}

figure.testimonial figcaption {
	text-align: right;
	font-size: 1.5rem;
	color: black;
}
Your checkout page should now look like the image below.


Final Thoughts
In this tutorial, we used a combination of techniques to customize a WooCommerce checkout page for free. The easiest and safest way to make content related changes is with plugins, both free and paid. After that, you can make layout related or visual changes using custom CSS code. Sometimes, the customization that you are looking for might not be provided with either free or paid plugins. In that case, your best bet is to write your own code.
Hopefully, you will be able to follow the steps in this tutorial to create your own customized WooCommerce checkout page.