Today we will be taking a quick look at how to create an Instagram post template in Adobe Photoshop!
Whether it’s for a hot sale your site is having, you’re announcing a huge giveaway or maybe you just want to wish your followers a happy holiday, having a blank Instagram post template that’s ready to be filled in and customized with only a few clicks is a must for any booming Instagram account!
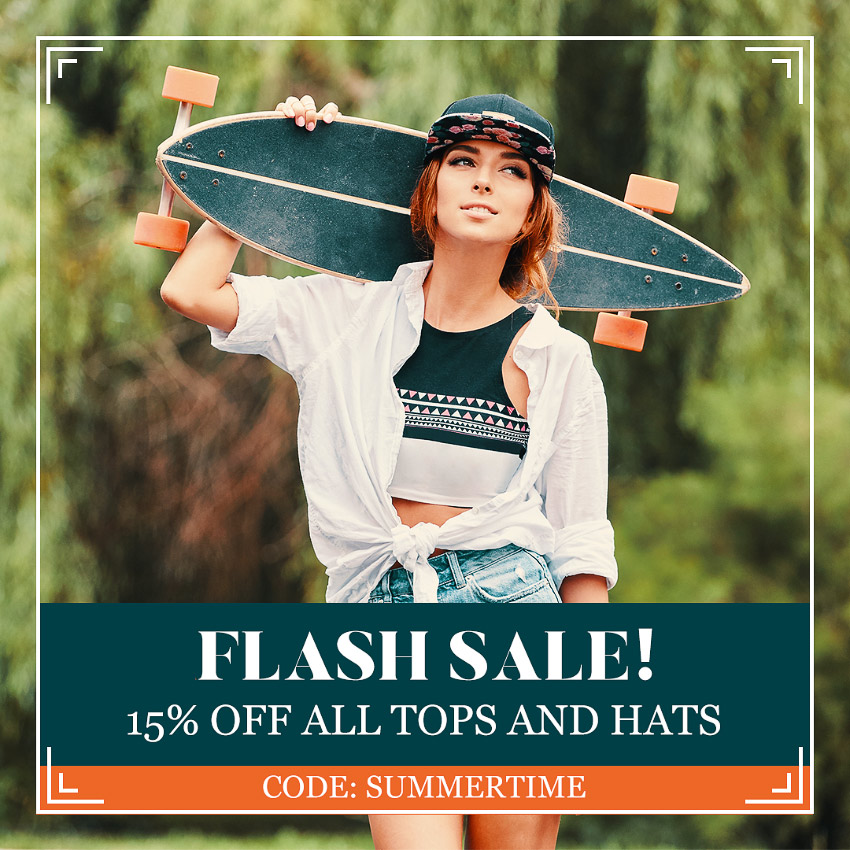
Today we will be recreating an Instagram template that can be found on Placeit!
Follow along with us over on our Envato Tuts+ YouTube channel:
What You Will Need
You will need the following resources to follow along with this tutorial:
Find more resources on Envato Elements and Placeit!
1. What Are Instagram’s Post Size Dimensions?
Step 1
Create a New Document in 1080 x 1080 pixels at 72 DPI/Resolution. That is the optimal size for an Instagram post; however, if your image is larger, that will work as well!
Just make sure your canvas is a 1:1 (Square) ratio! Otherwise, Instagram will crop your post.
Step 2
Drop and center your promo or subject image onto the middle of the canvas.

2. How to Create Borders in Photoshop
Step 1
Select the Rectangle Tool, setting the top toolbar’s settings to what you see below.
Rectangle Tool Settings
- Shape
- Fill: None
- Stroke: White 5px Solid
- Height: 988 px (may vary)
- Width: 988 px (may vary)
Step 2
Create your square border and move it to the middle of the canvas. Make sure there is an equal amount of space on all four sides.

Step 3
Select the Line Tool, once again setting the top toolbar’s settings to what you see below.
Line Tool Settings
- Shape
- Fill: White
- Stroke: None
- Weight: 5 px
Step 4
Using the Line Tool, create a horizontal 75 px line.
Create a second vertical line, connecting the two lines to make a corner-line shape.
Move the corner shape 10 px from the edge of the white border.
Group the two lines.

Step 5
Duplicate the corner group.
Align the two corners so that the new duplicated group is inside the original.
Shorten both the duplicated lines, located inside of the duplicated group, from 75 px to 25 px to create a shorter corner shape.
Move the duplicated group 10 px from the original corner group.

Step 6
Group both corner shapes into a new group.
Duplicate the new group four times, placing the groups around the four corners of the border.
Use Right-Click > Flip Horizontal and Flip Vertical to flip the corner shapes.

3. How to Create an Editable Instagram Post Template
Step 1
Create a New Layer above your subject/promo image, but below your border groups.
Select the Rectangle Tool, setting the top toolbar’s settings to what you see below.
Rectangle Tool Settings
- Shape
-
Fill: Dark Blue
#003f46 - Stroke: None
- Width: 988 px (may vary)
- Height: 269 px (may vary)
Place the dark blue rectangle at the bottom of your border.

Step 2
Create a second rectangle with the Rectangle Tool.
Rectangle Tool Settings
- Shape
-
Fill: Orange
#ed6726 - Stroke: None
- Width: 987 px (may vary)
- Height: 62 px (may vary)
Clip the orange rectangle into the dark blue rectangle, bringing the orange rectangle down to the bottom edge of the blue rectangle.

Step 3
Using the Butler Font, type what you want your viewer to see first. In this case, it’s “Flash Sale!”
Make the font centered towards the top of the dark blue rectangle and very large! I’ve set my text to white and 86.7 pt.

Step 4
Next, place your secondary information right below your first line of information. In this case, it’s “15% off all tops and hats”.
I used the font Georgia at a size of 53.42 pt.

Step 5
Finally, add your least important information. By least important, I mean least eye-catching! In this case, we want to catch them with “Sale!” then tell them what the sale is and then finally give them the code for the sale. In this case, it’s “Code: Summertime.”
I placed the font right in the middle of the orange rectangle using the same Georgia font at a size of 39.35 pt

We’ve Done It!
And there you have it! A fully customizable Instagram post template, ready to use whenever you need it, whatever you need it for. All you need is a few clicks to change out the words, colors, font, or even the border’s thickness and stroke type! Who doesn’t love a polka-dot border, after all?
And if you are in need of even more inspiration for your next Instagram post template, check out Placeit! Check out some of my favorites below:
So, as always, keep experimenting with different techniques and practicing, and don’t forget to post your version below, along with any questions, comments, or critiques!

Looking to learn more? Why not check out the following photo manipulation tutorials: