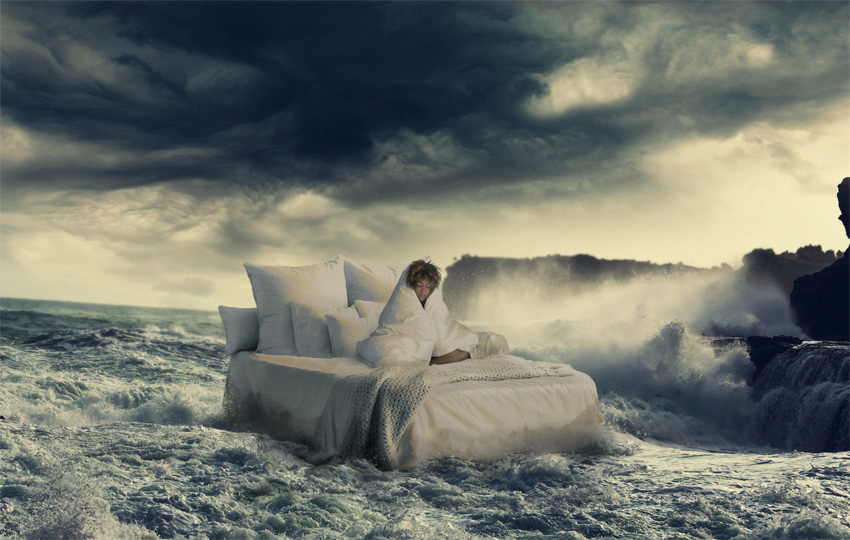
Although mental health is just as important as physical health, it’s often misunderstood and treated too lightly. After all, a person suffering from depression or anxiety looks completely fine on the outside, and nobody can tell what they’re really feeling. That’s where art can help—it allows the artist to show their inner state, to share it with other people to help them understand.
In this tutorial, I will show you how to create a special photo manipulation about a very common feeling occurring in many mental disorders. It’s when leaving the bed seems identical to going right into a heavy storm, and it requires a tremendous effort that doesn’t really seem worth it. If you know this feeling, I hope following this tutorial will help you express it. If you don’t, it may help you get an insight into the struggle that so many people deal with every day.
You may also be interested in our series of tutorials created especially for relaxation. No skills required!
What You Will Need
You can find all the photos you need on Envato Elements:
1. How to Prepare the Assets for Photo Manipulation
Step 1
Open the image of the woman in a blanket in Photoshop. Use the Lasso Tool (L) to outline the parts you want to select. You don’t have to be very careful about the hair—we’re going to adjust it in a minute.

Step 2
After you finish the selection, click Refine Edge.

Step 3
Adjust the View Mode to clearly see the separation between the selected and unselected areas. Check Smart Radius and play with the Radius to soften the edge.

Step 4
Paint over the hair with the Refine Radius Tool (E) to include it in the selection in a soft way. This tool is perfect for it!

Step 5
When you’re finished, change the Output to New Layer and click OK.

If you hide the other layer now, you’ll see the background has been removed. Save the file.

Step 6
Open the image with the bed now. Remove its background just like before, making sure to refine the edge around the soft parts.


Step 7
This bed has a perfect perspective for our purpose, but it’s not completely clean. We need to remove some elements with the magic of Photoshop! Use the Lasso Tool (L) to select what you want to remove.

Step 8
Go to Edit > Fill and select Content-Aware.


Step 9
Remove all the other unwanted elements in this way.

Step 10
Because the Content-Aware fill is not perfect, we need to do some manual fixes. Use the Patch Tool (J) to select the area you want to replace with something else.

Step 11
Drag the area to a part that would fit the selected part better.


If that looked confusing to you, let me show you another example. You select the part that doesn’t look good…

… and replace it with something that would look better.


Step 12
It can take a while to clean everything up this way, but there’s no automatic tool that will do it for you, so be patient and take your time. After you’re done, save the file.

Step 13
Open the image with the ocean now. Use the Crop Tool (C) to create a format that will fit our idea better.

Step 14
If you need to add an area to the image, use the Content-Aware fill again.

2. How to Merge the Assets
Step 1
Copy and paste the bed into the file with the ocean. Resize (Control-T) and place it where you want it to be. Try to see the perspective lines defined by the horizon, so that the position of the bed fits them.

Step 2
Go to the Adjustments panel (Window > Adjustments). Select Hue/Saturation.

Step 3
Clip the adjustment to the bed layer (Control-Alt-G) and lower the Lightness to better fit the low lighting in the scene.


Step 4
Add another Hue/Saturation adjustment, and place it under the previous one. Use it to color the whole bed as if it’s in shadow, similar to everything else that is in the shadow in this scene—bluish and dark.


Step 5
But the whole bed isn’t in shadow. Let’s remove this effect from the illuminated parts. Right-click the adjustment and select Blending Options. Go to the Blend If section and drag the upper white slider to the left.

You’ll see how the effect of the adjustment layer gets reduced to the shadow area.

Step 6
Hold Alt to split the marker in two, creating a subtler transition.


Step 7
Add another Hue/Saturation adjustment under the first one. This time, use it to color the illuminated parts as the scene suggests (the water foam looks yellowish, not white).


Step 8
Use Blend If here too, this time using the black marker.


Step 9
Once you’re done with the bed, copy and paste the woman into the scene. Resize her and place her in the right area.

Step 10
Add a Layer Mask to the layer. Click the mask that appears on the layer to paint on it.
You can learn about layer masks here:


Step 11
Paint on the mask with a soft brush. Use black to hide the parts of the layer, and white to reveal them.

Use this method to merge the woman with the bed.

Step 12
Select the adjustments of the bed and drag them while holding Alt to copy them to the woman. Make sure that they’re all clipped.

Step 13
Because the adjustments treat the dark skin of the woman as a shadow area, you need to use a Layer Mask to remove the effect from this area. Also, adjust the adjustments to fit this image, which may have a different white balance to the bed. Your goal is to make them look equal.

3. How to Put the Bed on the Water
Step 1
Duplicate the background layer (Control-J). Drag it to the top, and then add a Layer Mask. Paint on it with black to reveal the bed and the woman, creating a nice edge of the water on the bottom of the bed. It can look even more convincing if you use an irregular brush (I used a cloud brush). You can press while in the mask mode to see the mask, as shown in the image below.


Step 2
We need more waves still, so that the ocean will look as if it’s crashing over the sides of the bed. Use the Lasso Tool (L) to select some waves you like, and then paste them on top and place them where you want.

Step 3
Use a Layer Mask to remove the parts you don’t need. A soft or textured brush will help you merge the waves seamlessly with the water around.

Step 4
Use the same trick to add waves around the bed, everywhere that’s necessary.

Step 5
To make the waves more convincing, add a new Hue/Saturation layer on the bed and darken the area right behind the waves. It should be dark, but not a very noticeable shadow.

Step 6
Because the sheets are in the water and being hit by the waves, they should look wet. Add a Levels adjustment to the bed and drag the markers to make it look dark.
Step 7
Add a Layer Mask and fill it with black to make it transparent. Then use some splash-like brushes to reveal the adjustment where you want to. If you don’t have any, you can surely find some nice brushes on Envato Elements.

Step 8
Add another adjustment, this time Hue/Saturation. Use it to darken the bed.

Step 9
Fill it with black again, and then reveal it where you want to. Use both hard and soft brushes to create a nice, natural edge.

Step 10
The bed should cast a shadow, too. Add a Hue/Saturation adjustment on the top, darken it, and lower the saturation. Then add a Layer Mask and fill it with black to cancel the effect.

Paint on the Layer Mask to reveal the shadow right under the bed. You can add it to the bed as well, to merge it all better.

Step 11
This shadow may require more than one adjustment to look convincing. You can add Brightness/Contrast, for example, to nullify the difference between the bright and dark parts of the waves. Blend If can be also helpful here, to make the bright parts darker while leaving the dark parts as they are.
You can learn more about Blend If here:


Step 12
Because the waves are hitting the bed, they might create splashes, too. Add a New Layer on top, use the Eyedropper Tool (I) to pick the bright color on the waves, and then use a scatter brush to draw the droplets. You can also use a soft brush to simulate some mist made by the smallest droplets, which would have a unifying effect, too.


4. How to Finish a Photo Manipulation
Step 1
There’s a slight blur between the native elements of the scene, which is absent in the ones that have been cut and pasted. Let’s add it to them too. Select the layer with the woman, and then go into Quick Mask Mode (Q).

Step 2
In this mode, you can paint the selection. Paint with black to select the sharp border.

Step 3
Go out of the mode (Q) and invert the selection (Control-Shift-I). Then hide the selection (Control-H).

Step 4
Go to Filter > Blur > Gaussian Blur. Adjust the Radius for the effect you want.

Step 5
Do the same with the bed.


Step 6
The depth of field in the scene is a little too wide at the moment—it distracts us from what’s happening in the center. Duplicate the background again (Control-J) and bring it to the top. Add a strong Gaussian Blur to it.

Step 7
Select the woman and the bed layers with all their adjustments. Merge them (Control-E). Hold Control and click this merged layer to get a selection out of it.

Step 8
Invert the selection (Control-Shift-I) and add a Layer Mask to the blurred background on top. This will automatically add a black mask to the selected area.

Step 9
Deselect and paint on the mask with white to remove the blur from most of it. Keep it in the far background only, around the horizon.

Step 10
After you’re all done with the manipulation, merge all the layers. Go to Filter > Noise > Add Noise. Adjust the Amount to add some subtle noise—it will unify the scene even more.


Step 11
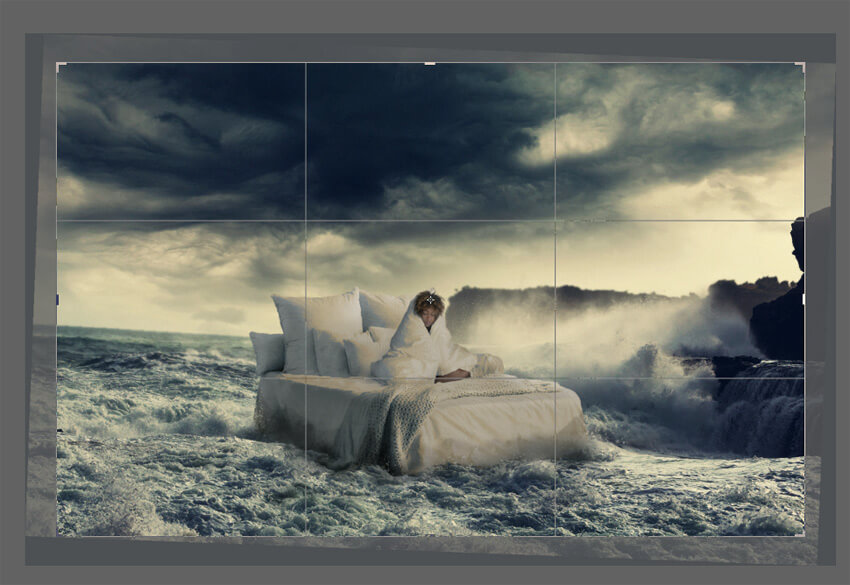
Use the Crop Tool (C) to break the balance of the image and to add some dynamism to it.
You can learn more about composition here:

Step 12
Finally, change the size of the image (Control-Alt-I) to make it more appropriate for showing on the Internet.

Good Job!
Do you want to keep learning about creating photo manipulations in Photoshop? Try one of these tutorials:
