
Create a beautiful and stylish photo manipulation in abstract style. This picture is a poster with a large number of interesting effects and creative solutions. In this tutorial I’ll show you a new and interesting effects, talk about alternative ways of selection, retouching, working with a variety of filters, tools and much more. We all create a beautiful effect grid of small dots, soft focus and glow. Read this tutorial and improve your knowledge in Photoshop!
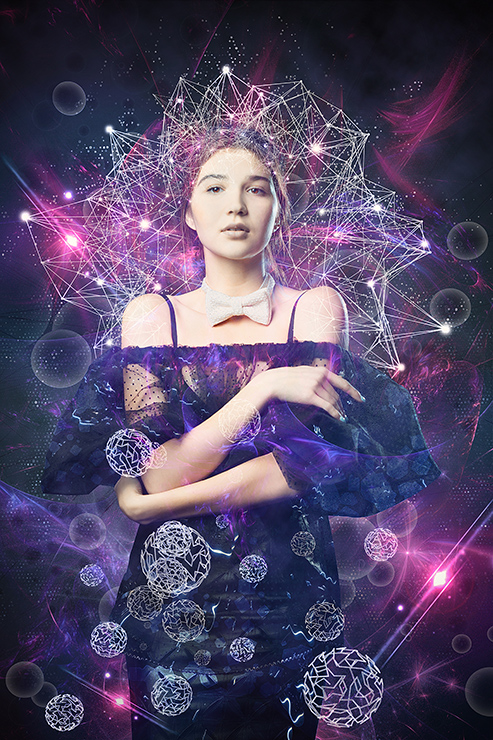
What you’ll be creating
To create this work, I needed only one resource – the model. In this artwork is that all the details and effects created in Cinema 4D and Photoshop by me. I start with of the creation a photo manipulation from the background. We will add important background objects and work with blending modes. Next I add the model and retouched it, add interesting texture to the dress and abstract render, a little effects and a grid of small dots effect for background. Following I will add the abstract sphere on the foreground and flares. At the end of photo manipulation I create lighting, soft focus and glow effects, color correction and sharpening the image. You will need good mood and be sure to have Photoshop beginning with CS version. In this tutorial will be presented pretty complex effects, so be careful and do not panic. I will write all very accessible and understandable.
Tutorial Resources
Step 1
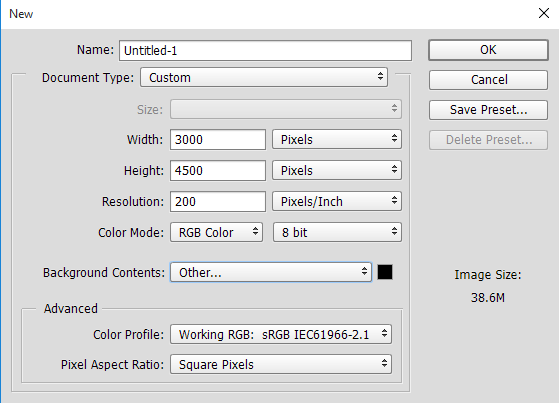
Open Photoshop and go on a fascinating journey! First at all create a new document (File > New or Cmd/Ctrl + N) with Width: 3000 pixels, Height: 4500 pixels, Resolution: 200 Pixels/Inch, Background color: #000000 (black).
Step 2
Add a main color spot and at the same time light source by using gradient. I work non destructive method so use fill adjustment layer “Gradient Fill”. Go to Layer > New Fill Layer > Gradient. In window that appears set Style to Radial, Angle to 90 degrees, Scale to 120% and set up gradient according to the following sequence – #000000 > #315a7a > #4e8eb2 > #92ccf0 > #ffffff. Click OK to apply gradient. Set layer Fill to 30%.

Step 3
Next I add wireframe texture to background. Go to File > Place…/Place Embedded and open image “013” from “Atom Stock Pack”. In Free Transform mode (Cmd/Ctrl +T or Edit > Free Transform) increase the size quite a bit and rotate it to 156.75 degrees. Hit Enter/Return or press check mark on settings bar to apply changes. Change layer Blending Mode to “Multiply” to hide white background.

Step 4
Now a bit of fractals. Fractals are very useful in the work, because the create unique shapes and complementary space. They can be used as a flare or backgrounds depending on what you want. Go to File > Place…/Place Embedded and open image “005” from fractal folder. In Free Transform mode resize the layer like shown in the image below. Use “Screen” Blending Mode to hide blacks and reduce Fill to 75%.

Step 5
Add another one fractal “004” and move it up on canvas to continue the first fractal. Use “Screen” Blending Mode and reduce Fill to 70%. Group all layers via Cmd/Ctrl + G or go to Layer > Group Layers and name it “Background”. We will return to this group later. With the groups it is very easy to working.

Step 6
And now a little bubbles. I accidentally created a this render when experimenting with materials. I liked it because (running a little ahead) can be used with different blending modes and they are nicely complement the picture. Place Image “2” into working document (File > Place…/Place Embedded). In Free Transform mode reduce size and rotate on -40.17 degrees. Set Blending Mode: “Screen”, Fill: 60%.

Step 7
Duplicate this layer via Cmd/Ctrl + G or go to Layer > Duplicate Layer… or grab and drop layer on icon “Create a new layer” icon at the bottom of layer panel. Change Blending Mode to “Soft Light” and restore Fill to 100%. This will add more contrast to the spheres.

Step 8
Add more bubbles to cover all working field by repeating Steps 6-7. Use both black bubbles images from folder. Experiment with different blending modes to find more interesting effects such “Multiply”, “Overlay” and etc. On image below shown all bubbles layers and their settings. After all, group layer (Cmd/Ctrl + G or Layer > Group Layers) and name it “Spheres”. Reduce group Fill to 65%.

Step 9
Now time for a model. As I say you can use any model. Download and Place image with model (File > Place…/Place Embedded). Reduce size of model to leave more space for the effects and objects and apply changes. This tutorial is built on the effects rather than the objects.

Step 10
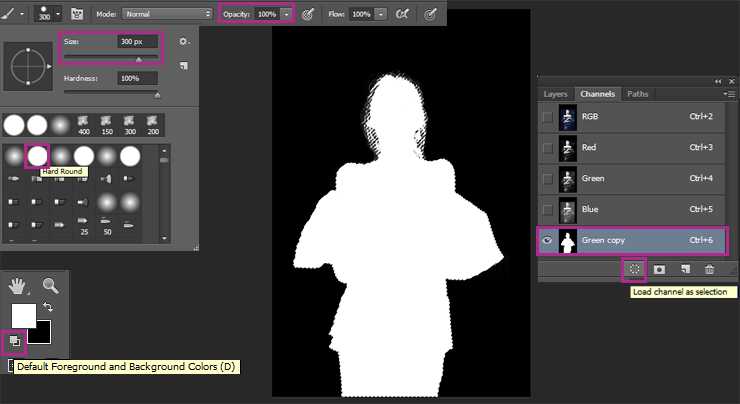
You need to remove background so we can continue montage. Hide all layers except model by clicking on eye icon near thumbnail. Go to Channels tab (Window > Channels) and grab “Green” channel and drop on “Create a new channel” icon so you create a copy of this channel. Use “Levels” (Image > Adjustments > Levels or use Cmd/Ctrl + L) adjustment to increase contrast of image until model become white and background black. I use following settings for Blacks: 11, Neutrals: 0.62 , Whites: 50. First, I always add a little black to hide the background when it is different in tone. Then do the same for whites. To correct, I use gray. I chose this channel because it is the best contrast. If you use this method in other cases, looking for a suitable channel.

Step 11
Of course not all of the model will be just white. Some of the details you need to adjust manually. Take a Brush Tool (B) with “Hard Round” preset, Size: 50-300 pixels, Opacity: 100%, Spacing (F5): 0% and set defaults background and foreground colors (D). Use black color to remove flare near model’s face and black on a model. Also, try not to touch model’s hair. With holding Cmd/Ctrl key click on “Green Copy” thumbnail or “Load channel as selection” button to load selection. Now the most important thing to understand how this method works. All of black this is unnecessary background (that’s what you want to remove) and white is desired object. The most important thing is to get the contrast that was only black and white. If the image has shades of gray it means that this item also add into selection but with less Opacity.
Step 12
Go to Layer panel and add a layer mask to a model (Layer > Layer Mask > Reveal Selection or click on “Add layer mask” icon at the bottom of Layer panel). Do not forget to restore the visibility of all layers. The method described above is very handy when the image contrasted and with a minimum number of objects. I often use it in my artworks, because it saves time. Duplicate model (Cmd/Ctrl + J or Layer > Duplicate Layer).

Step 13
Create a new layer via Cmd/Ctrl+ Shift + N or click on “Create a new layer” icon and clip it tp original model layer (Cmd/Ctrl + Opt/Alt + G or right click on layer > Create a Clipping Mask). Take a Brush Tool (B) with soft round form, Size: 900px, Opacity: 100%, color: #000000 (black) and draw at legs of model. Use Blending Mode “Multiply” and reduce Fill to 79%.

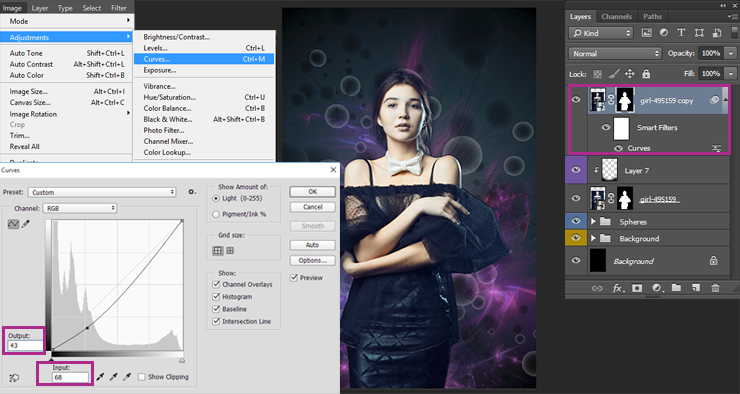
Step 14
For a second layer add an adjustment layer “Curves” (Image > Adjustments > Curves…). Put one point with Input: 68, Output: 43. This adjustment be like smart filter so you can edit this on a smart mask. Of course you can use adjustment layer if you want.