The internet would be pretty dull without images. However, maintaining and manipulating hundreds or thousands of images for your web site can be a headache. As your site design changes, you might need to modify all your images—for example, you might need to convert all your images to grayscale or resize them to 50% of their original size. You might also want to compress or crop different images. Doing this manually is time-consuming and error-prone, but with a little programming knowledge it can be automated.
In this tutorial, you will learn about the GD (Graphic Draw) library in PHP. You’ll see how this library can be used to manipulate images by resizing, cropping, rotating or filtering them.
What Is GD?
PHP can do much more than just serve HTML to visitors. For instance, it has the ability to manipulate images. Not only that, but you can also create your own images from scratch and then either save them or serve them to users.
PHP can handle almost all your basic image manipulating needs using the GD library—short for Graphic Draw.
Setup
If you are working on Windows, you can include the php_gd2.dll file as an extension in php.ini. If you’re using something like XAMPP, you will find the php_gd2.dll file in the directory xamppphpext. You can also check if GD is installed on your system using the function phpinfo();. If you scroll through the resulting output, you will find something similar to the following.
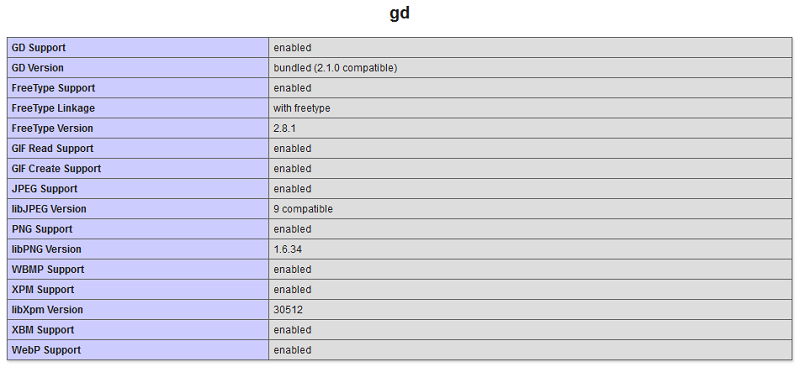
You can also visit the requirements and installation pages to learn more about the installation process.
Creating Images Using PHP GD
The first step towards manipulation of images using PHP is loading them into memory as an image resource. This can be achieved by using different functions for different formats. All these functions have very similar names so they are easy to remember.
Create a New Image
The imagecreatetruecolor() function will prove helpful if you don’t have an original image source that you want to manipulate. It accepts two integer parameters: a width and height. It will return an image resource if everything went as planned. The returned image resource is basically a black image with specified width and height.
Load an Image File
If you are planning on manipulating images that are already stored somewhere, you will benefit from using functions like imagecreatefromjpeg(), imagecreatefrompng(), and imagecreatefromgif(). These will create an image resource with all the data from the loaded image file. These functions accept a single parameter which specifies the location of the image you are loading either as a URL or as a file path.
Create an Image From a String
The GD library also allows you to create images from a string using the imagecreatefromstring() function in PHP. Remember that you will have to use base64_decode() on the given string before imagecreatefromstring(). The function can automatically detect if the image type is JPG, PNG, GIF, or another supported format.
Rotate, Scale, Crop, and Flip an Image
Some common operations that you might want to perform on an image resource are rotation, scaling, cropping, and flipping.
Rotation
You can rotate an image that you have already loaded in the script using the imagerotate() function. It will rotate the image at the provided angle using the center of the image as the center of rotation. The angle is provided as a float value, and PHP considers it to be the degree value for rotation.
Sometimes, the rotated image will have different dimensions in comparison to the original version. This means that you will end up with an uncovered area after the rotation. The third parameter of the imagerotate() function can be used to specify the background color of the empty area after rotation.
Scaling
It is very easy to scale an image using the GD library. You just have to pass the image resource as well as the width and height to the imagescale() function. If you omit the height, GD will scale the image to the specified width while preserving the aspect ratio.
You can also specify the mode for scaling the image. It can be set to IMG_NEAREST_NEIGHBOUR, IMG_BILINEAR_FIXED, IMG_BICUBIC, etc. One important thing that you need to remember is that this function returns a new scaled image source instead of modifying the original one.
Cropping
You can crop any image resource using the imagecrop() function in GD. The first parameter is the original image resource, and the second parameter is an associative array with the keys x, y, width, and height, specifying the position and dimensions of the cropping window.
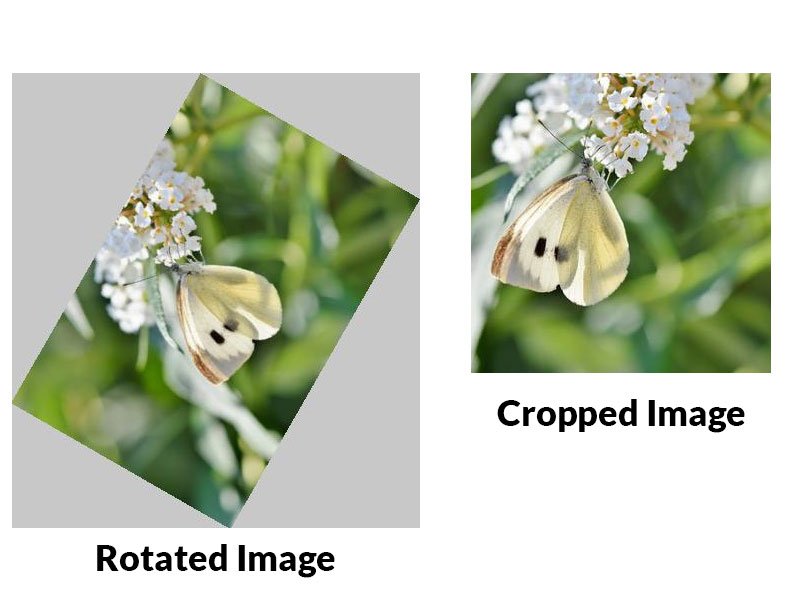
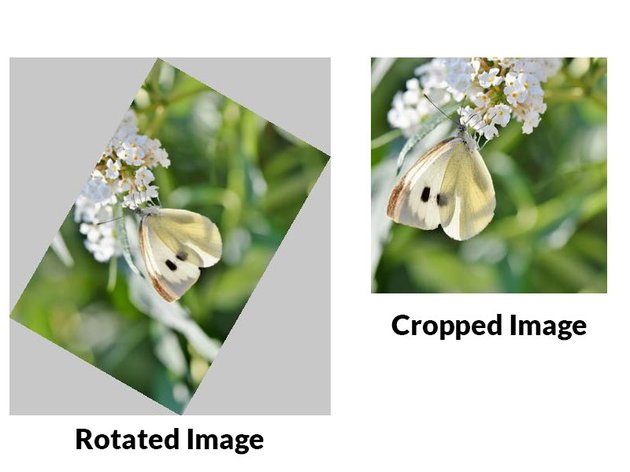
The butterfly image above was cropped using the following code:
$im_php = imagecreatefromjpeg('path/to/image');
$size = min(imagesx($im_php), imagesy($im_php));
$im_php = imagecrop($im_php, ['x' => $size*0.4, 'y' => 0, 'width' => $size, 'height' => $size]);
$im_php = imagescale($im_php, 300);
Basically, we store the length of the smallest side in the $size variable. This variable is then used to define the boundary of our cropping rectangle. Finally, the image is scaled down such that it is only 300 pixels wide and long. This gives us a properly sized square image.
Flipping Images
Images can be flipped horizontally, vertically or in both directions using the imageflip() function. It accepts the image resource you want to flip as the first parameter and the flip mode as the second parameter. The flip mode can be set to IMG_FLIP_HORIZONTAL, IMG_FLIP_VERTICAL, or IMG_FLIP_BOTH.
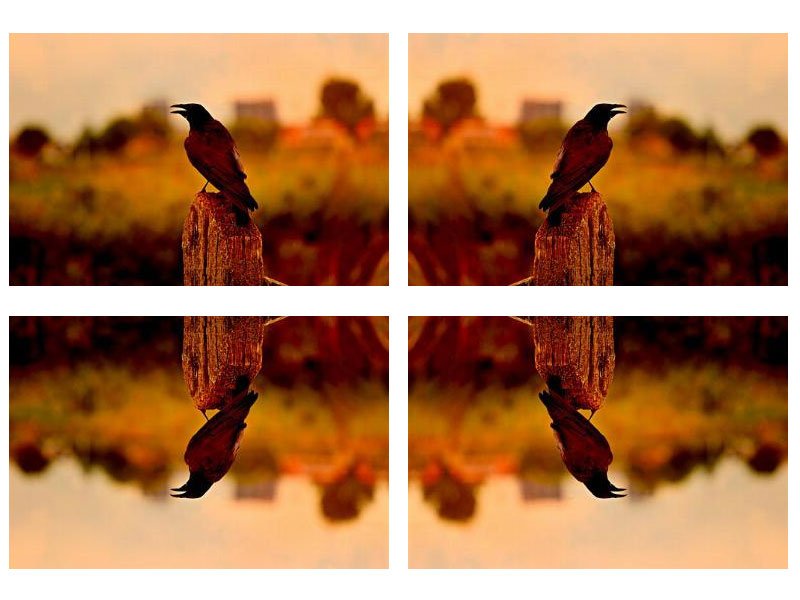
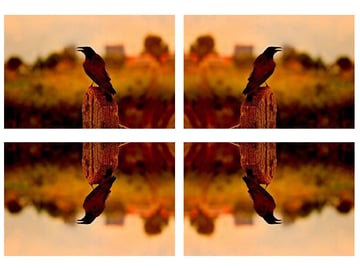
The top left image in the above figure is the original. The top right image was created using IMG_FLIP_HORIZONTAL, the bottom left image was created using IMG_FLIP_VERTICAL, and the bottom right image was created using IMG_FLIP_BOTH. (The crow image is from Pixabay.)
Applying Filters to an Image
GD also has a very useful imagefilter() function which can apply filters on different image resources loaded using the functions from previous images. This function can accept various parameters depending on the filter you are applying.
For starters, specify the image resource and the name of the filter that you want to apply. You can set it to one of the 12 predefined filter types mentioned in the docs.
-
IMG_FILTER_NEGATE: reverses the colors in the image -
IMG_FILTER_GRAYSCALE: removes color from the image -
IMG_FILTER_BRIGHTNESS: makes the image brighter or darker -
IMG_FILTER_CONTRAST: increases the image contrast -
IMG_FILTER_COLORIZE: tints the image to a selected color -
IMG_FILTER_EDGEDETECT: highlights the edges of the image -
IMG_FILTER_EMBOSS: similar to edge detection, but gives each edge a raised look -
IMG_FILTER_GAUSSIAN_BLUR: blurs the image using the Gaussian method -
IMG_FILTER_SELECTIVE_BLUR: blurs the image using the selective method -
IMG_FILTER_MEAN_REMOVAL: an effect to create a stylized image -
IMG_FILTER_SMOOTH: smooths jagged edges in the image -
IMG_FILTER_PIXELATE: makes the image look pixelated
Some filters like NEGATE, GRAYSCALE, EDGE_DETECT and EMBOSS don’t need any additional data. Other filters, like BRIGHTNESS, CONTRAST and SMOOTH, can accept an additional parameter which specifies the amount of brightness, contrast, or smoothness of the final image. The PIXELATE parameter allows you to specify two additional parameters: the block size as well as the mode of pixelation. Finally, the COLORIZE filter accepts four parameters which determine the values for the red, green, and blue components as well as the alpha channel.
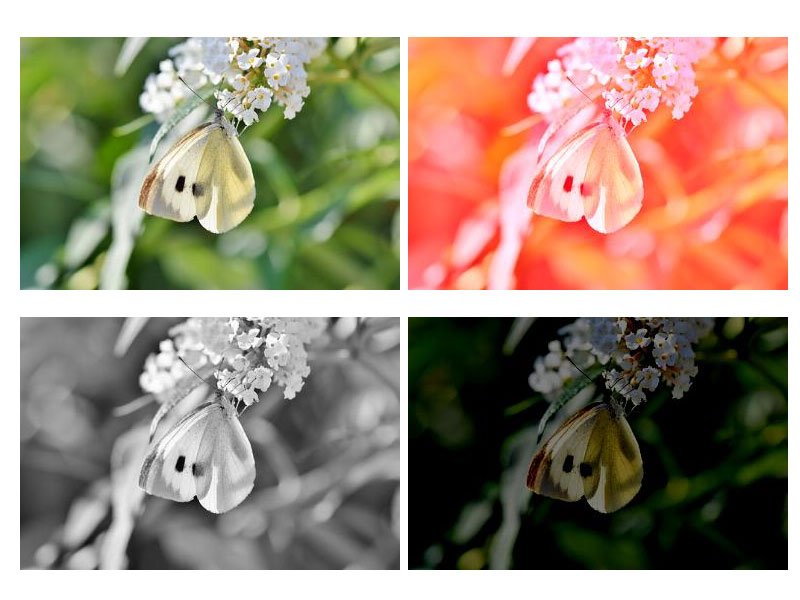
 The image in the top left is the original. The top right image was created using the
 COLORIZE filter, the bottom left was created using the GRAYSCALE filter, and the image in the bottom right was created using the BRIGHTNESS filter. (This butterfly image was found at Pixabay.)
Other Useful Image Manipulation Functions
You should also know about some other common GD functions that come in handy every now and then.
Get Image Dimensions
You can determine the width and height of an image resource using the imagesx() and imagesy() functions.
Another function called getimagesize() can also be used to get the width and height of an image along with its type. This function returns an array with elements specifying the width, height and format of the image. The first two elements of the array describe the width and height, and the third element contains a constant specifying the file format: one of IMAGETYPE_PNG, IMAGETYPE_GIF, etc.
Saving an Image
Once you have made all the desired changes to an image, you’ll most likely want to either output it to the browser or save it as a file. In either case, you will have to use one of the GD output functions like imagejpeg(), imagepng(), or imagegif(). You’ll pass your image resource to one of these output functions and, if you want to save the image to a file, you’ll specify a filename as well. You can also control the quality of the output image using a third optional parameter depending on the image type.
Get and Set Colors of Specific Pixels
There are a variety of functions in PHP that you can use to get or set the color of individual pixels at specific locations in an image. The first step is creation of an image resource with functions such as imagecreatefrompng().
After that, you can use the function imagecolorat($image, $x, $y) to get the index of the color of given pixel. The position of the pixel is determined by the second and third parameter in the function. You will get the RGB value of the pixel as an integer if this function is called on a true color image. Now, you can either use bitshifting and masking to get different color components or use another built-in function called imagecolorsforindex($image, $color).
The color of pixel at any particular location can be set using the imagesetpixel($image, $x, $y, $color) function.
Replacing Colors in Images with PHP
You can easily replace one color with another in PHP using the concepts we learned above. The quality of results will vary from image to image. As a general rule, less variation in the colors means better replacement. Solid colors can be replaced very effectively using this method. Lets write some code to replace the colors in the following image.



<?php

$filename = 'fancy_name.png'

$im_php = imagecreatefrompng($filename);

$origin_color = imagecolorsforindex($im_php, imagecolorat($im_php, 0, 0));

$dark_red = imagecolorallocate($im_php, 100, 0, 30);

list($width, $height, $type, $attr) = getimagesize($filename);


for($x = 0; $x <= $width - 1; $x++) {
    for($y = 0; $y <= $height - 1; $y++) {

        $index_color = imagecolorsforindex($im_php, imagecolorat($im_php, $x, $y));

        if($origin_color == $index_color) {
            imagesetpixel($im_php, $x, $y, $dark_red);
        }
    }
}

imagepng($im_php, 'fancy_name_red.png');

?>
The code above uses functions from the previous section to get and set color values. You should note that we are doing an exact color match. This might result in some artifacts because the pixels might vary in color slightly around boundaries. We could also avoid the calls to imagecolorsforindex() function when doing an exact match. However, having separate color components allows you to introduce some tolerance into the system and provide better results in certain situations. Here is the final image with exact color comparison and replacement.



Resizing All Images in a Directory
Let’s apply the knowledge we have gained so far to do something practical. In this section, we will resize all the JPEG images in a particular directory to have a width of 640 pixels. The height will be calculated automatically based on the dimensions of the original image.
We will save the resized images in a new folder titled Resized. All the original images in this case have the same dimensions, but the code will work properly with images that have different sizes and aspect ratios.
$directory = 'Nature/';
$images = glob($directory."*.jpg");

foreach($images as $image) {
    $im_php = imagecreatefromjpeg($image);
    $im_php = imagescale($im_php, 640);
    $new_height = imagesy($im_php);
    $new_name = str_replace('-1920x1080', '-640x'.$new_height, basename($image));
    imagejpeg($im_php, $directory.'Resized/'.$new_name);
}
In the above code, we begin by using the glob() function to find all the images with a .jpg extension in the directory titled Nature. The image files are stored in an array, and we loop over them one by one.
Since all the images that we want to resize are JPEGs, we use the imagecreatefromjpeg() function to load them into the script. The imagescale() function is then used to resize the image to a specific width—640 pixels in our case. We have not specified a fixed height, so the height will be calculated automatically.
Each of the original image files had -1920×1080 appended to the filename to indicate its dimensions. We use str_replace() on the original file name and replace -1920X1080 with the new image size.
Finally, we save the resized images in a folder named Resized with the new filenames. You can also pass a third parameter to the imagejpeg() function to set the quality of the saved image file. If the third parameter is omitted, the images are saved with a default quality of 75.
Apply Grayscale and Contrast Filters on Each Image in a Directory
This time, we will be applying two different filters on each image in our directory and saving the final result in a different directory without making any changes to the file name. Let’s dive into the code, and I will explain what each function does later.
$directory = 'Nature/';
$images = glob($directory."*.jpg");

foreach($images as $image) {
    $im_php = imagecreatefromjpeg($image);
    imagefilter($im_php, IMG_FILTER_GRAYSCALE);
    imagefilter($im_php, IMG_FILTER_CONTRAST, -25);
    $new_name = basename($image);
    imagejpeg($im_php, $directory.'Grayscale/'.$new_name);
}
As you can see, we load the images from the Nature directory exactly like we did for the previous example. However, we’ll use the imagefilter() function this time to apply filters on the loaded image resource.
Notice that imagefilter() modifies the original image and returns TRUE or FALSE based on the success or failure of the operation. This is different from the imagescale() function we used in the previous section, which returned the scaled image resource.
Another important thing to keep in mind is that the contrast filter accepts values from -100 to 100. Negative values imply more contrast, and positive values imply less contrast. This is the opposite of what some people might expect! A value of 0 will leave the image unchanged.
The brightness filter, on the other hand, has minimum and maximum limits of -255 and 255. The negative value in this case implies minimum brightness, and the positive value implies maximum brightness.
We get the file name from the file path using the basename() function and then save the image using the imagejpeg() function.
Final Thoughts
The aim of this tutorial was to get you familiar with the GD library in PHP and to show you how to use all these functions to make your life easier. You can use the examples at the end of the tutorial as a guide to write your own image manipulation scripts. For example, you can resize an image only if it is wider than a given limit by determining its width using the imagesx() function.
All these functions open up a lot of possibilities to make image manipulation easier and save you a lot of time in the end. If you have any questions related to this tutorial, please let me know in the comments.