How to Create File Upload Forms on Your WordPress Site
Forms are an easy way to collect information from website visitors, and file uploads allow users to add even more useful or important information. Some of the data which you can collect from file upload forms include:
user-submitted images and videos
content in the form of blog posts
resume files
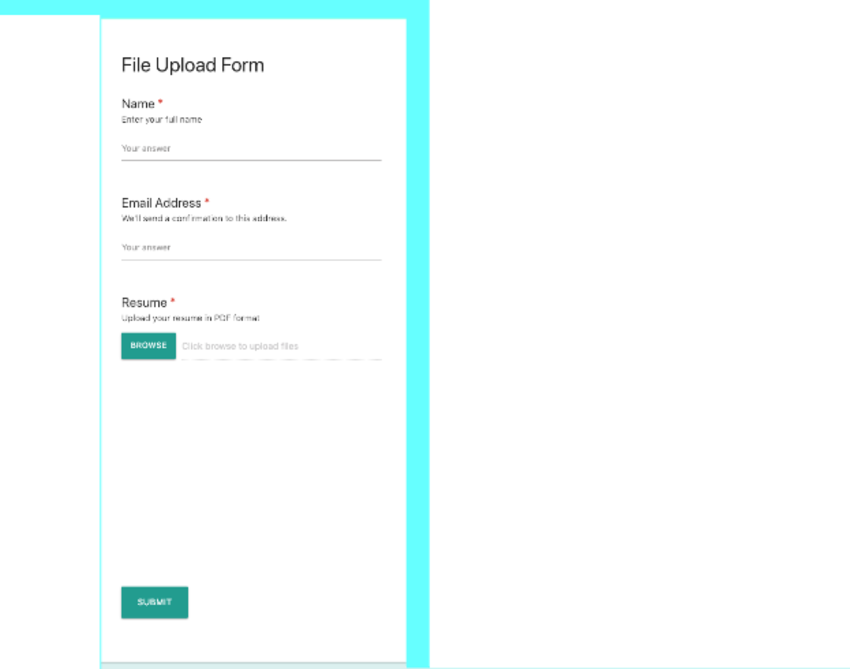
In this post, I’ll show you how to create a resume upload form for a WordPress website. Users will be able to upload resume files in PDF format. By the end of this tutorial, we should have something like this.
I’ll also show you how to add these uploaded files to Dropbox.
Sometimes you need to modify your WordPress login form to make it more user-friendly or maybe add some features. No matter your reason, here are 20 best…
If you own a WordPress site, forms are indispensable for creating a satisfying user experience and increasing your conversion rates. You need forms for…
Whether you are running an online store, marketplace, or a blog on your WordPress website, you’ll need a contact form. In this article, I am going to show…
The forms on your site are useless unless people actually complete them. Find out how to create great forms that encourage people to click submit.
Drag and Drop File Uploader Add-on for Contact Form 7
The Drop Uploader add-on for Contact Form 7 is a powerful plugin that allows you to add an upload area of any format to a form. You can also add several uploading areas to one form. It also allows you to copy these uploaded files to your preferred server or to Dropbox, which provides another backup for your data.
Other features include:
Javascript (front-end) file validation
ability to restrict specific file extensions
unlimited file upload ensures you can upload files of any size
ability to drag and drop or browse during upload
styling customization including colors, browse buttons and icons
receive uploaded files as links, mail attachments or both
receive attachments as zip files
store files in Dropbox
delete old files at a specific time
The plugin is translation ready and supports English, Spanish, French, Italian, German, Russian and Ukraine
Create Your Resume Upload Form
To get started creating an upload form, first purchase and download the Drop Uploader for CF7 plugin. You can find your installable WordPress files in the download section of your account.
Once you download the WordPress files, log in to your WordPress site, and install the plugin. Go to Plugins > Add New and upload the WordPress zip file you got from CodeCanyon. After uploading, click Install Now, wait a few seconds, and then click Activate. You can now start using the plugin.
Configurations
Go to Settings > CF7 Drop Uploader Settings and customize the Drop Uploader Style and other options such as layout and file storage.
File Storage
CF7 Drop Uploader offers three ways of storing files:
Attachment: if you enable this option, all files will be archived in to zip files.
Link: this option allows you to store uploaded files as links. It also allows you to delete the files at a specified time.
Dropbox: this option allows you to integrate and add your files to Dropbox. All you need is the Dropbox token, which you can obtain from your Dropbox account. You can also generate shareable links and link them to files or folder.
Create Your First File Upload Form
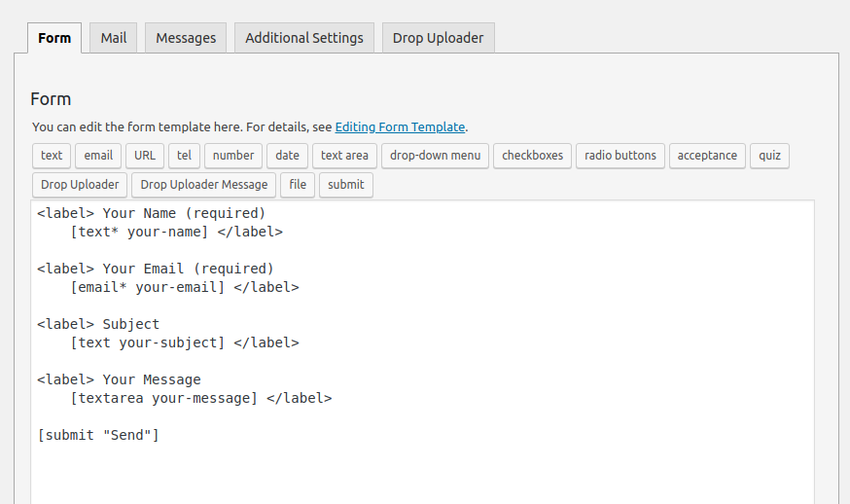
Install Contact Form 7 from the official WordPress plugins directory. Once done, you can now start creating your forms. Click Contact > Add New in your WordPress Dashboard menu. Contact Form 7 comes pre-configured with a ready to use template as shown below
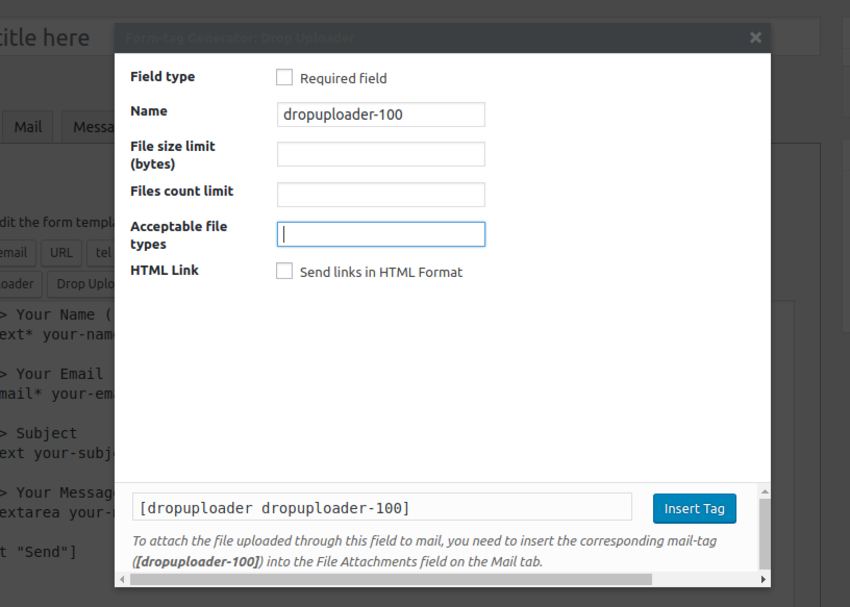
Click on Drop Uploader, and you should see a popup like the one below.
Mark the field type as a required field, set the Files count limit, and input Accepted file types as PDF format. Select the HTML Link checkbox if you wish to send links in HTML. Once you are done, click on Insert Tag, and all the changes are applied to the form. Rearrange the fields as you would want them to appear in your form. You can also add a message by clicking on the Drop Uploader Message tab.
The form template also contains additional fields such as checkboxes, date, and radio buttons, which you can use to make any form.
Next, go to the Mail tab and add the uploader shortcode—in my case [dropuploader-313]—to the message body and save the changes.
You can also receive the uploaded files as mail attachments by pasting the shortcode id of the uploader to the File Attachments section.
Embed Your Resume Upload Form in a Page
The final step is to embed the upload form to a WordPress page. To add the upload form, click the Add shortcode option and paste the shortcode of the contact form.
Receive Uploaded Files in Dropbox
In this section, we’ll cover how you to integrate Dropbox with your contact forms and send copies to Dropbox.
The first thing is to head to Dropbox developers and log in to your Dropbox account. Click on Create apps, select the Dropbox API option, choose the type of access you need for the API, and create a name for your app. Finally, click the Create app button. You will be redirected to the page which contains all the app’s information. Scroll to the OAuth 2 section and click on the Generate token button.
Once the token has been generated, copy and paste it to the Dropbox token section on your WordPress site.
To ensure your files will be stored in Dropbox, edit the form by enabling receiving files option. Go to the Drop Uploader tab and activate the Dropbox setting.
Save your form settings. In addition to receiving files as links in the message body, you will also receive files via Dropbox. To confirm if your file submissions have been saved to your Dropbox account, simply login to your Dropbox account and check under Apps.
Conclusion
This post has covered everything you need to get started on creating upload forms and storing your information. CF7 Drop Uploader will cater to every need, whether its for big or small files. If you are looking for a way to quickly create upload forms that automatically sends your file uploads to your Dropbox, this is an easy way to manage files and ensure safekeeping for your files. Take advantage of this awesome plugin and easily create file uploads.