Have you ever caught fireflies on a warm summer night?
When I was a kid we used to call them “lightning bugs.” I was always fascinated by how they would shine and glow against the sky, and loved releasing them back into the night.
So in this tutorial, I’ll show you how to create your own fireflies scene, using photo manipulation techniques and amazing tools in Adobe Photoshop.
Get inspired! Find more photos for your manipulations on Envato Market and Envato Elements.
Tutorial Assets
The following assets were used in the production of this tutorial:
Finding Inspiration
One of the best ways to stay inspired is to look for magic in everyday life. So for this manipulation, I’ll be creating a scene with a natural night feel using a collection of these stocks.

I typically gather references from various sources like Pinterest. But you can also prepare for the photo manipulation with a quick thumbnail sketch.
Mine was as simple as this little scribble below.

Let’s begin!
1. How to Remove an Object From a Photo
Step 1
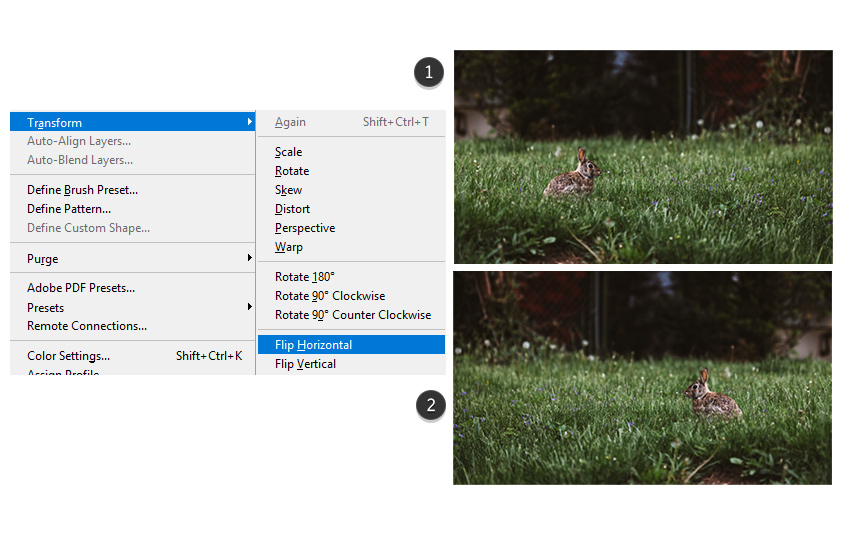
Open the Grass stock in Adobe Photoshop.
Looks like we already have a furry friend in this picture! So we’ll have to remove the bunny from the photo to make room for the fireflies.

But first, let’s flip the image. Go to Edit > Transform > Flip Horizontal.
Step 2
Now crop the photo for a tighter composition.
Select the Crop Tool (C) and crop the image like below.
Feel free to adjust the overall image size to one similar to my final result at 2500 x 1932 pixels.

Step 3
Let’s remove the rabbit!

- Select the Rectangular Marquee Tool (M) and make a selection of some grass from the left side. Copy and Paste the selection onto a New Layer and rename it Rabbit.
- Flip the grass. Go to Edit > Transform > Flip Horizontal. Then place it over the bunny.
- Add a Layer Mask to this layer. Use a Soft Round Brush (B) (100% Opacity, 0% Hardness) to mask away the harsh edges of the square.
Tip: Feel free to take the masking as far as you need. This is just a quick way to remove the rabbit so we can move on.
2. How to Add the Glass Jars
Step 1
Now let’s work on the glass jar. We’ll need to remove it from the white background first so we can insert it into the composition.

- Open your Glass Jar stock in Photoshop. Double-click the background layer to make it a normal one.
- Use the Magic Wand Tool (W) to select the white background.
- Then hit the Delete key to remove it completely.
Step 2
Create a New Layer above the rabbit cover and Copy and Paste the jar onto the grass.
Use the Free Transform Tool (Control-T) to rotate the jar at a slight angle. It’s sitting on grass after all, so perhaps it’ll rest a little off center.

If you’re using a jar stock similar to this one, then you’ll notice the inside is white just like the background. To make it more see-through like an actual glass jar, we’ll need to do the following steps.
First, select the Jar layer and hold Control-I to Invert it. This will turn it mostly black.

Step 3
Create a New Group and place the Jar layer inside.
Set the Layer Blend Mode of the jar to Screen, and then hold Control-J to make several more duplicates for a total of three copies.
We had to invert the jar first so that we can apply an effect that makes it more see-through. Duplicating the screen layers helps us bring the jar back without blocking the grass behind it. Here’s the result below.

Now select all the layers in the group and Right-click to Merge them together.
This will make the jar show up as black again, so make sure to set the Layer Blend Mode back to Screen.

Step 4
Continue to work on the jar.
Next, add a Layer Mask. Use a Hard Round Brush (B) (100% Opacity, 100% Hardness) to paint black onto the layer mask to remove the white reflection.
Then hold Control-J to duplicate this layer along with the new mask, setting the Opacity of the copy to 50%.

Now we have a clean glass jar that looks super realistic!
Step 5
Color correct the jar for more contrast and authenticity.
Create a New Layer above the Jar group. Right-click to set this layer as a Clipping Mask to the group.
Fill the layer with a pale pink color #b6a8b8 using the Paint Bucket Tool (G) before setting the Layer Blend Mode to Color Burn.

Step 6
Now paint shadow onto the jar. This step will help take away the harsh white lines.
Create a New Layer above the pink color fill and set it as a Clipping Mask to the Jar group as well.
Use a Soft Round Brush (B) (70-90% Opacity, 0% Hardness) to paint brown #262019 shadow all around the edges of the glass. Continue to paint more shadow on the bottom of the jar as well.
Layer the color as you go. Use the Eraser Tool (E) at any time to remove some shadow if it gets too heavy. Then set the Layer Blend Mode to Multiply.

Step 7
We’ve completed the first jar—great job!
Let’s add another.
To do this, select all the layers for the first jar (including the shadow and fill) and hold Control-J to duplicate them.
Now resize the second jar. While all the layers are still selected, hold Control-T to Free Transform the jar, resizing it to be much smaller in the back. Adjust the shadows and position as needed.

Here’s the result so far.

3. How to Add the Fireflies
Step 1
Now that our jars are set in place, we can start to add the fireflies.
Keep in mind that these aren’t real fireflies. I wasn’t able to find a stock of them flying so we’ll simply build our own.
First, download this 3D Fly stock at the right angle. A simple position like this one can be altered easily to make it look as if it’s flying.

Step 2
Copy and Paste the first fly onto a New Layer below both jar groups.
Free Transform (Control-T) to resize the fly, making it much smaller. Position the fly above the first jar.
To brighten the lighting on the fly, add a New Adjustment Layer of Curves above it and set it as a Clipping Mask to the fly layer. Adjust the curves for the RGB, Green and Blue Channels as follows. Then Merge the adjustment and fly layers together.

Step 3
Create more flies!
With the merged layer selected, hold Control-J to create several more duplicates of the lightened fly; a total of about 10 copies should do.
Position each new fly around the jars. Rotate, Resize, or Flip them to make the scene more dynamic. Make sure a few are sitting on top of the jars or just flying above them.

Step 4
Add one last fly. You can use the same angle or try a new one if you’d like.
Copy and Paste the original fly stock onto a New Layer above the rest. This stock should have the original lighting. Go to Edit > Transform > Flip Horizontal to flip it.
This fly will be flying in from the right side. So Resize it to be larger than the rest. Then position it at a downward angle for a sense of depth of field.

Step 5
To enforce the depth of field, blur the right fly.
Select the layer and go to Filter > Blur > Gaussian Blur, adding a Radius of 25 pixels.

Step 6
Now that all the flies are in place, we can cover the bottom of the jars with grass so that they fit perfectly into the ground.
Use the Rectangular Marquee Tool (M) to make a selection of the grass underneath the jars. Copy and Paste two copies of the grass onto two New Layers. Position each piece of grass over the bottom of a jar, and then Merge the layers together.

Refine the grass! Add a Layer Mask to mask away the harsh edges with a Soft Round Brush (B).
4. How to Finish the Fireflies Manipulation
Almost finished! Great work so far.
In order to get to the final stages of this manipulation, we still need to paint bright yellow glow onto the fireflies. Then we’ll bring the entire composition together with more shadow and light adjustments.
Step 1
Copy and Paste the Starry Sky stock onto a New Layer above the rest.
Set the Layer Blend Mode to Screen and the Opacity to 87%.
This layer will instantly add a flurry of stars to the scene. Adjust the intensity with a simple Layer Mask.

Step 2
Change the color scheme with a few Adjustment Layers.
To change the scene from day to night:
Add a New Adjustment Layer of Color Lookup. Set the 3DLUT File to NightfromDay.CUBE.
Then set the Layer Blend Mode to Hard Light and the Opacity to 73%.

Step 3
Next, add a New Adjustment Layer of Gradient Map.
Set the color to dark red #270209 to red #d90f31, and then set the Layer Blend Mode to Linear Dodge (Add).
Lower the Opacity to 30%.

Step 4
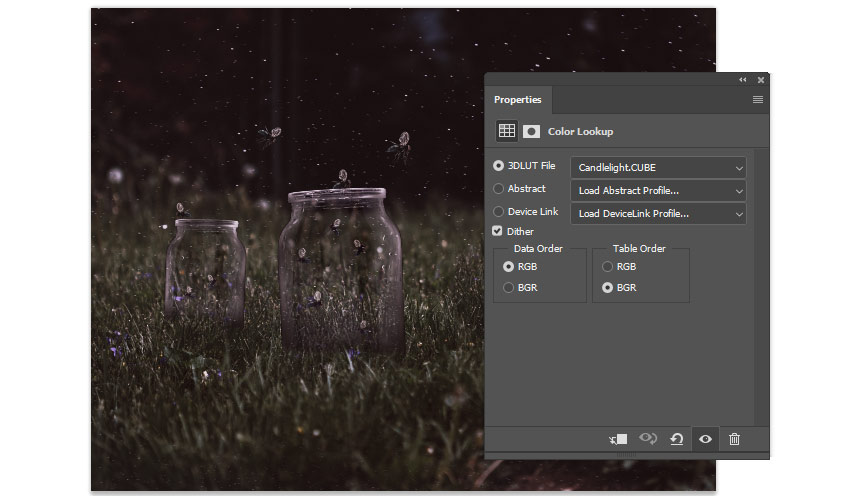
Continue adjusting the colors.
Add another New Adjustment Layer of Color Lookup.
Set the 3DLUT File to Candelight.CUBE and the Opacity to 71%.
Then follow up with another New Adjustment Layer of Gradient Map.
Set the color to the Blue, Yellow, and Pink preset, and then lower the Opacity to 30% and change the Layer Blend Mode to Hue.

Step 5
Almost there!
Since the colors are right on track, we can now experiment with more shadow. Let’s create a slight vignette effect to draw more attention to the jars and fireflies.
Create a New Layer set to Multiply above the rest. Use a Soft Round Brush (70% Opacity, 0% Hardness) to paint brown #403a2c all around the edges of the composition.
Bring some of the brown into the grass to tie it all together.

Step 6
Brighten up the scene with some light!
Create a New Layer above the rest. Use a Soft Round Brush (0% Hardness, 70% Opacity) to paint yellow #b8b660 onto the ends of each fly.

Then create another New Layer above the previous one and set it to Overlay.
Now paint glow around the jars, flies and grass with a much brighter yellow #f7cb57.
Adjust the Layer Opacity as needed.

Step 7
Let’s finish up with a few more color adjustments.
Start with a New Adjustment Layer of Selective Color.
Adjust the values for the Reds, Yellows, Neutrals, Whites, and Blacks to the following.

Then create a New Adjustment layer of Color Balance.
Set the values for the Shadows, Midtones, and Highlights to the following.

Here’s the result. We’ve added a lot more warmth and color intensity.

Step 8
To punch up the colors even more, create two New Layers and set them both to Overlay.
Use the Paint Bucket Tool (G) to fill the first layer with teal #2afbd1. Adjust the Opacity to 15%. Then fill the second layer with yellow #fbae2a. Set the Opacity to 40%.
Here’s the result.

Step 9
Our final details will help bring everything together for this manipulation. Use a Hard Round Brush to paint yellow #dcc95e highlights on the grass surrounding the glass jars.
A few highlighted strokes goes a long way, so feel free to experiment with this step!

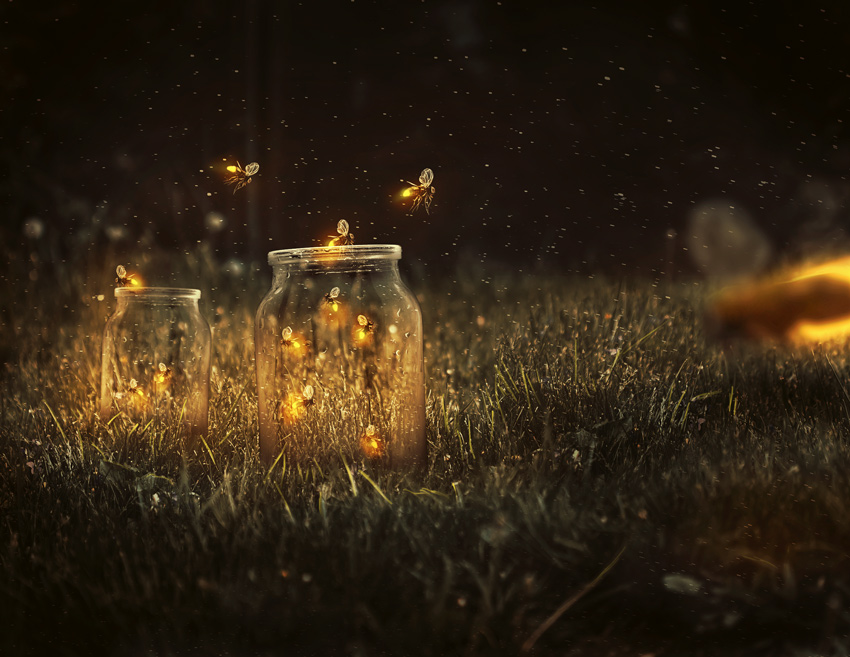
That’s it! Check out the final result below!
All Done! Great Job!
Relive your most nostalgic memories with a fun photo manipulation! In
this tutorial, we learned how to create an entire firefly scene from scratch using beautiful stocks and 3D assets. Feel free to find similar stocks on your own to customize this manipulation with more details.
I hope you’ve enjoyed this tutorial! How’d you do? Share your comments and results below.
For more photo manipulation tutorials like this one, check out these links:
![]()
Neon
How to Create an Instagram-Inspired Neon Text Effect: Photoshop in 60 Seconds
Melody Nieves
![]()
Photo Manipulation
How to Create a Forest Self-Portrait Photo Manipulation in Adobe Photoshop
Melody Nieves


