How do you add volume and texture to digital paintings?
Simple. Just reference real-life objects! Digital painting is difficult for many people, but it’s really all about patience and giving yourself adequate time to develop details to the best of your ability.
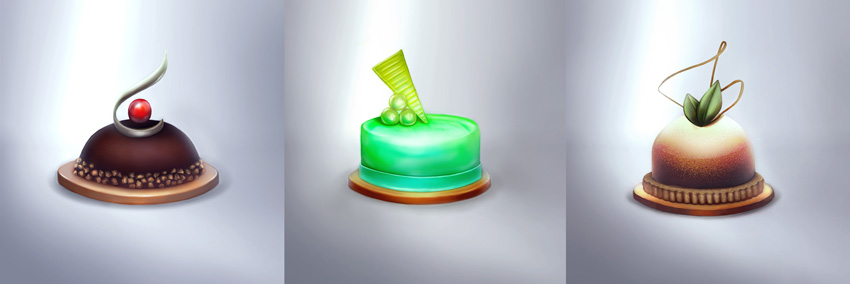
So today, we’re going to tackle this challenge by painting three French-inspired desserts. Learn how to use important tools like Clipping Masks and Layer Blend Modes to achieve more volume and texture!
Get inspired! Find incredible illustrations for your work on Envato Market.
Tutorial Assets
The following assets were used in the production of this tutorial:
1. How to Find Inspiration for Sketches
This tutorial is inspired by the small, delectable desserts often seen in French bakeries.
Petit fours are bite-sized baked goods that come in a variety of flavors, colors, and designs. They look super yummy to eat, and you can find a great selection of images on Pinterest for inspiration.
Each dessert in this tutorial was drawn with simple, geometric shapes. And I have already attached the final sketches to help you avoid any insecurities about drawing. Feel free to download them so you get can straight to the coloring part!
Here are the sketches.

2. How to Set Up the Spotlight Background
You can use premade backgrounds to help make your digital paintings easier.
I’ll be using #5 from this Abstract Spotlight Backgrounds pack to place each dessert against a spotlight background.
Step 1
But first, I adjusted the colors.
Create a 1000 x 1000 New Document in Photoshop at 150 dpi.
Place Spotlight #5 on a New Layer, making sure to stretch the image for a taller look so you’ll have plenty of flooring to work with. Continue adjusting the shape using the Free Transform Tool (Control-T) until you’re happy with the result.

Note: If you don’t have access to these stocks, feel free to try this tutorial with regular solid backgrounds.
Step 2
Next, adjust the color.
Add a New Gradient Map Adjustment Layer above the spotlight background layer.
Set the color to the Cobalt-Iron 2 preset, and then set the Layer Blend Mode to Color.

Then add two New Layers. Fill the first layer with a light cream color #efebe6 using the Paint Bucket Tool (G), and then set the Layer Blend Mode to Soft Light and the Opacity to 55%.

Follow up by filling the second layer with a pale blue #cbd5e3. Set the Layer Blend Mode to Color and the Opacity to 55%.

Let’s move on to the desserts! They’re currently ranked in order from easiest to hardest.
3. How to Paint a Chocolate Dessert
Step 1
Out of all our desserts, this is the simplest one to tackle. I’ll be going for a relatively matte chocolate finish, with a few shiny decorations on top.
Copy and Paste the Chocolate Dessert sketch onto a New Layer above the spotlight background. Add it to a New Group named First Dessert.

Step 2
Lower the Sketch layer to 86% Opacity.
Start painting the flat base colors first. Create a New Layer underneath the sketch for the gold plate. Use a Hard Round Brush (100% Opacity, 100% Hardness) to paint a gold color #ad8957 for the plate.

Give this color some texture. This will add realism for a metallic finish.
Go to Filter > Filter Gallery > Film Grain. Add two Film Grain layers with the following settings.

Step 3
Set the Layer Blend Mode of the sketch to Overlay.
Now paint the rest of the flat colors, each on their own New Layer with a Hard Round Brush (B).
Here are the values:
-
Chocolate:
#3f2a28 -
Red:
#be1b00 -
Nuts:
#9b7b4c -
Swirl Decor:
#dce8e5

Step 4
Add shadow to each section.
To do this, get into the habit of creating New Layers and setting them as Clipping Masks to each section. Set the Layer Blend Modes for the first round to Multiply.
For each section, use the Eyedropper Tool (I) to set the Foreground Color to the color of that section. Then use a Soft Round Brush (0% Hardness, 30% Opacity) to paint soft shadow for more volume.
If you need the shadows to be darker, use the Eyedropper Tool (I) to set the Foreground Color to a darker shade from that section.

Step 5
For the next round of Clipping Masks, set the Layer Blend Mode to Overlay. We’ll only need this for the Red, Chocolate, and Plate layers.
Add light to these areas by painting white, cream #b3b2a4, and light green #d9e4dd (for the swirl) using a Soft Round Brush. Adjust the Brush Opacity as needed for less or more intensity.
Digital paintings may take many layers to develop the color, so I won’t include them all. But they should all look similar to the Red layer shown below.

Step 6
Now Merge all the flat layers with their shadow and light together. Don’t include the Sketch layer.
Then Clip a New Layer to the merged result to continue developing the shadow.
Select nearby areas with the Eyedropper Tool (I) to set the Foreground Color to the one you need. Then use a Soft Round Brush (0% Hardness, 40% Opacity), to develop the shadow on the gold plate and red and swirl decorations.
Create realism by experimenting with the colors. Add some of the brown to the swirl to show reflected color, for instance.

Step 7
Now create a New Layer above the Sketch layer.
Start refining the painting to clean up the edges and lighting. This will take some time, so try to be patient!
Use a Hard Round Pressure Opacity Brush to do this, and adjust the Opacity and Hardness regularly.
Incorporate some of the gray background onto the sides of the dessert (the chocolate areas, gold plate, and red decor) by dusting it onto each section with a Soft Round Brush. Keep painting until your dessert looks a lot cleaner.

Step 8
Continue refining the painting on New Layers. Paint a soft gray shadow underneath the merged result layer with a Soft Round Brush.
Once the painting looks clean, start adding highlights.

Using the Hard Round Pressure Opacity Brush, paint white, gray, and gold #f7c17a highlights onto each section as needed. Pay attention to the way the light travels up the dessert and hits the back of the wall.
Create crisp, shiny spots for more realism on the crushed nuts, red circle, and swirl. Use the Eraser Tool (E) (0% Hardness, 30% Opacity) at any time to diffuse some of the colors you apply.
Step 9
Once you’re done painting, add a New Levels Adjustment Layer at the top of your group. Set the RGB and Blue Channels to the following settings.

Here is the final chocolate dessert.

4. How to Paint a Colorful Dessert
Let’s move on to the second dessert!
We’ll be using the same techniques as before to develop the flat colors, shadows, and lighting.
Step 1
Start with the gold plate. Repeat the same Filter method and color as before to create the textured gold plate base. Then set the Sketch layer to Overlay.
Paint each new flat color on its own New Layer with a Hard Round Brush. Here are the values:
-
Blue Top:
#88e4d2 -
Blue Bottom:
#65ddd0 -
Yellow Wedge:
#ccd758 -
Three Circles:
#fff4e4

Step 2
Just like before, start adding New Layers as Clipping Masks to each section.
Starting with the blue top and wedge layers, Clip New Layers set to Normal.
Create soft yellow gradients that blend into the flat colors using a Soft Round Brush (0% Hardness, 50-100% Opacity). Use the Eraser Tool (E) to remove any excess.
Here are the values:
-
Wedge:
#f4faba -
Blue Top: #
eeffe0

Step 3
Now Clip New Layers set to Multiply to each section.
Use a Soft Round Brush (0% Hardness, 30-50% Opacity) to begin painting shadow onto each section. Grab the colors you need from each section with the Eyedropper Tool (I), and then paint with those colors.
Gradually build up the shadows until you have a similar result. Each layer setup should be exactly like the blue top layer shown below.

Step 4
Merge all the flat colors, shadows, and lighting together. Don’t include the sketch layer.
Paint a soft, dark gray shadow below the merged layer with a Soft Round Brush. Then create a New Layer above the sketch. This one is essential for covering up the original sketch lines.
Take some time to clean up the edges with a Hard Round Pressure Opacity Brush. Incorporate a Soft Round Brush with low Opacity whenever possible for better blending.

Step 5
If the colors don’t seem saturated enough, add a New Layer above the rest set to Color Burn.
Don’t make it difficult for yourself by getting caught up in the color selection. Just grab colors that are already on the canvas to create a more saturated result. Here I added more green, yellow, and gold for the base.
I also covered the trio of circles with some green. This dessert is more reflective, so you’ll need to make sure the colors bounce around a bit.

Step 6
Add a New Layer above the rest and set it to Overlay.
Paint white highlights onto each detail. Concentrate the light towards the center so that it reflects the lighting setup of the spotlight background.

Now refine the painting. Take your time. Use a Hard Round Pressure Opacity Brush for the crisp details and a Soft Round Brush for the blending. Clean up all the edges until you get a result similar to the one below.
Start to incorporate sharp highlights and shadows into the mix. Make the colors bounce around so that there is some green showing up in the circles and wedge pieces.

Step 7
Now paint shiny highlights on the dessert. Use white for the majority of the highlights on the circles and cake, and bright yellow highlights on the wedge.
Don’t skimp on the highlights; they’ll add incredible realism to your work!

Step 8
Boost the contrast of your piece by adding a New Adjustment Layer of Levels to the top of your group. Adjust the values for the RGB Channel to the following.

Here is the final colorful dessert!

5. How to Paint a Fancy Dessert
For our final dessert, we’ll be creating a fancy showstopper!
Just like our previous paintings, we’ll use a similar layer arrangement to get the initial values and shadows on the canvas.
Step 1
Copy and Paste the third dessert sketch onto its own New Layer in a new Group. Paint the colors for each section using a Hard Round Brush, before setting the sketch to Overlay. Don’t forget to add a soft gray shadow below the other layers like before.
Here are the values:
-
Decoration:
#a57727 -
Leaves:
#adc992
-
Round Top:
#e1dbc8 -
Tart:
#c9b283

Step 2
Set up each section with New Layers set as Clipping Masks.
Start with New Layers set to Multiply for the plate, tart, and leaf layers. Use a Soft Round Brush (0% Hardness, 30% Opacity) to gradually build shadow.
Remember, just select the color from that layer first, and then paint with it to see the shadow effect.
If you need a darker shadow in that section, use the Eyedropper Tool (I) to select the next darker shade of the original base color.

Step 3
Now Clip New Layers set to Normal to each section.
Use a Soft Round Brush with low Opacity to balance out the lighting. The colors you’ll need for the round top and tart layers are included below. Create volume in the round top layer by concentrating the shadow #c2af9b in a delicate swoop shape, and then add a bright spot to the top #f2fcf5.
Incorporate some of the gray from the background to add additional realism. Start to develop the tart layer by drawing soft lines to section it off. Feel free to incorporate texture brushes like the Pastel on Charcoal Paper Brush for added texture.

Step 4
Merge the flat layers with their shadows and lighting together. Don’t include the sketch layer.
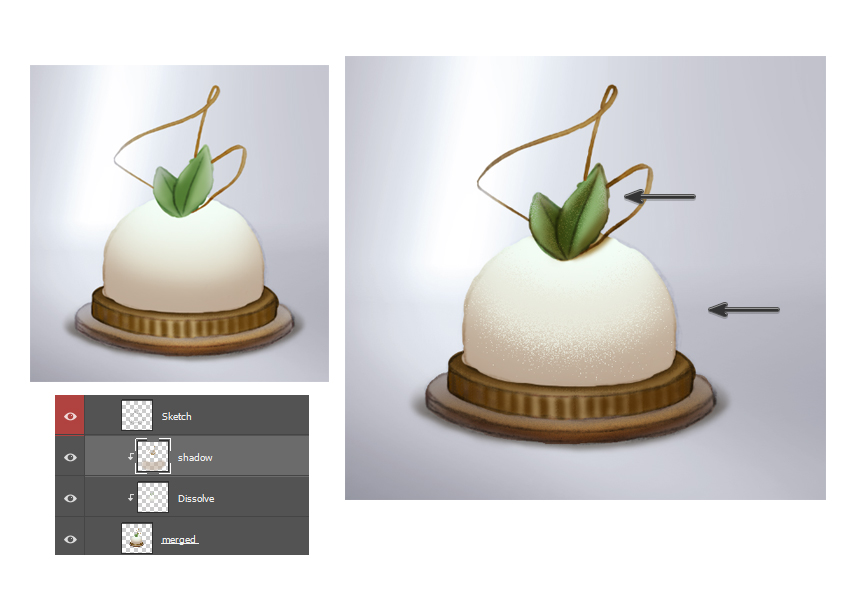
Clip a New Layer set to Dissolve to the merged layer. Use a Soft Round Brush to paint cream #eff4ea onto the round top and leaves. Instantly, it’ll create the effect of tiny dissolved dots, adding a cool texture effect. Remove some if necessary with the Eraser Tool (E).
Then Clip a New Layer set to Multiply above the texture. Develop the shadows even further. Add some of the brown from the base into the leaves for more realism.
Step 5
Next, add a New Layer above the sketch layer. Clean up the painting using a Hard Round Pressure Opacity Brush.
Start to develop the shape of the tart by making the ridges look like cylinder shapes.

Step 6
In this next step, we’ll dramatically change the color by adding two New Layers set to Color Burn.
Create a more saturated look. Use a muted #745d5a red color for the base and round top sections. Then add another Color Burn layer and paint over both with yellow #d4c39c.

Step 7
For more realism, continue to refine the painting on New Layers. Incorporate some gray from the background for a natural look.
Then set a New Layer to Overlay and paint white highlights around the pastry leaves and gold plate.

Feel free to take some time to fix the tart base on a New Layer.
Use a Hard Round Pressure Opacity Brush to draw a combination of squiggly lines and stacked dots for more texture. Don’t forget to add light brown highlights for more realism.

Step 8
Finish up the tart by painting a bright white swoop for a middle highlight. Then use a Levels Adjustment Layer at the top of the group to improve the contrast.
Use the following settings:

Here’s the final fancy dessert!

Combine them all together for an alternate result!

All Done. Great Job!
Today, we learned how Photoshop’s extraordinary tools and settings can help you achieve amazingly realistic results faster than painting them by hand. Get familiar with Photoshop to the best of your ability as you learn more digital painting tips.
So, how’d you do? Feel free to share your results in the comments.
Learn more about digital painting tips with these articles:
![]()
Digital Painting
How to Paint Realistic Skin in Adobe Photoshop
Melody Nieves
![]()
Illustration
How to Create Hair and Fur Textures in Photoshop Using the Kyle T Webster Brush Sets
Rowena Aitken


