The following tutorial will teach you how to make a 70s-style striped geometric pattern using Adobe Illustrator. To double the fun, I’ll show you not one but two methods of making a striped pattern in Illustrator to help you get creative with your own 70s aesthetic pattern for your retro projects.
If you don’t have the time to learn how to make a pattern in Illustrator, then Envato is your quick one-stop solution. You can instantly download vector patterns, graphics, and countless Illustrator add-ons without restrictions!
What you’ll learn in this tutorial
1. How to create a new document and set up a pattern tile
Step 1
Open Illustrator and use the shortcut Control-N to create a New Document. Give your file a suitable name, and set 1 for Number of Artboards.
Select Centimeters from the Units drop-down menu, enter a 10 cm Width and Height, and then click More Settings. Select RGB for the Color Mode, set the Raster Effects to Screen (72 ppi), and then click Create Document.


Step 2
Once the artboard is set, head over to the color palette generator, Adobe Color, to find or create a 70s-themed color palette to work with. You can use Adobe Color to generate a new palette based on an image, a color wheel, or your personal selection.
The 1970s were known for their distinctive blend of vibrant hues and earthy tones. For our first pattern, I chose nature-inspired earthy tones of bold colors like mustard, yellow, and burnt orange, a popular 70s aesthetic.
- Beige R=249 G=222 B=192
- Yellow R=244 G=157 B=78
- Mustard-orange R=204 G=106 B=25
- Orange-red R=187 G=62 B=3
- Rasberry-red R=155 G=34 B=38
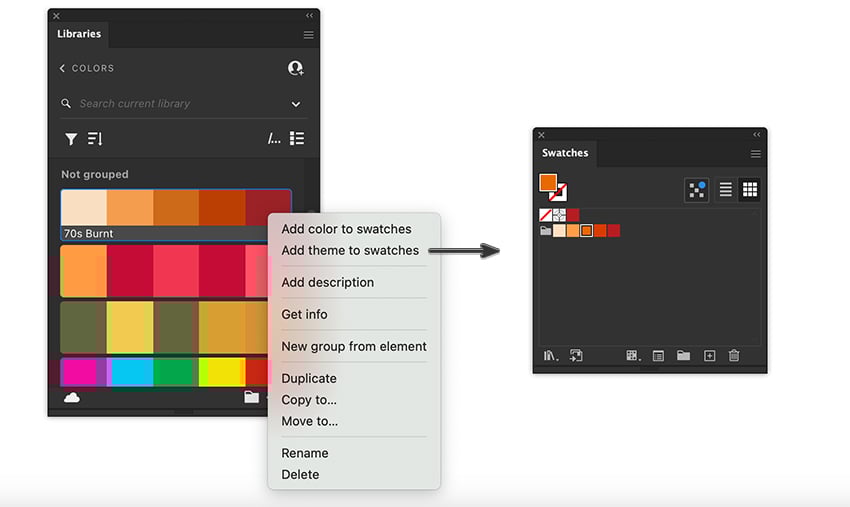
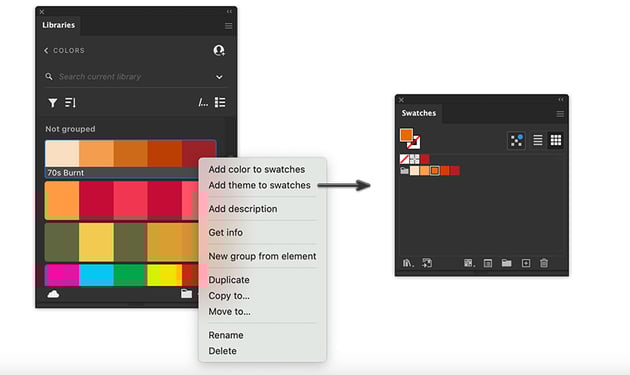
Save the palette to your Creative Cloud Libraries. This automatically syncs the palette across all your Creative Cloud applications. Access Illustrator again, and go to Window > Libraries. Locate your saved palette. Right-click on the palette name in the Libraries panel and select Add Theme to Swatches to import the colors into the Swatches panel.
2. How to create a 70s-style striped pattern tile in Illustrator
Step 1
Turn on the Smart Guides with the Command-U shortcut to help you align your artwork correctly. We will design our striped pattern tile by creating a striped art brush.
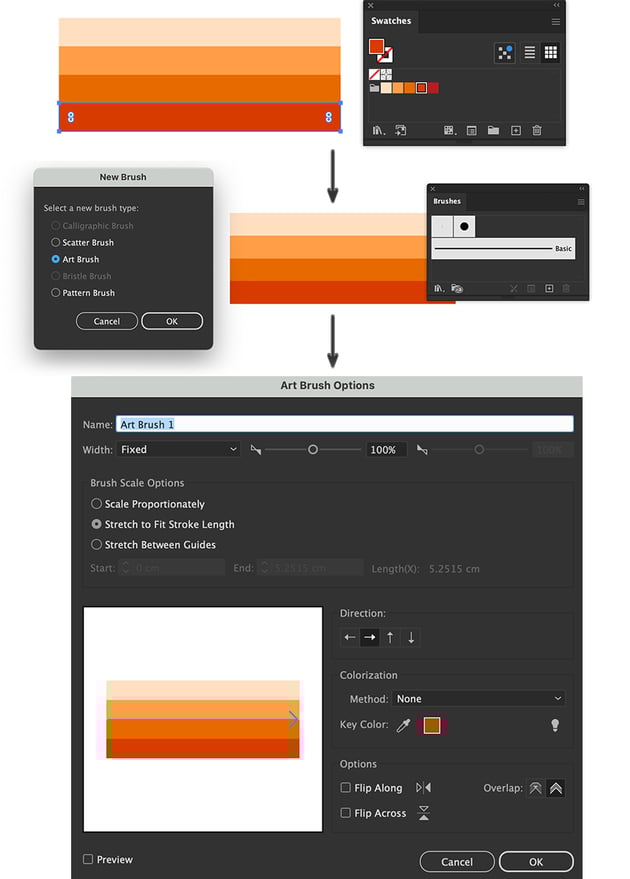
Grab the Rectangle Tool (M) with any Fill color and null Stroke. Draw a rectangle about 5 cm in Width and 0.5 cm in Height.
Take the Selection Tool (V) to grab the rectangle. Hold down the Shift-Alt and drag to duplicate the selection of the rectangle shape below the first bar. The Smart Guides will help you snap on point. Repeat the same action until you have four bars underneath each other.


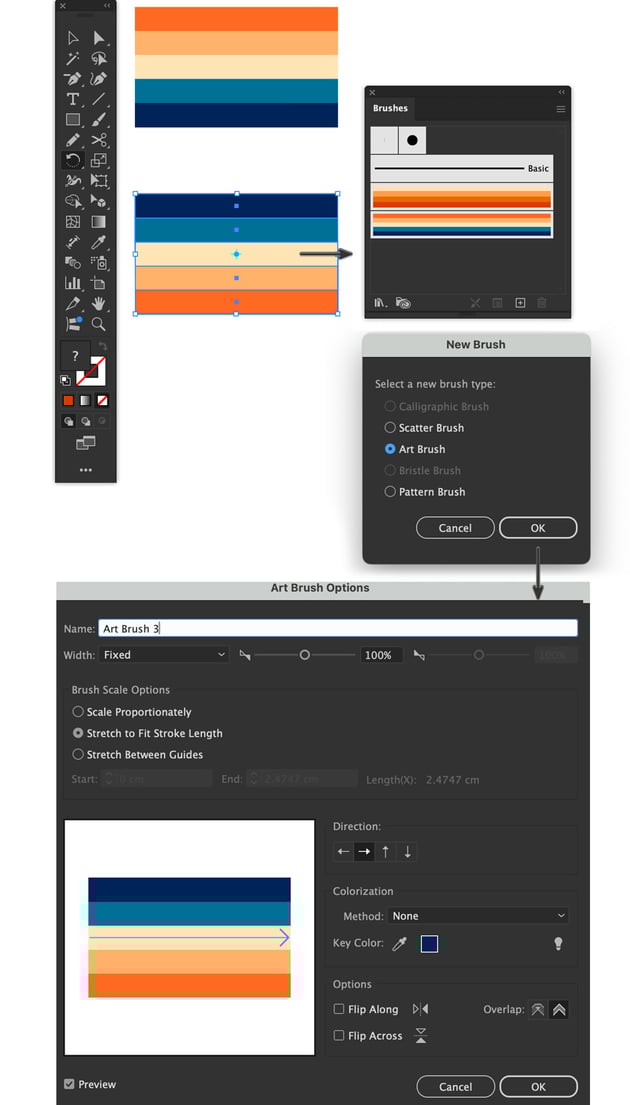
Step 2
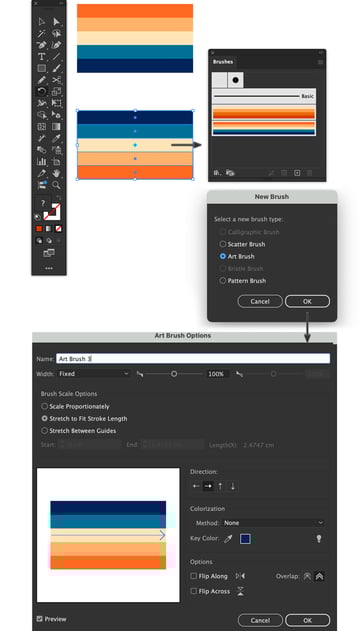
Now, give each rectangle a color fill, following the sequence of colors we uploaded to the Swatches panel. Open the Brushes panel (Window > Brushes). Use the Selection Tool (V) to grab the set of four bars and drag them onto the Brushes panel to open the New Brush dialog window. Select Art Brush and OK to open the Art Brush Options.
Keep the options at the defaults and just click OK to create our art brush, which will appear automatically in the Brushes panel. The new airbrush will allow us to create a stripe pattern.


Step 3
To make a geometric pattern, we need geometric shapes. Take the Rectangle Tool (M) and create a perfect square outline with a null Fill and 1 pt Stroke, holding down the Shift and Alt keys for about 7 cm. Let’s add a few anchor points to our shape outline. Click Objects > Path > Add Anchor Points to distribute anchor points evenly evenly.
Then, grab the Scissors Tool (C) and cut at the four center anchor points we created.


Step 4
Use the Selection Tool (V) to select the four segments. From the Brushes panel, apply the art brush with the 70s color palette we created. Then, select each segment individually. Hold down the Shift key to constrain the rotation to 45°. This will help you align at a precise angle. Rotate each corner twice to get a 90° turn.


Step 5
Next, let’s curve our corner edges. Grab the Direct Selection Tool (A), hold Shift to select multiple anchor points, and select all the corner anchor points. You will notice the appearance of the Live Corners widget, which has little circular nodes in the internal corners of the segment. Drag the Radius to about 0.85 cm.


Step 6
Moving on, let’s add a backdrop to our design. Use the Shift-D shortcut to switch the drawing mode to Draw Behind.
Grab the Rectangle Tool (M), use the rasberry-red R=155 G=34 B=38, and color fill.


Step 7
Select all the shapes and open the Pattern Options panel (Window > Pattern Options). Open the fly-out menu of this panel and go to Make Pattern.
Name your pattern ’70s Pattern 1′ and select Grid from the Tile Type. The width and height will be set automatically. Then, click the Done tab to save your pattern in the Swatches panel (Window > Swatches).


Step 8
Once the swatch is created, take the Rectangle Tool (M) and draw any rectangle to apply the pattern swatch to its Fill from the Swatches panel. And voila, you have your first 70s illustrator pattern!


3. How to draw a striped geometric 70s pattern
Step 1
For our second pattern tile, we will work with a different color palette for a 70s look. Head back to Adobe Color and find another 70s vintage color palette to stylize the new stripe pattern. For this tile, I chose:
- Dark Blue R=3 G=40 B=89
- Teal R=1 G=111 B=148
- Mellow-yellow R=255 G=228 B=182
- Pale-orange R=255 G=176 B=109
- Orange R=254 G=106 B=44
Save the swatch palette to Creative Cloud Libraries, and then return to Illustrator and go to Window > Libraries. Locate the saved 70s palette in the Libraries panel. Right-click and select Add Theme to Swatches to import the colors into the Swatches panel.


Step 2
Now, let’s create our second artbrush using the previous set of bars we made for the first artbrush. Take the Selection Tool (V) and recolor the Fill of each bar in the set using the Retro 70s palette from the Swatches panel.
Select the fourth bar and hold down Shift-Alt and drag to replicate and constrain the shape’s proportions. Create another bar below it. Give the fifth bar a dark blue Fill of R=3 G=40 B=89.


Step 3
Grab all the bars and drag them into the Brushes panel. This opens the New Brush dialog window. Select Art Brush and OK to open the Art Brush Options.
Keep the options at the defaults and just click OK. Our brush will appear automatically in the Brushes panel.


Step 4
Next, use the Selection Tool (V) to select the five bars. Then, grab the Rotate Tool (R) and hold down the Shift key to snap at a 180° turn.
Once turned, drag the set of bars into the Brushes panel. Select Art Brush from the New Brush dialog window and click OK. In the Art Brush Options, just press OK, and the airbrush will automatically be added to the Brushes panel.

Step 5
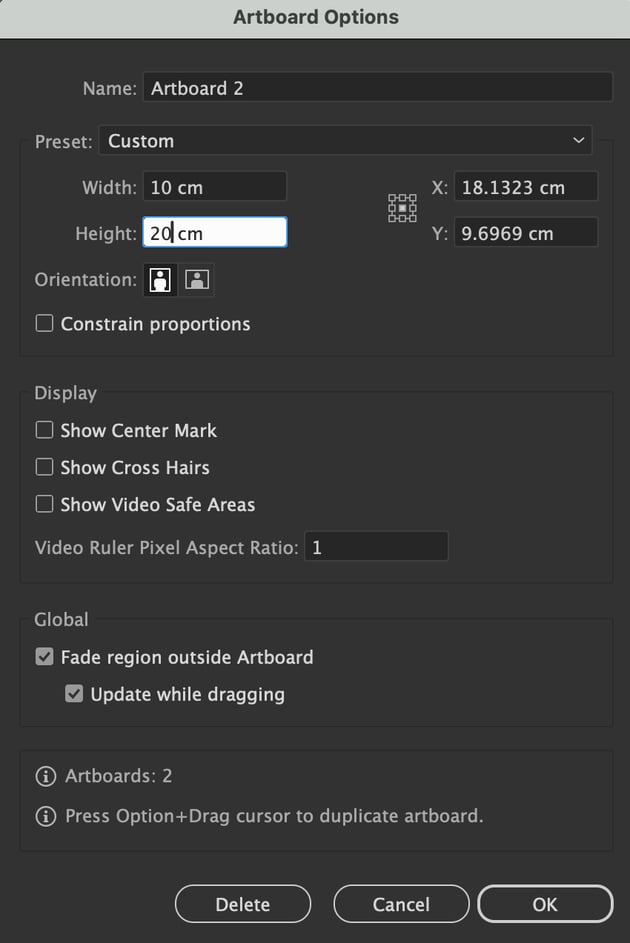
Now that we have both art brushes uploaded to the Brushes panel, let’s create our 70s pattern tile by adding a new artboard.
File > Document Setup and select Edit Artboards. Set Width at 10 cm and Height at 20 cm.

Step 6
Take the Rectangle Tool (M) with the red and orange Fill we used in the first tile of R=187 G=62 B=3, and draw a 10 x 20 cm square to fit the dimensions of the artboard. The Smart Guides will help you snap on.


Step 7
Next, take the Ellipse Tool (L) and choose a null Fill and 1 pt Stroke Weight. Draw a perfect 5 x 5 cm ellipse from the center of the artboard, holding down the Shift and Alt keys to constrain the proportions. The new circle should be half the width of the artboard.


Step 8
We need to duplicate the circle on the top, bottom, left, and right of the center circle. So take the Selection Tool (V), grab the circle, hold down the Shift and Alt keys to duplicate and constrain movement, and place the duplicated ellipses around the artboard, as shown below.


Step 9
Grab the Scissors Tool (C) and cut the anchor points of each circle as marked below, except for the center circle. Then, Delete all the excess segments from the artboard.


Step 10
Select all our circle segments. Apply the second art brush with the 70s color palette from the Brushes panel to all the outer segments. The first airbrush is applied to the two inner ellipses, as shown below. Set the Stroke Weight to 1.7 pt from the Stroke panelto give the design some breathing space.


Step 11
We must move some segments forward and backward to look like the image below. Object > Arrange > Send Backward (Command-[) to send segments behind, and Object > Arrange > Send Forward(Command-]) to move them forward.


Step 12
When ready, select all the pattern tile shapes and open Window > Pattern Options). The fly-out menu will open; select Make Pattern.
Select Grid from the Tile Type. The width and height will be automatically set. Then click Done to save the pattern to the Swatches panel.


Congratulations! Your 70s striped patterns are complete!
Here is what your 70s striped pattern should look like. I hope you’ve enjoyed this tutorial on how to create a pattern in Illustrator and can apply these techniques to future projects. Have fun adjusting the 70s patterns in your style!
You can get some great sources of 70s inspiration at Envato, where you can find interesting solutions to improve your geometric pattern design.
Ready-to-use 70s patterns and assets
If you want to save time, you can easily download any of the thousands of assets available, including 70s patterns and designs.
1. Groovy Boho 70s Textures (JPG, EPS)
This hypnotizing ready-to-print collection of 20 groovy 70s patterns with a 70s color palette can be an excellent start for a retro-themed design.


2. Retro geometrical patterns (EPS, JPG)
Suppose you don’t have time to learn how to make a pattern in Illustrator. In that case, this set of retro geometric patterns, with a 70s palette, might be the solution.


3. Retro lines seamless patterns (AI, EPS, PNG)
If you’re looking for a special set of line patterns to transform your designs and draw all the attention, look no further. Here’s a set of 25 unique retro line patterns that are great for social media designs or wallpaper.


4. Groovy Boho poster patterns flower 70s (EPS, JPG)
This collection of 160 seamless patterns with a 70s aesthetic lets you quickly whip up many designs in no time.


5. Retro Abstract Patterns (AI, EPS)
If you’re looking for 70s inspiration, this pack of old-school patterns has a set of 8 unique patterns, with two variations each that can be easily scaled or recolored.


Want to learn more?
We have plenty of tutorials on Envato Tuts+, from beginner to intermediate level. Have a look!