Blurring images in Photoshop is a great way to soften a picture, creating a stylized yet professional effect. It’s a commonly used tool for giving photos a dreamy or vintage look—but it’s also perfect for helping to focus a viewer’s attention on a certain subject. In this tutorial, you’ll learn how to blur a picture in Photoshop so you can create a variety of effects.
Let’s get started with how to blur a photo in Photoshop!
1. How to Blur in Photoshop
Step 1
Photoshop has several blur options to choose from. You’ll find them in Filter > Blur. In this example, we’ll be using Motion Blur to add a motion blur effect in Photoshop. However, you can mix and match different blurs, pair them with layer masks, and much more.
First, let’s Duplicate our main image layer using Control/Command-J. Bring the duplicate above the original. This is the layer we will be applying our blur to.
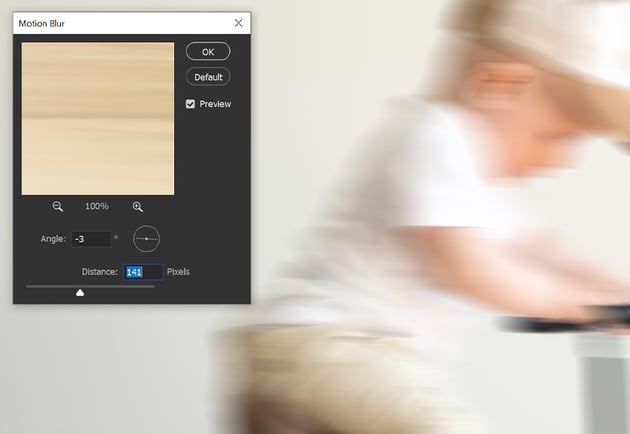
Step 2
Next, let’s add a Filter > Blur > Motion Blur to the duplicate layer. Each blur effect in Photoshop filter will have its own settings. When using Motion Blur, you can adjust its Angle and Distance. These settings will depend on the effect you want.


Step 3
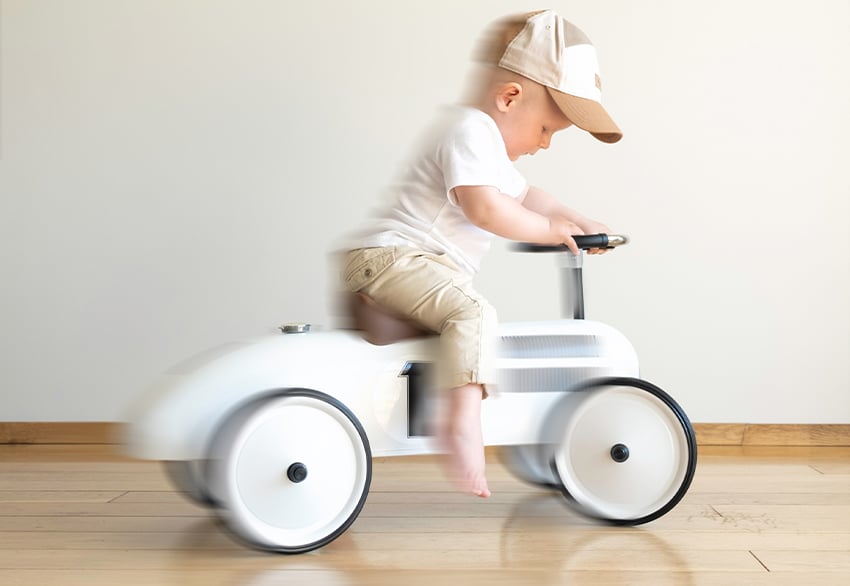
Finally, we can use Layer Masks to pinpoint where we want the blur to be. Add a Layer Mask to the blurred image, and fill it with black by hitting Control-I. This will Invert the white mask to black, hiding the blur.
tip
When using layer masks, painting with black will hide the image, while white will reveal the image.
Use a soft white round Brush to mask back in any areas you want the blur to be applied. In this case, with the layer mask active, we want to paint white on the edges of the subject.


2. How to Blur an Image in Photoshop Using Gallery Blur
Step 1
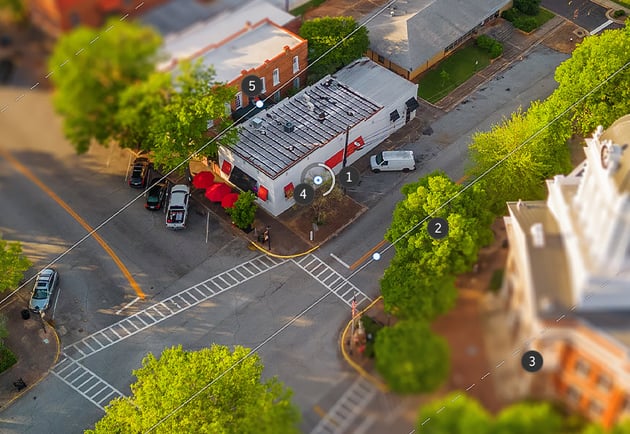
If you are looking for how to blur something in Photoshop more photo-realistically or add depth and bokeh effects, then you’ll want to use Filter > Blur Gallery. There are several to choose from; today, we will be looking at the Tilt-Shift Blur. However, all the blurs work very similarly to each other, simply offering different shapes and effects.
First, let’s Duplicate the image using Control/Command-J. This will give us a backup. Alternatively, you can convert the layer to a Smart Object by right-clicking the layer and choosing Convert to Smart Object.
tip
Using Smart Objects will allow you to go back and change an applied filter’s settings at any time.
Step 2
Now, go to Filter > Blur Gallery > Tilt-Shift. This blur simulates the effect of a tilt-shift lens.
- Use the Blur Slider either on the canvas or the right-side Blur Tools panel to adjust the Blur amount and Distortion.
- Use the Solid line to place where the blur will begin and the Dashed line to place where the image will reach maximum blur.
- Use the Middle Anchor point to move the focal point around.
- Use the Solid Line Anchor points to rotate the focal point.
You can also click on the canvas to add a New Focal Point. The original focal point will stay and interact with the newly placed point. This is less common with Tilt-Shift blurs but can be very helpful while using some of the other blurs.


That’s It!
And there you have it—you now know how to blur an image in Photoshop. Blurring is a great way to soften an image and add a dreamy vintage feel or add depth and pull focus. And by following the steps outlined in this tutorial on how to blur something in Photoshop, you will be able to blur any image easily.
Looking for more? Check out some of these other Photoshop tutorials: