
Plugins are what makes WordPress special.
Without them, WordPress wouldn’t be much more than a humble blogging platform. But by adding plugins to your site, you can turn it into so much more.
Depending on what you need, you can use a plugin to make your site more efficient and to boost its discoverability, to add extra content types and use WordPress’s full content management system (CMS) capabilities, to run a store, or to integrate with another system such as Google Maps or Twitter.
It’s unlikely you’ll be able to run an effective WordPress site without installing at least a couple of plugins. And if you don’t add any plugins, you’re missing out!
-
Whether you want to show off customer testimonials, your latest blog posts, your best images, or just celebrate the members of your team, there is a…
-
Whether you need an event calendar plugin, a booking system with payments, or a Google calendar widget, this list of plugins will have something to improve…
-
![]()
Websites for restaurants, retreat centers, country clubs, and many other businesses and organizations can benefit from a weather WordPress widget. Take a…
-
![]()
Websites for restaurants, retreat centers, country clubs, and many other businesses and organizations can benefit from a weather WordPress widget. Take a…
-
![]()
Want to know the coolest and most useful new addons and extensions available for the WPBakery Page Builder? Here’re a list of the 20 best of 2019.
-
![]()
If you’re looking for fresh and interesting ways to encourage visitors to opt in to your email subscribers list, this awesome list of over 20 WordPress popup…


In this tutorial, I’m going to show you how to install a plugin on your WordPress site: either one you download for free via the WordPress plugin directory, or one you’ve downloaded from a plugin vendor such as CodeCanyon.

But first, let’s take a look at just why you might need to install a plugin.
Why Install Plugins?
Plugins add extra functionality to WordPress that will make your site more effective. Here are some examples:
- SEO plugins to boost your search engine rankings
- performance plugins to make your site run faster
- eCommerce plugins to add a store to your site
- backup plugins so you can keep your site backed up
- social media plugins so you can share your posts and encourage others to
- maps plugins to embed maps in your site
There are plenty more examples of uses for plugins. Even if you don’t need extra functionality, it’s a good idea to install plugins for SEO, performance, security, and backups, as these will make your site more effective.
How to Install a Free Plugin
If you want to install a free plugin, there’s only one place you should be getting it from, and that’s the WordPress plugin directory.

The plugin directory has thousands of excellent free plugins, all of which can be easily downloaded and installed on your site.
The benefits of installing from the plugin directory are:
- The plugin will have been tested for performance and security.
- You’ll have access to free updates (and will be notified when these are available).
- You’ll have access to free support from the WordPress support forums (remember you got the plugin for free, so don’t expect lightning-fast response times).
For me, the biggest benefit is security. If a plugin is available for free outside the plugin directory, ask yourself why. Why would the provider want to bypass the plugin directory and want you to download the code?
There are two potential reasons that should ring alarm bells. The first is that the plugin carries malicious code, which will compromise your site. And the second is that they want to distribute a premium plugin for free, bypassing the original plugin developer and effectively taking revenue from them. Again, plugins like these often include malicious code. You should avoid them.
If a developer wants to make their code available for free, there’s no reason why they wouldn’t submit it to the plugin directory. The process is easy and freely available, and it ensures that the plugin has been properly tested. It protects you and the developer.
So having established that you should only get free plugins from the official theme directory, how do you install them?
Installing a Plugin From the Plugin Directory
You can install a plugin from the plugin directory right from the admin screen of your site.
Go to Plugins > Add New. You’ll see a screen with some of the most popular plugins listed. In the search bar at the top, type in the name of the plugin you want or the kind of thing it does. So if you want a plugin for SEO, for example, type in SEO.
Note: If you’re running WordPress Multisite on your WordPress installation, you can only install plugins from the network admin screens. If you’re a site admin on a Multisite network, you cannot install plugins—only activate plugins that have already been installed by the network admin. Sorry!

Browse the plugins that are displayed. You can find out more about each one by clicking the More Details link for each of them. And remember these are free plugins, so you can always try some out and decide which ones are for you.
Once you’ve picked a plugin, click the Install button next to its name. WordPress will take a moment to install the plugin, and then the Install button will change to an Activate button.
If you want to activate the plugin now, click that Activate button. If you don’t want to activate it yet (e.g. if you’re installing a few plugins so you can test them one at a time), just ignore the button—you can activate the plugin later.
Note: If you’re running a Multisite network, the button will say Network Activate instead of Activate. If you want to activate it for every site in the network, or if it’s a plugin such as a backup plugin that needs to be network activated, you can click this. If you don’t, it’ll be available for your site admins to choose to activate.
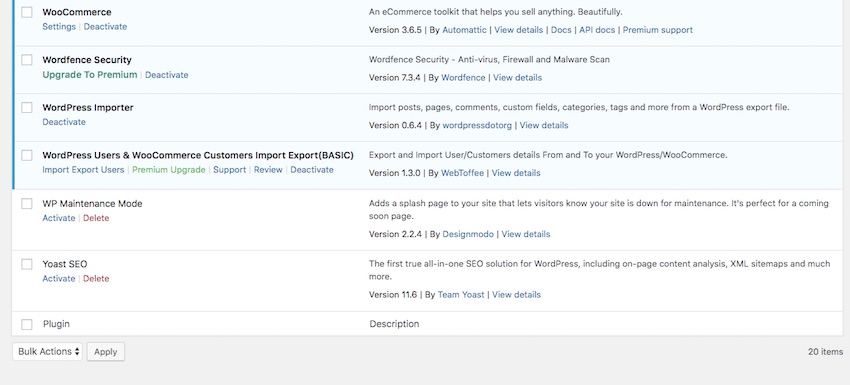
To see the plugin details and activate it later on, go to the Plugins screen in your dashboard.
Scroll down to find the plugin you just installed—in my example, it’s Yoast SEO. Click the Activate link beneath the plugin to activate it.

Note: If your site is part of a Multisite network, you activate plugins from the Plugins screen in the site admin in the same way.
Now your plugin is installed and activated.
Installing a Premium Plugin
If you have bought your plugin from a plugin vendor like CodeCanyon, you’ll have to upload a file to WordPress in order to install it.
The file will need to be a compressed file, in the .zip format. All of CodeCanyon’s plugins are supplied as zip files; if the plugin you are installing hasn’t been compressed, you’ll need to compress it to a zip file on your computer first.
Once you have your zip file, go to Plugins > Add New in WordPress.
At the top of the screen is an Upload Plugin button. Click this.
Click the Choose File button that appears and select the zip file from your computer. Once you have that, its name will be shown onscreen. Click the Install Now button.

WordPress will install the plugin for you and show you a notification screen when that’s done. If you want to activate the plugin, click the Activate Plugin button. Alternatively, you can activate it later from the Plugins screen as described above.
Managing Plugins
Once you’ve installed and activated your plugins, you’ll need to manage them. This includes configuring the plugins via their settings screens, updating them, and deactivating and deleting them if you need to.
Finding a Plugin’s Settings Screen
Sometimes when you activate a plugin, it’s not immediately apparent where to configure it.
In some cases, the plugin will add a new top-level menu item to your admin menu. In others, it’ll add a lower level item to an existing menu section. Examples include:
- Dashboard—for plugins relating to updates (such as plugins for automatic updating)
- Appearance > Customizer—for plugins that give you extra customization options or widgets
- Users—for user-related plugins, such as ones that force strong passwords or that migrate user data
- Tools—for plugins that give you extra admin tools such as importing and exporting
- Settings—probably the most commonly used location, for plugins that add extra settings to your site such as backups and spam protection
If you still can’t find the settings screen for the plugin, try looking in the Plugins screen. You may find a link under the plugin name that takes you directly to its settings screen.
Updating Plugins
From time to time you’ll need to update your plugins. It’s important to do this, because if the update is for a security patch, it will prevent your site from becoming vulnerable to attack.
There are two ways to do this:
- In the Plugins screen, click the Update link below the name of the plugin—you will see a message if it needs updating.
- Or, in Dashboard > Updates, select the plugin and click on Update Plugins.
Doing this regularly will keep your site secure and ensure it runs smoothly.
Deactivating and Deleting Plugins
If you decide you don’t need the plugin after all, or it causes you problems, you’ll need to deactivate it and/or delete it. It’s a good idea to delete any plugins you’re not using, as this is better for security and performance.
In the Plugins screen, find the details of the plugin.

If the plugin is activated, you’ll need to deactivate it before it’s deleted. Click the Deactivate link below the plugin name.
Once you’ve done that, a red Delete link will appear under the plugin name, Click that to delete the plugin. A pop-up will appear, asking if you’re sure you want to delete the plugin and all its data. Click the OK button to delete it.
Note: Plugins should remove all of their data from your site when you delete them, but some don’t. Instead, they remove the plugin files but not any data that the plugin added to the database tables. If you want to clean up this data, try using a plugin that will clean up your database.
Your plugin will now be removed from your WordPress installation. If you ever need to use it again, you’ll need to reinstall it.
Plugins Make Your WordPress Site Work the Way You Need It To
Adding plugins to your WordPress site can make it many times more effective. Whether you’re adding a free plugin or a premium plugin to your site, follow the instructions above and you’ll be able to add extra functionality to your site and make it work exactly how you want.
-
Whether you want to show off customer testimonials, your latest blog posts, your best images, or just celebrate the members of your team, there is a…
-
Whether you need an event calendar plugin, a booking system with payments, or a Google calendar widget, this list of plugins will have something to improve…
-
![]()
Websites for restaurants, retreat centers, country clubs, and many other businesses and organizations can benefit from a weather WordPress widget. Take a…
-
![]()
Websites for restaurants, retreat centers, country clubs, and many other businesses and organizations can benefit from a weather WordPress widget. Take a…
-
![]()
Want to know the coolest and most useful new addons and extensions available for the WPBakery Page Builder? Here’re a list of the 20 best of 2019.
-
![]()
If you’re looking for fresh and interesting ways to encourage visitors to opt in to your email subscribers list, this awesome list of over 20 WordPress popup…