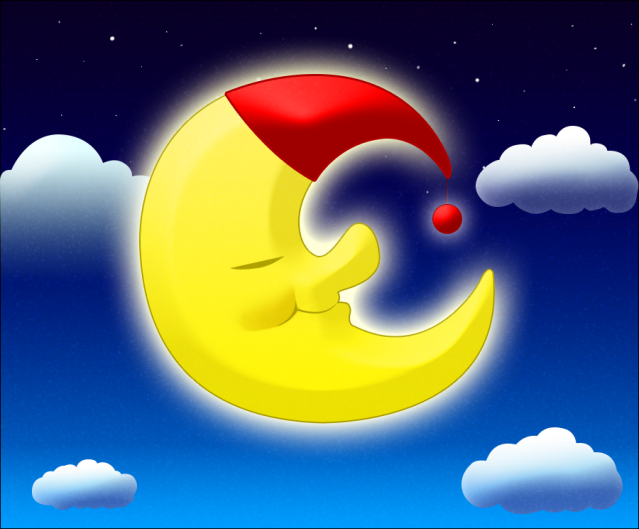
From a simple sketch to full blown colored artwork you will learn how create an Illustration of a Sleeping Moon. A drawing tablet isn’t necessary for this tutorial but it can make things go little smoother. Before I touch Photoshop I draw a series of sketches for my Moon design and select the best one I like. In the creation of my sketch I research real moons as well as other illustrations of moons from various artists. This is only to build up ideas on how I want my moon to look. You can draw your own sketch or right click and save the one I made and place it in your Photoshop canvas.
Final Results
Tutorial Resources
Step 1
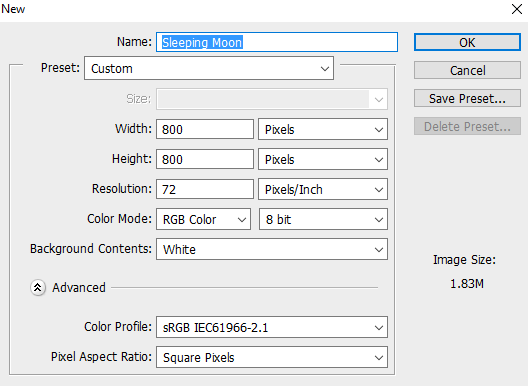
Open Photoshop and create a new document, it can be 900 x 800 pixel 72 dpi like mine. Make sure your sketch is centered in the middle of your canvas.
Step 2
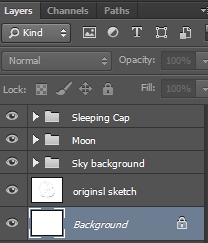
In your layers menu create 3 groups. Rename the first group “Sky background”, the second group “Moon” and the third group “Sleeping Cap”. This just to help keep things organized for our design.
Step 3
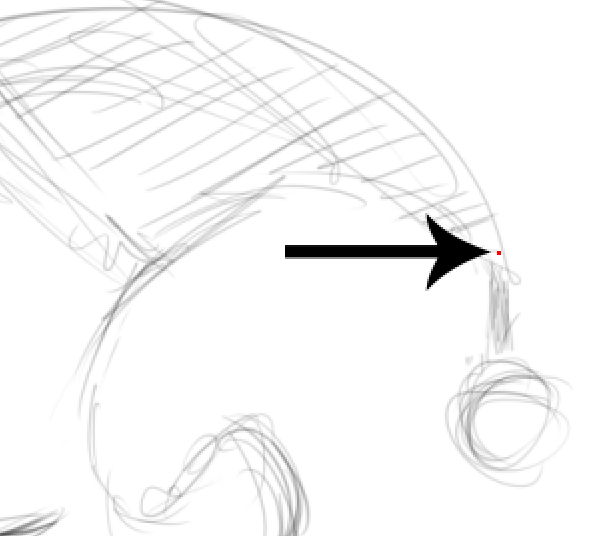
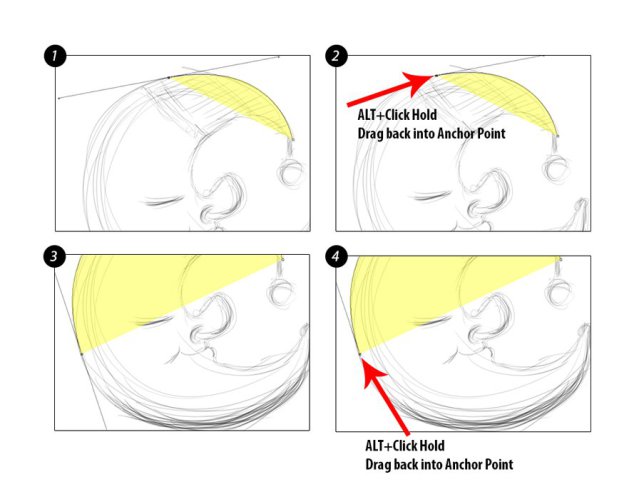
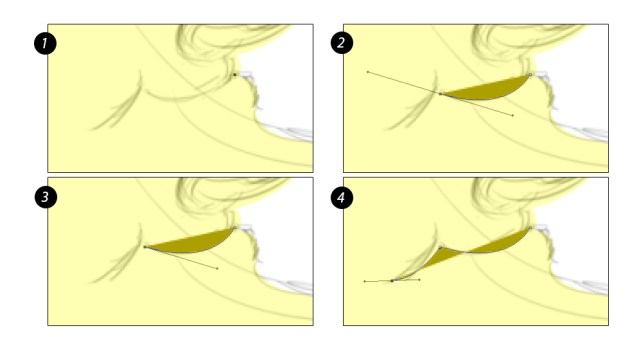
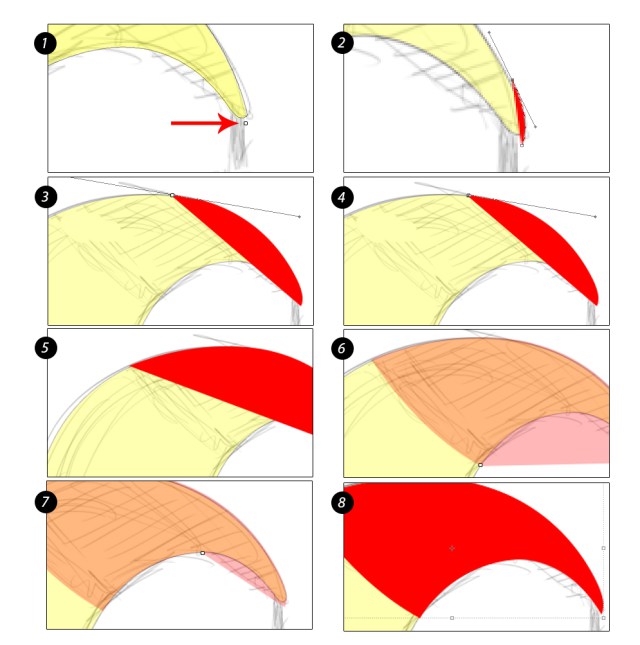
If you’re really knowledgeable with the Pen Tool then this part and many others parts should be breeze for you. Select your Pen Tool (P), make sure your fill color is set on yellow (#ffff00). Click on the top outer edge of the moon as you see in the image below. This will drop an anchor point.
Doing this automatically creates a new layer for you. Now before doing anything else we’re going to bring the opacity down to 40%. Doing this will make it easier to see the sketch below it for us to trace. And also double click your layer and rename it “Moon”.
Step 4
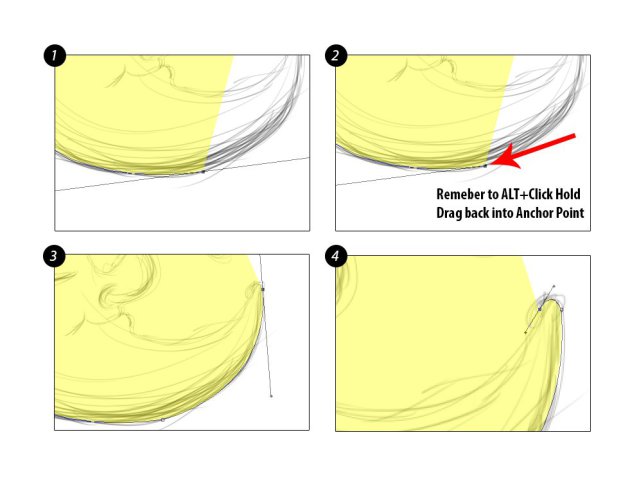
Now what we’re going to do is select the top left part of the moon to make a curve. Click and drag out our anchor point to curve it. Now hold down Alt + Click Hold which will change you Pen Tool into the Convert Point Tool. And drag the left control handle back into the anchor. You’re going to do this for every new anchor the moon.
Step 5
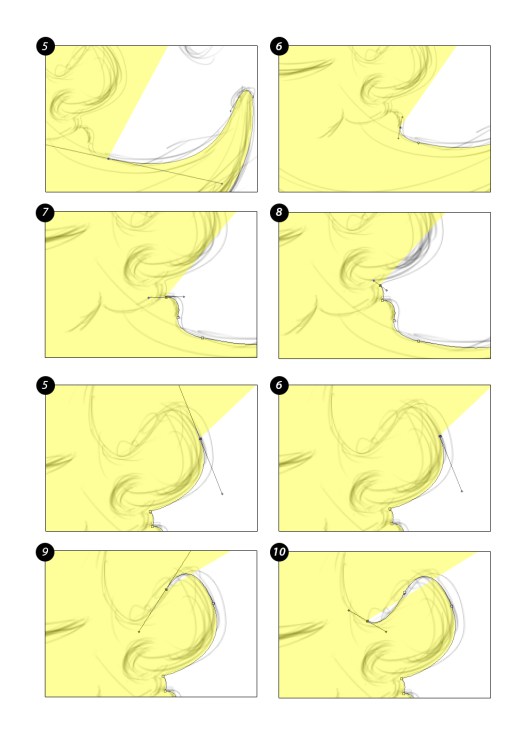
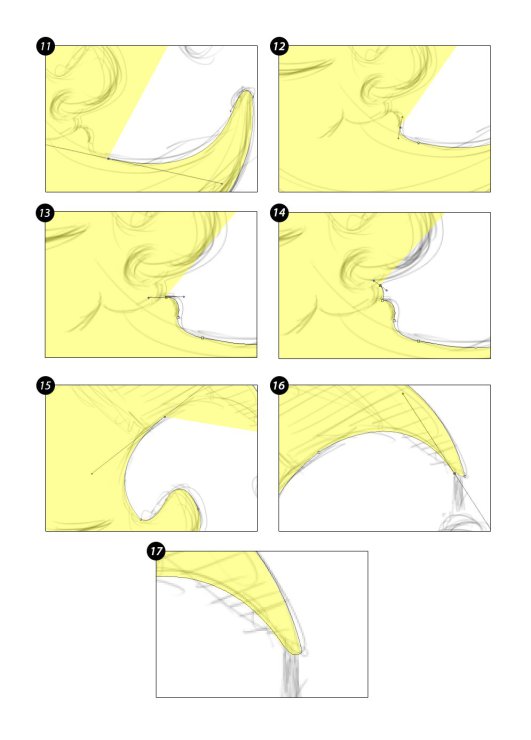
Continue to trace around the edges.
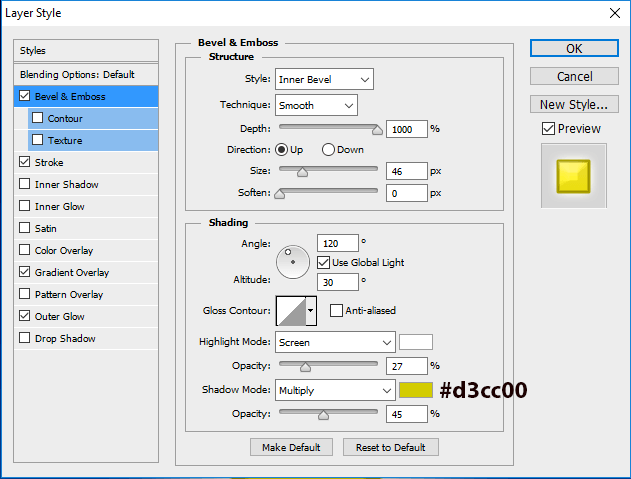
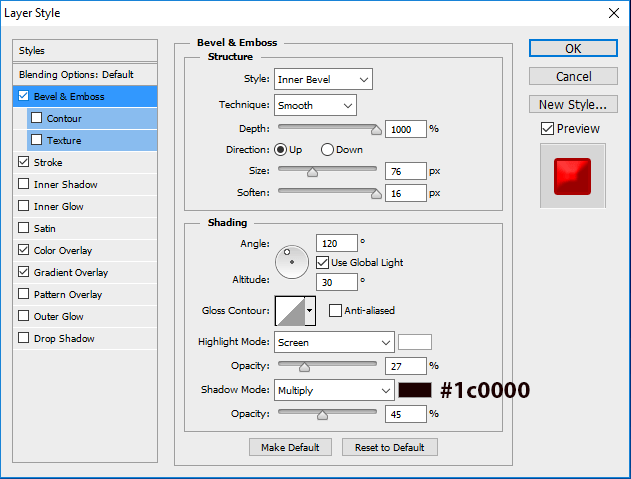
Step 6
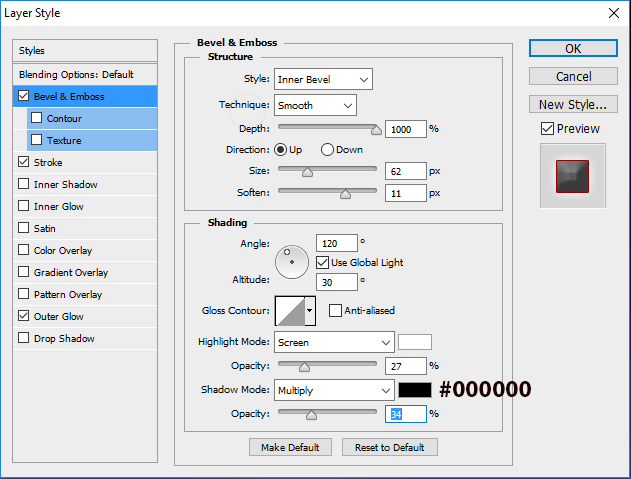
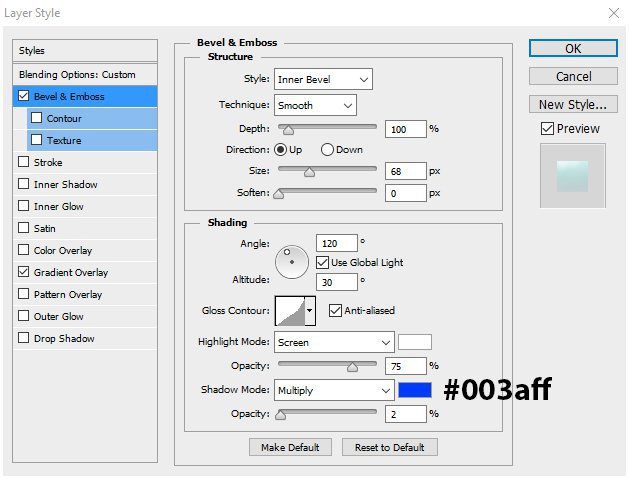
Now its time to breath more life into our crescent moon and give it some lighting and shading using our “Blending Options”. Double click or right click the moon layer and select Blending Options. Set the Bevel and Emboss settings to the same settings in the screenshot below.
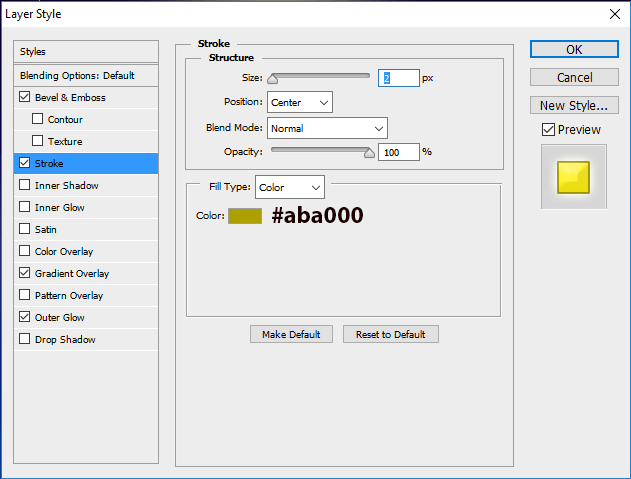
Step 7
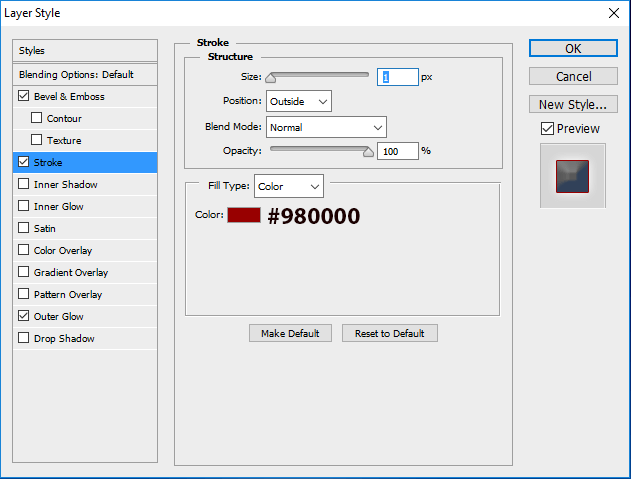
Add a Stroke layer style with the settings shown in the screenshot below.
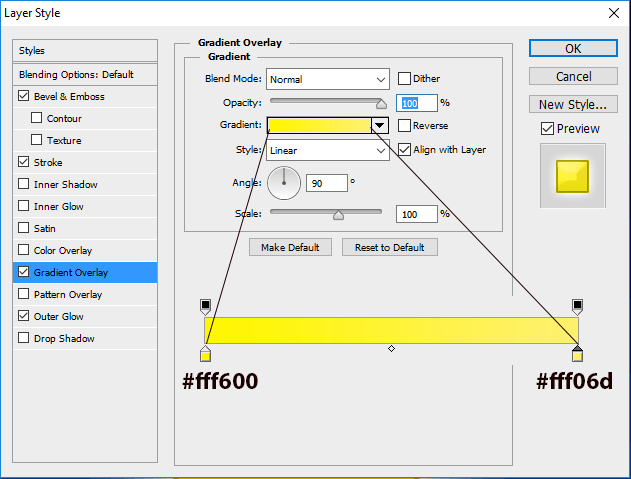
Step 8
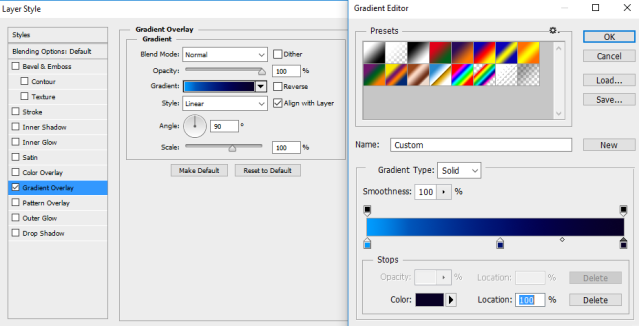
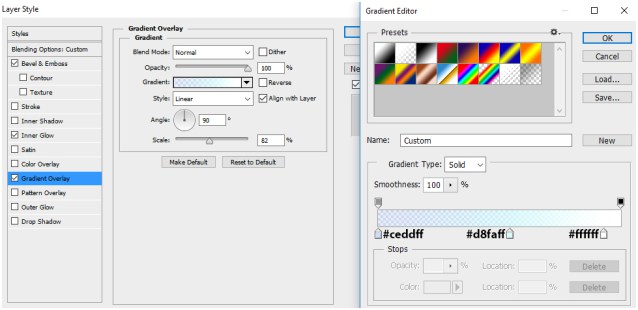
Add a Gradient Overlay with the settings shown below.
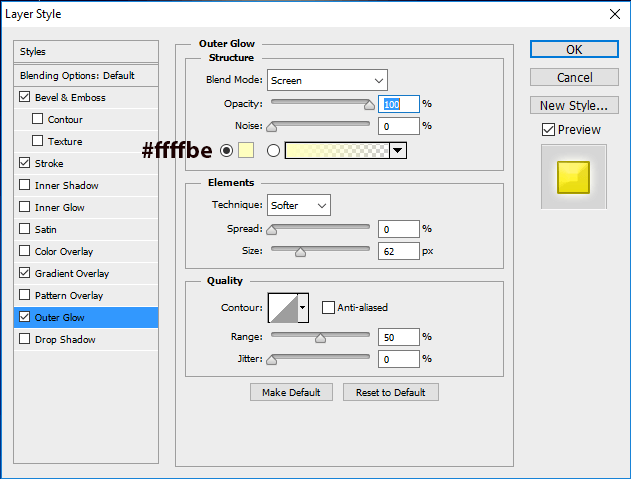
Step 9
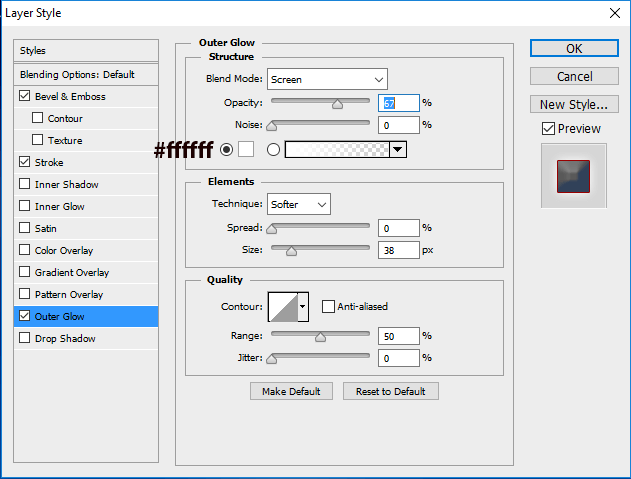
Finally, add an Outer Glow layer style.
Step 10
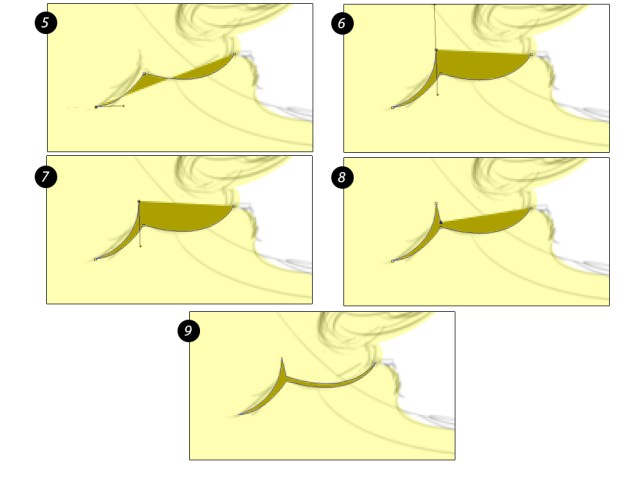
Now that we’re done creating the body our moon and rendering it, next up for our design will be the closed eye and mouth.
Select the Pen Tool (P) and drop an anchor on the right edge of the sketch. And click another anchor point on the other end, but this time dragging it out to make nice curve. Now connect it to the other end. Once done rename the layer eye.
We’re going to draw a smile. Locate the right edge of the mouth near the lips and drop an anchor point. Proceed to trace the mouth like in the example below.
When its completed rename the layer smile.
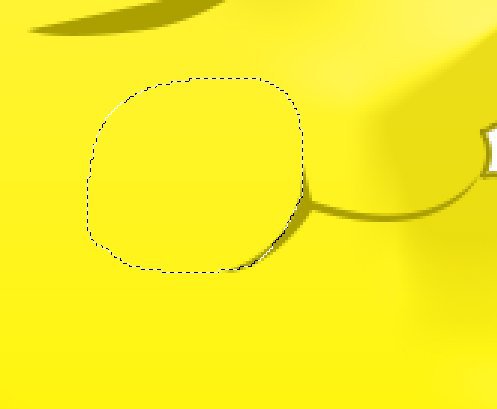
Step 11
Next we are going give the cheek area a little more volume by shading it with the Brush Tool. First create a new layer, name it cheek. Select your Elliptical Marquee Tool (M) and drag out nice round ellipse like in the example image below.
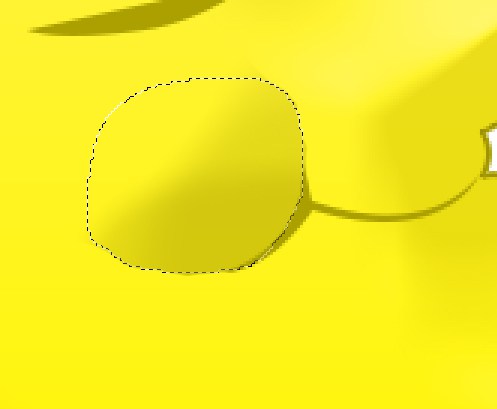
Step 12
Select your Brush Tool (B) and set your foreground color to dark yellow (#aba000)

Step 13
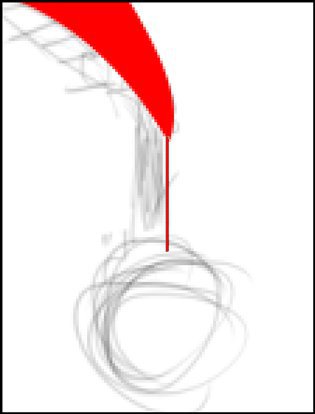
Lets travel up to our Sleeping Cap group. And we are going to trace the cap in the moon sketch.
Now select your Line Tool (U) in the shape sub-menu, make sure the color is red (#ff0000) and Stroke is 1 pt. Hold down shift + click and drag the line down from the tip of the cap.
Step 14
Now we’re going to render the sleeping cap, adding some lighting and shading to it.

Step 15
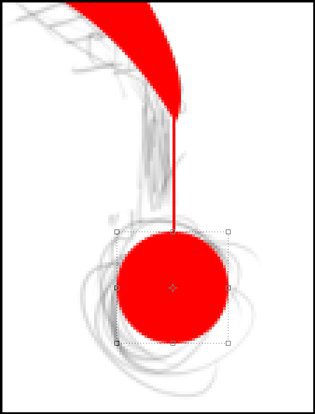
And now we’re going to create a string and ball to go with the sleeping cap. Select your Line Tool (U) set the Fill to red and Stroke to pt 1.
Step 16
Now ellipse Tool (U) in the shape sub-menu. Now hold down shift + click drag a small Ellipse out and set it under your string.
Step 17
Now its time to add some rendering to the ball of the sleeping cap.
Step 18
Its time to work on our background. Go to your “Sky Background” group and select your Rectangle Tool (U). Locate the top left hand corner of your canvas and Click + Hold drag your Rectangle Tool down to the bottom right corner. Or you can go to the Rectangle Tool menu bar at the top and change the width to 800px and height to 800px then center align your background. Once that’s done change the name of your layer to “Sky”. And now right click the layer and go to Blending Mode and select Gradient Overlay, copy the settings in example. Gradient code from left to right (#009cff #00106f #080025)

Step 19
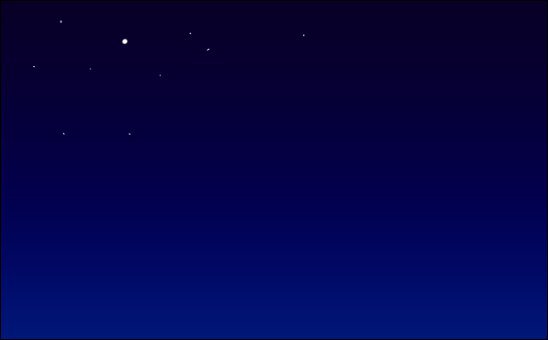
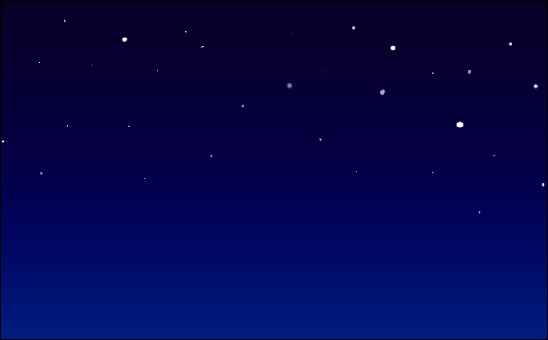
Moving on lets create some stars for our background. This part is very easy to do because we’re going to place small white dots in different areas of top portion of the sky. Create a new layer above your “Sky Background” layer and rename it “Stars”. Now we’re going to select our Brush Tool (B). Make sure your foreground color is set to white (#ffffff). Throughout this process we will change the brush range from 1 pt to 4 pt, doing this will give a little variety to the stars we’re going to place here.
Step 20
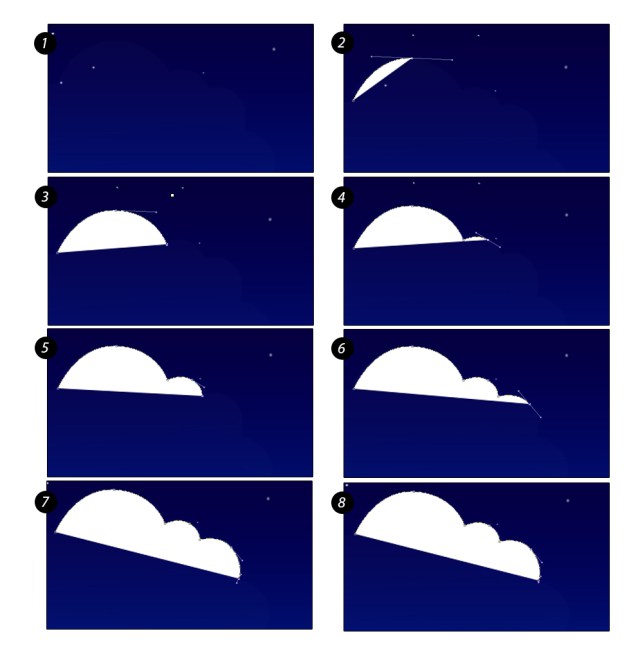
Next we’re going to design some clouds to go with our sky and stars. Whip out the trusty Pen Tool (P) and follow what you see in the example below. Remember to Click + Hold and Drag your handle back into the Anchor Point after a single curve.
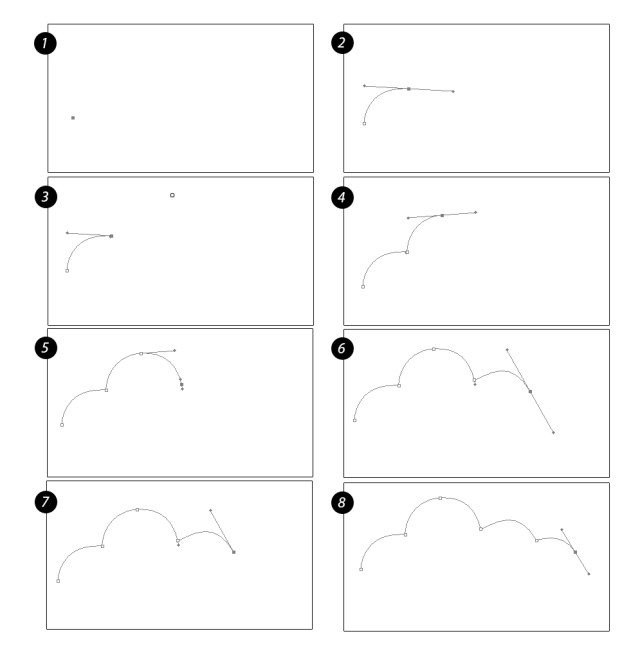
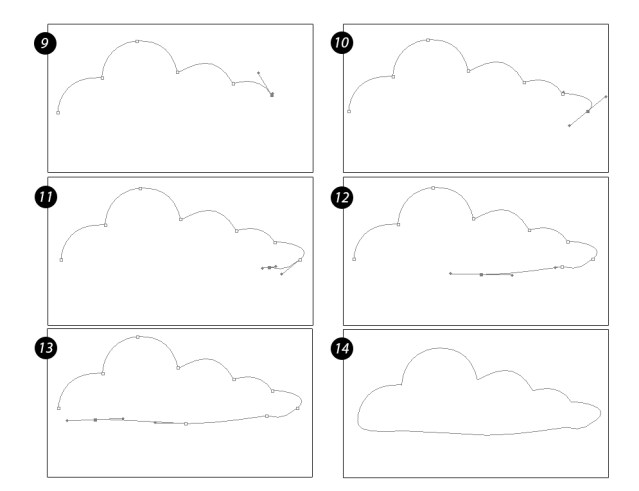
Step 21
You can make as many clouds as you want using that method. The sky is the limit.
We’re going to make a big cloud that is further in on the background on the left side of our moon.
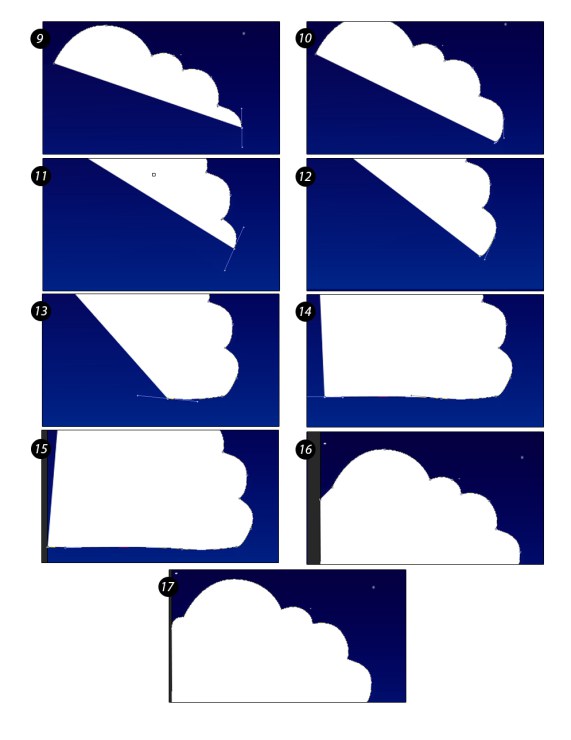
Step 22
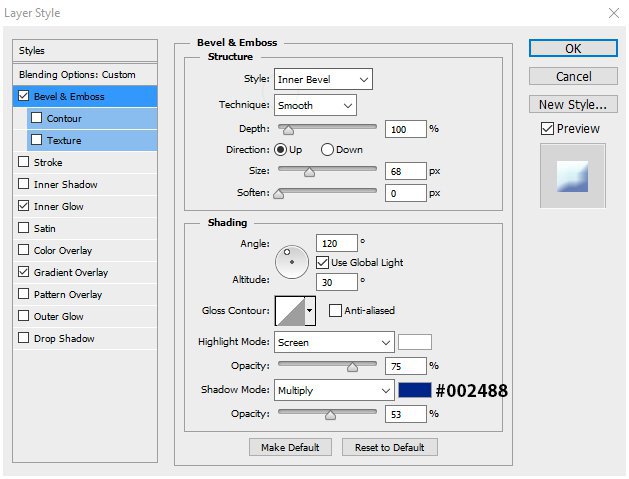
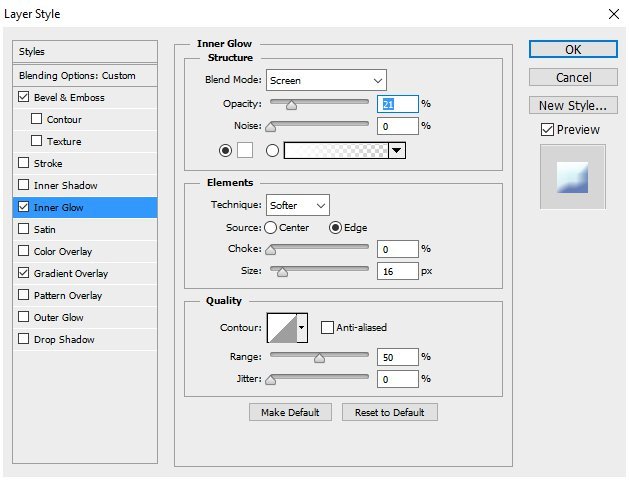
We are going to render our clouds in this step. Go to your Blending options for the top right cloud. Copy Blending Option settings below.
Step 23
And this should be the result of using my Blending Option formula. You can apply these settings to every new cloud you design.

Step 24
For the large cloud on left I changed the Blending settings a little to give it a nice background fade effect. To achieve that same look copy these Blending settings below.


Step 25
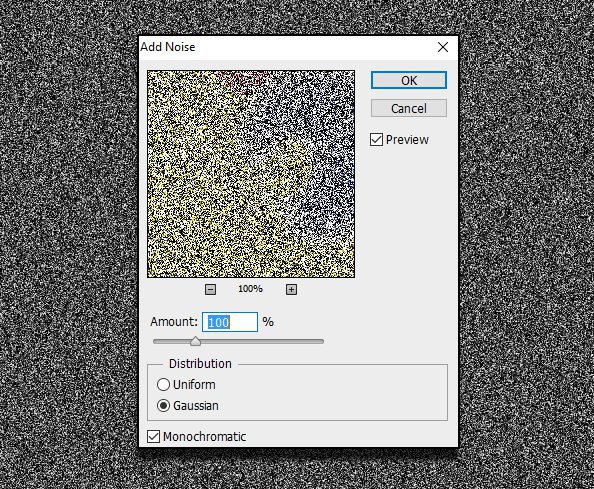
Now its time to add some texture to our entire design. Make sure all 3 group layers are visible. Create new layer above your three groups and rename it “Texture”. Now select your Paint Bucket Tool (M) make sure your foreground color is black and just click the center of your canvas.
Step 26
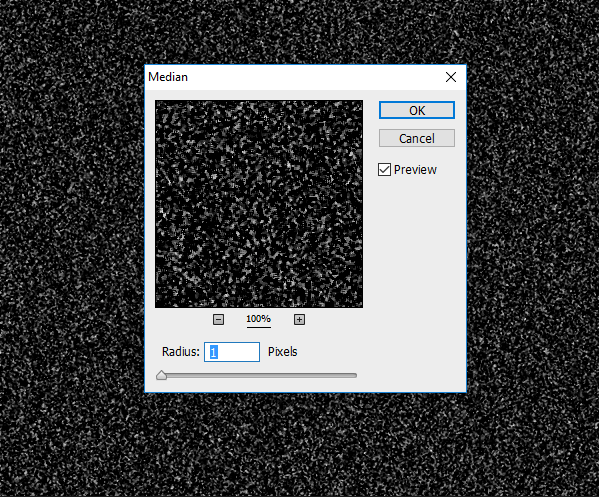
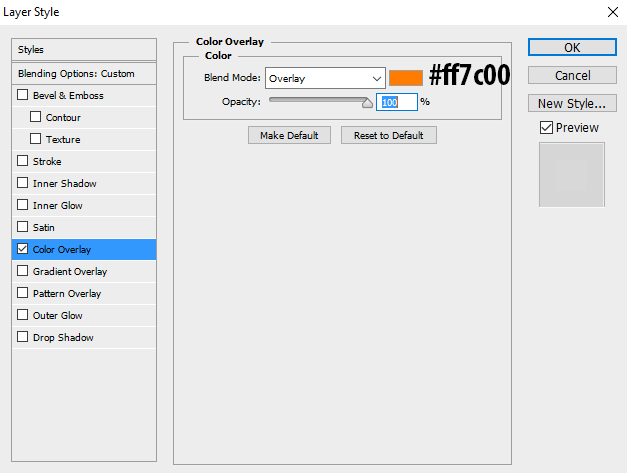
Go back to your Filters – Noise Menu and select Median.
Then after that right click your Gradient Layer and change your Color Overlay to orange (#ff7c00).
Final Results