
Create a mystical picture and wallpaper for your desktop. In this tutorial you will learn many interesting effects such as creating lightning, fog and carved and burning runes and much more. I’ll show you an interesting example of the image toning and sharpening, a lot of interesting tricks and techniques.
What you’ll be creating
First, I will create a background and adjust its color. In this part I will tell you about the creation of lightning in Photoshop and work with filter Camera Raw, work with a layer masks and selection tools. The next step I will add stones and write them harmoniously into the overall atmosphere. I also tell you how to create a realistic fog. In the following steps I will create the effect of fire and carved runes. At the end of tutorial I increase sharpness, create depth of field and toning for the entire image and few details. This tutorial is designed for any knowledge of Photoshop. To create this, you will need Photoshop beginning with CS or or newer version.
Tutorial Resources
Step 1
First you need to open Photoshop and create a new document. Go to File > New or use short key Cmd/Ctrl + N, create a blank document with size 1920 pixels wide and 1080 pixels high, resolution 200 Pixels/Inch. This resolution I chose specifically because I wanted to make wallpapers.

Step 2
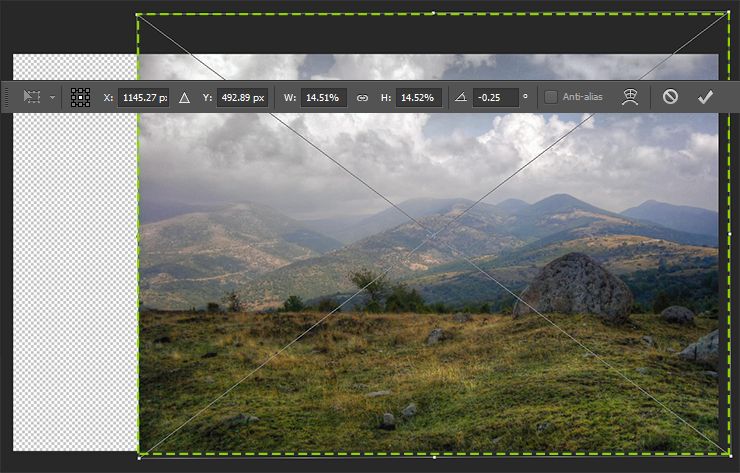
The first thing that we need to do is background. Go to File > Place (Place Embedded) and open “Hill” image. You need to properly locate it. In Free Transform Mode (Ctrl/Cmd + T or Edit > Free Transform) place image on right side of working field, reduce it’s size and rotate on -0.25 degrees and apply changes by pressing Enter/Return.
Step 3
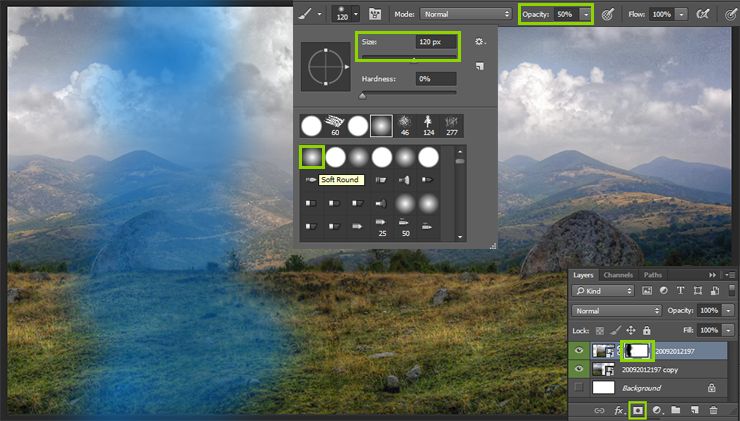
To fill left side of image I duplicated layer with hill (Cmd/Ctrl + J or go to Layer > Duplicate Layer) move this layer down in layer stack and with Move Tool (V) place a copy in left side. Add a layer mask to parent layer (use “Add Layer Mask” button in the layers panel or by going to Layer > Layer Mask > Reveal All). Take Brush Tool (B) and with soft round brush (Size: 120px, Opacity: 50%) blend images to make landscape. Don’t worry about stone in left side. We remove it in next step.
Step 4
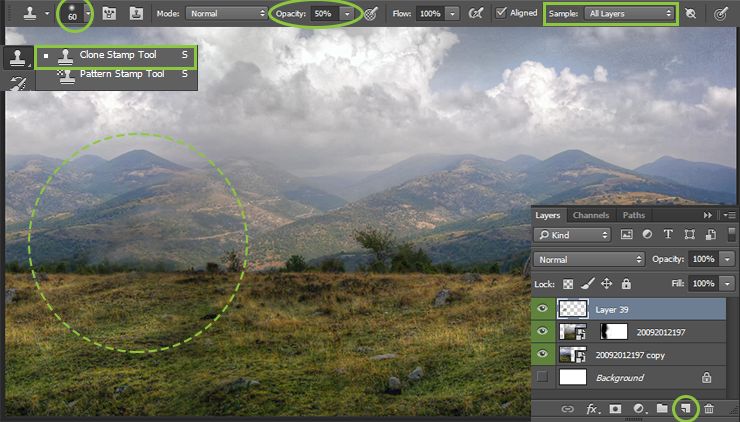
Select the Clone Stamp Tool (S) then set the brush size to 100 pixels and Opacity to 50%, change sample to “All layers”. Paint over the object shown in the image below. Choosing the right texture paint over remnants of the stone and continue mountains. Try to match the areas of source clone to place where you put them.
Step 5
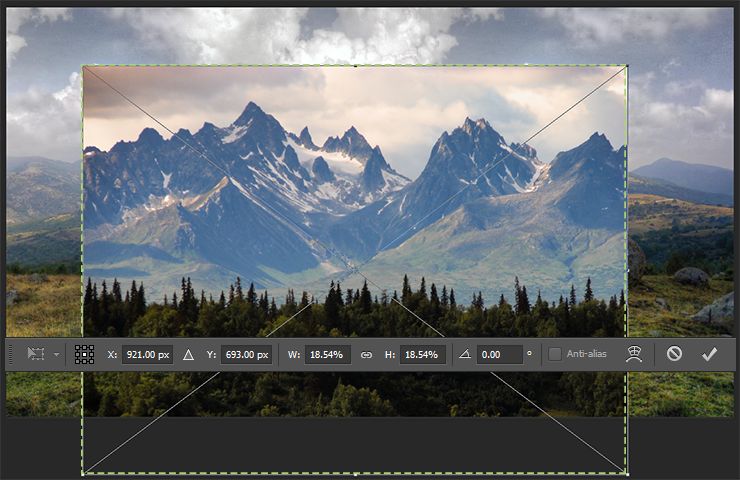
I decided to build the mountain to create depth in the image. Go to File > Place (Place Embedded) and open “Mountains” image. The most important thing at this stage is as possible pick the exact position of the mountains, that this image was a continuation of the basics. Do not worry about the color.
Step 6
Add a layer mask and remove all unnecessary trees and base of the mountains. Use Brush Tool (B) with the settings from Step 4. It is important to create the impression of integrity of the mountains and the background. For me was to create background realistic as possible.
Step 7
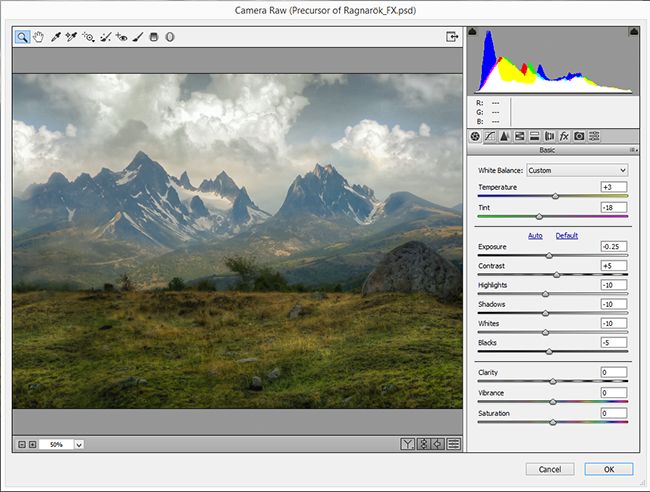
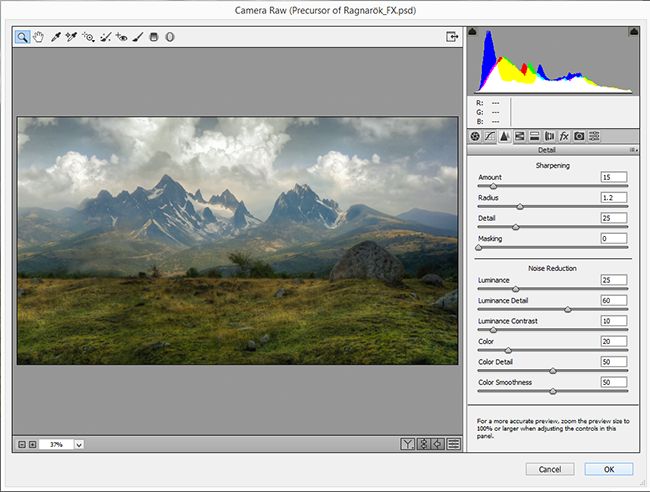
Create a merged copy of image with Cmd/Ctrl + Opt/Alt + Shift + E and convert it to Smart Object (Right click on layer > “Convert to Smart Object” or go to Layer > Smart Objects > Convert to Smart Object). Go to Filter > Camera Raw Filter (Cmd/Ctrl + Shift + A). This is powerful and quick tool to editing pictures without using a lot adjustment layers. So let’s get started from white balance and toning. Set following settings – Temperature: +3, Tint: -10, Exposure: -0.25, Contrast: +5, Highlights: -10, Shadows: -10, Whites: -10, Blacks: -5.
Now reduce noise from picture. Not all noise can be removed because otherwise we lost details in the foreground. So I use middle settings. Go to “Sharpness” tab and set for “Sharpening” Amount: 15, Radius: 1.2, Detail: 25. Set for “Noise Reduction” Luminance: 25, Luminance Detail: 60, Luminance Contrast: 10, Color: 20, Color Detail: 50, Color Smoothness: 50.
Step 8
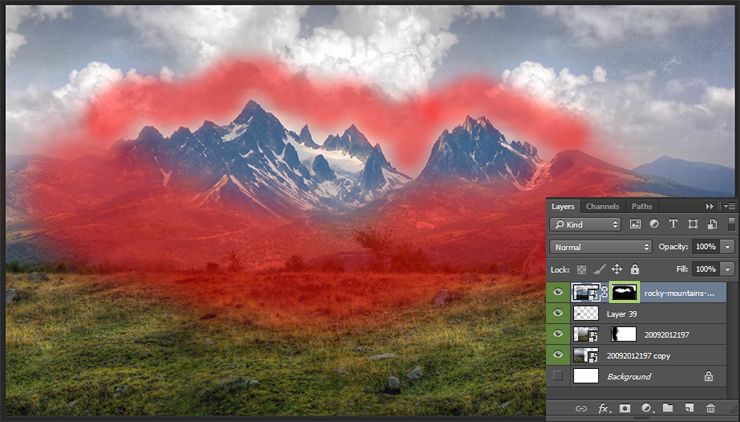
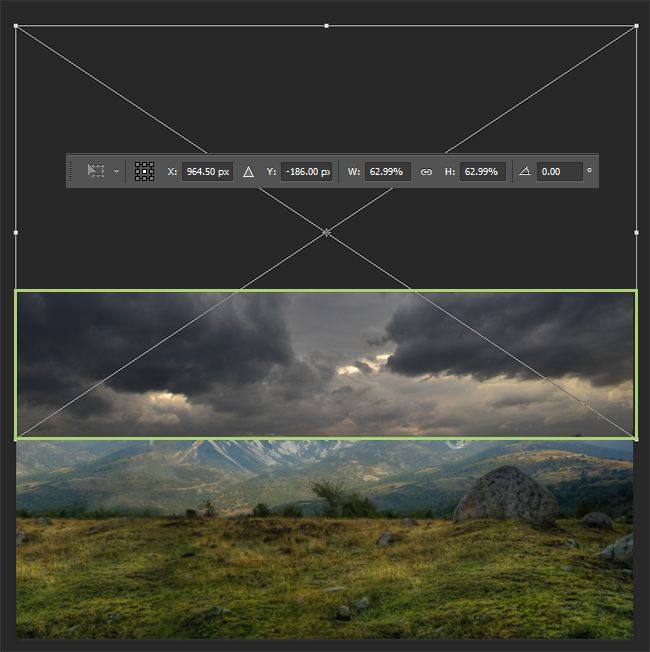
Now we replace the sky. I decide to change clouds to more smooth sky to increase the tension in the atmosphere and the overall environment. Go to File > Place (Place Embedded) and open sky image. Increase image size until it fill working field and move it up as shown in image below.
Step 9
Add a layer mask and as with the previous images, you need to make a smooth transition between sky and main image. With same settings for Brush Tool (B) work carefully on a layer mask and use different brush sizes to get a realistic picture.
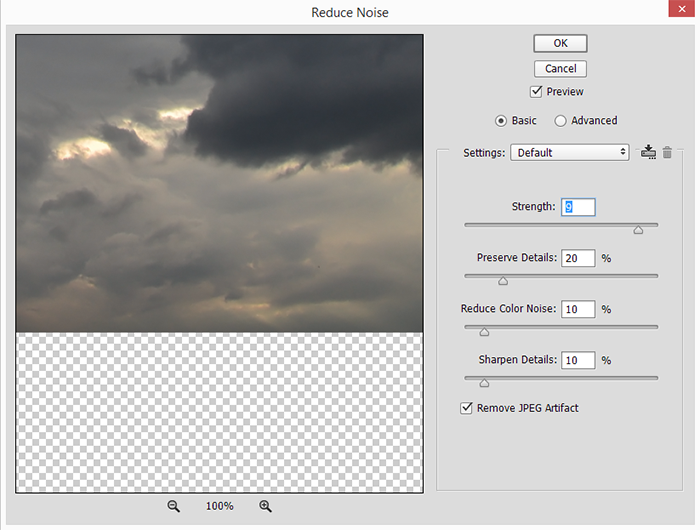
Next, remove noise from clouds. I specifically did not create the background completely and then use Camera Raw filter because each image has its own degree of noise and need different settings for each layer. Also, I do not need to change the color of the sky, because the original image has beautiful shades and blends in well with the background. Go to Filter > Noise > Reduce Noise… Set Strength to 9, Preserve Details to 20%, Reduce Color Noise to 10% and set around 10% to Sharpen Details, be sure to checked “Remove JPEG Artifact”.
Step 10
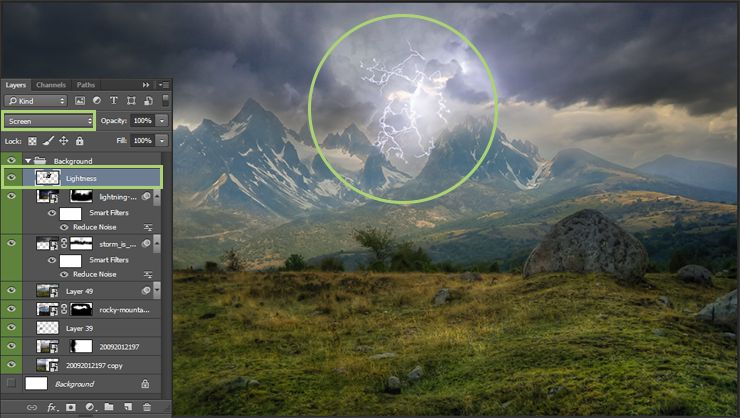
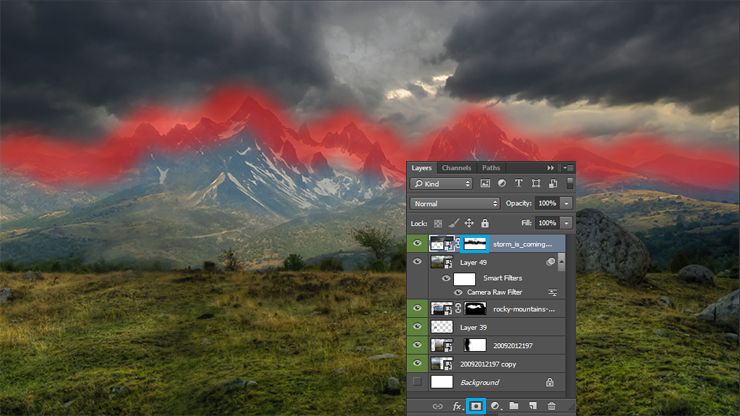
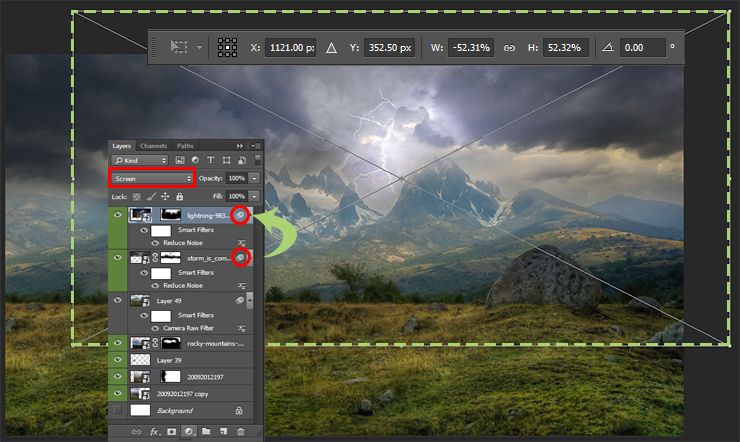
I decided to add some details. To emphasize the drama of what is happening (although still nothing happens, but you’ve seen the final result). Lightning is a very good element of the picture, because it tells the viewer about something mystical or terrible (if we take into account the Norse mythology, Thor the god of thunder and rain storms. Maybe this is epic battle between Thor and the snake Jormungand). So, place lightning image (File > Place (Place Embedded)). Resize it as shown in image below and change layer Blending Mode to “Screen”. Next duplicate filter “Reduce Noise” from the sky (hold Opt/Alt and drag the circles on a layer with lightning). Add a layer mask and mix sky with clouds and lightning.
Step 11
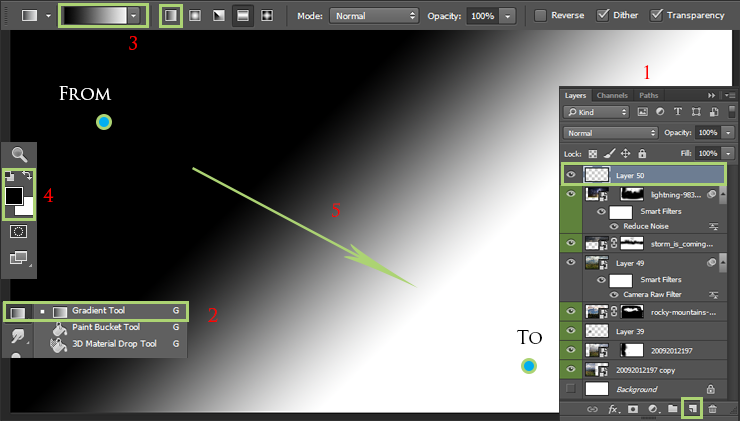
Now you have several options. The first is to leave the lightning and follow the principle of realism, or you can read these few steps and add more lightnings. Now I will tell you how to create a nice lightnings by using Photoshop. First of all you need to create a new layer (Cmd/Ctrl +Shift + N or use “Create a new layer” icon). Take a Gradient Tool (G) with black and white gradient (D) and linear style. Draw a gradient from left to right side it does not matter how you apply a gradient. Most importantly, there was a small slope.
Step 12
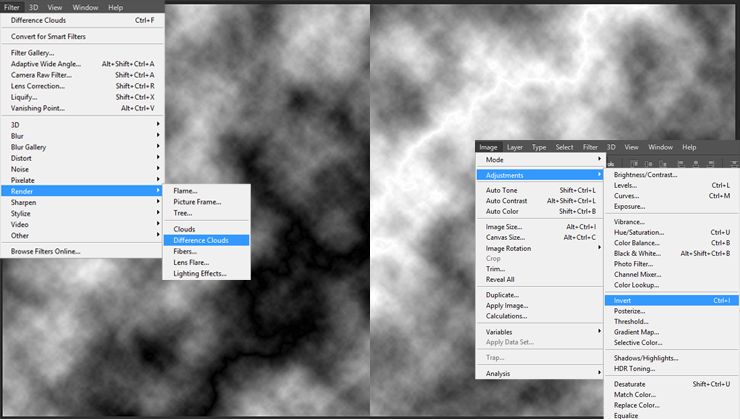
Go to Filter > Render > Difference Clouds. You see on the transition of black and white formed a stripe. This is Lightning. Inverse image (Cmd/Ctrl + I or go to Image > Adjustments > Invert…) to lightning become a white. Do not worry, that the clouds stayed around the lightning.
Step 13
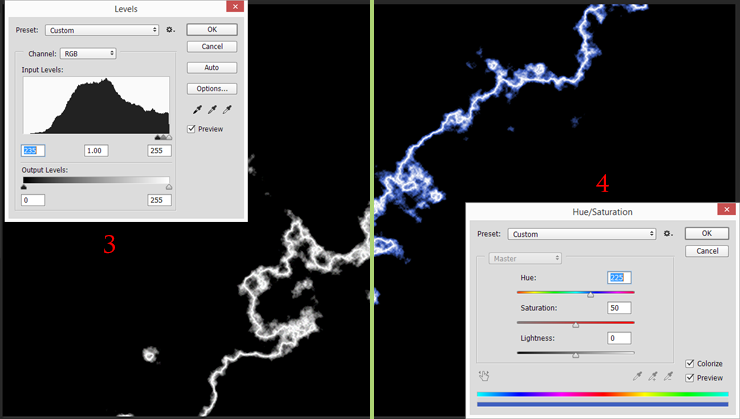
Go to Image > Adjustments > Levels… or press Cmd/Ctrl + L to open Levels adjustment window. Set for for blacks value 235 an click OK. So we have removed all unnecessary leaving only lightning. If you want more glow around the lightning just play with the settings. Use “Hue/Saturation” adjustment to colorize your lightning. Go to Image > Adjustments > Hue/Saturation… or use Cmd/Ctrl + U. In window that appears check mark “Colorize”, change Hue to 225 and increase Saturation to 50.
Step 14
With Free Transform Tool (Cmd/Ctrl + T or Edit > Free Transform) reduce the size of lightning. Hold Shift key to make it proportionally. Change layer Blending Mode to “Screen” and place it not far from the original lightning. Repeat Steps 11 – 14 several times to create more lightning. You can also use other colors. Do not be afraid to experiment. Merge all created lightnings into one layer ( select layers > Cmd/Ctrl + E or Layer > Merge Layers…) and be sure to use “Screen” Blending Mode. On this work with the background is completed. Group all layer via Cmd/Ctrl + G or Layer > Group Layers.