Take a few shortcuts with my comprehensive guide on evaluating designers
Why is evaluating designers so difficult?
Evaluating the performance of a product designer within a startup or agency environment is challenging. It involves a mixture of objective and subjective data that is synthesized in an attempt to gauge if someone is to be rewarded, supported, or let go.
It’s a big responsibility because the consequences will influence a designer’s relationship with the company and the trajectory of their career.
Traditional teams (like those you’d find in a startup or agency, including product, sales, marketing, customer support, and engineering) have the luxury of being able to measure quantifiable metrics to assess individual performance.
Examples of these quantifiable metrics include:
- Active users and churn rate (Product)
- Close rates and deal size (Sales)
- Impressions and conversions (Marketing)
- Ticket response time and resolution rate (Customer support)
- Code cycle time and average downtime (Engineering)
How are designers currently being evaluated?
Things aren’t so straightforward for designers. Measuring effectiveness within a traditional company or product-driven Key Performance Indicators (KPIs) is unreliable.
Metrics like revenue, NPS, and user retention, or shipping a highly publicized feature, may suggest that a designer is a high performer.
However, these metrics don’t work for those who were assigned to work on a project that failed or never shipped. In other words, their performance evaluation might be tied to decisions that were likely outside of their control.
Raw output as a metric is also a no-go. Counting the number of screens, components, or slide decks that a designer has churned out isn’t an accurate reflection of their ability, impact, or value to the team.
In a best-case scenario, a designer’s efforts are tied to KPIs owned by the product team. This implies that there is infrastructure in place to track, measure, and analyze product usage, and, subsequently, the impact of design improvements.
If more self-reliant methods for validating design decisions are needed, a designer can turn to user tests with clickable prototypes.
But if your organization doesn’t value or recognize the need for user testing, or if the product team is more focused on churning out features than improving outcomes, it makes evaluating impact all the more difficult.
Unfortunately, this seems to be the reality for most designers, especially those working at smaller organizations where resources and infrastructure tend to be limited.
Despite these challenges, designers, like everyone else, still need to be evaluated and go through some form of a performance review process.
My approach to conducting design reviews
I’ve spent the majority of my career in the startup world as a lead designer and design director, which means I’ve often had to develop programs and processes from scratch.
This can be daunting, overwhelming, and lonely. Thankfully, I’ve been able to rely on many wonderful people on the internet who have shared their knowledge and expertise.
Now, I’d like to offer the same by sharing my experience of creating a performance review program at my current company, UX Cabin. I hope this helps design leaders, managers, and senior designers who are in the process of launching or evolving their own processes.
I’ve broken down my approach into six steps, which we’ll cover below:
- Defining the objectives of performance reviews
- Asking the team for input
- Answering key questions
- Creating a career tracks and skills rubric
- Building a review process
- Creating surveys
- Preparing the review reports
Step One: Defining the Objectives
In June 2022, I joined the UX Cabin team as its Director of Design. One of my first major initiatives was to develop a process for conducting performance reviews.
UX Cabin was a remote-only company that had recently gone through a growth spurt. The design team grew to include 12 product designers, ranging in experience and location. Up until that point, there hadn’t been a consistent process for reviews.
Promotions and raises had been given inconsistently; sometimes annually, other times on an ad hoc basis. The criteria behind evaluating performance weren’t fully defined, either.
This worked when the team was smaller, but the recent growth in team size necessitated a more standardized process. (This wasn’t anyone’s fault. In the early stages of any company, you’re simply moving too quickly and your energy is rightly focused on acquiring and retaining customers.) That’s where I came in.
Working with Seth, UX Cabin’s CEO, I outlined the following objectives:
- Define how we will measure performance
- Give designers a roadmap for how to reach the next level
- Create a review process that balances effort with results
Step Two: Asking the Team for Input
One of the first things I did was ask the design team for input. I wanted to understand how the team felt about feedback, role-related expectations, and compensation. I also wanted to learn what sort of feedback team members would find helpful, how they would like to receive this feedback, and how often.
This gave me a sense of what the team needed, while also establishing a relationship of understanding and trust. This was especially important for me since I was new to the company — and a new boss at that.
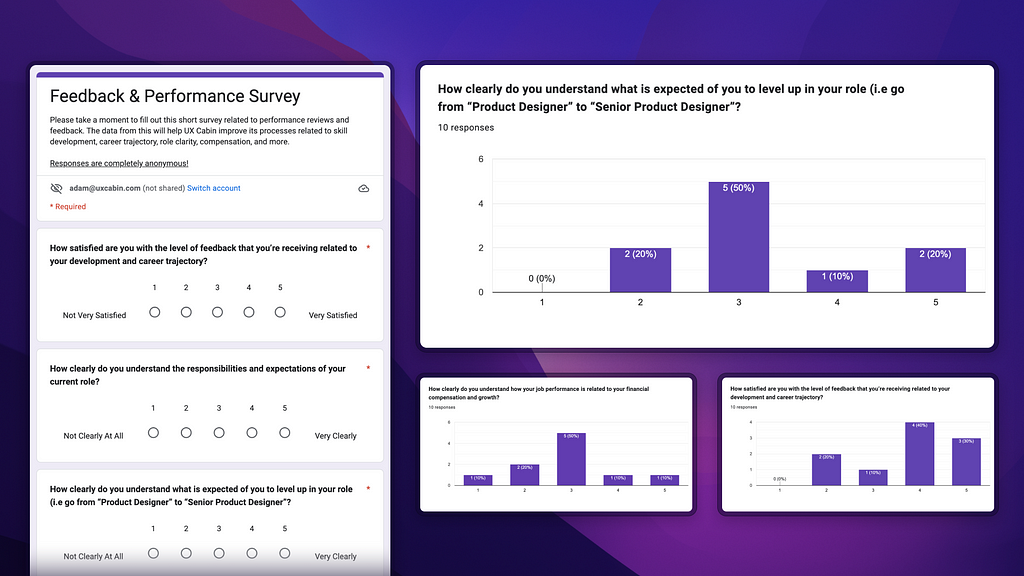
I created and sent out a survey using Google Forms with the following sets of questions, broken down into baseline and feedback-related questions.
Baseline questions:
- How satisfied are you with the level of feedback you’re receiving related to your development and career trajectory?
- How clearly do you understand the responsibilities and expectations of your current role?
- How clearly do you understand what is expected of you in order to level up in your role? (i.e. go from “Product Designer” to “Senior Product Designer”)
- How clearly do you understand how your job performance is related to your financial compensation and growth?
Feedback-related questions:
- What feedback would be the most helpful for your development and career trajectory?
- What feedback would be the most unhelpful?
- Who would you like feedback from?
- Who would you not like feedback from?
- How would you like this feedback to be delivered?
- How many times per year would you like to have a formal review?
Seth and I weren’t sure what to expect from the survey results, especially from the baseline questions. We had assumed that the results would skew towards lower scores because the company had grown quickly in the last year, the current review process wasn’t standardized, and job role expectations hadn’t been formally defined.
In actuality, the results varied more than expected. The feedback questions didn’t yield any responses that were too surprising. However, they helped me understand who the team wanted feedback from, how often, and in what format.
Here’s a peek at some of the results:
Step Three: Answering Key Questions
The next step was to answer a set of key questions that would determine our entire approach to performance evaluations. Now that we understood the needs and preferences of designers, we could start to define and flesh out the evaluation process.
‘What does it mean to be a high performer?’
To answer this, we defined the ideal qualities that UX Cabin designers should exemplify. This would be used as a guiding light during the hiring and evaluation processes. I’ll dig into this more in a future article, but from a high level, we focused on:
- Visual design and animation
- Interaction design
- Doing the work
- Selfless collaboration
- Async mastery
‘How should we gauge a designer’s current level and growth?’
For this question, we created a holistic workflow for a performance review. It would include a:
- Self Review
- Peer Review
- Leadership Feedback Survey
For this question, the idea was to focus less on measurable impact and more on the process, decision-making, peer feedback, and self-reflection.
Central to this workflow was a career tracks matrix that I created with the CEO. The matrix mapped key skills and behaviors as they relate to job roles at UX Cabin. It provided a designer with visibility into the expectations of their current role, along with what it would take to reach the next level. (I cover the career matrix in more detail in the next section.)
‘How would we evaluate someone’s decision-making ability?’
The first round of reviews focused on setting goals, focus areas for skill development, and level-setting within our newly established career tracks matrix.
In the future, we’d like to take this further by digging into specific points of a project to understand how a designer is making decisions and articulating trade-offs. I don’t know, exactly, what this will look like, but I suspect that adjacent efforts like design critiques, project retros, end-of-week project summaries, and client feedback will provide valuable insights.
‘How would we create a process that provides depth and value to the team without requiring an unrealistic amount of effort?’
We needed to strike a balance between collecting enough data to provide actionable feedback and not overwhelming team members with a million questions.
The result was a series of Google Form surveys that contained a mix of multiple-choice and open-response questions. We also considered question order, as we wanted the reviewer to warm up a little before diving into anything too critical.
Step Four: Creating a Career Tracks & Skills Matrix
The career track and skills matrix was one of the biggest elements of performance evaluation. It provided a foundation for the review process because it outlined expectations for each role across levels.
In other words, it was a rubric we would use to ‘grade’ our designers. It would also provide transparency into which roles were supported at UX Cabin and how they could reach the next level.
At UX Cabins, these levels are:
- L1 • Associate Product Designer
- L2 • Product Designer
- L3 • Senior Product Designer
- L4 • Design Director
Note that this is what made sense for us and may look different for you.
Depending on the size and makeup of your company, you may need additional levels that account for the individual contributor (IC) track (Staff Designer, Sr. Staff Designer, Principal Designer, etc.) and managerial track (Design Manager, Associate Director, VP of Design, etc.).
You might also find that you have additional tracks for designers who are focused more on marketing and brand-related efforts. L1 through L4 suited our needs since the UX Cabin team are all individual contributor product designers (aside from the CEO and myself).
After we solidified the career tracks and skills matrix, we needed to define the skills, competencies, and behaviors we would be evaluating. For these, I referenced a helpful article that the Buzzfeed design team had written and used a template of a rubric I had exported out of a platform called Lattice while working at a previous company.
The skills, competencies, and behaviors that we defined are:
- Problem Definition
- Solution Definition
- UI/UX Design
- Scope
- Accountability
- Business Impact
- Communication
- Collaboration
- Mentorship
Each of these was defined for every designer level (L1, L2, L3, and L4). Once a draft was in place, I recorded a video explanation of the rubric using Loom and sent it to a few senior designers on the team for feedback.
Seth and I also did a dry run with a team member to see if the criteria allowed us to accurately map their level and provide actionable feedback.
Here’s what the final version of the rubric looked like:

Step Five: Outlining the Review Process
Once the team completed the preliminary survey and we had the rubric done, it was time to outline the review process in more detail.
Who would review who? How often? What questions would we ask? Which tools would we use?
UX Cabin opted for a bi-annual frequency because it allows for consistent feedback checkpoints without being too overwhelming. January would be the “big review”, during which time each team member would reflect on the previous six months and identify focus areas for the next six.
The flow was as follows:
- Each team member would complete 3 surveys: a self-review, a peer review, and a leadership review
- Someone from the leadership team would evaluate every team member
- A final report would be compiled containing all of the consolidated feedback (self-review, peer review, and leadership review)
- The report would be sent to the team member as a Notion document a few days before their performance review, which was conducted over Zoom
- Promotions, raises, and/or bonuses were given out during the January review
We decided to schedule another review in July to evaluate how each team has been progressing toward its goals and focus areas. Monthly check-ins will lead up to this second review, while progress toward goals and development areas will be tracked in a project management tool called Asana.
Step Six: Survey Questions
When thinking through which questions we would ask, our goal was for the review to be a space for feedback, as well as for celebrating wins and accomplishments. Some questions acted as jumping-off points to help start the conversation and build momentum during the actual review.
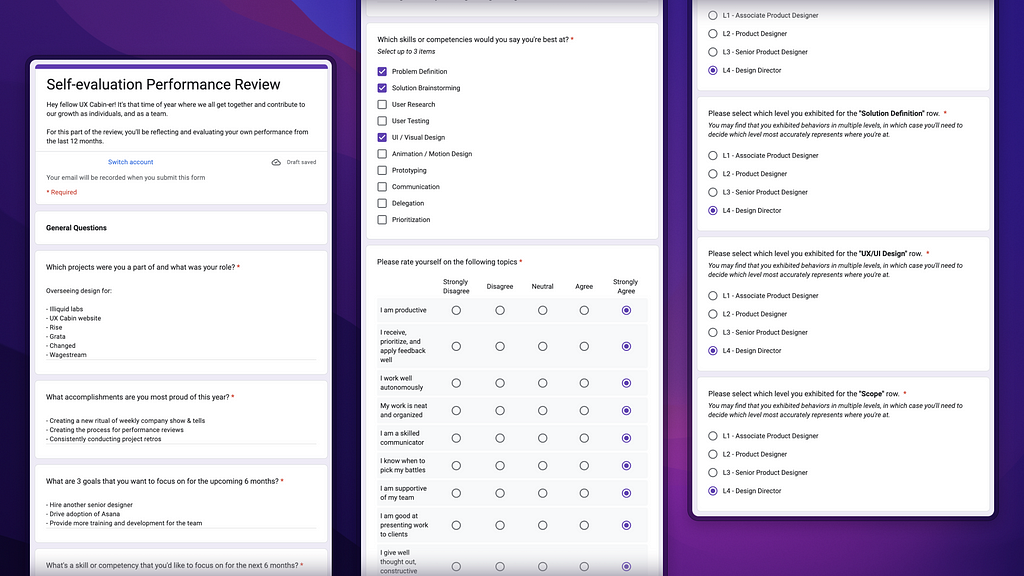
Examples of self-evaluation questions:
- Which projects were you a part of and what was your role?
- What accomplishments are you most proud of this year?
- What’s a skill or competency you’d like to focus on for the upcoming 6 months?
Some sections included questions that were a rating across topics (‘How much oversight do you require?’) and referenced the skills rubric (‘Please rate yourself for “Problem Definition“’).
The team member evaluation included additional questions like, ‘What’s something that you admire about this person?’ The leadership feedback survey was completely different and contained questions related to satisfaction with project work, benefits, and the leadership team.
If you’d like to see the full surveys, you can do so here:
Step Seven: Preparing the Reports & Conducting the Reviews
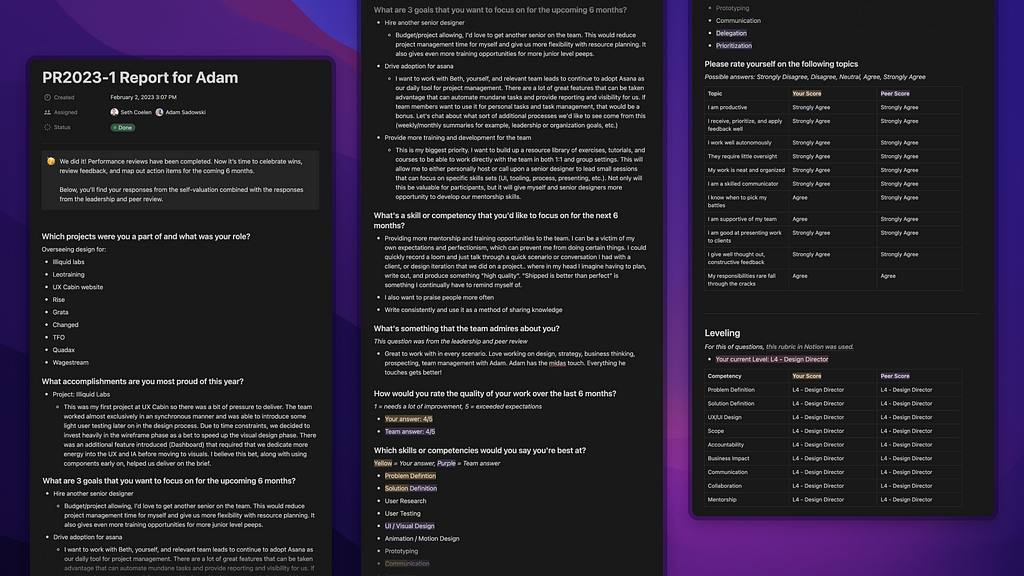
The final report is where everything came together. Once everyone had completed the surveys, I exported and compiled everyone’s individual data into a unique Notion page for that person. This contained the results from their self-evaluation, an evaluation from a colleague, and an evaluation from the leadership team (Seth or myself).
I scheduled a meeting with every team member and sent them the report to review beforehand. That meant they had time to digest its contents and think of any questions or clarifying points that they wanted to dive into.
We did our best to create a relaxed atmosphere. If the team member was being promoted or was receiving a raise, we started with a quick celebration before diving in. It not only started things off on a high note, but it also helped put any nerves at ease.
From there, we relied on the report to guide the flow of the conversation. The report’s layout made it easy to compare a designer’s answers to the peer aggregate. At the bottom, the final outcome (a promotion, raise, or bonus) was clearly displayed.
One of the most important outcomes of the review was being able to create actionable steps for each individual related to their goals and focus areas. I did this by capturing notes from our discussion, having each team member create a private project in Asana to measure progress, and incorporating reminders in our 1:1 agendas.
Here’s an example of what the reports looked like (using mine as an example):
Post-Review Surveys
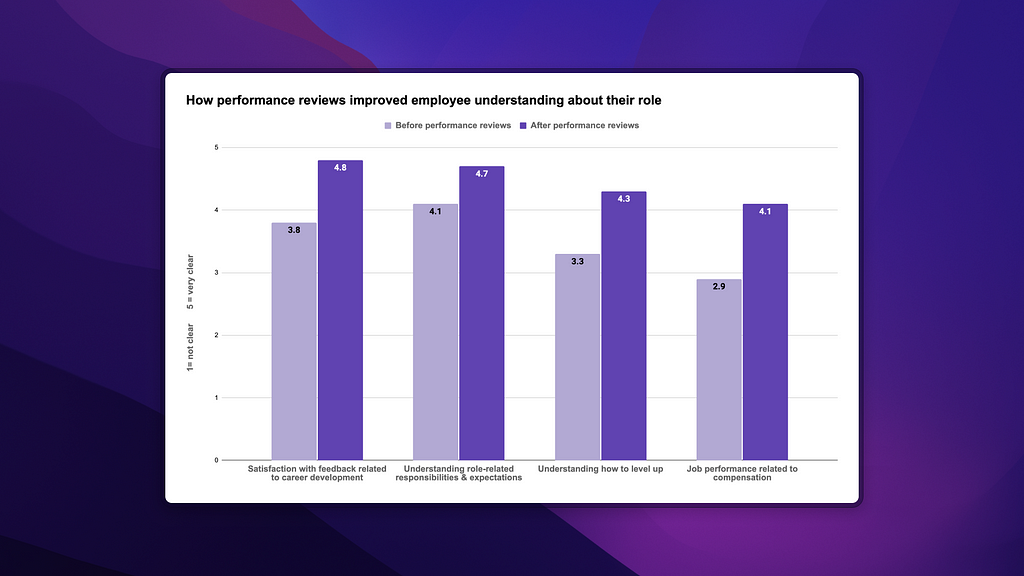
After the reviews were finished and the company celebrated promotions, I sent out one final survey. It contained the same set of questions from the first survey that I had sent out when I asked for the team’s input.
These questions included:
- How satisfied are you with the level of feedback that you’re receiving related to your development and career trajectory?
- How clearly do you understand the responsibilities and expectations of your current role?
- How clearly do you understand what is expected of you to level up in your role (i.e. go from “Product Designer” to “Senior Product Designer”?
- How clearly do you understand how your job performance is related to your financial compensation and growth?
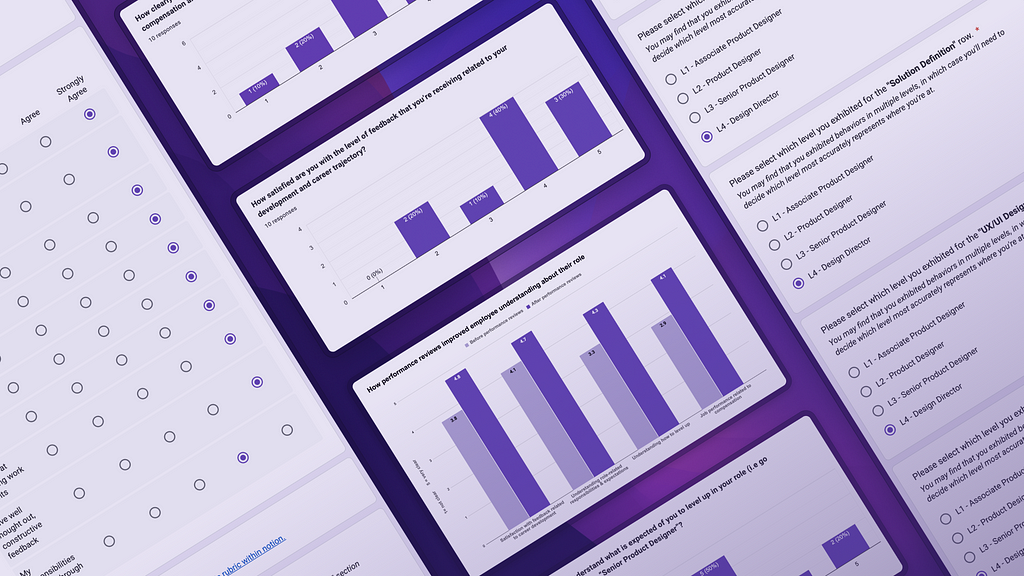
We saw a substantial increase in satisfaction and understanding related to feedback, roles, and compensation. This was really rewarding and validating to see — and it meant that the many months of work had paid off.
You can see the results for yourself below:
Concluding thoughts
For the next round of performance reviews, we’ll look to add additional questions that will help spark more conversation and reflection around decision-making. This will likely involve pulling in data from design critiques, project retrospectives, and client feedback.
We’re also considering adding the ‘Staff Designer’ role as an additional level in the IC track to give our senior designers more opportunities for growth.
Finally, in the instance that we need to put someone on a Performance Improvement Plan (PIP), we’ll be formalizing what that template and process look like.
And that’s it! Thanks so much for reading.
I hope that sharing my experience and materials was of some use. If you have any questions or want a second opinion on anything related to your own review process, don’t hesitate to reach out. I’d love to connect!
![]()
Setting up performance reviews for Product Designers was originally published in UX Collective on Medium, where people are continuing the conversation by highlighting and responding to this story.