OpenAI, the team behind ChatGPT, recently expanded upon their API and added ChatGPT. This means that you can call their API, get responses directly from ChatGPT, and include the responses in your own application.
The API lets you integrate artificial intelligence into your own application. You can use it to build a question and answer application, chatbot, messaging assistant, or some other AI-powered application—the possibilities are endless.
It’s also incredibly easy to use and well documented. This article will walk you through the whole process of creating an OpenAI account, getting your API key, and querying ChatGPT from your Node.js application. Let’s dive right in!
Sign Up for a ChatGPT Account
To get started with ChatGPT, you need to sign up for an OpenAI account if you don’t already have one. After signing up successfully, you’ll be redirected back to the homepage.
Click on your profile image in the top right corner and click Manage Account. Next, click on API Keys in the sidebar, and then click Create new secret key. OpenAI will generate a secret key for you:
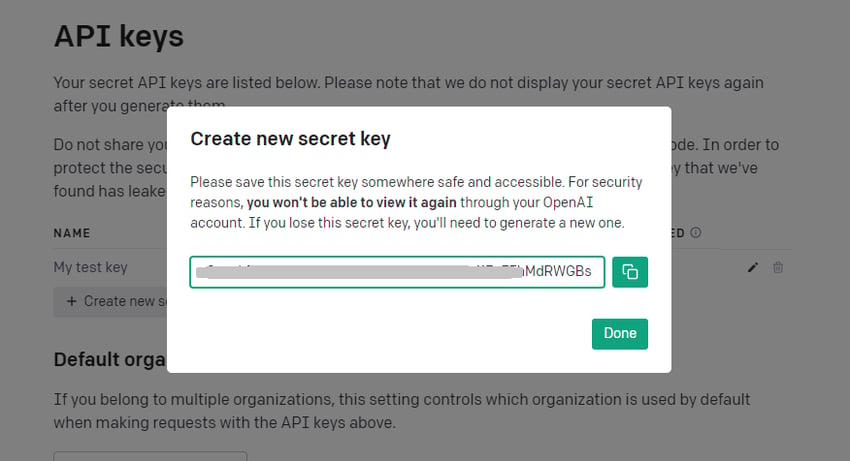
Copy the secret key to a safe location because you won’t be able to view it again through your OpenAI account. You’re going to need this key to connect your application with their API.
Now that you have your API key, the next step is to create an application and connect the app with OpenAI so we can make queries to ChatGPT and get answers. We’ll start with the installation and basic setup.
Setting Up the Project
You’ll need to have Node.js installed on your local machine to run the application we’re about to build. In addition to Node.js, you need to have a text editor (e.g. Visual Studio Code) and a command terminal on your local machine before proceeding.
Create an empty folder and navigate to the folder in your command terminal. Then, run the following command to create a new Node project:
This command generates a package.json file inside the working folder. Go into your package.json file and add the following field so that you’ll be able to use ES6 modules:
1 |
{
|
2 |
// Other fields
|
3 |
"type": "module" |
4 |
}
|
Next, you need to install two packages: dotenv and openai. Dotenv allows you to safely store environmental variables (such as your secret key) and load them in the application when required. The OpenAI library allows you to connect your application with the OpenAI API and interact with ChatGPT.
Run the following command to install the dependencies in one go:
Inside the root folder, create a file named .env. Open the file in a text editor and paste in your API key like so:
1 |
API_KEY = <api-key-here>
|
Replace <api-key-here> with the API key (i.e. the long string) that you copied from your ChatGPT account.
Now that you’ve successfully installed the dependencies, the next step is to create your Node.js application and connect it to the OpenAI API to query ChatGPT.
Implementing ChatGPT
At this point, the only file in your project is .env for environmental variables. Create a second file and name the file script.js. This is where you’re going to run all of your code.
Next, open the file with your text editor and configure dotenv. With this code, the script can now access the API key stored in your .env file:
1 |
import { dotenv } from "dotenv" |
2 |
dotenv() |
Import Configuration and OpenAIAPI from the openai library. Configuration is how you set everything up, and OpenAIAPI is what you call to interact with the ChatGPT servers.
1 |
import { Configuration, OpenAIAPI } from "openai" |
Create a new instance of the OpenAI connection object. To successfully connect with your account, you need to pass in your API key from the .env file:
1 |
const openai = new OpenAIAPI(new Configuration({ |
2 |
apiKey: process.env.API_KEY |
3 |
}))
|
The openai object has a lot of properties and methods, but the only one relevant to this tutorial is createChatCompletion() (for opening a chat with ChatGPT):
1 |
openai.createChatCompletion({ |
2 |
model: "gpt-3.5-turbo", |
3 |
messages: [ |
4 |
{ role: "user", content: "Hello ChatGPT"} |
5 |
]
|
6 |
}).then(res => { |
7 |
console.log(res.data.choices) |
8 |
})
|
Here you specify the ChatGPT model, which is gpt-3.5-turbo at the time of writing this. The second property is messages, an array of messages you want to send to the API. Each item is an object containing the role (e.g. user) and the content of the message.
Run the script by executing the following command:
ChatGPT will give you back a response array that looks similar to this:
1 |
[
|
2 |
{
|
3 |
message: { |
4 |
role: "assistant", |
5 |
content: 'nnHello there, how can I assist you today?', |
6 |
},
|
7 |
finish_reason: "stop", |
8 |
index: 0 |
9 |
}
|
10 |
]
|
It’s an array because you can ask it to give you more than one message if you want. The object contains the role, the content of the response, and the finish reason (the reason ChatGPT stopped generating more text).
All we want to access from the array is the content from the first object. To do that, you need to modify your code to this:
1 |
openai.createChatCompletion({ |
2 |
// other code
|
3 |
}).then(res => { |
4 |
console.log(res.data.choices[0].message.content) |
5 |
})
|
Now, when you rerun the script with node script.js, the content is going to show on your terminal.
Next, we’re going to add a way for the user to input information rather than us hardcoding the question.
Adding User Input
The best way you can add user input in Node.js is with a library called readline (which is built into Node.js).
Start by importing the library into script.js:
1 |
import readline from "readline" |
Next, set up a user interface by calling createInterface(). This will be how we input information:
1 |
const userInterface = readline.createInterface({ |
2 |
input: process.stdin, |
3 |
output: process.stdout, |
4 |
})
|
Create a prompt on the terminal where the user can write their question:
Next, set up an event listener and move your API request into the callback function, like so:
1 |
userInterface.on("line", async input => { |
2 |
const res = await openai.createChatCompletion({ |
3 |
model: "gpt-3.5-turbo", |
4 |
messages: [ |
5 |
{ role: "user", content: input} |
6 |
]
|
7 |
|
8 |
console.log(res.data.choices) |
9 |
userInterface.prompt() |
10 |
})
|
The callback accepts an input as an argument (whatever we pass into our prompt will be used as the input). We then query the API and log the response on the terminal. With the last line of code, we’re telling Node.js to show the prompt again after logging the message to the user.
Run the application with the following command:
A prompt will appear on your command terminal. Type in a question for ChatGPT and click Enter on your keyboard. It’s going to give you back a response on that same terminal.
Conclusion
The OpenAI API has now made it possible to integrate ChatGPT into web and mobile applications. For example, Slack integrated ChatGPT to help colleagues compose faster messages using AI. Snapchat also integrated ChatGPT to help friends converse with one another.
This API can be handy in a lot of scenarios in your own application. You can generate answers to user-provided questions. This makes it possible to build sophisticated chatbots and information-based applications.