In this tutorial, we’re going to be creating an ‘interweaving’ effect that you can use with your photos using Photoshop CS6′s new Scripted Patterns feature.
One of my viewers sent me a link to an ‘Interweaving’ Photoshop tutorial, which they were having some difficulty completing, and after taking a look at the tutorial, it’s very tedious. So I thought to myself, there HAS to be an easier and shorter way to achieve this effect. And that’s when I remembered Photoshop CS6′s new Scripted Patterns feature. Let me show you how this effect can be achieved in a much shorter amount of time.

Before we even touch our image, we need to create the pattern that Photoshop will use to create this effect. For the pattern’s document, the size will be set to 50 by 20 pixels. We only need to create one of the weaves. If you want larger or smaller weaves, you can always create a smaller or larger document, based on the design we’re about to create.

When the document has been created, we’re going to head straight into our Layer Styles to add a gradient and a slight highlight at the top.
Gradient
For the Gradient Overlay, start by setting the Angle at 0 degrees and set the Style to Reflected.

Now, hop into the Gradient Editor to define the colors. The color on the right will act as the shadow that appears underneath, as the design is interweaving. It’s going to be a dark grey, and color on the left, will be a lighter grey. These two colors will work well when we go to blend our pattern with the image in the background.

Inner Shadow
Finally, let’s add an Inner Shadow, which will act as a highlight, to give our pattern a bit of depth.

The image below shows what the pattern looks like, blown up to 800%. Yours should look similar.

Now to save this pattern, you can use the Define Pattern option under the Edit menu. This will allow you to save the pattern which you’ll be able to access in Photoshop’s Pattern Pickers.

So now that the pattern has been saved, let’s hop back over to our image. The image I’m using is from Shutterstock.com, but of course, you can use your own images if you wish.

To keep this design non-destructive, we’re going to apply this pattern onto a new layer. You can quickly create a new layer by pressing the New Layer icon at the bottom of your Layers panel or with your Command + Option + Shift + N shortcut on the Mac, Ctrl + Alt + Shift + N shortcut on Windows.
Once the layer has been created, we can use the new Scripted Patterns feature. This can be found in Photoshop’s Fill window, which is located under the Edit menu.

When the window is visible, start by choosing Pattern for the Contents, and then open up the Pattern Picker right below. If you saved your pattern correctly, it should be at the very bottom of the picker.

Once it’s been chosen, at the bottom of the Fill window, you’ll find the Scripted Patterns option. Again, this is only available in Photoshop CS6. Here, you’ll want to choose the Cross Weave preset.

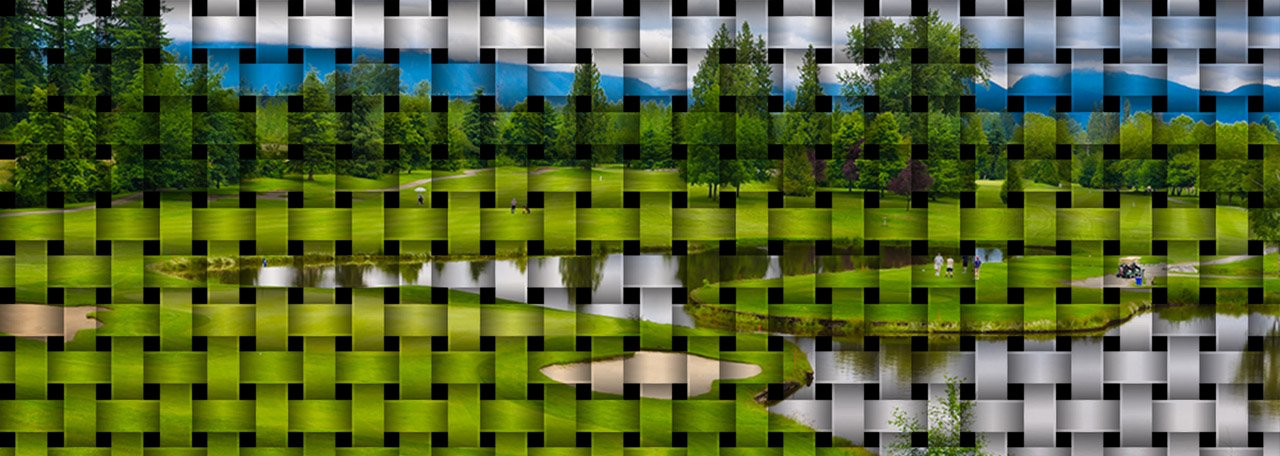
When you press OK, Photoshop will generate an interweaving effect using the pattern we created a few moments ago.

You may notice that a bit of color has been introduced on the pattern. It won’t appear much when we blend it, but if you want to quickly get ride of it, Command/Ctrl + Shift + U will desaturate the layer.
Now, to blend the pattern with the image, you can use a variety of Blending Mode, which will give you different results. Personally, the Multiply Blend Mode gave me a pretty decent result for this image, a bit dark, but we’ll deal with that in a moment. Your images may require some experimentation with the other Modes, such as Overlay or Soft Light.

To brighten up the pattern a touch, I’m going to add a Levels Adjustment Layer. Make sure to clip it so that it only affects the pattern texture, and not the image behind it.

Finally, the last step you may want to take, is to fill in the holes behind the pattern. You can either apply a Drop Shadow to the pattern’s layer, if you want the background image to remain visible, or you can apply a black Stroke to completey fill in the holes.

Either way, you’ll be left with a pretty neat looking interweaving effect, created with a simple pattern, and Photoshop CS6′s new Scripted Patterns feature.