
I can remember years ago, when I first began coding in PHP and MySQL, how excited I was the first time I got information from a database to show up in a web browser.
For someone who had little database and programming knowledge, seeing those table rows show up onscreen based on the code I wrote (okay, so I copied an example from a book) gave me a triumphant feeling. I may not have fully understood all the magic at work back then, but that first success spurred me on to bigger and better projects.
While my level of exuberance over databases may not be the same as it once was, ever since my first ‘hello world’ encounter with PHP and MySQL I’ve been hooked on the power of making things simple and easy to use.
As a developer, one problem I’m constantly faced with is taking a large set of information and making it easy to digest. Whether it’s a large company’s client list or a personal MP3 catalog, having to sit and stare at rows upon rows upon rows of data can be discouraging and frustrating. What can a good developer do? Paginate!
Looking for a Quick Solution?
If you’re looking for a quick solution, there’s a great collection of pagination scripts and helpers over at Envato Market.
For example, try out the ZPager PHP pagination class. It makes it easy to generate listing pagination links and customize them in just a few clicks. ZPager supports Bootstrap, MySQL, and Smarty Template Engine, and it also lets you use SEO-friendly URLs.

1. Pagination
Pagination is essentially the process of taking a set of results and spreading them out over pages to make them easier to view.
I realized early on that if I had 5,000 rows of information to display, not only would it be a headache for someone to try and read, but most browsers would take an Internet eternity (i.e. more than about five seconds) to display it.
To solve this, I created a simple, flexible, and easy-to-use PHP class that I could use for pagination in all my projects.
2. The Database
Gotta love MySQL. No offense to the other database systems out there, but for me, all I need is MySQL. And one great feature of MySQL is that they give you some free sample databases to play with at https://dev.mysql.com/doc/#sampledb.
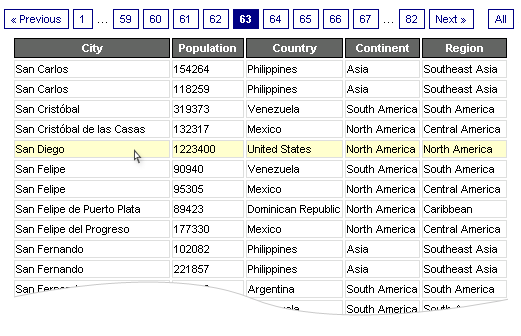
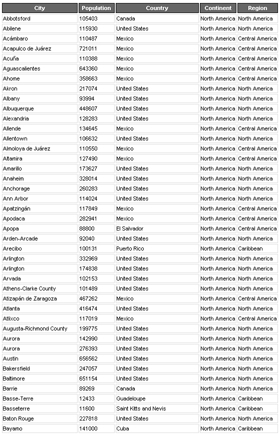
For my examples, I’ll be using the world database (~90k zipped), which contains over 4,000 records to play with, but the beauty of the PHP script we’ll be creating is that it can be used with any database. Now I think we can all agree that if we decided not to paginate our results, we would end up with some very long and unwieldy results like the following:
So let’s gets down to breaking up our data into easy-to-digest bites like this:
Beautiful, isn’t it? Once you drop the pagination class into your code, you can quickly and easily transform a huge set of data into easy-to-navigate pages with just a few lines of code. Really.
3. The Paginator
This example will be composed of two scripts: the reusable paginator class and the index file that will display the table items and controls.
Paginator.class.php
The paginator class will have only two methods and the constructor. We will build it gradually, explaining each step as we move forward.
<?php

class Paginator {

     private $_conn;
        private $_limit;
        private $_page;
        private $_query;
        private $_total;

}
This definition only sets the paginator required member variables. Since this is a helper class and it’s destined for pagination only, it will rely on a valid connection to the MySQL server and an already defined query, to which we will append the parameters necessary to paginate the results. We’ll start with the constructor method.
<?php

public function __construct( $conn, $query ) {

    $this->_conn = $conn;
    $this->_query = $query;

    $rs= $this->_conn->query( $this->_query );
    $this->_total = $rs->num_rows;

}
Quite simple, right? This method only sets the object’s database connection and the necessary query. After that, it calculates the total number of rows retrieved by that query without any limit or skip parameters. This total is necessary to create the links for the paginator.
Note that, for simplicity, we are not doing error checking or any other validation of the given parameters, but in a real-world application, these checks will be necessary.
Retrieving Results
Now, let’s create the method that will actually paginate the data and return the results.
<?php
public function getData( $limit = 10, $page = 1 ) {

    $this->_limit   = $limit;
    $this->_page    = $page;

    if ( $this->_limit == 'all' ) {
        $query      = $this->_query;
    } else {
        $query      = $this->_query . " LIMIT " . ( ( $this->_page - 1 ) * $this->_limit ) . ", $this->_limit";
    }
    $rs             = $this->_conn->query( $query );

    while ( $row = $rs->fetch_assoc() ) {
        $results[]  = $row;
    }

    $result         = new stdClass();
    $result->page   = $this->_page;
    $result->limit  = $this->_limit;
    $result->total  = $this->_total;
    $result->data   = $results;

    return $result;
}
Let’s analyze this one step at a time. First, we set the limit and page parameters, which by default are set to 10 and 1 respectively. Then, we check if the user requires a given number of rows or all of them. Based on this and the page parameter, we set the LIMIT term of the query. Note that we take one from the page number because our script counts from 1 instead of from 0.
After this, we simply evaluate the query and get the results. Finally, we create a new results object which contains the limit, page, and total parameters of the executed query, as well as the data for each of the retrieved rows.
Displaying Pagination Links
Now, let’s write the method used to get the pagination links.
<?php
public function createLinks( $links, $list_class ) {
if ( $this->_limit == 'all' ) {
return '';
}
$last = ceil( $this->_total / $this->_limit );
$start = ( ( $this->_page - $links ) > 0 ) ? $this->_page - $links : 1;
$end = ( ( $this->_page + $links ) < $last ) ? $this->_page + $links : $last;
$html = '<ul class="' . $list_class . '">';
$class = ( $this->_page == 1 ) ? "disabled" : "";
$html .= '<li class="' . $class . '"><a href="?limit=' . $this->_limit . '&page=' . ( $this->_page - 1 ) . '">«</a></li>';
if ( $start > 1 ) {
$html .= '<li><a href="?limit=' . $this->_limit . '&page=1">1</a></li>';
$html .= '<li class="disabled"><span>...</span></li>';
}
for ( $i = $start ; $i <= $end; $i++ ) {
$class = ( $this->_page == $i ) ? "active" : "";
$html .= '<li class="' . $class . '"><a href="?limit=' . $this->_limit . '&page=' . $i . '">' . $i . '</a></li>';
}
if ( $end < $last ) {
$html .= '<li class="disabled"><span>...</span></li>';
$html .= '<li><a href="?limit=' . $this->_limit . '&page=' . $last . '">' . $last . '</a></li>';
}
$class = ( $this->_page == $last ) ? "disabled" : "";
$html .= '<li class="' . $class . '"><a href="?limit=' . $this->_limit . '&page=' . ( $this->_page + 1 ) . '">»</a></li>';
$html .= '</ul>';
return $html;
}
This is a rather long method, so let’s look over it in more detail.
First, we evaluate if the user requires a given number of links or all of them. If the user is requesting all links, then we simply return an empty string, since no pagination is required.
After this, we calculate the last page based on the total number of rows available and the items required per page.
Then, we take the links parameter, which represents the number of links to display below and above the current page, and calculate the start and end link to create.
Next, we create the opening tag for the list and set the class of it with the list class parameter. We also add the “previous page” link—note that for this link, we check if the current page is the first, and if so, we set the disabled property of the link. We also display a link to the first page and an ellipsis symbol in case the start link is not the first one.
Next, we add the links below and above the current page, based on the previously calculated start and end parameters. In each step, we evaluate the current page against the link page displayed and set the active class accordingly.
After this, we display another ellipsis symbol and the link to the last page, in case the end link is not the last one.
Finally, we display the “next page” link and set the disabled state when the user is viewing the last page, close the list, and return the generated HTML string.
That’s all there is to the Paginator class! Of course, we could add setters and getters for the database connection, limit, page, query, and total parameters, but for simplicity we’ll keep it this way.
4. The Index Page
Now we’ll create the index.php file, which is in charge of using the Paginator class and displaying the data. First, let me show you the base HTML.
<!DOCTYPE html>
    <head>
        <title>PHP Pagination</title>
        <link rel="stylesheet" href="css/bootstrap.min.css">
    </head>
    <body>
        <div class="container">
                <div class="col-md-10 col-md-offset-1">
                <h1>PHP Pagination</h1>
                <table class="table table-striped table-condensed table-bordered table-rounded">
                        <thead>
                                <tr>
                                <th>City</th>
                                <th width="20%">Country</th>
                                <th width="20%">Continent</th>
                                <th width="25%">Region</th>
                        </tr>
                        </thead>
                        <tbody></tbody>
                </table>
                </div>
        </div>
        </body>
</html>
Quite simple—this file only displays a table that we will populate with the information retrieved from the database. Note that for this example I’m using Bootstrap for basic page styling.
Using the Paginator
<?php for( $i = 0; $i < count( $results->data ); $i++ ) : ?>
        <tr>
                <td><?php echo $results->data[$i]['Name']; ?></td>
                <td><?php echo $results->data[$i]['Country']; ?></td>
                <td><?php echo $results->data[$i]['Continent']; ?></td>
                <td><?php echo $results->data[$i]['Region']; ?></td>
        </tr>
<?php endfor; ?>
Now, to make use of our Paginator class, add the following PHP code at the top of the document.
<?php
    require_once 'Paginator.class.php';

    $conn       = new mysqli( '127.0.0.1', 'root', 'root', 'world' );

    $limit      = ( isset( $_GET['limit'] ) ) ? $_GET['limit'] : 25;
    $page       = ( isset( $_GET['page'] ) ) ? $_GET['page'] : 1;
    $links      = ( isset( $_GET['links'] ) ) ? $_GET['links'] : 7;
    $query      = "SELECT City.Name, City.CountryCode, Country.Code, Country.Name AS Country, Country.Continent, Country.Region FROM City, Country WHERE City.CountryCode = Country.Code";

    $Paginator  = new Paginator( $conn, $query );

    $results    = $Paginator->getData( $limit, $page );
?>
This script is quite simple—we just required our Paginator class. Note that this code assumes that this file is in the same directory as the index.php file—if this is not the case, you should update the path accordingly.
Then, we create the connection to our database using the MySQLi library, retrieve the paginator parameters from the GET request, and set the query. Since this is not an article on MySQL, I will not get into details about the connection or the query used here.
Lastly, we create the Paginator object and retrieve the results for the current page.
Displaying the Results
Now, to display the obtained results, add the following code to the table body.
<?php for( $i = 0; $i < count( $results->data ); $i++ ) : ?>
        <tr>
                <td><?php echo $results->data[$i]['Name']; ?></td>
                <td><?php echo $results->data[$i]['Country']; ?></td>
                <td><?php echo $results->data[$i]['Continent']; ?></td>
                <td><?php echo $results->data[$i]['Region']; ?></td>
        </tr>
<?php endfor; ?>
Here, we are simply iterating through the results data attribute containing the city records and creating a table row for each one of them.
Pagination Links
Now, to display the paginator links, add the following code below the table.
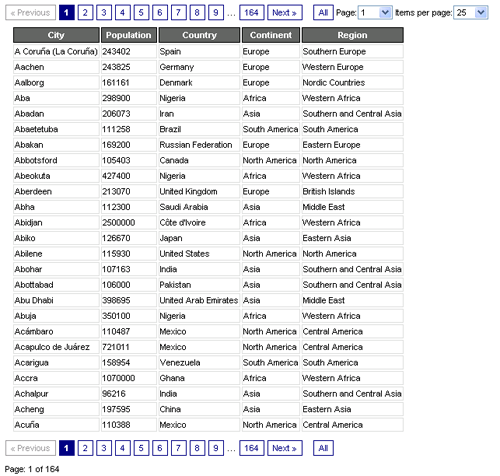
<?php echo $Paginator->createLinks( $links, 'pagination pagination-sm' ); ?>
To the paginator createLinks method, we pass the obtained links parameter and the CSS class for the pagination links used from Bootstrap. Here is the result of the created page.

How to Implement AJAX-Based Pagination
In this section, we’ll quickly go through how you could convert the above PHP pagination example into AJAX-based pagination. We’ll revise all the files and discuss the changes that we will need to make.
Firstly, let’s update the index.php file, as shown in the following snippet.
<!DOCTYPE html>
    <head>
        <title>PHP Pagination</title>
        <link rel="stylesheet" href="css/bootstrap.min.css">
    </head>

    <body>
        <div class="container">
                <div class="col-md-10 col-md-offset-1">
                    <h1>PHP Pagination</h1>
                    <div id="ajax_wrapper">
                        <?php
                            require_once 'ajax_pagination.php';
                        ?>
                    </div>
                </div>
        </div>
        <script src="https://code.jquery.com/jquery-3.5.1.min.js" integrity="sha256-9/aliU8dGd2tb6OSsuzixeV4y/faTqgFtohetphbbj0=" crossorigin="anonymous"></script>
        <script src="pagination.js"></script>
    </body>
</html>
First of all, we’ve moved the HTML code which is required to build the pagination into the ajax_pagination.php file so that we can reuse it. Next, we’ve loaded the jQuery library and pagination.js file at the end of the file.
The ajax_pagination.php file looks like this.
<?php
require_once 'paginator.php';

$conn       = new mysqli( '127.0.0.1', 'root', 'root', 'world' );

$limit      = ( isset( $_GET['limit'] ) ) ? $_GET['limit'] : 25;
$page       = ( isset( $_GET['page'] ) ) ? $_GET['page'] : 1;
$links      = ( isset( $_GET['links'] ) ) ? $_GET['links'] : 7;
$query      = "SELECT City.Name, City.CountryCode, Country.Code, Country.Name AS Country, Country.Continent, Country.Region FROM City, Country WHERE City.CountryCode = Country.Code";

$Paginator  = new Paginator( $conn, $query );
$results    = $Paginator->getData( $limit, $page );
?>

<table class="table table-striped table-condensed table-bordered table-rounded">
    <thead>
        <tr>
            <th>City</th>
            <th width="20%">Country</th>
            <th width="20%">Continent</th>
            <th width="25%">Region</th>
        </tr>
    </thead>
    <tbody>
    <?php for( $i = 0; $i < count( $results->data ); $i++ ) : ?>
        <tr>
                <td><?php echo $results->data[$i]['first_name']; ?></td>
                <td><?php echo $results->data[$i]['last_name']; ?></td>
                <td><?php echo $results->data[$i]['email']; ?></td>
                <td><?php echo $results->data[$i]['phone']; ?></td>
        </tr>
    <?php endfor; ?>
    </tbody>
</table>
<?php echo $Paginator->createLinks( $links, 'pagination pagination-sm' ); ?>
It’s pretty much the same.
Next, let’s have a look at the pagination.js file.
$(document).on( "click", ".pagination a", function(e) {
    var pageValue = $(this).attr("data-page");

    $.ajax({
        url: '/ajax_pagination.php?limit=25&page='+pageValue,
	    type: "GET",
	    success: function(data){
            $("#ajax_wrapper").html(data);
        }
    });

    e.preventDefault();
});
It does a couple of things here. Firstly, it binds the click event to every pagination link. Next, when the link is clicked, it makes an AJAX call to fetch the listing data of the corresponding page and updates the page.
Finally, you need to update the createLinks method as shown in the following snippet.
public function createLinks( $links, $list_class ) {
if ( $this->_limit == 'all' ) {
return '';
}
$last = ceil( $this->_total / $this->_limit );
$start = ( ( $this->_page - $links ) > 0 ) ? $this->_page - $links : 1;
$end = ( ( $this->_page + $links ) < $last ) ? $this->_page + $links : $last;
$html = '<ul class="' . $list_class . '">';
$class = ( $this->_page == 1 ) ? "disabled" : "";
$html .= '<li class="' . $class . '"><a data-page="' . ( $this->_page - 1 ) . '" href="?limit=' . $this->_limit . '&page=' . ( $this->_page - 1 ) . '">«</a></li>';
if ( $start > 1 ) {
$html .= '<li><a data-page="1" href="?limit=' . $this->_limit . '&page=1">1</a></li>';
$html .= '<li class="disabled"><span>...</span></li>';
}
for ( $i = $start ; $i <= $end; $i++ ) {
$class = ( $this->_page == $i ) ? "active" : "";
$html .= '<li class="' . $class . '"><a data-page="' . $i . '" href="?limit=' . $this->_limit . '&page=' . $i . '">' . $i . '</a></li>';
}
if ( $end < $last ) {
$html .= '<li class="disabled"><span>...</span></li>';
$html .= '<li><a data-page="' . $last . '"href="?limit=' . $this->_limit . '&page=' . $last . '">' . $last . '</a></li>';
}
$class = ( $this->_page == $last ) ? "disabled" : "";
$html .= '<li class="' . $class . '"><a data-page="' . ( $this->_page + 1 ) . '" href="?limit=' . $this->_limit . '&page=' . ( $this->_page + 1 ) . '">»</a></li>';
$html .= '</ul>';
return $html;
}
Basically, we’ve added the data-page attribute to every link, so that we can get the page number when the user clicks on the link.
And with these changes in place, you’ve turned your pagination into AJAX-based pagination!
Conclusion
This should provide you with everything that you need to know in order to get up and running with pagination in your application.
Learn PHP With a Free Online Course
If you want to learn PHP, check out our free online course on PHP fundamentals!
In this course, you’ll learn the fundamentals of PHP programming. You’ll start with the basics, learning how PHP works and writing simple PHP loops and functions. Then you’ll build up to coding classes for simple object-oriented programming (OOP). Along the way, you’ll learn all the most important skills for writing apps for the web: you’ll get a chance to practice responding to GET and POST requests, parsing JSON, authenticating users, and using a MySQL database.
-
FREE
 PHPPHP Fundamentals

This post has been updated with contributions from Sajal Soni. Sajal belongs to India and he loves to spend time creating websites based on open source frameworks.
