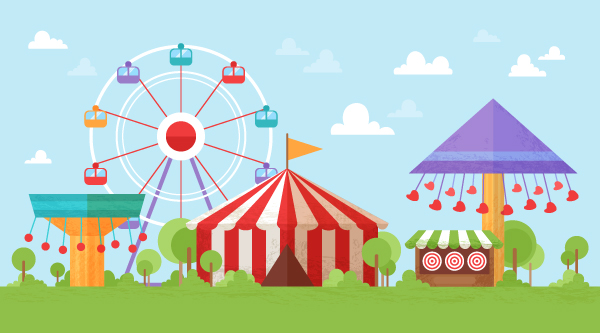
Wanna have some fun in the amusement park? Then join me in this tutorial and create a retro-style flat funfair scene, inspired by the Grease movie! No special drawing skills are required here—we’ll be working with simple geometrical shapes and the Pathfinder operations of Adobe Illustrator. What is more, we’ll learn how to use the brushes and the Draw Inside mode in order to apply a grungy texture to the objects just in a few clicks.
Have you seen the Grease movie with John Travolta and Olivia Newton-John? Be sure
to check it out if you like the 1950s. It has all sorts of things to create a
proper retro atmosphere—clothes, hairdos, cars and music—everything you can
imagine. For me, one of the most memorable moments of the movie is dancing at
the funfair. So in this tutorial we’ll be creating a simplified and stylized
version of this amusement park from the movie.
Feel free to browse the Funfair section of Envato Market to find out what the funfair elements look like and to gather some
inspiration in case you want to make more objects in addition to those we’ll
be making in this tutorial. You can also find some nice Vintage Funfair
photo-references on PhotoDune that will give you a closer look.
Let’s start!
1. Make a Fun Striped Pavilion
Step1
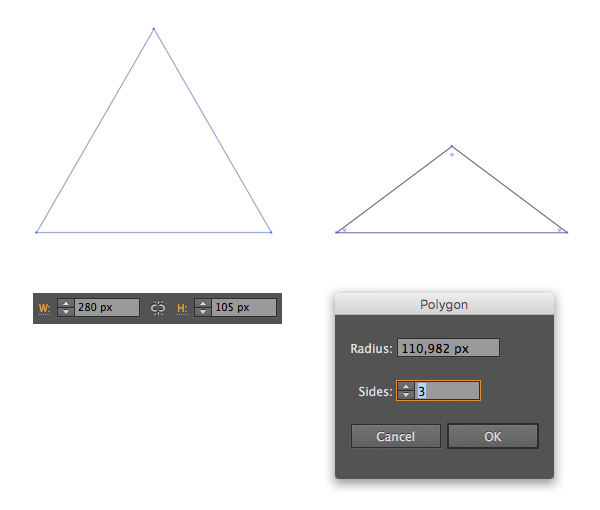
A large striped tent is one of the first elements
that you think of when talking about retro funfairs. Let’s start building such pavilion from a triangle of 280 x 105
px, which we can make with the help of the Polygon Tool.
Then squash the shape with the Selection Tool (V) to make it flat.
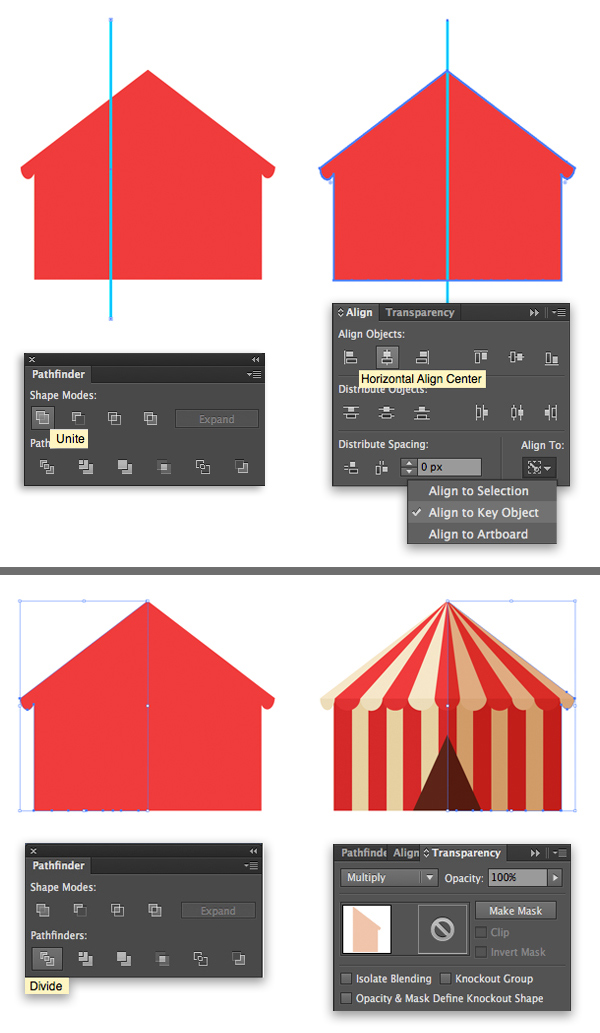
Step 2
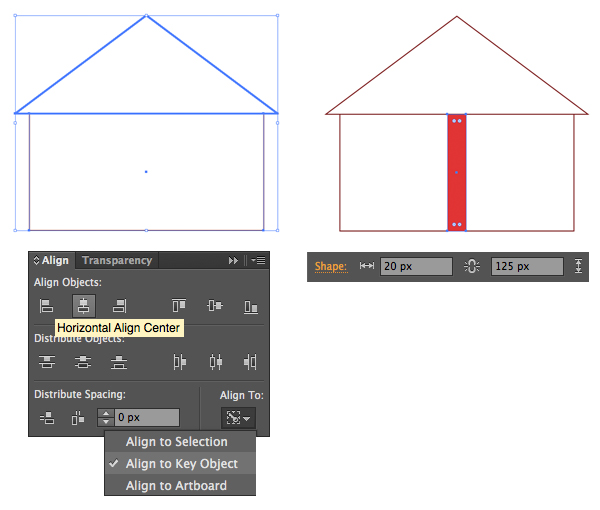
Take the Rectangle Tool (M) and form the wall of the pavilion, attaching it
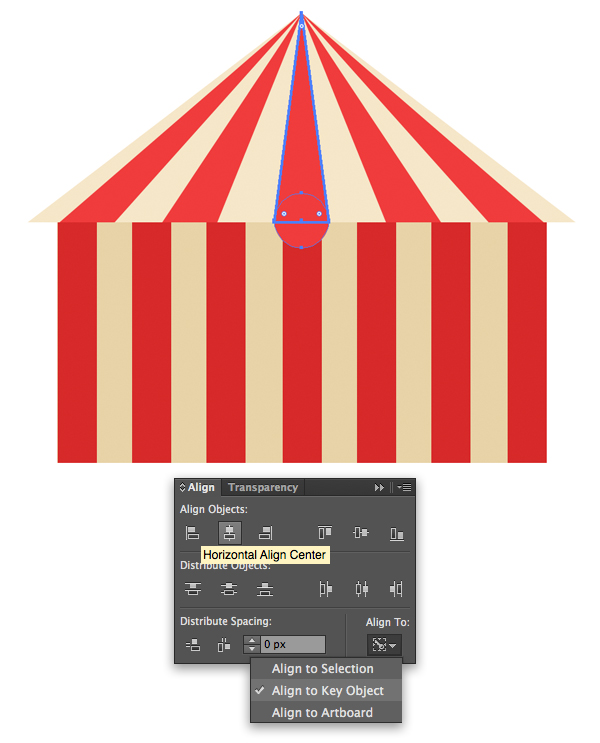
to the triangle roof. And let’s align the wall to the roof, using the roof as
the Key Object. Select both shapes,
hold Alt and click the triangle
roof. You will see a thick selection outline, indicating the Key Object. Now we can head to the Align panel and click Horizontal Align Center.
Great! Now that the base is ready, let’s add
those stripes! Use the Rectangle Tool
(M) to make a 20 x 125 px narrow
vertical stripe, filing it with pale red color.
Step 3
Align the stripe to the left side of the wall, using the wall as the Key Object.
Copy
the stripe and
Paste in Front (Control-C > Control-F). Align the copy to the opposite side
of the wall.
Select both stripes and go to Object > Blend > Make. Now we can
change the settings to our liking in Object > Blend
> Blend Options. Let’s set the Spacing to Specified Steps
with 5 steps.
Go to Object
> Expand Appearance to turn the Blend group into a set of separate
stripes. Change the color of the wall to light yellow.

Step 4
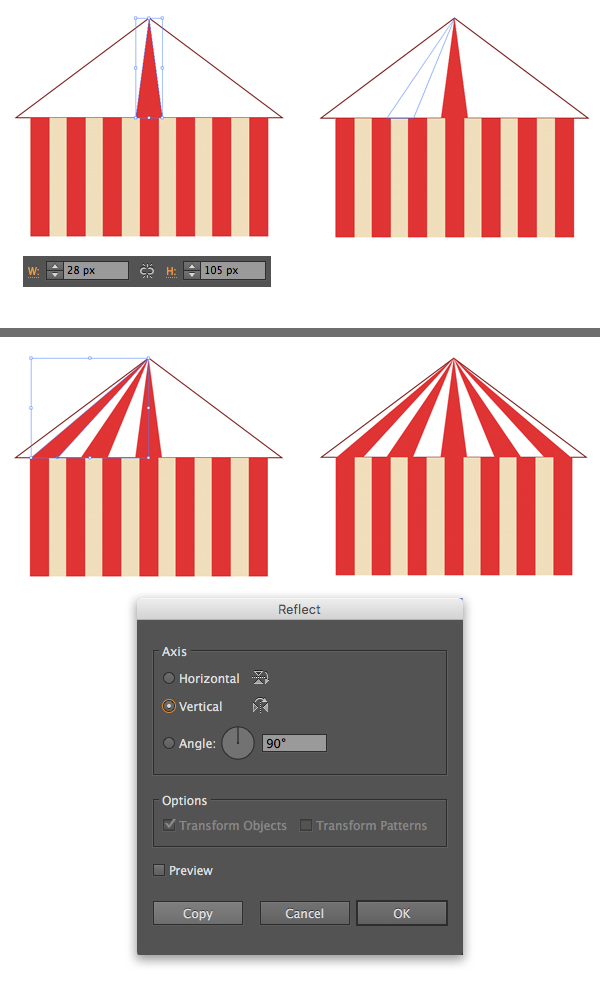
And now let’s add some stripes to the roof
as well. Duplicate (Control-C >
Control-F) the roof, hold Alt
and shrink the shape with the Selection Tool (V), making a narrow triangle. Fill it with red
color.
Duplicate the created stripe, select its
bottom anchor points with the Direct
Selection Tool (A) and drag them to the left, so that the triangle is skewed and its top anchor point remains attached to the top of the roof.
Make another copy of the triangle stripe
and move it further left.
Finally select the two copies that we’ve
made and double-click the Reflect Tool
(O) to open the options window. Flip the shapes over the Vertical Axis and click Copy to make the same stripes for the
right side of the roof.
Step 5
Apply slightly lighter colors to the roof
elements in order to separate the roof from the wall. And let’s add some more
details.
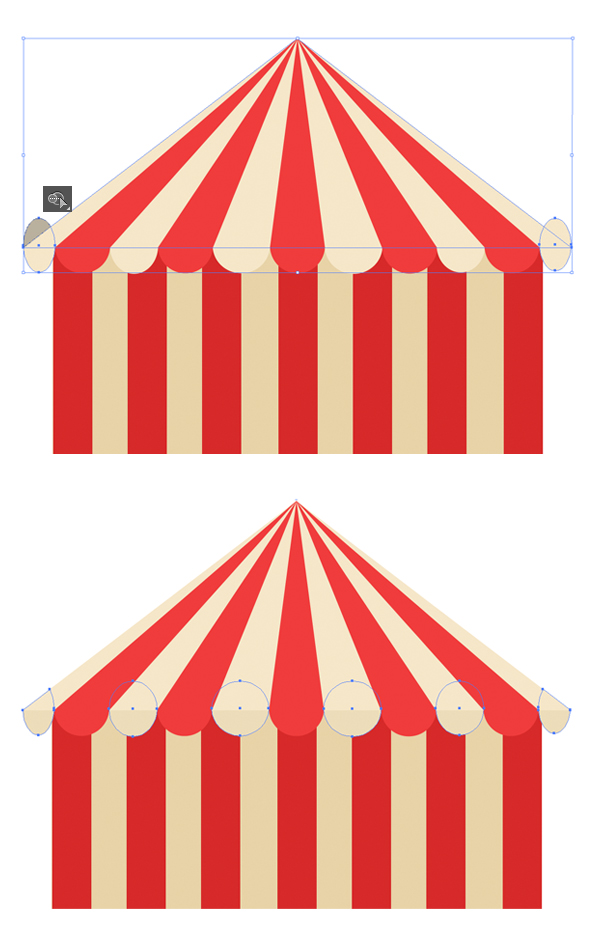
Take the Ellipse Tool (L), hold Shift
and make an even circle, fitting it to the width of the central stripe. Use the
Smart Guides (View > Smart Guides)
to make it easier to “stick” the shapes to each other.
Align the shapes horizontally.
Step 6
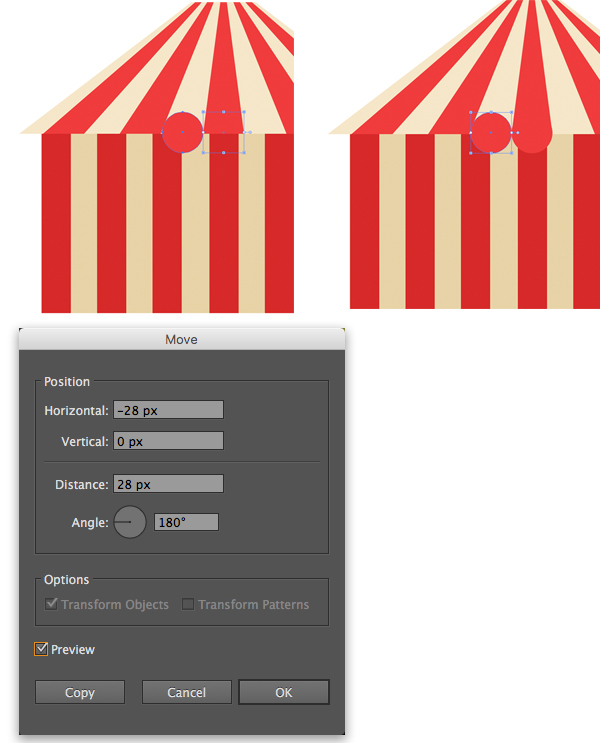
Let’s add more circles! Now select the
circle and hit the Enter key to open
the Move options window. Set the Horizontal value equal to the width of
the circle. In my case, it is 28 px. If we want to move the circle to
the left, the value must be negative, so we need to set the Horizontal value to -28 px and click Copy.
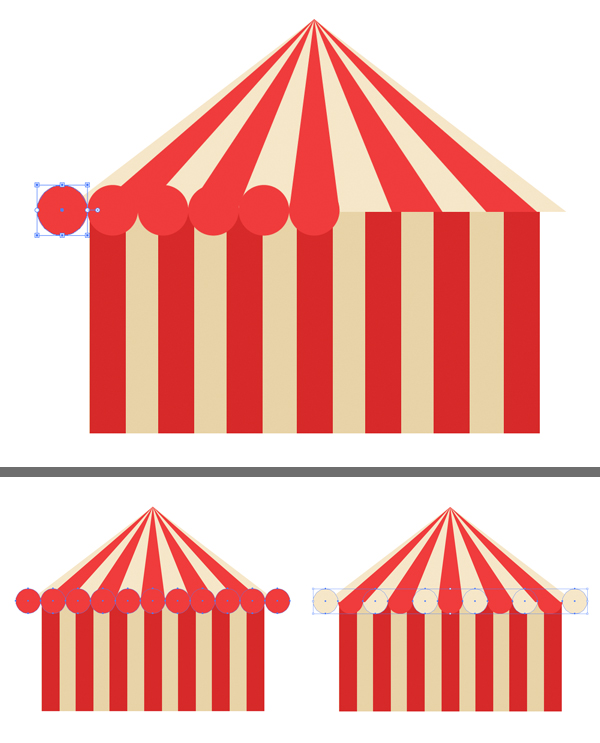
Step 7
Great! Now just press Control-D several times to repeat the last action, creating more
circles.
And then repeat the same for the right half
of the tent, moving the copy of the central circle 28 px to the right and repeating the action.
Alternate the colors of the circles, making
them match the colors of the stripes on the roof.
Step 8
If you notice that some of the circles
don’t fit the stripes, just move them left or right a bit or use the Selection
Tool (V) to make the circles wider or narrower, squashing or extending the
shapes.
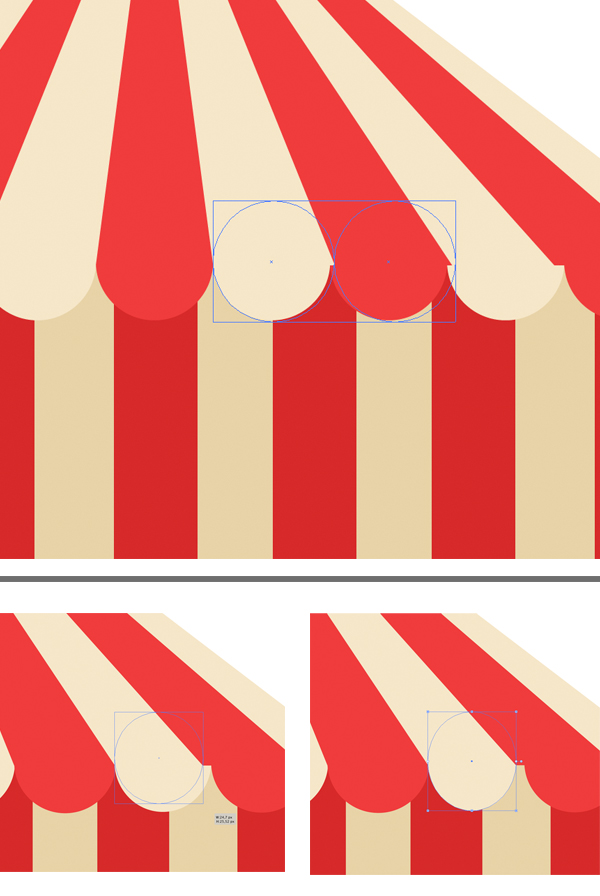
Step 9
Now let’s delete the unneeded pieces.
Select the side circles together with the roof and arm yourself with the Shape Builder Tool (Shift-M). Hold Alt
and click the pieces that you want to delete.
Finally, Group (Control-G) all the circles and place them beneath the roof (Control-[), making them a bit darker. Don’t forget to group the elements of the roof as well to make your work more
organized and neat.
Step 10
Add a dark-brown triangle for the entrance,
placing it in the center of the wall.
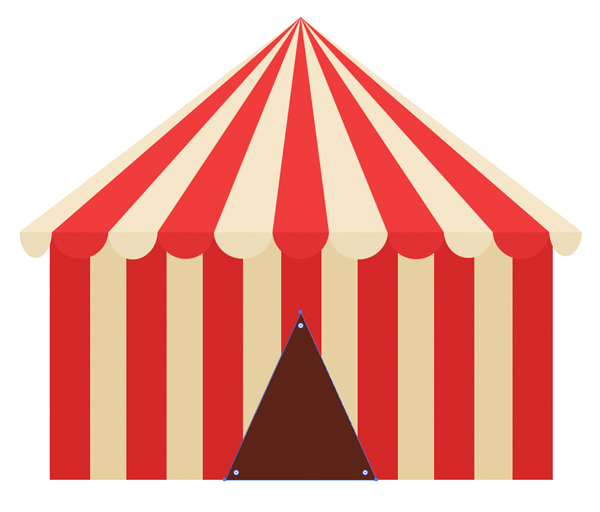
Step 11
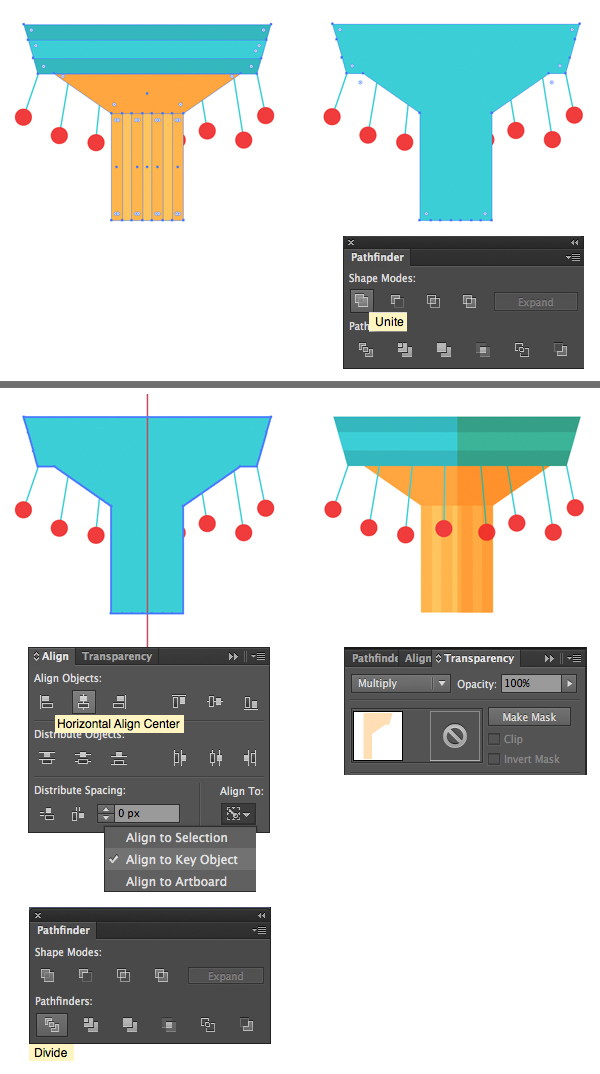
Finally, let’s add a semi-transparent
flat-style shadow. Duplicate (Control-C
> Control-F) the pavilion and, keeping the copy selected, Unite it in the Pathfinder, creating a flat silhouette.
Use the Line Segment Tool () to make a vertical line and Align it to the center of the
silhouette.
Keeping both shapes selected, Divide them in Pathfinder, splitting the silhouette into two equal halves.
Finally, delete the left half and switch
the right one to Multiply Blending
Mode, darkening the pavilion.
And that’s it! Our striped pavilion is
ready! Now we can move on to the next element of our fancy funfair.
2. Draw Fancy Vintage Carousels
Let’s make a couple of carousels for our retro
amusement park.
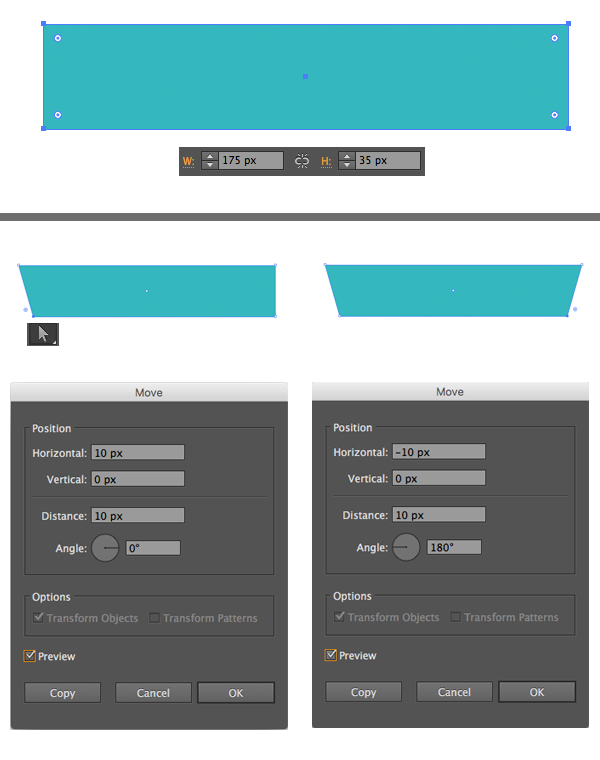
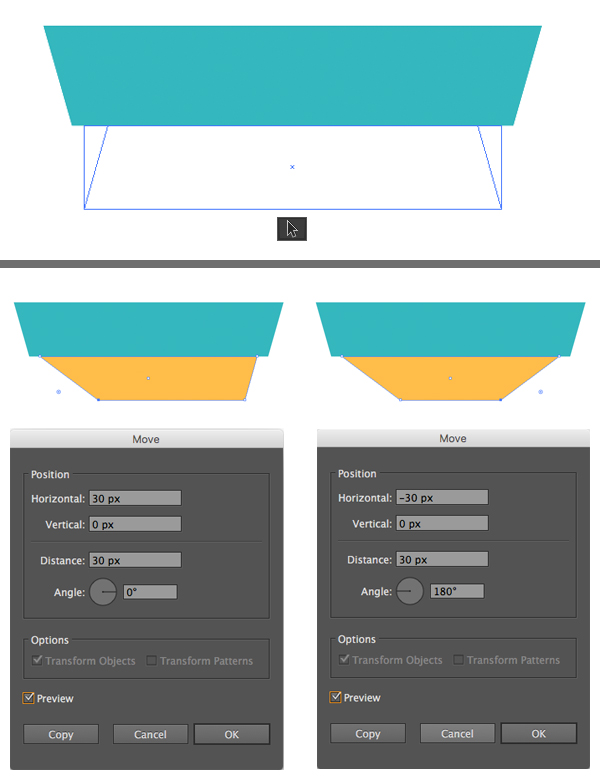
Step 1
Let’s make the top part of our carousel
from a 175 x 35 px rectangle of
turquoise color. Select the bottom left anchor point with the Direct Selection Tool (A) and hit Enter to open the Move options window. Set the Horizontal
value to 10 px in order to move the
point to the right. Click OK.
Repeat the same for the bottom right anchor
point, but this time set the Horizontal
value to -10 px, moving the point to
the left.
Step 2
Now duplicate
(Control-C > Control-V) the shape. Take the Selection Tool (V), grab the upper side of the shape and drag it
down, turning the shape upside down. Make it a bit smaller and fill with
light-yellow color.
Use the Direct Selection Tool (A) and the Move function to move the bottom anchor points closer to each other.
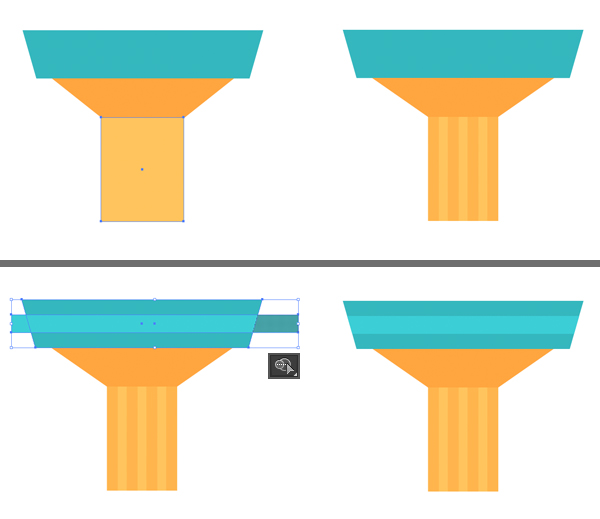
Step 3
Take the Rectangle Tool (M) and make a column, fitting the bottom of the yellow shape (in my case the column is about 50 x 75
px). Add darker vertical stripes to the column in the same way as we did it
with the wall of the striped pavilion.
Add a lighter stripe to the turquoise top of the
carousel, and use the Shape Builder Tool
(Shift-M) while holding Alt to delete the unneeded pieces outside the
carousel.
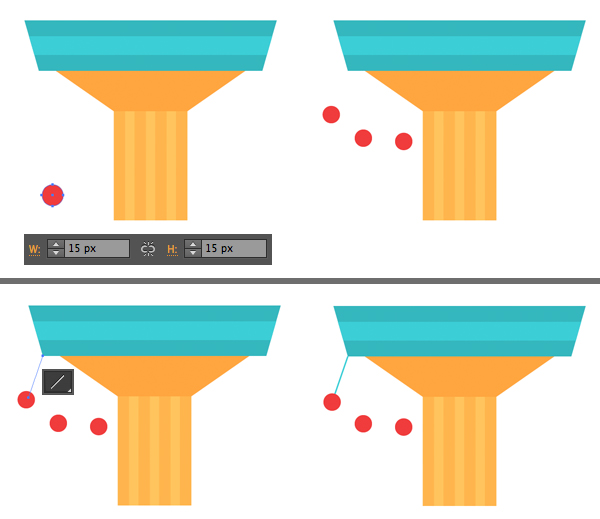
Step 4
Now let’s add stylized seats or cabins that
will be spinning around the carousel. Make a 15 x 15 px circle and pick the pale-red color from the tent, using
the Eyedropper Tool (I).
Select the created circle, hold Alt and drag the circle to the side,
creating a couple of copies. Use the Line
Segment Tool () to connect the cabins to the carousel.
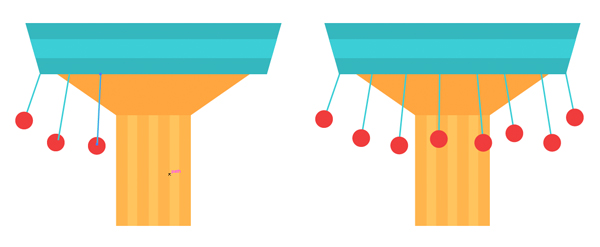
Add more cabins and connect them to the carousel. Place the circles on top (Shift-Control-]),
so that the strings are hidden beneath the cabins.
Step 5
Let’s add a gentle shadow to the carousel.
Select the basic parts (without the cabins) and duplicate them. Unite the elements of the copy in Pathfinder, creating a merged
silhouette. Draw a vertical line across the silhouette and Align it to the center of the carousel.
Finally, Divide the line and the silhouette in Pathfinder, delete the left half, and switch the remaining part to Multiply mode.
That’s it! Let’s make another carousel.
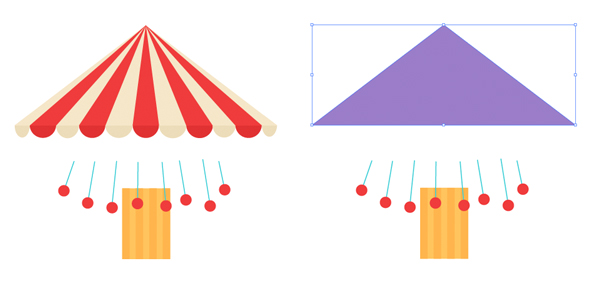
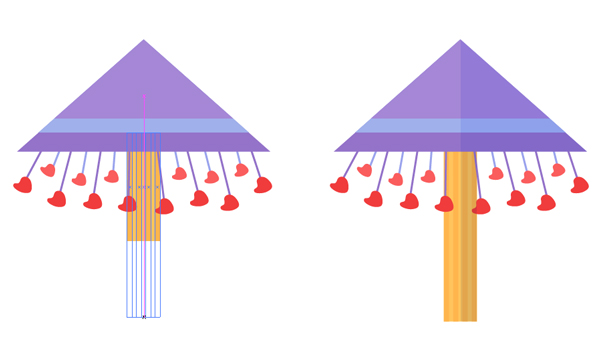
Step 6
For our next carousel, let’s use the
triangle top of the striped tent and the column with cabins from the carousel
that we’ve just made. Remove the stripes from the roof and fill it with a pale purple color.
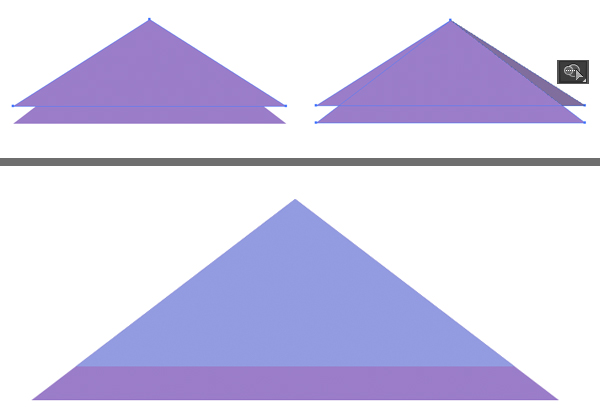
Step 7
Let’s adjust the roof a bit. Make a copy
and move it up a bit. Select both shapes and use the Shape Builder Tool (Shift-M), holding Alt, to delete the pieces outside the roof. Make the top of the
roof light purple-blue.
Step 8
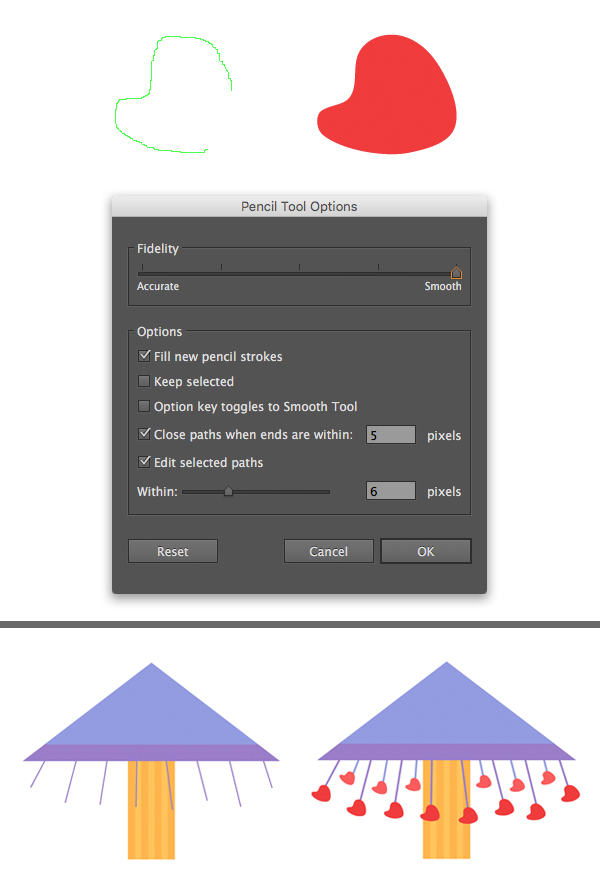
Now let’s replace the circle cabins with
seats of a different shape. Grab the Pencil
Tool (N) and draw a small bean-shaped seat. If you want the lines to be
smoother while drawing, double-click the Pencil
Tool (N) and move the Fidelity
slider all the way to the right.
Make more copies of the seat and
arrange them around the column. Make some of the seats smaller and fill them
with lighter red color, creating distance between the objects.
Step 9
Finally, extend the column and make it taller by selecting its bottom anchor points with the Direct Selection Tool (A) and dragging them down. Add another stripe to the roof. Finish up by adding a
semi-transparent shadow to the right half of the object, making it look
complete.
3. Make a Colorful Ferris Wheel
Step 1
We’ll start by making the most detailed
part of the big wheel: the cabin. Make a light-turquoise rectangle of 20 x 15 px size.
Use the Live Corners feature to make the corners of the cabin rounded. To do this, switch to the Direct Selection Tool (A) and pull a
tiny circle marker closer to the center. If you’re working in earlier versions of
Adobe Illustrator, you can use Effect
> Stylize > Round Corners instead, which gives the same result.
Duplicate the shape and make the copy
smaller, filling it with light-blue color, depicting the glass.
Keeping the glass selected, take the Eraser Tool (Shift-E), hold Alt and drag over the bottom half of
the shape to erase it.

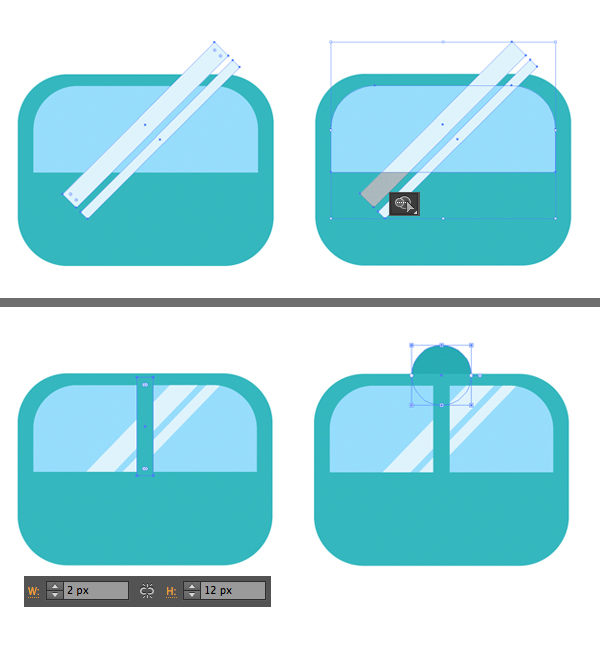
Step 2
Make two vertical stripes of a lighter blue
color and rotate them 45 degrees
by holding Shift and using the Selection Tool (V).
Place the stripes above the window and use
the Shape Builder Tool (Shift-M) to
delete the unneeded pieces.
Finally, add a 2 x 12 px stripe in the center of the window to divide it into two
halves.
Place a darker-turquoise circle at the top of the cabin (Shift-Control-[).
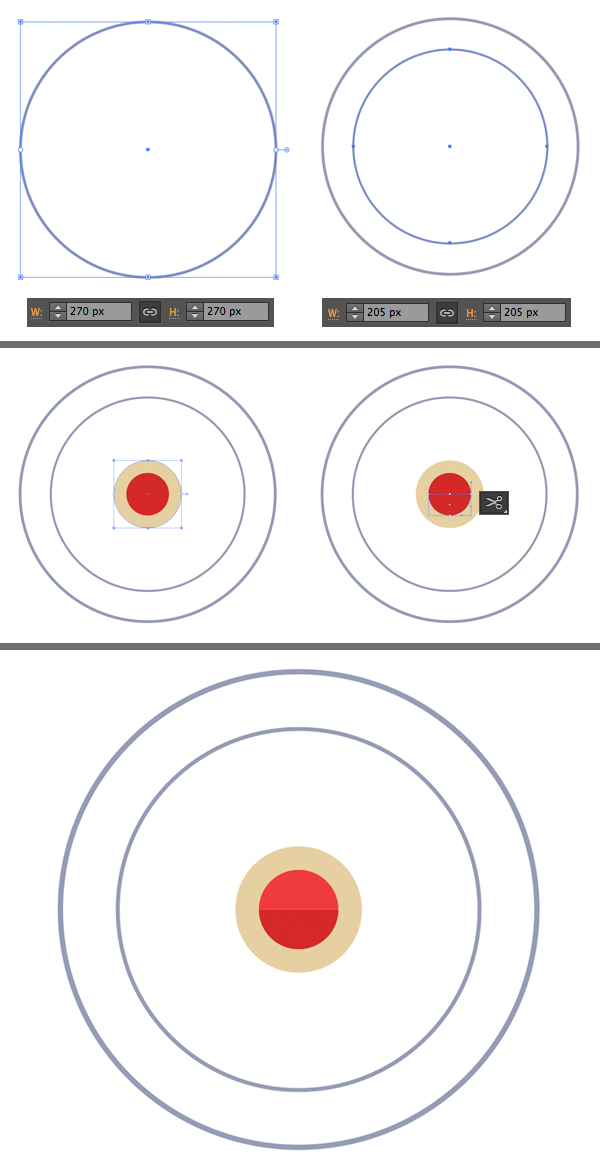
Step 3
Now let’s form the wheel. Make a 270 x 270 px circle with grey Stroke and no Fill (you can set the Fill to none in the Color panel).
Place a 205 x 205 px circle inside the first one.
Continue by adding colorful details in the center, consisting of two circles. Take
the Scissors Tool (C) and click the
side anchor points of the red circle to split it apart. Make the bottom part a
bit darker.
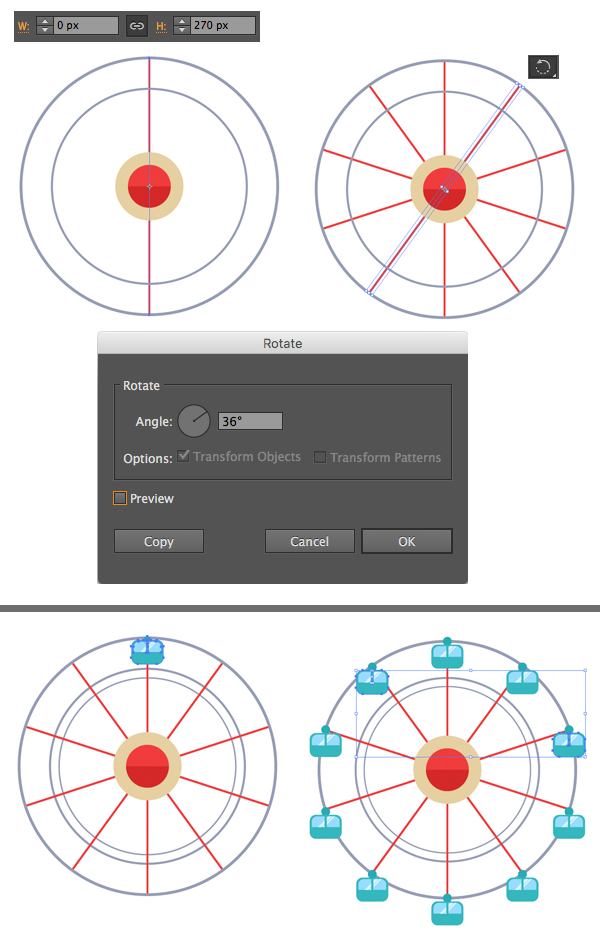
Step 4
Use the Line Segment Tool () to make a vertical spoke of 270 px height (equal to the height of
the bigger circle). Double-click the Rotate
Tool (R) and set the Angle value
to 36 degrees. Click Copy and press Control-D several times, adding more spokes.
Now that we have enough spokes, place the cabins at the tips of each spoke.
Step 5
Recolor some of the cabins, making the
wheel look more colorful and festive. And, finally, add the base to the
wheel by making a 175 x 230 px
triangle with 6 pt Stroke and no Fill. Send it to Back (Shift-Control-[), beneath the wheel.

4. Create Additional Elements
Step 1
Funfairs are known for having a lot of
exciting attractions and entertainment, such as shooting galleries,
competitions, bumper car rides and so on.
Let’s create one of them, and later you can
actually make more of those, using the created base. We’ll be making a shooting
gallery shack.
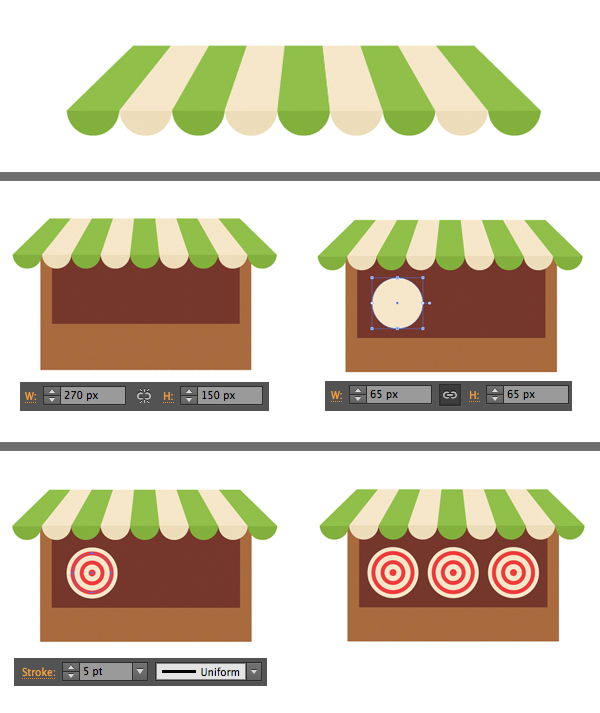
Start by making a striped green-white roof. You can check Part 2 (Step 3 and onwards) of Create a Colorful Cartoon Hot-Dog Van in Adobe Illustrator tutorial to see how to make
exactly the same shape of the canopy.
Make a 270 x 150
px brown rectangle and Send it to Back (Shift-Control-[), beneath the canopy. Make a smaller and darker
rectangle for the inside of the shack.
And, finally, create the targets of the
shooting gallery. Make a 65 x 65 px
circle of light-yellow color and add smaller circles inside with 5 px red Stroke and no Fill.
Step 2
And now let’s make some plants and trees
that will help us to create a nice green scene.
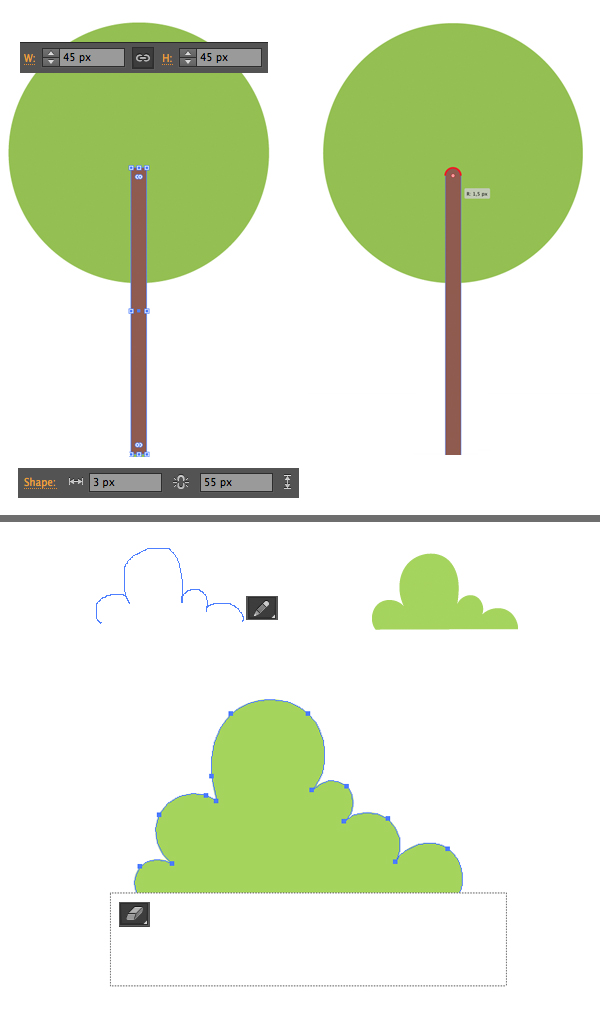
Start with the crown of the tree by making
a 45 x 45 px circle. Use the Rectangle Tool (M) to make a narrow 3 x 55 px stripe for the tree trunk. Make
the top of the trunk slightly rounded, using the Live Corners feature.
Now take the Pencil Tool (N) and draw a rounded bubbled shape for the
cartoon bush. Use the Eraser Tool
(Shift-E) and hold Alt to erase
the bottom part of the bush to make it a straight horizontal edge.
5. Create a Retro Funfair Composition
Step 1
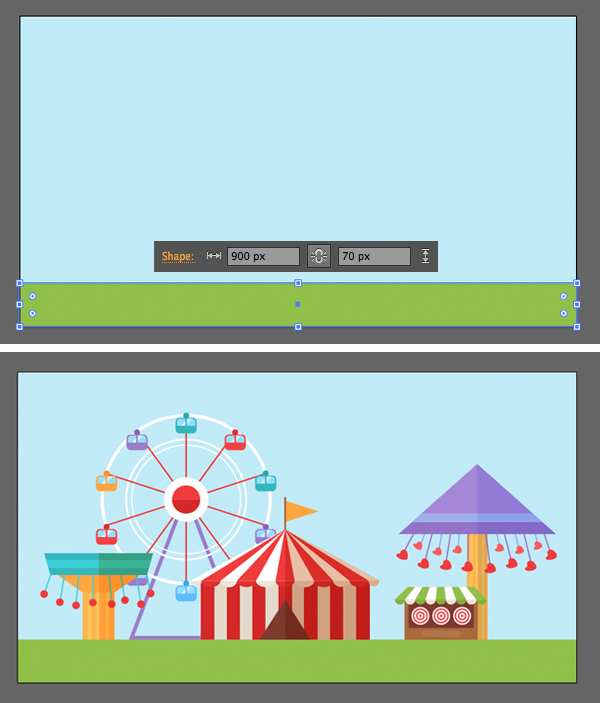
Now let’s combine all the elements into a
scene, making a balanced composition. Set the size of your Artboard to 900 x 500 px with the help of the Artboard Tool (Shift-O). Make a
light-blue rectangle of the same size for the sky and a smaller 900 x 70 px green rectangle for
the ground.
Use the Align panel to place the shapes properly, using the Align to Artboard and Align to Key Object features.
Place the created elements of the funfair
next to each other, making some of them overlap. You may need to scale the
objects, making some of them larger and others smaller.
Step 2
Fill up the spaces between the objects with
the trees and bushes that we made earlier. Make some of them smaller and others larger. Vary the colors of the tree crowns and bushes from
light green to dark green to separate them from each other, adding depth to the
image.
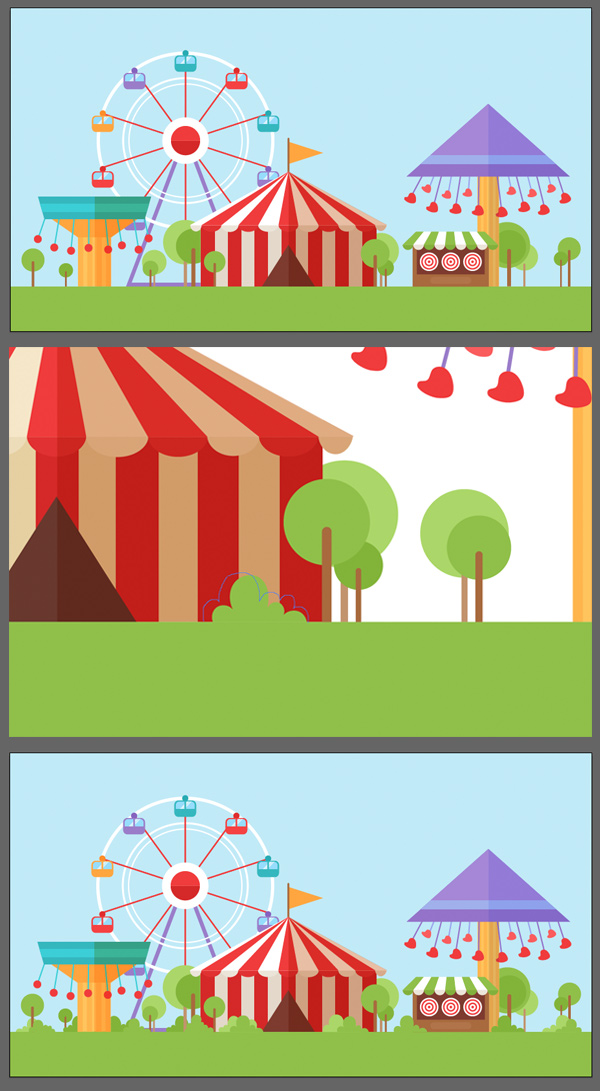
Step 3
Use the elements that we’ve made for the bushes
to add the fluffy clouds. Speckle the clouds over the sky and recolor them
into white and light-blue colors, varying the sizes.
Our composition already looks finished, and
you can actually stop at this step if you want to end up with clean and simple
flat design.
However, if you want to add more of a retro touch to our image, go on to the next part and learn how to add texture to the objects.

6. Add a Grungy Texture Using Brushes
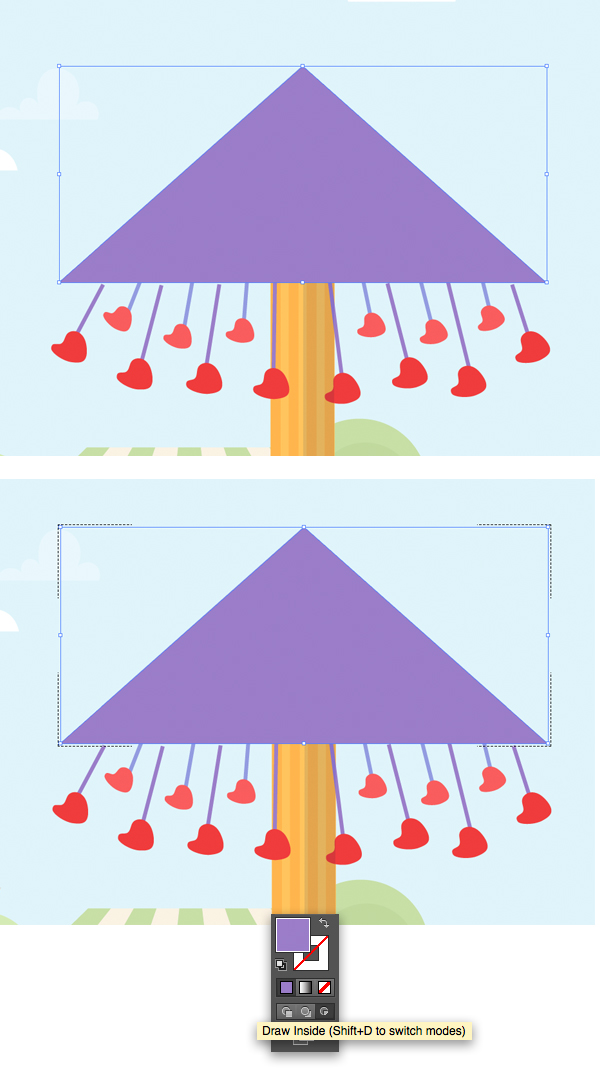
Step 1
Let’s use our purple carousel as an example.
Duplicate its triangle roof and drag it to the very top of the carousel group
in the Layers panel.
Head to the Tools panel and find the Draw Inside button beneath the Fill and Stroke colors. You will see dotted corners around the selected
object, indicating that you will draw inside this shape as you would inside a Clipping Mask.
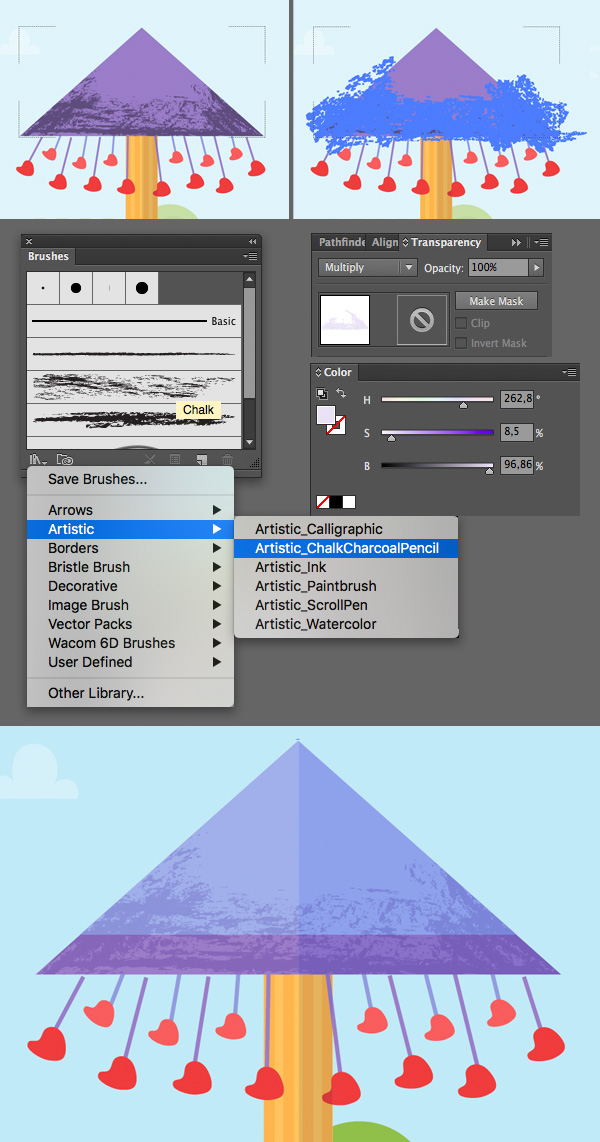
Step 2
Now let’s select a nice grungy brush
from the Adobe Illustrator library. Open the Brushes panel (Window >
Brushes) and go to Brush Libraries
Menu > Artistic > Artistic_ChalkCharcoalPencil. Select the Chalk brush on top of the list, take the
Paintbrush Tool (B) and make a few
strokes at the bottom of the triangle roof.
Now let’s turn our brushstrokes into shapes
so that we can adjust them. Select the created strokes and go to Object > Expand Appearance. Fill the
shapes with a very light-purple color and switch to Multiply Blending Mode, creating a gentle grungy effect and adding
a shabby touch to the carousel.
Step 3
Use the same Chalk brush or any other
grungy brushes to your liking to add a gentle shabby effect to the other
objects as well.

You’re All Done! Our Retro Funfair Is
Finished!
Great job! We’ve created a nice
flat-style funfair composition, inspired by the Grease movie! We were using the basic shapes and simple
Pathfinder operations and even added a grungy retro touch using the built-in Adobe Illustrator brushes.
I hope you’ve enjoyed following this
tutorial and discovered some new tips and tricks, which will help you to create
more retro-style flat images, such as a carnival scenery or vintage circus and
so on.
If you want to take a closer look at the
illustration that we were making in this tutorial and you want to have the night version of it, feel free to get a Retro Funfair Flat Style Illustration at GraphicRiver.
Have fun and don’t forget to share your
result! Good luck!