The first thing I do on any new device is customize the home screen. This has been a tradition of mine since my first non-DOS computer, when I used my Mario Paint manual to help me make some Legend of Zelda pixel art in MS Paint, and set it as the Desktop wallpaper.
Now that I’m a husband and a father, I prefer to put pictures of my family on my Desktop, and for years I’ve been doing so manually with the help of GeekTool, but I waste a lot of time on that manual process: Choosing the newest images, exporting them, resizing them, moving them around in GeekTool, and repeating the whole process every time I import a new batch.
I use Adobe Lightroom to manage my photos, and one day it occurred to me that the Catalogue itself must be searchable outside of the application. Looking further into it, I learned that it is merely an SQLite Database. With that knowledge, I began sketching a plan to ease my desktop woes. My goals were:
- Use a keyword to find the latest flagged/picked image from a Lightroom Catalog.
- Take that image and make a smaller copy.
- Do this for a number of keywords.
- Show those images dynamically on the Desktop.
In this article, we’ll learn how to do all of the above using our own Node module. So let’s dig in!
Overview
Its important to start with a plan, so here are the tasks we’ll need to accomplish in order to reach our goal.
- Setup our Node module and add dependencies
- Write our SQLite queries to find the image file we want.
- Copy file locally.
- Allow for multiple keywords.
- Shrink the image to a reasonable size.
- Setup the Desktop to use our generated images.
Prerequisites
There are a number of required apps and scripts you’ll need to follow along. Not everyone will have them, and I am coming from a decidedly Mac point of view, but my hope is that you’ll learn something of what Node can accomplish “server-side”, even when that server is your laptop. Windows users will have to chime in with workarounds if something doesn’t make sense, as the scripts we’re using are meant for Unix systems.
You’ll certainly have to have a copy of Adobe Lightroom installed. You’ll also need an Sqlite browser, Homebrew, Node & npm, some image manipulation libraries, and a tool like GeekTool or Übersicht. But we’ll go through all those as we come to them in the session.
Setup our Node module and add dependencies
To begin, we’ll need to scaffold out a Node module. This is quite easy, so long as you already have Node and npm installed. Use the official installer from Nodejs.org, or install via Homebrew. (If you don’t have Homebrew installed, you’ll need it later on. Get things started here: Homebrew Setup)
Once you’re ready, we’ll create our project. Open up your Terminal app, and mkdir a folder wherever you like (I prefer to place mine in ~/Code/). We’ll call it lr-latest, then cd into it.
$ mkdir lr-latest && cd lr-latest
Now we’ll create the Node module. Step one is to run the init command by npm:
$ npm init
By default it uses the name of the folder you’re in for the module name. That sounds good to me. In fact, just hit Enter/Return at all of the prompts. When its done, you’ll have a new file in your directory named package.json, that looks like this:
{
  "name": "lr-latest",
  "version": "1.0.0",
  "description": "",
  "main": "index.js",
  "scripts": {
    "test": "echo "Error: no test specified" && exit 1"
  },
  "author": "",
  "license": "ISC"
}
Lets start there and get things cleaned up. The most important field is "main", as it tells Node what file to run when you use the module. Let’s change that to a more specific filename:
"main": "lr-latest.js",
Also, we’re going to add two more lines manually to make things run how we want. Above "author" add these lines:
"preferGlobal": true,
"bin": {
  "lr-latest": "lr-latest.js"
},
Don’t forget the commas! Only the last line can be left without a comma. What the above is doing is first telling Node that we prefer our command to be installed via the npm install -g tag, as this is a system-wide function we’re building.
More importantly is the bin line, which tells Node that typing lr-latest on the command line should run node lr-latest.js within this module. Much easier to remember and use.
So, before we move on, we’ll need to create lr-latest.js!
$ touch lr-latest.js
For now, let’s put something simple in here to test it out:
#!/usr/bin/env Node
console.log('Well hi there!');
We begin with a hash-bang (is that what its called?) to tell the system we’re using Node, and then we’ll spit out a bit of friendly text.
To finish, we’ll run a command in the Terminal to make Node think that we’ve installed our module globally, but actually leave it where it is so we can keep editing it.
$ npm link
You may see a few errors here, npm WARN EPACKAGEJSON [email protected] No description and npm WARN EPACKAGEJSON [email protected] No repository field. That’s totally ok, and only a warning. If you were to publish on NPMjs.org, you’d want to have those fields filled out. But for now, let’s see if it worked!
$ lr-latest
If you saw “Well hi there!”, we’re good to go, you can now run your command anywhere on your system.
Add Dependencies
One of my favorite things about npm is how easy it is to piggyback off the amazing work of others. For this project we’re going to need some functions that we really shouldn’t have to write out by hand ourselves. Doing a search on Github or npmjs.com will point you in the right direction to find well-maintained modules whenever you need additional functionality.
For us, we will want to grab information from the Lightroom Catalog, which is an sqlite database. So I’ve found a nice module called sqlite3 that we simply cannot do without.
To install it and use it, we first have to include it in our package.json, which we can add manually, but which npm will do for us if we type the following:
$ npm install sqlite3 --save
The –save part will automatically add the module as a dependency inside our package.json file. Open it up, and you should see this new section:
"dependencies": {
  "sqlite3": "^3.1.1"
}
So, all that’s left is to actually use it.
Write our SQLite queries to find the image file we want.
Prepare Lightroom
First, you’ll need to have some photos in your Lightroom Catalog. What we said earlier is that we want to show the “latest” photo that’s been “picked” for a given “keyword”. So, for now, choose a few photos you think are good and give them a Keyword of ‘Fantastic’.
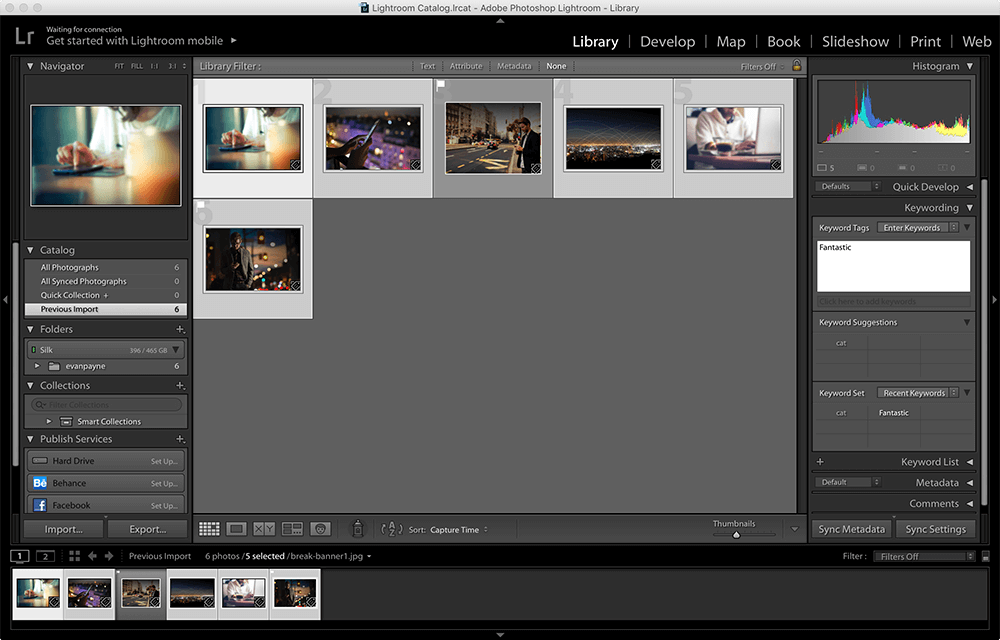
Also, choose two and add a picked Flag. Leave Lightroom open for reference as we proceed.
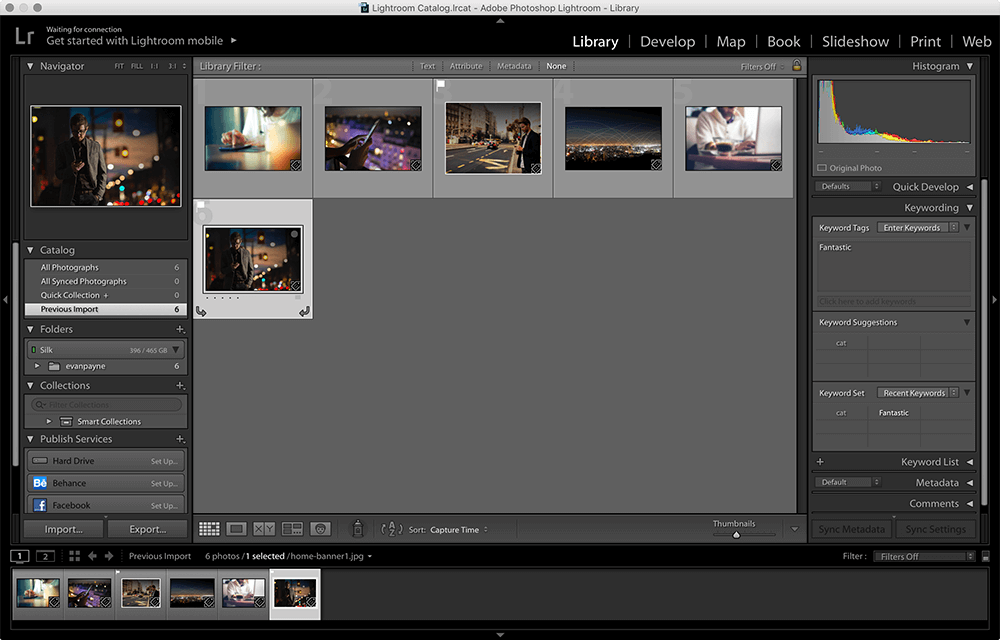
What we want to find with our Node command is the Absolute location of the most recently captured photo in our catalog with the keyword “Fantastic” and its flag set to “Picked”.
Exploring the Database
We can’t really write much until we understand what we’re trying to do. For this next part, you’ll probably prefer to use a GUI, and I like sqlitebrowser. Install through their website if you wish, but bonus points if you use the Homebrew extension Cask, and install with brew cask install sqlitebrowser.
In the app, click on Open database, and browse to your Lightroom Catalog.
In the current version, I get the error message invalid file format. That’s ok, we’ll just make a copy of the catalog and change its extension to .db instead of .lrcat (Keep in mind, this is only for exploration-mode, in our module, we’ll use the actual database in read-only mode).
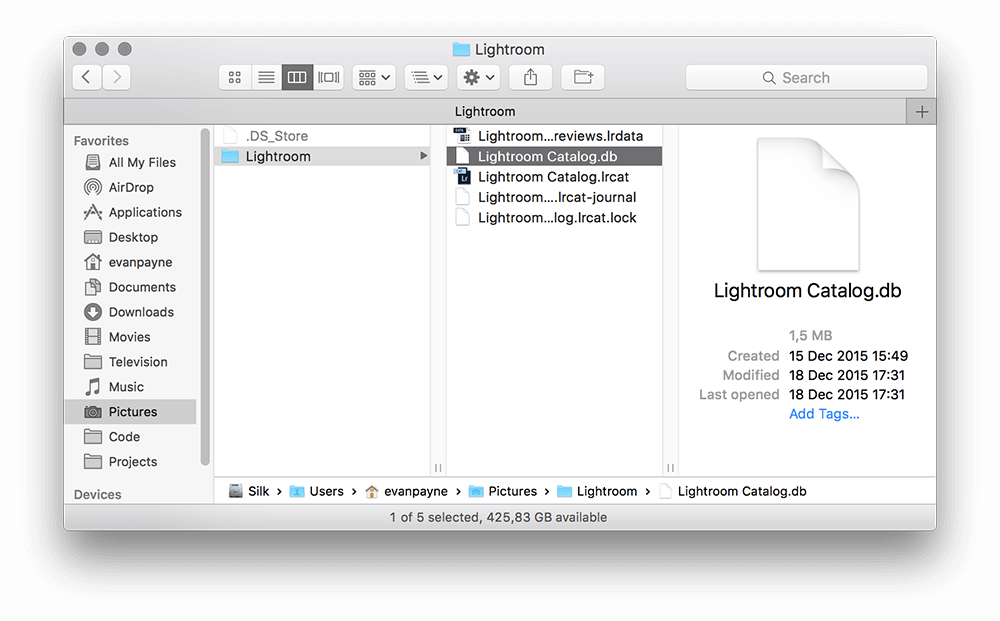
You should now be able to see the structure of the database.
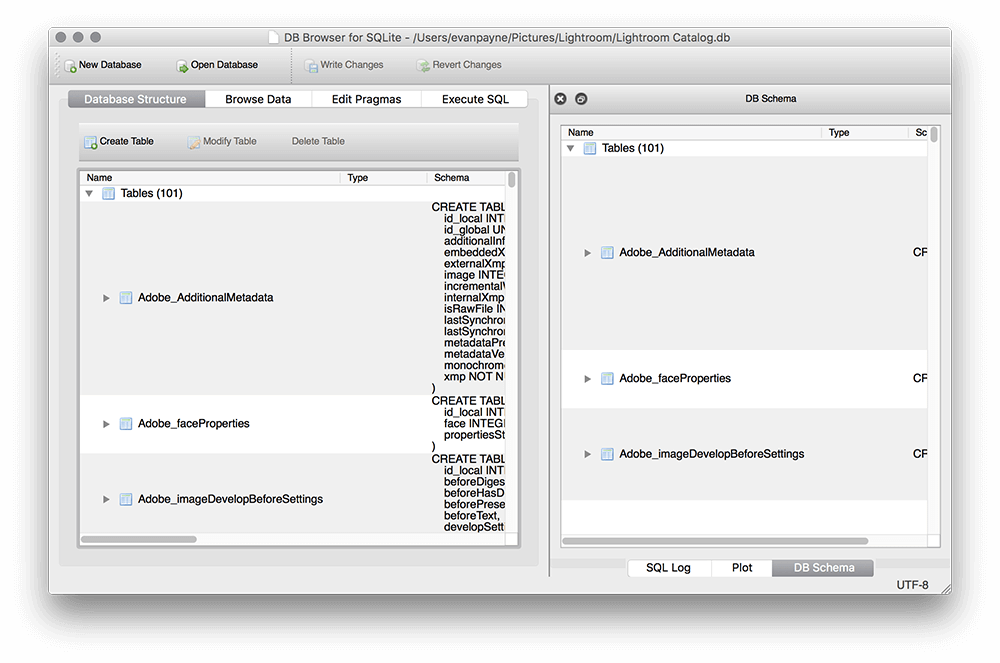
Test a query
Before digging into this project, I’d never had the “pleasure” of writing an sqlite query. It gets very complex, very fast, and this one was a doozy.
Lets start with finding the photo we want. It took quite a bit of guess work, and just sticking with it, to find the tables I needed. What you need to understand is that there is no full path in the database, so we’ll need to build several queries to get the parts we need, and put them together later.
I’ll save you some time, and just tell you what we need:
- fileAbsolutePath
- filePathFromRoot
- fileBaseName
- fileExtension
Lets start with the BaseName.
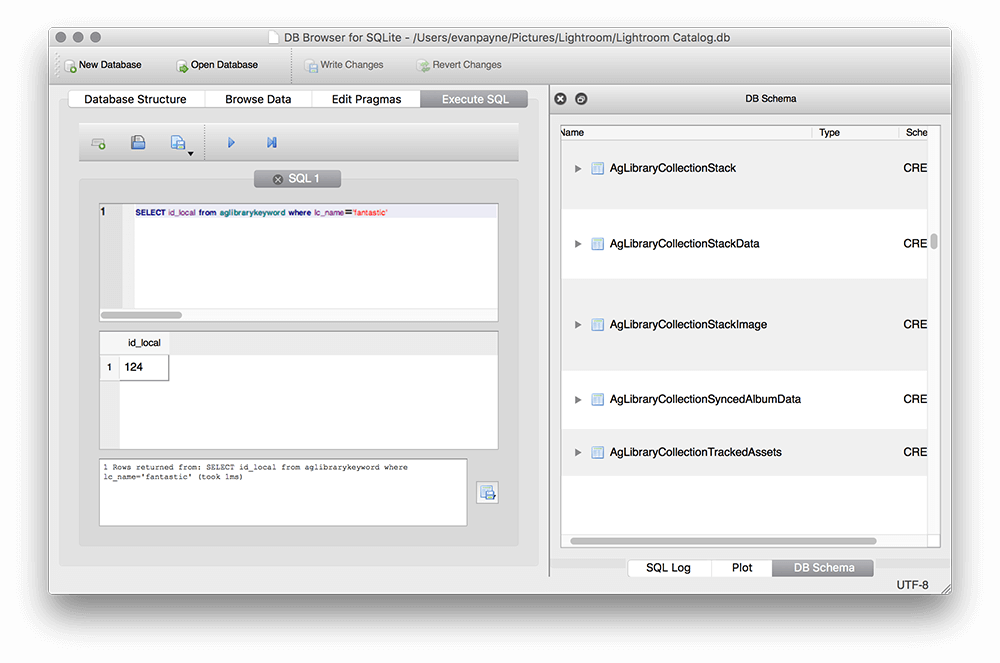
First, we need to know the id_loca of our tag/keyword. I found this in the agLibrarykeywordimage table. To get the id, we’ll use this:
SELECT id_local from aglibrarykeyword where lc_name='fantastic'
If you run that in the Execute SQL section of the app, you should see a number, in my case 124.
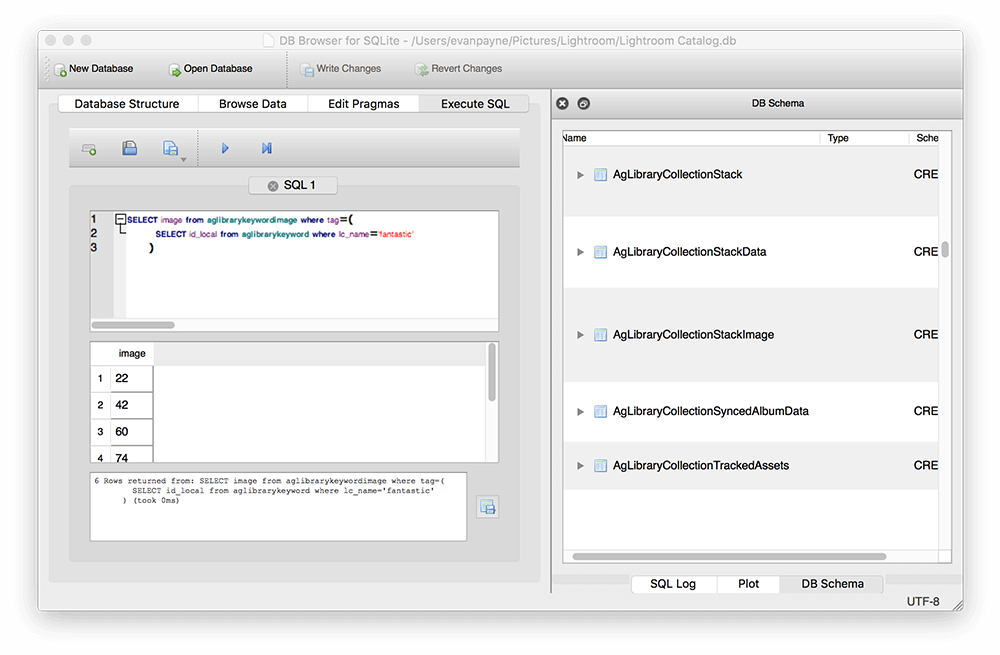
Next, we want to use that number to find any rows in the table aglibrarkeywordimage that have that number in the ‘tag’ column. Specifically, we want a list of the values of the image column. Like so:
SELECT image from aglibrarykeywordimage where tag=(124)
The best part, though its complex, is that we can nest our queries, so 124 can be replaced with the previous query:
SELECT image from aglibrarykeywordimage where tag=(
  SELECT id_local from aglibrarykeyword where lc_name='fantastic'
)
That should return a handful of numbers.
Next, we want to find all of those images that are picked, and only keep the one with the most recent capture time. the adobe_images column has a most of the information we want about the actual image. You’ll see there’s a captureTime column, as well as a pick column. Here’s the query that will get what we want:
SELECT max(captureTime) FROM adobe_images AS A JOIN (
  SELECT image from aglibrarykeywordimage where tag=(
    SELECT id_local from aglibrarykeyword where lc_name='fantastic'
  )
) AS B ON A.id_local=B.image where pick=1.0
Yeesh, that was beyond what I felt comfortable doing, but logically it makes sense. We’re joining results from the adobe_images table, and our previous image results, and only keeping the ones where the pick column from adobe_images has a value of 1.0. This works because the id_local column in adobe_images contains the same values as the image column in id_local.
Then, we’re taking those results and only keeping the one with the highest value of in its captureTime column. If you run that, you should see a single result, the latest captureTime value.
Ok, so what we actually want is the rootFile value from that row, so we add another wrapper around our query, like so:
SELECT rootFile from adobe_images where captureTime=(
  SELECT max(captureTime) FROM adobe_images AS A JOIN (
    SELECT image from aglibrarykeywordimage where tag=(
      SELECT id_local from aglibrarykeyword where lc_name='fantastic'
    )
  ) AS B ON A.id_local=B.image where pick=1.0
)
That gets us the rootFile number, which is the same as the id_local column in the AgLibraryFile table. That table also has a column called baseName, which finally (finally!) has the actual file name we’re looking for. So our final query is:
SELECT baseName from AgLibraryFile where id_local=(
  SELECT rootFile from adobe_images where captureTime=(
    SELECT max(captureTime) FROM adobe_images AS A JOIN (
      SELECT image from aglibrarykeywordimage where tag=(
        SELECT id_local from aglibrarykeyword where lc_name='fantastic'
      )
    ) AS B ON A.id_local=B.image where pick=1.0
  )
)
That should return a filename, like IMG_2012 or such. If you get an error, be careful that your test photos don’t all have the same capture time, as that confuses matters and we have no error protection built in here.
Ok, so we can move forward now, right? Wrong! That’s only one part of what we need. We’re looking for the absolute path, after all. But rather than walk you through them all, you can find them in the sections below as we build our actual Node module.
On a side note, if you were finding this all yourself, you’d have to start with the filename, then dig through the tables until you traced back to the tag. It takes a while, but the relationships are all in there! Now, on to the module.
Building the queries in Node
Lets change our lr-latest.js file so it looks like this:
#!/usr/bin/env Node
var tag = "fantastic";
getFile(tag);

function getFile(tag) {
  console.log(tag);
}
This creates a function that takes a tag we give it and lets us do things with it. We’ll want it wrapped up in a function so we can make it take multiple tags later on. The tag variable is, for now, being set manually to the keyword we want to retrieve from the catalog.
Next, we’ll take the tag and try and get the filename from our database. We’ll be using the sqlite3 module, so lets add in the includes just below the hash-bang (really though, is that what its called?) the following:
var catpath = '/Users/evanpayne/Pictures/Lightroom/Lightroom Catalog.lrcat';
var sqlite3 = require('sqlite3');
var db = new sqlite3.Database(catpath, 'OPEN_READONLY');
You’ll need to change catpath to the absolute location of your own Lightroom catalog. The easiest way to do this is to browse to the catalog in the Finder, drag-and-drop the catalog onto your Terminal window, then copy and paste the line that appears.
What db is doing is creating a new sqlite3 Database object, using our catalog as the database. We’re also specifying that we want it to be readonly, so we don’t have to worry about accidentally deleting anything.
Next, we’ll replace what we had in our getFile function as follows:
function getFile(tag) {
  db.parallelize(function(){
    db.get("SELECT baseName from AgLibraryFile where id_local=(SELECT rootFile from adobe_images where captureTime=(SELECT max(captureTime) FROM adobe_images AS A JOIN (SELECT image from aglibrarykeywordimage where tag=(SELECT id_local from aglibrarykeyword where lc_name='"+tag+"')) AS B ON A.id_local=B.image where pick=1.0))"
    , function(err, row) {
      if (err){
        console.log(err);
        process.exit(2);
      }
      else{
        console.log(row.baseName);
      }
    });
  });
}
In this function, we’re using sqlite3’s parallelize function to perform actions on the db. This is because trying to do it other ways caused a lot of trouble, mostly because we’ll be doing a number of such calls, and Node will try and run them all at the same time.
So, we’ve seen how our tag variable gets passed into the function, and now we’ll use it with db.get() within the sqlite query we built before, all on one line. Please note the distinction between single and double quotes here. Single is used to surround the tag, and would still be there if we hand-coded it, double quotes allow us to use a variable, much like in php, only joining with plus signs instead of dots.
We could skip logging the error, but its nice to know what’s happening in case it breaks. If all goes well, we’ll echo the baseName property of the returned object we called row. If you save the file and run lr-latest now, you should see the filename we want.
Our module will just stop when its finished, but it would be best practise to make sure the database we opened is closed as well, so we’ll add this at the end of the file:
db.close();
Adding more queries
Ok, before we go further, we have to understand something about Node. It tries to do everything as fast as it can, so you can’t specify order. Point in case, try adding this after the db.parallelize() function:
console.log('Hi.');
If you run you’re code, you’ll probably see Hi. before the filename. That’s normal with Node, because it takes longer to get a result from the db query.
A lot of the time, that’s great, but for our particular use case, we’ll want a little more control over the order of things. So we’ll use the easy-to-grasp async module. On the command line, run:
$ npm install async --save
Then, under the hash-bang in the lr-latest.js file, add this line:
var async = require('async');
Now we’re cooking. We’re going to use the series method, so we can control the order.
Change the beginning of our getFile function so it looks like this:
function getFile(tag) {
  var absolutePath, pathFromRoot, baseName, extension, filename;
  var tasks = [
    fileAbsolutePath, filePathFromRoot, fileBaseName, fileExtension, buildFilename
  ];

  async.series(tasks, finish);

  // this is where the db.paralellize() function is.
  // you can remove the console.log('Hi.'); line now.
}
What we’re doing here is setting up the variables we’ll need, then telling async that we want to run a series of functions in order (the names are in the tasks variable), as well as one to finish.
This will require us to change how we build things though. In this case, the query we already wrote should look a little different:
function fileBaseName(cb) {
  db.parallelize(function(){
    db.get("SELECT baseName from AgLibraryFile where id_local=(SELECT rootFile from adobe_images where captureTime=(SELECT max(captureTime) FROM adobe_images AS A JOIN (SELECT image from aglibrarykeywordimage where tag=(SELECT id_local from aglibrarykeyword where lc_name='"+tag+"')) AS B ON A.id_local=B.image where pick=1.0))"
    , function(err, row) {
      if (err){
        console.log(err);
        process.exit(2);
      }
      else{
        baseName = row.baseName;
        cb();
      }
    });
  });
}
The most important change to notice is that we’ve wrapped our call in a function with a callback. Async functions need to return a callback, in this case we name it cb. If we were really clever, we could use promises here (with a library like bluebird or q), but for now, this works and will pass the baseName variable along the series, and let us use it in our buildFilename function.
Lets add in the other calls now, since we’ve covered most of it. The complete getFile() function should look like this:
function getFile(tag) {
  var absolutePath, pathFromRoot, baseName, extension, filename;
  var tasks = [
    fileAbsolutePath, filePathFromRoot, fileBaseName, fileExtension, buildFilename
  ];

  // Each function below is executed in order
  async.series(tasks, finish);

  function fileAbsolutePath(cb) {
    db.parallelize(function(){
      db.get("SELECT absolutePath from AgLibraryRootFolder where id_local=(SELECT rootFolder from AgLibraryFolder where id_local=(SELECT folder from AgLibraryFile where id_local=(SELECT rootFile from adobe_images where captureTime=(SELECT max(captureTime) FROM adobe_images AS A JOIN (SELECT image from aglibrarykeywordimage where tag=(SELECT id_local from aglibrarykeyword where lc_name='"+tag+"')) AS B ON A.id_local=B.image where pick=1.0))))"
      , function(err, row) {
        if (err){
          console.log(err);
          process.exit(2);
        }
        else{
          absolutePath = row.absolutePath;
          cb();
        }
      });
    });
  }

  function filePathFromRoot(cb) {
    db.parallelize(function(){
      db.get("SELECT pathFromRoot from AgLibraryFolder where id_local=(SELECT folder from AgLibraryFile where id_local=(SELECT rootFile from adobe_images where captureTime=(SELECT max(captureTime) FROM adobe_images AS A JOIN (SELECT image from aglibrarykeywordimage where tag=(SELECT id_local from aglibrarykeyword where lc_name='"+tag+"')) AS B ON A.id_local=B.image where pick=1.0)))"
      , function(err, row) {
        if (err){
          console.log(err);
          process.exit(2);
        }
        else{
          pathFromRoot = row.pathFromRoot;
          cb();
        }
      });
    });
  }

  function fileBaseName(cb) {
    db.parallelize(function(){
      db.get("SELECT baseName from AgLibraryFile where id_local=(SELECT rootFile from adobe_images where captureTime=(SELECT max(captureTime) FROM adobe_images AS A JOIN (SELECT image from aglibrarykeywordimage where tag=(SELECT id_local from aglibrarykeyword where lc_name='"+tag+"')) AS B ON A.id_local=B.image where pick=1.0))"
      , function(err, row) {
        if (err){
          console.log(err);
          process.exit(2);
        }
        else{
          baseName = row.baseName;
          cb();
        }
      });
    });
  }

  function fileExtension(cb) {
    db.parallelize(function(){
      db.get("SELECT lc_idx_filenameExtension from AgLibraryFile where id_local=(SELECT rootFile from adobe_images where captureTime=(SELECT max(captureTime) FROM adobe_images AS A JOIN (SELECT image from aglibrarykeywordimage where tag=(SELECT id_local from aglibrarykeyword where lc_name='"+tag+"')) AS B ON A.id_local=B.image where pick=1.0))"
      , function(err, row) {
        if (err){
          console.log(err);
          process.exit(2);
        }
        else{
          extension = row.lc_idx_filenameExtension;
          cb();
        }
      });
    });
  }

  function buildFilename(cb) {
    filename = absolutePath+pathFromRoot+baseName+'.'+extension;
    cb();
  }

  function finish(err, results){
    console.log(filename);
  }

};
If you follow along (and trust that the db queries actually work), what should happen is that we find the values of the absolutePath, the pathFromRoot, the baseName, and the file extension, then combine them all into single string and log that string to the console. If you save and run our command, you should see the absolute path of the file we’re looking for!
Copy File Locally
Our final step will be to copy the file we found to the directory we’re in. To do this we need the exec/child_process function, which is pre-built into Node, so all we have to do is call it.
First, at the top of the file, make sure to include child_process so we can use it further on:
var child_process = require('child_process');
Then, change our finish function so it looks like this:
function finish(err, results){
  console.log(filename);
  child_process.exec(['cp '+ filename + ' ' + process.cwd()+'/'+tag+'-latest.jpg'], function(err) {
    if (err instanceof Error) {
      console.log(err);
      process.exit(1);
    }
  });
}
exec is Node’s way of running simple command-line commands. In our case, that’s cp /Absolute/Path/to/Original.jpg /Absolute/Path/to/Current/Directory/tag_name-latest.jpg So, we’ll use variables we already have. Make sure you add your own spacing in, such as +' '+. The exec function used to take an array, but it seems like that method is being deprecated, and it prefers to use child_process.exec now.
A quick note: Since we’re dealing with the async module, we’re just going to use exec, but if we were using a promise-based method, we would look into something like spawn.
Allow for Multiple Keywords
Just knowing where the file lives gives us the ability to do a lot of other things. But before we go too much further, we should rework things to satisfy some of our earlier requirements. Namely, we want to find multiple tags, and also, we should be able to specify those tags with our command, not hard-code them into the module.
Adding command line arguments
Thankfully, pulling arguments from the command line is something built into Node, and its quite simple. Replace the var tag = "fantastic"; line with this:
var userArgs = process.argv.slice(2);
The process object is the command that was executed, and it contains the argv object, which is an array of the single words that were typed. If we had typed lr-latest big awesome cool, the process.argv object would return:
['/path/to/Node',
'path/to/lr-latest',
'big',
'awesome',
'cool']
So, we’re using slice to pull out everything from the array, starting with the number 2 element (counting from 0).
So, just like that, we can have user input tags in our module. We’ll integrate them below as we also allow for multiple tags.
Adding Multiple tags
Just below setting the userArgs variable, replace the getFile(tag) line with this:
async.each(userArgs, function(tag){
  getFile(tag);
}, function(err){
  if( err ) {
      console.log(err);
    }
});
This will break down whatever tags were available and run our getFile function with them all. We’ll also throw in an error message, just in case.
So, if you type lr-latest fantastic into the command line, you should see the filename. If you tried adding another, you’ll probably see a gnarly error message. That’s because we just logged the error, and because the tag we asked for doesn’t exist. Ideally, we’d add a kinder message, but for now, lets fix the error by opening our Lightroom Catalog and adding a new keyword to any of the photos, and setting its flag to Picked.
I recommend the keyword ‘cat’.
Now, if you type lr-latest fantastic cat, you should get back two files (or perhaps the same file twice, in which case, just one).
One interesting thing you might notice is an error telling you the database is locked. This happens if Lightroom is open in the background, and it is an excellent idea to avoid messing with the database (even read only) while the app that owns it is running.
Ok! We’re amazing! We’ve got files! But what should we do with them? I suggest doing awesome things.
Shrink the image to a reasonable size
This next part isn’t actually using Node. In fact, in our script, we’ll just be changing our exec command to run another local command. For this, we’ll need to use ImageMagick, which will allow us to convert one image to another through the command line.
Let’s install our tools!
Earlier on I said we’d need Homebrew, and this is why. With a few commands, we’re going to make sure we have everything we need. Those commands are:
$    brew install libpng jpeg libtiff dcraw little-cms exiv2 freetype webp
--
$    brew install ufraw --with-exiv2
--
$    brew install imagemagick --with-webp
Those get you most of what you need to work with images on the command line. Before we add it to our script, we’ll check if it works by running a command directly via the command line:
convert cat-latest.jpg -resize 500x500 cat-latest-sm.jpg
Now, run the convert command from above once again, and you should end up with a resized image, 500 pixels on its longest side. Let’s add the command into our lr-latest.js script and break down what its doing. First, we have to add a new function into our async series called convertImage. Our tasks section should now read:
var tasks = [
  fileAbsolutePath, filePathFromRoot, fileBaseName, fileExtension, buildFilename, convertImage
];
We will place our new function between buildFilename and finish:
function convertImage(cb) {
  child_process.exec(['convert ' + filename + ' -units PixelsPerInch -colorspace sRGB -density 72 -format JPG -quality 80 -resize 500x500 -auto-orient ' + process.cwd()+'/'+tag+'-latest.jpg'], function(err) {
    if (err instanceof Error) {
      console.log(err);
      process.exit(1);
    }
    cb();
  });
}
We’ve added a few things here, firstly telling ImageMagick that we want to convert our file using Pixels per Inch, using the sRGB colorspace, set at 72dpi, as a jpeg, with 80% quality.
The -resize modifier will resize, not crop, so we’re telling it to make it 500 pixels wide, or tall, whichever is larger, and to resize the other dimension proportionally. (so, a 1500×500 image would be resized to 500×100, while a 1000×2000 image would be resized to 250×500).
We’re also tacking on the -auto-orient modifier, because I found that a lot of images taken in portrait (as opposed to landscape), come out sideways. This fixes that, and seems to have no effect on landscape images.
Take the time to look through ImageMagick’s website, there’s a lot of amazing things it can do.
Now that that’s all set we’ll just need to change our finish function so it simply tells us everything is ready:
function finish(err, results){
  console.log(filename + ' is ready!');
}
Keep in mind that running the command will overwrite without warning if the file is already in our working directory, but that should be alright, since we’re always looking for the latest image. Another benefit of using the convert command is that it will also convert Adobe DNG files (special preview images created for use in a Lightroom Catalog). To do this, we need just needed a few plugins, which we already installed above when we used Homebrew. Raw files like CR2s should be converted ok as well.
Setup the Desktop to use our generated images
So, the very last thing we wanted to do was set the images dynamically on our Desktop. I mentioned GeekTool previously, which works fine, but I recently found an equally brilliant tool called Übersicht, which does much the same as GeekTool, but with an easier way to build your own widgets.
In practise, every widget in Übersicht is a simple Coffeescript file with some html and css rules to place the output of the a shell command on the desktop. For our inital attempt, we won’t use much of the functionality available at all, just a few simple rules.
Begin by installing Übersicht, and once you do, click on the icon in your menu-bar and choose Open Widgets Folder. We’ll create our widget inside this folder, and it will be automatically loaded without our having to do anything else.
Create a folder called lr-latest.widget. Inside, we should have a single file called index.coffee. Inside that file, we’ll write our code in three sections:
# Execute the shell command.
command: ""

# Set the refresh frequency (milliseconds).
refreshFrequency: 86400000
Ideally, we would use this first section to run our lr-latest command with the keywords we want, but we’re just going to leave it blank for now, so we can see some results right away.
# Render the output.
render: (output) -> """
  <div><img src="http://scotch.io/./lr-latest.widget/fantastic-latest.jpg"><img src="./lr-latest.widget/cat-latest.jpg"></div>
"""
In the next section, we’re rendering the output. This is where we would make a fancy loop in coffescript to allow for any number of images.
# CSS Style
style: """
  margin:0
  padding:0px
  width: 100%
  text-align: center
  top: 60px;

  img
    width: 500px
    height: auto
    margin: 0 20px

  h1
    font-size: 24px
"""
Finally, we set up some simple styling with Compass, placing our two images next to each other near the top of the desktop. One of the things I love about Übersicht is how easy it is to move your widgets around with simple css rules.
The widget will refresh every 86400000 miliseconds, also known as 1 day, but you can just save the index.coffee file, and it wil reload right away. Finally, to test things, just run ‘lr-latest fantastic cat’ from inside the lr-latest.widget folder (remember, you can type cd [space] and drag-and-drop the folder into the terminal to quickly navigate to it).
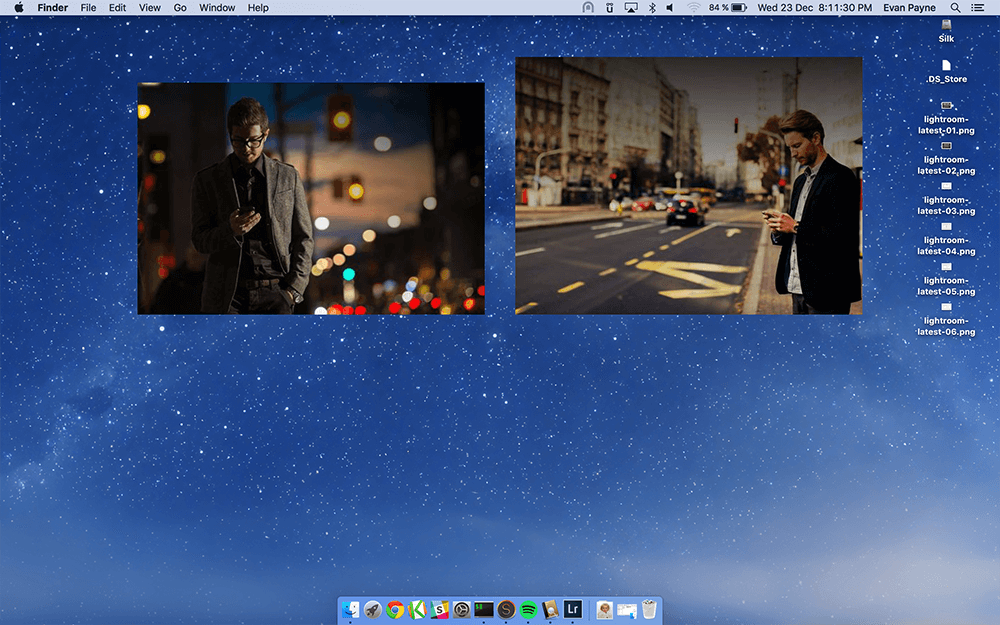
And there we have it, two nicely positioned images fixed to our desktop. Congratulations!
Bonus Round
Ok, I don’t feel right leaving it like that, so I took the time to learn a bit of Coffeescript and get things working correctly.
We’ll start by slightly changing things around with the assumption that our node module will be called via Übersicht. The only things we have to do is be sure we’re logging the filenames, and that the convert command is put in using its absolute path. This is how our final two functions inside getFile look now:
function convertImage(cb) {
  child_process.exec(['/usr/local/bin/convert ' + filename + ' -units PixelsPerInch -colorspace sRGB -density 72 -format JPG -quality 80 -resize 500x500 -auto-orient "' + process.cwd()+'/lr-latest.widget/'+tag+'-latest.jpg"'], function(err) {
    if (err instanceof Error) {
      console.log(err);
      process.exit(1);
    }
    cb();
  });
}

function finish(err){
  console.log('./lr-latest.widget/'+ tag +'-latest.jpg,');
}
First, we changed convert to /usr/local/bin/convert, and you can easily find the path for that using the command which convert. This is also how the absolute paths should be found for node and lr-latest command in the widget file below.
We changed the location of the output file slightly, since Übersicht runs its files from the base of its widget folder. We also added /lr-latest.widget to store our images inside our widget’s folder, for cleanliness sake.
Finally, we changed our finish function to simply log the relative path to the image from the Übersicht base widget folder. Notice that there is a trailing comma at the end of the filename: ...-latest.jpg,. This way, we can trick Übersicht into thinking our output is an array.
Lastly, here’s our new index.coffee file inside lr-latest.widget:
# Execute the shell command.
command: """/usr/local/bin/node /usr/local/bin/lr-latest fantastic cat"""

# Set the refresh frequency (milliseconds).
refreshFrequency: 86400000

# Render the output.
render: (output) -> """
  <div id='images'>
  <div>
"""
update: (output, domEl) ->
  container = $(domEl).find('#images')
  $(container).html("")
  images = output.toString().split(",")
  wrap = (image) -> $(container).append """<img src="http://scotch.io/#{image}" />"""
  wrap image for image in images

# CSS Style
style: """
  margin:0
  padding:0px
  width: 100%
  text-align: center
  top: 60px

  img
    width: 500px
    height: auto
    margin: 0 20px

  h1
    font-size: 24px
"""
With those simple changes, you shouldn’t have to manually type out the commands anymore, just keep Übersicht running, and it will refresh the photos every day, automatically. Success and Joy!
Thanks for following along, I hope this encourages you to explore the software you use, and to push the boundaries of what you think you’re comfortable doing with code!