As the number of images and videos on a website continue to grow, slower load times, which result in a negative user experience, are growing concerns for any company. An article in The Fiscal Times, citing Internet data measurement company HTTP Archive, noted that the average website is now 2.1 MB in size, compared to 1.5MB a couple of years ago. One of the main reasons for this growth is the addition of content, such as videos and engaging images, designed to drive more traffic to the site.
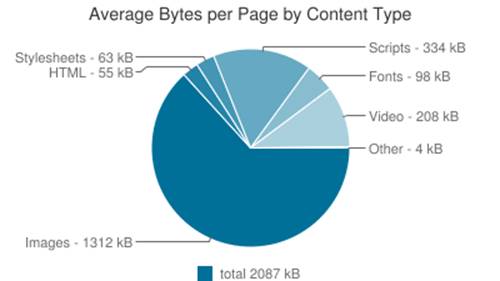
The Fiscal Times – Web Slowing Down – Chart
The article illustrated that images account for almost 63 percent of the bytes (1,312 KB of the total 2,087 KB) of the average page by content type. Video came in a distant second at 10 percent (208 KB).
The impact of images on a website can be dramatic, eating costly bandwidth and increasing the time website visitors spend waiting for pages to load. When every passing second reduces your website’s overall conversion rate and ultimately revenues, it makes perfect sense to want to optimize your images and their delivery as much as possible.
If you’re having website performance problems, it’s possible you’re making one – or more – key mistakes with images. In this two-part series, we’ll examine how to optimize both your images and your network to ensure the best user experience and minimize costs, as well as bandwidth and storage needs.
Here’s a look at most common mistakes you may be making when it comes to managing images, and how you can avoid them:
Not Using More Efficient, Modern Image Formats
Even though Google has added support for its WebP image format to Chrome browsers, and Microsoft has done the same for JPEG-XR in most of its Internet Explorer and Edge browsers, developers have still not embraced them. Perhaps you aren’t aware of these formats, or maybe it’s too difficult to deliver different image formats to various browsers and devices. As a result, you may be sticking with the same JPG and PNG formats, and not taking advantage of how the modern formats can optimize their sites.
How to fix: Convert images to the WebP and JPEG-XR modern formats, while also adjusting compression quality to balance between the formats. Also by detecting the specific browser that accesses each image and delivering a different version of the image to the respective browser, you can ensure users receive the best images possible, in terms of visual quality and file size optimization.
 |
 |
| 16.9KB JPG | 6.9KB WebP |
Embedding Short Video Clips Using the GIF Format
You may rely on the GIF image format to display short video clips on news sites, media sites and social sharing sites. While the GIF format is easy to use for embedding video clips using a simple HTML image tag, it is not efficient for captured movies because the files are huge and slow to load, especially on mobile devices, resulting in high bandwidth costs and high CPU utilization.
How to fix: There are several ways to deliver and embed the same clips and animations using modern file formats, such as Animated WebP for Chrome browser users. Another approach is to apply lossy compression of the GIF file, which results in a slight visual quality reduction but significantly decreases the file size.
GIF files also can be converted to MP4 or WebM video formats, embedding the clips and HTML5 video tags instead of the image tag. In most modern browsers, this works smoothly and the site looks exactly the same but loads much faster. By taking one of these steps, you will be able to reduce the file size dramatically, saving page load time, improving user experience and cutting bandwidth costs.
 |
 |
| 6.3MB GIF | 311KB MP4 |
Delivering 2X (Retina Display) Images to All Users
Modern mobile devices and laptops have high device pixel ratios (DPR). Because you want your sites to look great on these devices, you may be embedding double resolution images. While this is a good practice, many developers tend to deliver the same size images to all users. As a result, users with regular displays (e.g., non-Retina displays) must download the hi-res images while their displays only benefit from half the resolution. This results in wasted time waiting for pages to load and increases bandwidth costs unnecessarily.
How to fix: Create different resolutions for each DPR value (e.g., regular images and double resolution images) and automatically detect the DPR value of the web page in the current user’s browser. This will enable you to deliver regular images to users with regular displays and 2x resolution images to users with retina display devices.
 |
 |
| DPR 1.0 – 100×100 – 4.6KB | DPR 2.0 – 200×200 – 12.1KB |
Wasteful Browser-Side Resizing
One of the common shortcuts developers employ is using browser-side image resizing instead of resizing images on the server-side. On modern browsers, the end result looks exactly the same, but bandwidth-wise the story is quite different. Website visitors waste precious time downloading an unnecessarily large image and you waste bandwidth delivering it to them. For older browsers, the problem is even more pronounced as their resizing algorithms are usually sub-par.
How to fix: Make sure the images you deliver perfectly fit their required website dimensions. Even if the same image should be made into different sized thumbnails to fit different pages, it’s well worth creating different thumbnails rather than delivering a large image and relying on the browser to resize it.

Example of wasteful browser-side resizing
Unnecessarily High Quality JPEGs
JPEGs have truly revolutionized the web. For many years now, this lossy format has allowed web developers to depict high resolution images with great detail using a fraction of the bandwidth required by any rival image format. But many developers and graphic designers don’t experiment with JPEG compression, which could significantly reduce file size without a discernible loss in viewing quality.
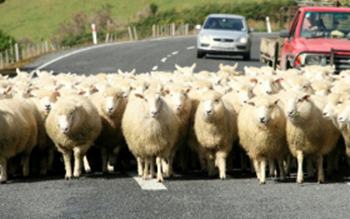
While 85 percent JPEG quality seems common, we’ve seen many websites in which 95 percent quality was common while a much lower quality would have significantly reduced file size without harming the overall experience. The end result is a higher bandwidth consumption and a dent in the visitors experience.
How to fix: Don’t be afraid to experiment with lower JPEG quality levels. For certain websites, using a 50 percent JPEG quality yielded a very reasonable result and the benefits far outweighed the costs. While higher quality JPEGs will always look better, the improvement in quality will not always be worth the extra bandwidth and waiting times.
 |
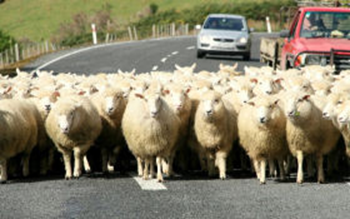 |
| 95% JPEG – 34KB | 80% JPEG – 17KB |
Incorrect Image File Types
JPEG, PNG and GIF are the most common file formats used on websites today, but each one has very different roles, so if you use the wrong format you’re wasting your visitors’ time and your own money.
A frequent mistake is using PNGs to deliver photographs. There is a common misconception that PNGs, as lossless formats, will yield the highest possible reproduction for the photos. While this is generally true, this is also quite an unnecessary optimization. A JPEG with relatively high quality will return a photo of a comparable quality at a fraction of the PNG’s file size.
How to fix: Always keep in mind what image format should be used for the content shown. PNG should be used for computer generated images (charts, logos, etc.) or when you need transparency in your image (image overlays). JPEG should be used when you are showing a captured photograph. GIF should be use when animation is needed (Ajax loading animation, etc.).
 |
 |
| PNG – 110KB | JPEG – 15KB |
Delivering Non-Optimized Images
Even though PNG is a lossless format, it can be compressed with freely available compression tools that reduce it by up to 50 percent yet still deliver the exact same image. Unfortunately, many developers and web designers skip this step and deliver non-optimized images.
How to fix: PNGCrush and OptiPNG are two open-source image optimization libraries, and if you’re not using these already, you should definitely check them out. If you don’t need to automate the optimization process, you can head to Yahoo’s online smush.it service to manually compress your PNGs even further.
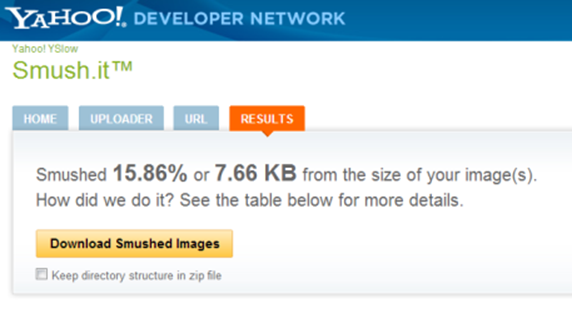
An example of Yahoo smush.it in action
Forgetting to Strip Image Metadata
Many modern websites allow visitors to upload photographs. Whether it’s the user’s profile picture or a shared photo from a recent trip, these were originally taken using a modern camera, which most likely introduced a lot of meta-data into the photo. In the majority of the cases, it would be an excellent idea to strip this meta-data off, but developers rarely take the time to do so, which results in the images requiring more bandwidth to deliver and a slower browsing experience for users.
How to fix: Make sure to strip the meta-data off your images and user uploaded photos. If this information is necessary, you can keep it available somewhere, just not as part of your images. Even if the image metadata is not necessary for your website, there’s one snippet of information, the image’s original shooting orientation, that’s actually critical for correctly displaying the photo on your website. When stripping the Exif info, make sure you rotate the image to its correct orientation based on its Exif data before losing this information.
Finished!
This article, while no means comprehensive, outlines the most common image-related issues that can be easily and cost-effectively fixed, eliminating excessive bandwidth usage and providing a better experience for your website visitors. In the final part of this series, we’ll talk about tips for ensuring network optimization when delivering images.