
In this tutorial, you’ll learn how to make a business brochure with a clean, corporate style in Adobe InDesign. Business brochure templates are quick and simple to put together in InDesign, and can be easily adapted with your own text and images.
This eight-page brochure design has a clean and modern style which can be adapted for corporate businesses or startups, and the InDesign template is also easy to put together for beginners.
Ready to create your business brochure design? Awesome, let’s dive in.
Looking for more business brochure templates? These InDesign brochure templates on GraphicRiver and Envato Elements come in a huge range of customizable styles.
What You’ll Need to Create Your Business Brochure
As well as access to Adobe InDesign, you’ll also need to download and install the following font families from Envato Elements to use in your brochure:
You can choose to use the photos used in the business brochure template as pictured or replace these with your own choice of images. The photos used in the template, as pictured here, are:
Once you’ve installed the font files on your computer and have your images to hand, you’re ready to start creating your business brochure template.
1. How to Set Up the Brochure Template in InDesign
Step 1
Open InDesign and go to File > New > Document.
Select Print from the Intent options at the top of the window, and choose Letter for the page size.
Increase the number of Pages to 8 (you can always add more pages later from the Pages panel) and make sure Facing Pages is checked.
Set the Top and Outside Margins to 0.75 in, the Inside to 0.875 in, and the Bottom to 1 in.
Add a Bleed of 0.25 in to all edges except the Inside edge, which you can keep to 0 in. Then click Create.

Step 2
Go to the Layers panel (Window > Layers) and double-click on Layer 1, renaming it Color.
Create three more new layers—Photos, Circles, and Type.

Then lock all the layers except the bottom layer, Color.

Step 3
Expand the Swatches panel (Window > Color > Swatches) and choose New Color Swatch from the panel’s drop-down menu.
Set the levels to C=77 M=20 Y=0 K=0, and click Add and Done.
Create a second new CMYK swatch: C=91 M=63 Y=49 K=52.

Step 4
Select New Gradient Swatch from the panel’s drop-down menu.

Name the swatch Gradient 1, set the Type to Linear, and choose Swatches from the Stop Color menu.
Click to select the left-hand stop on the Gradient Ramp below, and choose C=77 M=20 Y=0 K=0 from the list of swatches above. Choose the darker blue, C=91 M=63 Y=49 K=52, for the right-hand swatch.
Then click Add and Done.

2. How to Create a Front Cover for Your Brochure Template
Step 1
Working on the Color layer, switch to the Rectangle Tool (M) and drag to create a shape across the first page of your document, extending the edge up to the bleed and left page trim.
From the Swatches panel, set the Fill of the shape to dark blue.

Step 2
Lock the Color layer and unlock the Circles layer above.
Switch to the Ellipse Tool (L) and, while holding Shift, drag to create a large circle across the top-right corner of the page, setting the Fill to Gradient 1.

With the circle selected, head up to Object > Effects > Inner Glow. With the Mode set to Normal, click on the colored square to the right of the Mode menu to open the Effect Color window. Select the paler blue swatch and click OK.
Back in the Inner Glow window, bring the Opacity down to 25%, set the Technique to Softer, Source to Center, Size to about 0.9 in, and Noise to 83%.
Then click OK.

Edit > Copy and Edit > Paste the circle twice, scaling each down, and scatter them across the page, as shown below.

Step 3
Lock the Circles layer and unlock the top layer, Type.
Use the Type Tool (T) to create a large text frame towards the bottom-left corner, typing in the main title of the brochure.
Set the Font to Ace Sans Bold and the Font Color to pale blue.
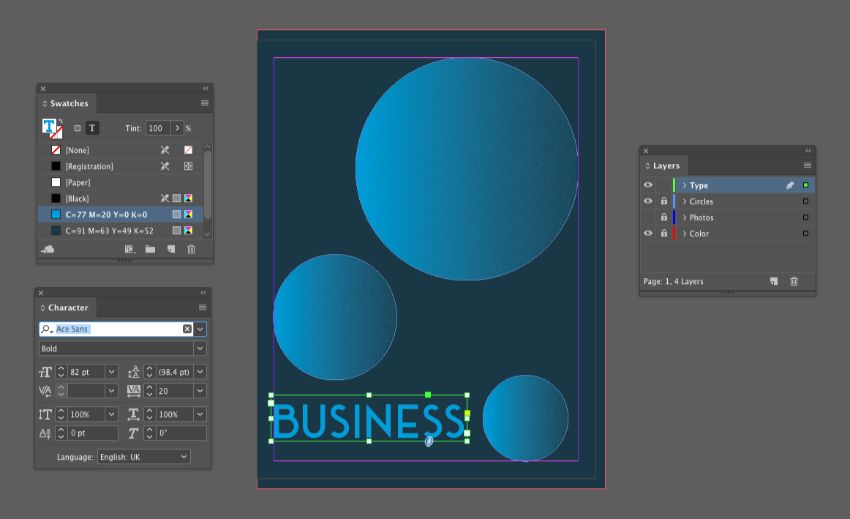
Add a second text frame below for a subtitle, setting the Font to Quadran Medium and Font Color to [Paper].

You can also add a logo or other information in the top-left corner of the page.

3. How to Create a Contents Page for Your Brochure
The first inside spread of your brochure is the best place for a contents page. Here’s how to put it together.
Step 1
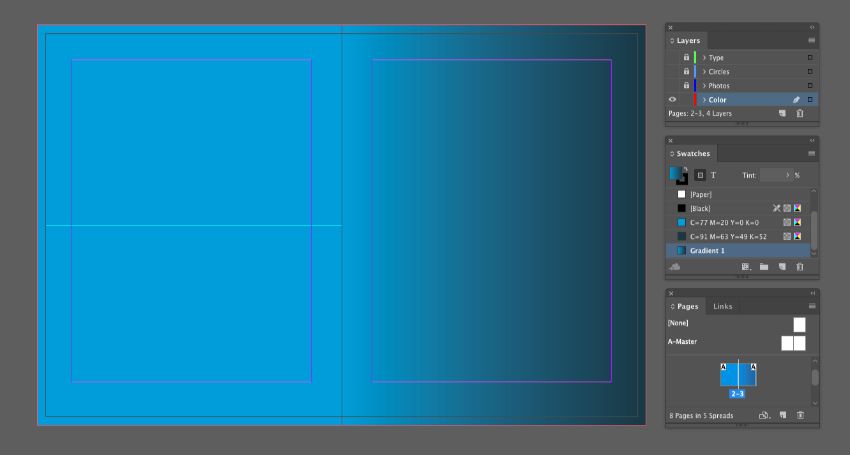
Scroll down to Pages 2 and 3 of your InDesign document. Lock the Circles layer and unlock the Color layer.
Use the Rectangle Tool (M) to create a shape across the whole page, setting the Fill to Gradient 1.
Step 2
Unlock the Circles layer and scroll briefly up to the front cover page of your brochure.
Select the largest circle and Copy it.
Back on Page 2, Edit > Paste the circle and position it centrally on the page, allowing half the circle to cross onto the pasteboard. Scale the circle up a little too.
When you’re happy, Copy and Paste this larger circle, and move it into a mirrored position on the right-hand page.

Step 3
Go to Window > Text Wrap. With both circles selected, click on the Wrap around object shape option in the Text Wrap panel. Set the Offset value below to 0.3125 in.
This will ensure that the text is always pushed away from the circle graphics.

Step 4
On the Type layer, add a header text frame to the top left of Page 3, setting the Font to Ace Sans Bold and a [Paper] Font Color.

Create a subtitle text frame below, set in Vistol Sans Medium.

Step 5
On the facing page, create a small text frame for the first chapter number, setting the Font to Vistol Sans Bold, Size 60 pt.

Add the chapter title next to this, set in Vistol Sans Bold, Size 23 pt.

Select both text frames and Copy and Paste them, positioning them in a fan arrangement around the top side of the circle.

Pull out guides from the left-hand ruler (View > Show Rulers) to mark the left edge of each chapter number, to allow you to position the chapter titles on the lower half of the page in a symmetrical layout.


4. How to Create a Template for the Inside Pages of Your Brochure
Once you’ve created the first inside spread for your brochure, you can use this as a template for populating further pages.
Step 1
Unlock the Color layer, and Copy the gradient-filled rectangle sitting on Pages 2 and 3.
Scroll down to the next inside spread, Pages 4 and 5, and Edit > Paste in Place.
You can adjust the strength of the gradient, to make the darker blue more dominant, by moving the sliders in the Gradient panel (Window > Color > Gradient).

Step 2
Unlock the Circles layer, and head briefly back up to the contents page (2 and 3). Select and Copy both of the circles on this spread.

Scroll back to Pages 4 and 5, and Edit > Paste in Place. Adjust the Fill of the circles to the pale blue swatch.

Step 3
Unlock the Photos layer below, and use the Ellipse Tool (L) to create two circular image frames below each gradient-filled circle, matching the dimensions of the colored circles above.

You can then File > Place images of your choice into each image frame, though you won’t be able to see them quite yet without switching off the visibility of the Circles layer.

Step 4
Lock the Photos layer and, working on the Circles layer, select both colored circles on the spread.

Head up to Object > Effects > Transparency. Set the Mode to Hue and bring the Opacity down to 65%, before clicking OK.
This overlay effect will give your photos a subtle wash of color.

Step 5
You can Copy and Paste text frames across from the contents page, to create a header and subheading on the left-hand page.


Create a new text frame for body text, setting the Font to Vistol Sans Bold and setting the first paragraph in All Caps from the Character panel (Window > Type & Tables > Character).

Step 6
Copy and Paste the three text frames, using them to populate the facing page. Try shuffling the header to the top of the page to create more interest on the layout.


Step 7
You can now use this spread as a template for other spreads in your brochure.
Simply unlock all the layers, drag your mouse across the whole spread to select all elements sitting on it, and Copy them.
On the next blank spread, Edit > Paste in Place.
Adjust the text and images for a fresh look, and you can also switch the direction or strength of the gradient background from the Gradient panel, as before.

Step 8
Use the front cover design from Page 1 as a template for creating a back cover for your brochure too.
Copy and Paste all the elements from Page 1 onto the final page of your brochure. Why not try reversing the background color from dark to pale blue for a different look?
This is also a great place to add contact details for your business.

5. How to Export Your Business Brochure for Printing
Step 1
Go to File > Export and choose Adobe PDF (Print) from the Format menu at the bottom of the window. Name your file and click Save.
In the Export Adobe PDF window that opens, choose Press Quality from the Preset menu at the top.

Step 2
Click on Marks and Bleeds in the left-hand menu, and check both All Printer’s Marks and Use Document Bleed Settings.
Click Export to create your PDF.

Great job! You can send this PDF straight off to be printed.
Conclusion: Your Finished Business Brochure Design
This modern and stylish business brochure template can be used in its original style or as a versatile template for creating your own unique brochure design.

Why not try mixing up the fonts and color swatches for a fresh look?
Looking for more stylish brochure templates? These InDesign templates on GraphicRiver and Envato Elements come in a huge range of modern and customizable styles.
Don’t miss these brochure design tutorials for InDesign and Photoshop:
-
![]()
Learn how to create an InDesign catalog template for showcasing products. This simple and stylish design could also be adapted as a lookbook for fashion…
-
![]()
Create a lasting impression with a professional brochure. Check out this amazing collection of 25 brochure templates from Envato Elements.
-
![]()
This is your essential checklist for designing brochures that are guaranteed to grab and hold someone’s attention. Read on to get to know your bifolds,…
-
![]()
Imagine what a new layout could do for your company brochure. Discover fascinating and inspiring premium brochure templates for 2019. Gain some brochure…


