This tutorial will cover how to build a minimalistic homepage Chrome extension, with JavaScript, designed to help users stay productive.
A Chrome extension is a program that enhances and customizes the browsing experience for Chrome users. Among the various types of extensions available, homepage extensions are the most popular. These extensions allow users to personalize their browser’s start page, often adding features and tools to improve productivity.
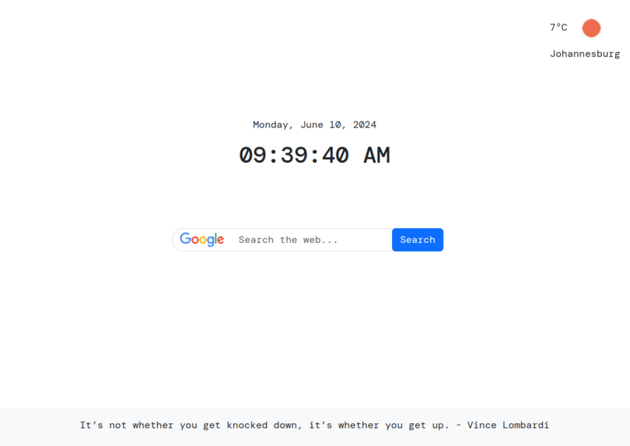
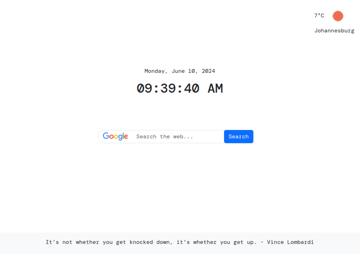
The homepage will contain the following elements:
- An element showing the current weather
- An element showing the current date and time
- A search bar
- Random quotes at the bottom of the page
By the end of this tutorial, we will have a nice minimalistic homepage that looks like this:

Components of a Chrome Extension
A chrome extension will typically consist of the following components:
- A manifest file
- Application files which include HTML files, JavaScript files, CSS files, images, icons, and any other assets necessary for the extension’s functionality.
Manifest
A manifest is a .json file that contains the instructions of how to run the extension. It also includes permissions which the extension requires. Our manifest file will look like this:
1 |
{
|
2 |
"manifest_version": 3, |
3 |
"name": "Minimalistic homepage", |
4 |
"version": "1.0", |
5 |
"description": "A Minimalistic homepage for my Chrome browser", |
6 |
"chrome_url_overrides": {
|
7 |
"newtab": "home.html" |
8 |
} |
9 |
} |
The file contains the following fields:
-
manifest_version: This specifies the version of the manifest file format that your extension is using. The current version is 3. The manifest version is defined by Chrome and dictates the set of features and rules available to the extension. Usingmanifest_version: 3ensures that your extension adheres to Chrome’s latest standards and practices. -
name: this is the name of the extension. -
description: this is a short description of the extension. -
chrome_url_overrides: Chrome, by default, provides a new tab page; withchrome_url_overrides, we are telling Chrome that we will override the new tab page with a custom one.
Application Structure
The application structure will consist of the following files:
- home.html
- styles.css
- index.js
HTML Structure
The HTML structure will be created using Bootstrap. Bootstrap is a front-end framework that allows developers to build websites and applications faster.
Start by adding the link to the Bootstrap CDN files in the <head> section of your home.html file.
1 |
<link
|
2 |
href="https://cdn.jsdelivr.net/npm/[email protected]/dist/css/bootstrap.min.css" |
3 |
rel="stylesheet" |
4 |
integrity="sha384-QWTKZyjpPEjISv5WaRU9OFeRpok6YctnYmDr5pNlyT2bRjXh0JMhjY6hW+ALEwIH" |
5 |
crossorigin="anonymous" |
6 |
/>
|
We will then add a div at the top right of the page. The div will contain:
- A
<span>element to display the weather. - A weather icon.
- A
<p>tag to display the current user’s location.
1 |
<div class="position-fixed top-0 end-0 mt-2 me-3 py-2"> |
2 |
<span id="weather"></span> |
3 |
<img id="weather-icon" class="weather-icon" alt="Weather Icon" /> |
4 |
<p id="location"></p> |
5 |
</div>
|
The main section will consist of a Bootstrap container element with the following components:
- date and time element
- Search bar component
Create the container element that will house the elements above.
1 |
<div class="container mt-5 pt-5"> |
2 |
|
3 |
|
4 |
</div>
|
Inside the container element, let’s start by adding the date and time elements:
1 |
<div class="text-center pt-5 mt-5"> |
2 |
<p id="current-day"></p> |
3 |
<h1 id="current-time"></h1> |
4 |
</div>
|
The <p> tag will display the date, while the <h1> tag will display the current time.
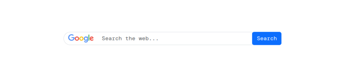
Next, we will have a responsive bootstrap column consisting of an input text element and a search button.
1 |
<div
|
2 |
class="row justify-content-center align-items-center w-100 mt-5 pt-5" |
3 |
>
|
4 |
<div class="col-12 col-md-8 col-lg-6"> |
5 |
<div class="input-group mb-3"> |
6 |
<div class="input-group-prepend"> |
7 |
<span class="input-group-text"> |
8 |
<img
|
9 |
src="https://www.google.com/images/branding/googlelogo/2x/googlelogo_color_92x30dp.png" |
10 |
alt="Google" |
11 |
height="24" |
12 |
/>
|
13 |
</span>
|
14 |
</div>
|
15 |
<input
|
16 |
type="text" |
17 |
id="search" |
18 |
class="form-control outline-none" |
19 |
placeholder="Search the web..." |
20 |
/>
|
21 |
<div class="input-group-append"> |
22 |
<button id="search-btn" class="btn btn-primary">Search</button> |
23 |
</div>
|
24 |
</div>
|
25 |
</div>
|
26 |
</div>
|
The <div class="input-group-prepend"> is used in Bootstrap to create a container that holds elements that will appear before the input field in an input group. This will allow us to add an icon before the input field.


The last component is the random quotes component, which will be fixed at the bottom center. Inside the component, we will have a <p> tag to display the random quotes.
1 |
<div
|
2 |
class="fixed-bottom text-center bg-light py-2 pt-3" |
3 |
id="quote-container" |
4 |
>
|
5 |
<p id="random-quote" class="mb-3"></p> |
6 |
</div>
|
CSS Functionality
Add some custom CSS such as a custom font, custom border radius to the form-control group, and custom size for the weather icon.
1 |
@import url("https://fonts.googleapis.com/css2?family=DM+Mono:ital,wght@0,300;0,400;0,500;1,300;1,400;1,500&display=swap"); |
2 |
.input-group-text { |
3 |
background-color: white; |
4 |
border-radius: 30px 0 0 30px; |
5 |
border-right: none; |
6 |
}
|
7 |
body { |
8 |
font-family: "DM Mono", monospace; |
9 |
}
|
10 |
.form-control { |
11 |
border-radius: 0 30px 30px 0; |
12 |
border-left: none; |
13 |
}
|
14 |
|
15 |
.weather-icon { |
16 |
width: 60px; |
17 |
height: 60px; |
18 |
}
|
JavaScript Functionality
To display the weather, we will use these 2 APIs
- ipapi.co is an API that gets the current location from the user’s IP address
- api.openweathermap.org is an API that allows developers to access current weather data, forecasts, and historical weather data for any location in the world.
Let’s start by getting the weather elements:
1 |
const weatherElement = document.getElementById('weather'); |
2 |
const weatherIcon = document.getElementById('weather-icon'); |
3 |
const locationElement = document.getElementById('location'); |
Next, create a function called getWeather. Inside this function, we will make a POST request to the ipapi.co API to get the current user’s location, then we will use the user’s location to get the current weather.
Inside a try block, make a call to the ipapi.co API,
1 |
async function getWeather() { |
2 |
|
3 |
const locationResponse = await fetch('https://ipapi.co/json/'); |
4 |
const location = await locationResponse.json(); |
5 |
locationElement.textContent = location.city; |
6 |
|
7 |
}
|
-
fetch('https://ipapi.co/json/'): This line of code sends a request to the ipapi.co API to retrieve location data based on the user’s IP address. const location = await locationResponse.json();waits for the response and parses it as a JSON.locationElement.textContent = location.city;retrieves the city from the JSON data above and updates thetextContentof the location element to the current city.
The openweather API allows us to get the location using the city name as a parameter, so let’s send a request to the weather API using the city name.
1 |
async function getWeather() { |
2 |
try { |
3 |
const locationResponse = await fetch('https://ipapi.co/json/'); |
4 |
const location = await locationResponse.json(); |
5 |
locationElement.textContent = location.city; |
6 |
|
7 |
const ApiKey = '04419024fb0f20edd3f1abd06e46dd6d'; |
8 |
const url = `https://api.openweathermap.org/data/2.5/weather?q=${location.city}&units=metric&appid=${ApiKey}`; |
9 |
|
10 |
const response = await fetch(url); |
11 |
const weatherData = await response.json(); |
12 |
console.log(weatherData) |
13 |
|
14 |
} catch (error) { |
15 |
console.error('Error fetching weather data:', error); |
16 |
locationElement.textContent = "Error fetching weather"; |
17 |
|
18 |
}
|
19 |
}
|
In the code above:
- First, we declare our
API_KEYvariable. - Next, we construct a url by joining the weather API endpoint with the user’s current city and the API_key.
-
const response=awaitfetch(url);Then, we perform a fetch request to the constructed url. -
const weatherData=awaitresponse.json();we parse the response as JSON and store the object in a variable calledweatherData.
The weatherData logged to the console looks like this:

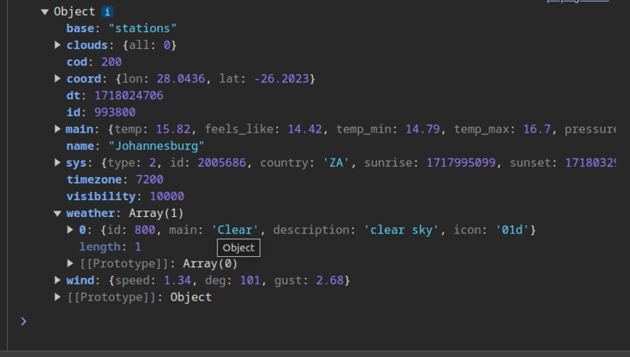
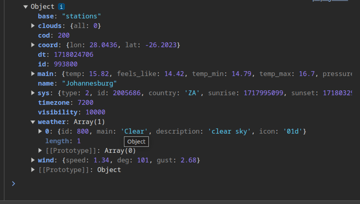
From the information above, we want to get the temperature and the icon code. We will update the weatherElement to show the current temperature and the weatherIcon element to show the url of the current weather icon .
Update the getWeather function:
1 |
async function getWeather() { |
2 |
try { |
3 |
const locationResponse = await fetch('https://ipapi.co/json/'); |
4 |
const location = await locationResponse.json(); |
5 |
locationElement.textContent = location.city; |
6 |
|
7 |
const ApiKey = '04419024fb0f20edd3f1abd06e46dd6d'; |
8 |
const url = `https://api.openweathermap.org/data/2.5/weather?q=${location.city}&units=metric&appid=${ApiKey}`; |
9 |
|
10 |
const response = await fetch(url); |
11 |
const weatherData = await response.json(); |
12 |
console.log(weatherData) |
13 |
|
14 |
const temperature = weatherData.main.temp; |
15 |
const weatherIconUrl = `https://openweathermap.org/img/wn/${weatherData.weather[0].icon}.png`; |
16 |
|
17 |
weatherElement.textContent = `${Math.round(temperature)}°C`; |
18 |
weatherIcon.src = weatherIconUrl; |
19 |
} catch (error) { |
20 |
console.error('Error fetching weather data:', error); |
21 |
locationElement.textContent = "Error fetching weather"; |
22 |
|
23 |
}
|
24 |
}
|
25 |
|
26 |
getWeather(); |
In the updated code we do the following:
-
const temperature = weatherData.main.temp;will get the temperature from the weather object. -
const weatherIconUrl = `https://openweathermap.org/img/wn/${weatherData.weather[0].icon}.png`;constructs a weather icon url from the current weather icon. -
weatherElement.textContent = `${Math.round(temperature)}°C`;updates theweatherElementwith the value of the current temperature rounded off to the nearest whole number.
The next step is to show the current date and time. Create a function called updateTime, which looks like this:
1 |
function updateTime() { |
2 |
const now = new Date(); |
3 |
const options = { |
4 |
weekday: "long", |
5 |
year: "numeric", |
6 |
month: "long", |
7 |
day: "numeric", |
8 |
};
|
9 |
const formattedTime = now.toLocaleTimeString("en-US", { |
10 |
hour: "2-digit", |
11 |
minute: "2-digit", |
12 |
second: "2-digit", |
13 |
});
|
14 |
currentTimeElement.textContent = ` ${formattedTime}`; |
15 |
|
16 |
const formattedDate = now.toLocaleDateString("en-US", options); |
17 |
currentDay.textContent = `${formattedDate} `; |
18 |
}
|
In the code above we do the following:
-
const now = new Date();gets the current date and time. -
const formattedTime = now.toLocaleTimeString("en-US"{ hour: "2-digit", minute: "2-digit", second: "2-digit"});gets the current time and formats it in hours, mins, and seconds format. -
currentTimeElement.textContent = ` ${formattedTime}`;updates the currentTimeElement with the formatted time. -
const formattedDate = now.toLocaleDateString("en-US", { weekday: "long", year: "numeric", month: "long", day: "numeric" });Here we are using thetoLocaleDateString()method to format the date into a string showing the full day of the week, month, numeric day of the month and year. For example, a sample date will look like this (Monday, June 10, 2024). -
currentDay.textContent=`${formattedDate} `;updates thecurrentDayelement to show the formatted date.
To update the date and time in real time, use the setInterval method to call the updateTime() function after every second.
1 |
setInterval(updateTime, 1000); |
2 |
updateTime(); |
The last functionality is to display random inspirational quotes at the bottom of the page.
Create an array of quotes which looks like this:
1 |
const quotes = [ |
2 |
"The best way to get started is to quit talking and begin doing. - Walt Disney", |
3 |
"The pessimist sees difficulty in every opportunity. The optimist sees opportunity in every difficulty. - Winston Churchill", |
4 |
"Don’t let yesterday take up too much of today. - Will Rogers", |
5 |
"You learn more from failure than from success. Don’t let it stop you. Failure builds character. - Unknown", |
6 |
"It’s not whether you get knocked down, it’s whether you get up. - Vince Lombardi", |
7 |
"If you are working on something that you really care about, you don’t have to be pushed. The vision pulls you. - Steve Jobs", |
8 |
"People who are crazy enough to think they can change the world, are the ones who do. - Rob Siltanen", |
9 |
"Failure will never overtake me if my determination to succeed is strong enough. - Og Mandino", |
10 |
"Entrepreneurs are great at dealing with uncertainty and also very good at minimizing risk. That’s the classic entrepreneur. - Mohnish Pabrai", |
11 |
"We may encounter many defeats but we must not be defeated. - Maya Angelou" |
12 |
];
|
Next create a function called getQuote() which looks like this:
1 |
function getQuote(){ |
2 |
const quoteIndex = Math.floor(Math.random() *quotes.length); |
3 |
const randomQuote = quotes[quoteIndex]; |
4 |
document.getElementById('random-quote').textContent = randomQuote; |
5 |
}
|
6 |
getQuote(); |
Inside the function, we are updating the element with the id “random_quote” with the result of selecting a random quote from the quotes array and setting it as the text content of the element.
How to Upload a Chrome Extension
Ensure all your are in the same folder. Your folder structure should now look like this:
1 |
.
|
2 |
├── home.html |
3 |
├── index.js |
4 |
├── manifest.json |
5 |
└── styles.css |
Next, navigate to Chrome’s extensions page. You can also go directly to chrome://extensions/. At the top right, enable Developer mode.


On the top left, click the Load unpacked button and select the folder containing all your files. Once the files have been uploaded, the extension will appear in your list of extensions, and your homepage will now be replaced by the new custom homepage.
Here is the demo.
Conclusion
In conclusion, you now know how to build and deploy a Chrome extension! With this knowledge, you are in a position to create even more custom tools to enhance and personalize your browsing experience.