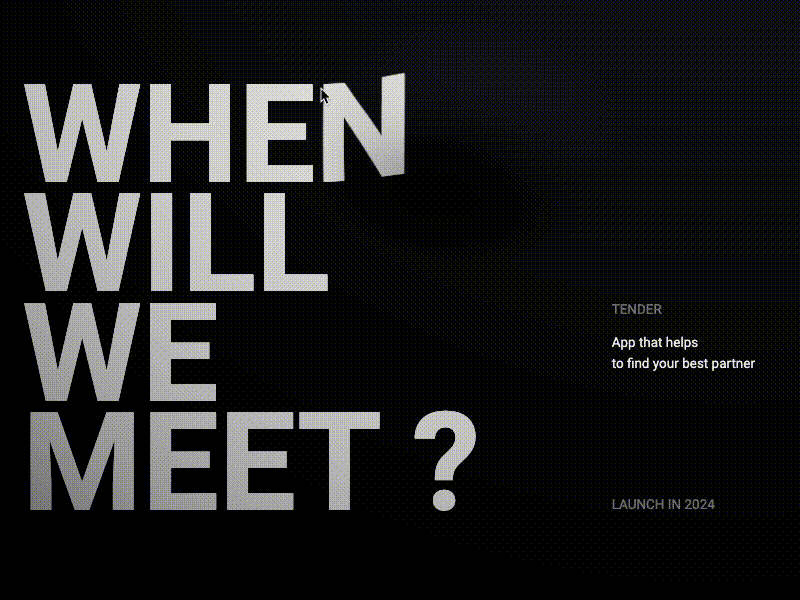
In this tutorial, we’ll explore how to generate a engaging bulge effect on text using React Three Fiber.
For the past few weeks, I’ve been experimenting with mixing 3D and 2D to create compelling effects. Today, I’ll guide you through replicating this bulge effect on text.
To streamline the process and maintain a structured approach for combining HTML with 3D, we’ll use React Three Fiber.
Let’s dive in!
Setup
First, let’s set up our 3D scene by creating:
- a plane (where our text bulge effect will be displayed).
- our HTML text element.
With drei, you can directly inject HTML elements inside your Scene components using the HTML component. This is useful in our case because we’ll need access to our HTML inside our 3D scene.
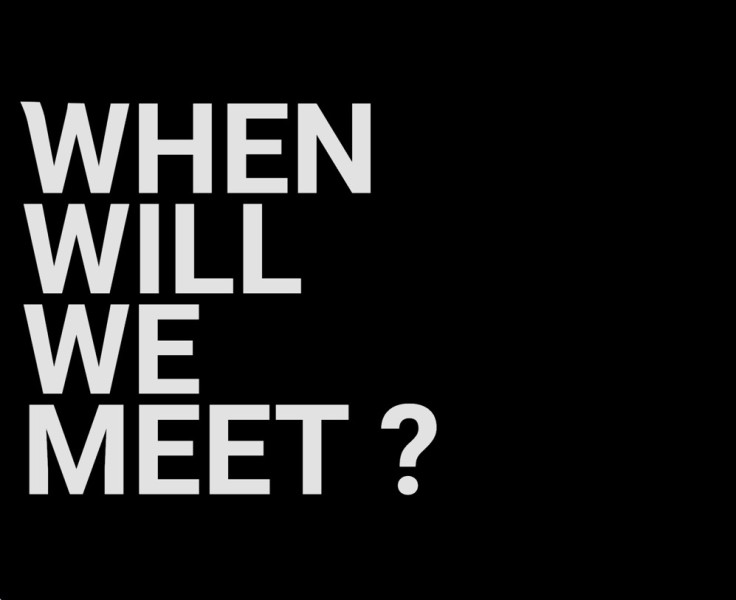
It’s also important to wrap the title within a single div that spans the entire viewport width and height. Similarly, for the plane, with R3F’s useThree() hook, we can easily retrieve the viewport sizes.
For now, let’s set the plane’s opacity to 0 to see our HTML element:
function Scene() {
  const { viewport } = useThree();

  return (
    <>
      <Html zIndexRange={[-1, -10]} prepend fullscreen>
         <div className="dom-element">
            WHEN <br />
            WILL <br />
            WE <br />
            MEET ?<br />
        </div>
      </Html>
      <mesh>
        <planeGeometry args={[viewport.width, viewport.height, 254, 254]} />
        <meshBasicMaterial transparent opacity={0} />
      </mesh>
    </>
  );
}
Converting HTML to Texture
Now, the main trick for this effect is to convert our div into a texture that we will apply to our plane. For that, we’ll utilize the html2canvas library to generate an image from our DOM element and then convert it into a texture.
To streamline this process for future projects, let’s create a custom hook named useDomToCanvas.
const useDomToCanvas = (domEl) => {
  const [texture, setTexture] = useState();

  useEffect(() => {
    if (!domEl) return;
    const convertDomToCanvas = async () => {
      const canvas = await html2canvas(domEl, { backgroundColor: null });
      setTexture(new THREE.CanvasTexture(canvas));
    };
    convertDomToCanvas();
  }, [domEl]);

  return texture;
};
We can also enhance the hook to handle resizing, as the div may remain behind the canvas. We simply need to recall the function when the window is resized. To prevent excessive draw calls, let’s incorporate a debounce.
const debouncedResize = debounce(() => {
  convertDomToCanvas();
}, 100);

window.addEventListener("resize", debouncedResize);
Implementing the Bulge Effect
Now, to achieve the bulge effect, we’ll use shader programs to access the vertices of the plane. Although shader programming might seem difficult, don’t worry – in our case, it will be a simple effect. We’ll break it down into three small steps so you can easily follow what’s happening.
For an introduction to shaders, you can also refer to the Lewis Lepton YouTube series.
First, let’s use a shaderMaterial as the material for the plane and create our fragment and vertex shaders.
// Scene.jsx
...
<shaderMaterial
ref={materialRef}
uniforms={uniforms}
vertexShader={vertexShader}
fragmentShader={fragmentShader}
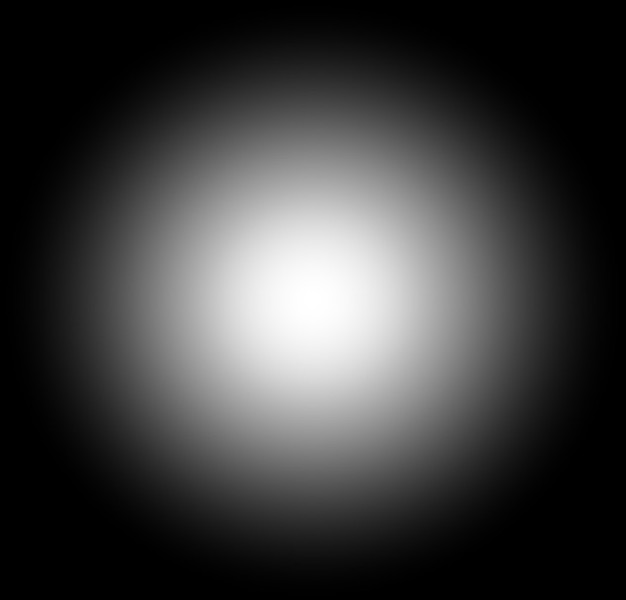
/>Step 1 : First, the idea is to draw a circle on our plane. To achieve this, we’ll utilize the UV coordinates and the GLSL distance function. Let’s encapsulate the code into a function to enhance clarity.
// fragment.glsl
...
float circle(vec2 uv, vec2 circlePosition, float radius) {
	float dist = distance(circlePosition, uv);
	return 1. - smoothstep(0.0, radius, dist);
}

void main() {
	float circleShape = circle(vUv, vec2(0.5), 0.5);
	gl_FragColor = vec4(vec3(circleShape), 1.);
}
Step 2 : Now, we’ll dynamically adjust the circle’s origin position based on mouse movement. With R3F, accessing normalized mouse positions is straightforward using useFrame(). By passing mouse positions as uniforms to the fragment shader, we’ll observe the circle’s movement.
// Scene.jsx
...
useFrame((state, delta) => {
  const mouse = state.mouse;
  materialRef.current.uniforms.uMouse.value = mouse;
});

// fragment.glsl
...
void main() {
	vec2 mousePositions = uMouse * 0.5 + 0.5;
	float circleShape = circle(vUv, mousePositions, 0.5);
	gl_FragColor = vec4(vec3(circleShape), 1.);
}
Step 3 : Now, we just need to call the circle function in the vertex shader and adjust the z position based on the circle. And… voilà! We have our bulge effect!
(Also, don’t forget to replace the texture in the fragment shader.)
// vertex.glsl
void main() {
	vec3 newPosition = position;

	// Elevation
	vec2 mousePositions = uMouse * 0.5 + 0.5;
	float circleShape = circle(uv, mousePositions, 0.2);
	float intensity = 0.7;
	newPosition.z += circleShape * intensity;

	gl_Position = projectionMatrix * modelViewMatrix * vec4(newPosition, 1.0);
}

// fragment.glsl
uniform sampler2D uTexture;
varying vec2 vUv;

void main() {
	vec4 finalTexture = texture2D(uTexture, vUv);
	gl_FragColor = vec4(finalTexture);
}
Adding Lighting
To enhance the 3D appearance, let’s incorporate lighting effects. While coding custom lighting effects within the fragment shader can be complex, we can leverage existing libraries like customShaderMaterial. With customShaderMaterial, we’ll seamlessly integrate standardMaterial and a pointLight to achieve stunning shading effects.
// Scene.jsx
<CustomShaderMaterial
  ref={materialRef}
  baseMaterial={THREE.MeshStandardMaterial}
  vertexShader={vertexShader}
  fragmentShader={fragmentShader}
  uniforms={uniforms}
  flatShading
/>
<pointLight position={[2, 4, 6]} intensity={30} distance={12} decay={1} />
Congratulations! You’ve successfully implemented the effect.
I’ve included a GUI within the repository so you can play with positions and light color. I’d love to see your creations and how you build upon these demo. Feel free to share your experiments with me on Twitter!