In the previous part of the series, we looked at how we can use the WP REST API to retrieve content from the server. We learned to retrieve content for different resources including posts, post meta, tags, categories, etc. This is a powerful feature since this content can be used anywhere inside or outside WordPress.
We also learned about the OPTIONS request that self-documents the API by listing all the routes, their endpoints, and their respective arguments. This diminishes the need for relying on an external documentation for the API and allows changes to be discovered rather quickly in case the API has been updated or changed.
Having looked at these features, in the current tutorial we will now focus our attention on the other three operations of CRUD, i.e. creating, updating, and deleting data using the WP REST API.
In this tutorial, we will:
- analyze which resources support create, update, and delete methods
- learn to create, update, and delete resources
- look at ways to send data along the request to create a resource
- analyze server response and different response codes
So let’s begin by analyzing which resources support the create, update, and delete methods using the WP REST API.
Checking for Create, Update, and Delete Methods in the Routes
Before we dive straight into creating and updating data with the WP REST API, we need to analyze which routes support creation and update methods. We do this by checking the routes and the methods property in their endpoints. This can be done by sending a separate OPTIONS request to individual routes, but a more convenient way is to send a GET request to the /wp-json index route as we did in the previous part of the series.
Sending a GET request to the /wp-json route returns an object containing all the routes and their endpoints in the routes property.
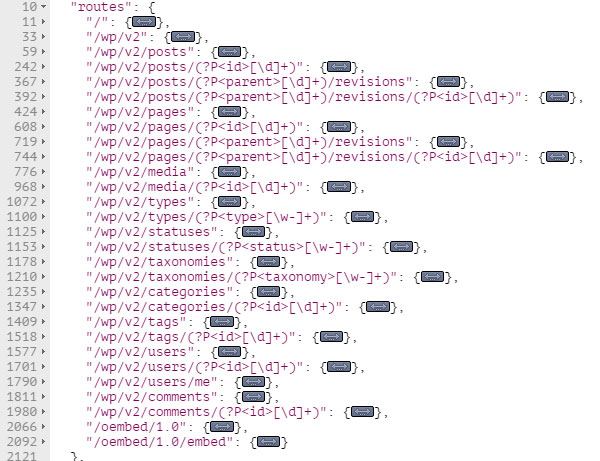
It’s in these individual routes that we can check if a specific resource supports POST, PUT, and DELETE methods. Let’s begin by analyzing the Posts resource.
The Posts resource exposes data with the following two routes:
/wp/v2/posts
/wp/v2/posts/(?P<id>[d]+)
The first route points to the collection of the post object, and its method property is as follows:
"methods": [
    "GET",
    "POST"
],
This methods property shows that the /posts route supports GET and POST methods for retrieving and creating data respectively.
For the /posts/(?P<id>[d]+) route, which points to a single Posts resource, the methods property is as follows:
"methods": [
    "GET",
    "POST",
    "PUT",
    "PATCH",
    "DELETE"
],
As can be seen in the above code, the /posts/(?P<id>[d]+) route supports the GET, POST, PUT, PATCH, and DELETE methods.
By examining both the above routes, we can conclude that the /posts route supports resource retrieval and creation. And the /posts/(?P<id>[d]+) route supports resource retrieval as well as update and deletion. Though it does support the POST method, this route doesn’t support resource creation as we will see in an example below.
Hence, routes pointing to a single resource can’t be used to create content, although they do support the POST method. This is because, for these routes, the POST, PUT, and PATCH methods are used to update content in the WP REST API.
To conclude this section, let’s summarize the concepts we have learned here:
- We can check which routes support
GET,POST, andDELETEmethods by sending anOPTIONSrequest. - Routes pointing to a single entity can’t be used to create content. They are used to update content, although they do support the
POSTmethod.
Having analyzed different routes, we are now ready to create content using the WP REST API, and we will begin by exploring the Posts resource.
Creating and Updating a Post
Let’s create a post by sending a test request from Postman or any other HTTP client. To do this, fire up your HTTP client and send a POST request to the /posts route. But before that, remember that resource creation, deletion, and update require authentication as a user with edit_posts rights. So we will use the basic authentication method that we learned in the second part of this series.
Initially, we send an empty request body along the request for testing purposes:
$ POST /wp/v2/posts
The server will return a 400 – Bad Request error since the required arguments were missing in the request body. The following response will be returned by the server:

The response states that either of content, title, or excerpt are required for creating a post object. These arguments can be sent along the request in the request body in either of the following three ways:
- As a JSON object
- By using forms
- As URL parameters
It’s just a matter of choice to use any of these methods, and we will look into them more closely later in this tutorial. But let’s now use the first method for creating a post.
To send arguments as a JSON object in Postman, switch to the Body tab and select the raw radio button. Then from the drop-down on the right, select the JSON (application/json) option. In the text area below, you can then add the JSON body.

Currently, this JSON body holds only one property for the title of the post.
Send the request by clicking the Send button. If all goes well, the server will return a 201 – Created status with the newly created post object as the response.
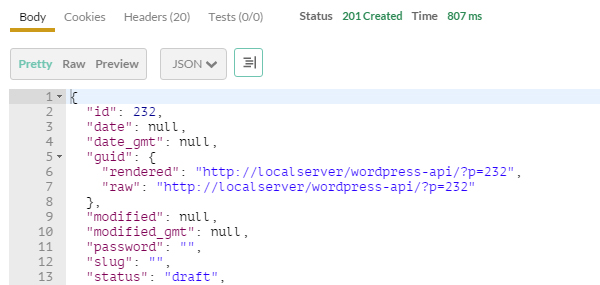
The default status of this newly created post is draft. We can update the status, as well as some other properties, by sending another POST, PUT, or PATCH request. The ID of the post returned in my case is 232, so I’ll send a request to the following endpoint:
$ POST /wp/v2/posts/232
The request body to update the status and the content property looks like this:
{
    "status": "publish",
    "content": "This is the content of the post"
}
After sending the request, the server will return a 200 – OK status, meaning that the post has been updated successfully.
In the example above, we came across the following three arguments to create a post:
-
title -
status -
content
The complete list of supported arguments for creating a post can be retrieved by a simple OPTIONS request as follows:
$ OPTIONS /wp/v2/posts
We can then check the args property in the POST method array.
Now that we have learned how we can create and update a post, let’s take a look at some more resources we can work with.
Creating and Updating Post Meta
Update: Working with post and page meta in WP REST API now requires a companion plugin available on GitHub by the WP REST API team.
Post meta can be created by sending a POST request to the following route:
/wp/v2/posts/(?P<parent_id>[d]+)/meta
Where (?P<parent_id>[d]+) is the ID of the parent post. I’ll be using the ID of the post we created in the previous section, which is 232.
In a similar manner to how we send a request body to create a post object, a JSON object comprising of two properties can be sent to create a post meta. These two properties are key and value.
{
    "key": "name",
    "value": "Bilal"
}
The values of the key and value properties are name and Bilal respectively.
Send the request and the server will return a 201 – Created status code, showing that the post meta has been created successfully. The newly created post meta object will also be returned in the response:
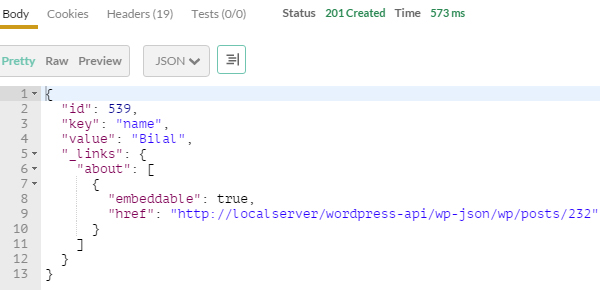
Please note that at the time of writing this tutorial, the WP REST API doesn’t support integer values for creating post meta. If we try to send an integer value in the JSON object for creating post meta, a 400 – Bad Request status code will be returned by the server.
{
    "key": "value",
    "value": 12345
}
Note the missing quotes around the value 12345. The response returned will be like the following:

So anything you send along the request to create post meta should be in string format.
Data Creation and Update Methods
So far in this tutorial, we have been using JSON format in the request body to create and update resources. Let’s take a look at all the options that the WP REST API provides for creating and updating data.
Sending Data as URL Parameters
The easiest way to send data along the request is to send it as URL parameters. Consider the following POST request for creating a post:
$ POST /wp/v2/posts?title=the+title&content=this+is+the+content
The above request sends two parameters to the server for the title and the content of the post.
Similarly, for creating post meta for a post having an ID of 232, we use the following POST request:
$ POST /wp/v2/posts/232/meta?key=name&value=Bilal
The above request will create the following meta object:
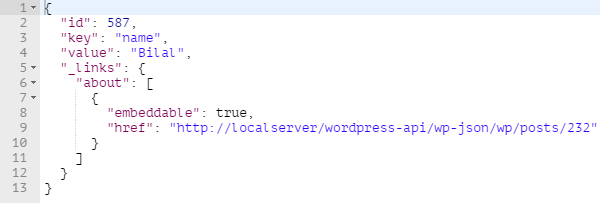
This method is most suitable when the parameters are short strings, as in the example above. But as the number of parameters and the length of their values increases, it becomes hard to manage them as URL parameters.
Sending Data as a JSON Object
Using this method, we take arguments as a key/value pair in a JSON object to pass them along the request. Till now, we have been using Postman to send requests to the server. We will now take a look at how we can implement this method using HTML and jQuery.
Consider the following simple form that consists of three fields for the title, status, and the content:
<form name="post-form" id="post-form">
    <label for="title">Title</label>
    <input type="text" name="title" id="title">

    <label for="status">Status</label>
    <select name="status" id="status">
    	<option value="publish">Publish</option>
    	<option value="draft">Draft</option>
    </select>

    <label for="content">Content</label>
    <textarea name="content" id="content"></textarea>

    <input type="submit" name="submit" value="Submit">
</form>
When the above form is submitted, the following JavaScript (jQuery) code is executed:
var postForm = $( '#post-form' );

var jsonData = function( form ) {
    var arrData = form.serializeArray(),
        objData = {};

    $.each( arrData, function( index, elem ) {
        objData[elem.name] = elem.value;
    });

    return JSON.stringify( objData );
};

postForm.on( 'submit', function( e ) {
    e.preventDefault();

    $.ajax({
        url: 'http://your-dev-server/wp-json/wp/v2/posts',
        method: 'POST',
        data: jsonData( postForm ),
        crossDomain: true,
        contentType: 'application/json',
        beforeSend: function ( xhr ) {
            xhr.setRequestHeader( 'Authorization', 'Basic username:password' );
        },
        success: function( data ) {
            console.log( data );
        },
        error: function( error ) {
            console.log( error );
        }
    });
});
On submission of the above form, we send an AJAX request to the /wp/v2/posts route. The jsonData() method accepts a jQuery instance of the HTML form and converts its data into JSON format. This JSON data is then used in the data property of the $.ajax() method. Additionally, we set the content type to application/json by using the contentType property.
Before sending the request, we set the header to include the Authorization header for using the basic authentication method. We have already learned to set up and use the basic authentication method in the second part of this series.
Finally, the request is sent to the /wp/v2/posts route, and a new post is created. This newly created post object is returned by the server as the response and we simply log it into the console inside the success() method.
The above example demonstrates the use of JSON format to send data along the request. The source of this JSON object can be anything besides an HTML form, depending on the architecture of your application.
Please note that for the above code to work properly, you might need to set the Access-Control-Allow-Headers header field to include the Authorization and Content-Type values. This can be done by adding the following code in your WordPress’s .htaccess file:
Header set Access-Control-Allow-Headers "Content-Type, Authorization"
Let’s now look at sending data through HTML forms.
Sending Data Using Forms
The last way of sending data along the request is by using HTML forms. These forms should contain fields with the name attribute. The name attribute serves as an argument name like title, status, content, etc. The values of these fields serve as the value of these arguments.
We can use the same HTML form created in the previous example, and then make use of the following code to create a new post:
var postForm = $( '#post-form' );

postForm.on( 'submit', function( e ) {
    e.preventDefault();

    $.ajax({
        url: 'http://your-dev-server/wp-json/wp/v2/posts',
        method: 'POST',
        data: postForm.serialize(),
        crossDomain: true,
        beforeSend: function ( xhr ) {
            xhr.setRequestHeader( 'Authorization', 'Basic username:password' );
        },
        success: function( data ) {
            console.log( data );
        }
    });
});
The above code is the same as the previous example, except that we removed the jsonData() method and we are now sending the form data in string format using jQuery’s serialize() method. The above jQuery code uses the default application/x-www-form-urlencoded content type that sends the data in the form of a giant string with arguments separated by the & sign and their values being assigned using the = sign. This somewhat resembles sending data as URL parameters, except that it doesn’t expose data. This is an efficient way to send data if the data contains only alphanumeric characters.
To send binary (non-alphanumeric) data, we use the multipart/form-data content type. This method can be used if we need to upload images or other files using the WP REST API.
To send form data in Postman, you can switch to the Body tab and then use either the form-data or x-www-form-urlencoded option.

Arguments can then be defined in key/value pairs to send along the request.
Detailed information regarding different form types can be found in the W3C specifications.
Uploading Media Using the multipart/form-data Content Type
Now that we have looked at the x-www-form-urlencoded form type, which sends data in the form of a string, let’s begin exploring a more advanced form encoding type, i.e. multipart/form-data.
The multipart/form-data content type is used when dealing with binary data, and hence it can be used to upload images or other file types to the server.
In the following example, we use a simple HTML form consisting of an input[type=”file”] and a bit of jQuery to upload images to the server using the /wp/v2/media route.
Consider the following HTML form:
<form name="image-form" id="image-form">
    <label for="image-input">File</label>
    <input name="image-input" id="image-input" type="file">

    <input type="submit" value="Upload">
</form>
The following JavaScript will be executed when the above form is submitted:
var imageForm = $( '#image-form' ),
    fileInput = $('#file'),
    formData = new FormData();

imageForm.on( 'submit', function( e ) {
    e.preventDefault();

    formData.append( 'file', fileInput[0].files[0] );

    $.ajax({
        url: 'http://your-dev-server/wp-json/wp/v2/media',
        method: 'POST',
        data: formData,
        crossDomain: true,
        contentType: false,
        processData: false,
        beforeSend: function ( xhr ) {
            xhr.setRequestHeader( 'Authorization', 'Basic username:password' );
        },
        success: function( data ) {
            console.log( data );
        },
        error: function( error ) {
            console.log( error );
        }
    });
});
Here we first get a jQuery instance of the form and its input field. Then we initialize a new FormData object. The FormData interface provides a way for constructing a set of form fields with key/value pairs and uses the same format as the multipart/form-data form encoding type.
When the form is submitted, we prevent its submission by calling the .preventDefault() method on the event object. We then append a new field to the formData instance using the .append() method. The .append() method accepts two arguments for the name and the value of the field. The WP REST API enforces the name attribute of the file input field to be file. That’s why we set the first argument—the name—to be file, and for the second argument we pass a file blob object by referring to the input element.
By default, the data passed into the data property of the jQuery.ajax() method is processed into a query string. Since we are uploading image files here, we don’t want that to happen, and for that purpose we set the processData property to false. We also set the contentType property to false to prevent application/x-www-form-urlencoded being sent as the default content type to the server.
And lastly, we set the Authorization header to authenticate ourselves as a user with edit_posts privileges.
Be sure to run the above script from within a server. If all goes well and the file is uploaded, the server will return the newly created media object.
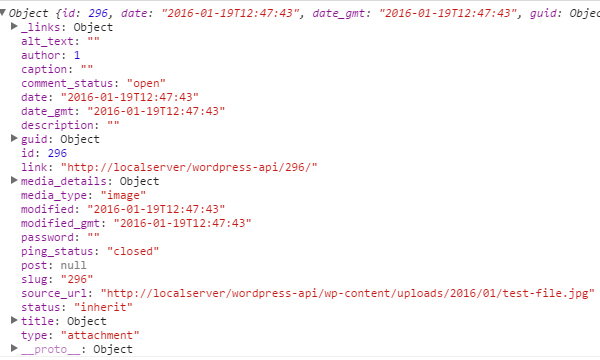
This image can then be set as a featured image for a post.
Having closely looked at ways to create and update resources using the WP REST API, let’s see how we can delete them.
Deleting Data With the WP REST API
Deleting data with the WP REST API is as simple as sending a DELETE request to a particular resource.
If we need to delete a post having an ID of 10, we send the following DELETE request:
$ DELETE /wp/v2/posts/10
This will move the post to trash but won’t permanently delete it. For permanently deleting a post, we use the force argument:
$ DELETE /wp/v2/posts/10?force=true
Note that the force argument is required when a deleting a resource that doesn’t support trashing. Examples of such resources are post meta and media.
Having said that, we now conclude the current part of the series.
What’s Up Next?
In this lengthy tutorial, we looked at creating, updating, and deleting different kinds of resources using the WP REST API. We learned about different ways to send data along the request, including sending data as URL parameters, in JSON format, and by using forms. At the end of the tutorial, we learned about deleting resources by sending a DELETE request.
In the next and final installment of the series, we will learn about the internal structure of the WP REST API and its classes. We will also learn to extend the API to modify server responses. See you in the next part of the series—stay tuned…