
Creating digitally gives amazing possibilities. You get so many colors, so many materials, every mistake can be fixed easily and it’s all in a friendly, clean environment – you just need to turn off your computer afterwards. All these advantages are the reason why so many artists try their hands at Adobe Photoshop.
This software, although so popular and powerful, is designed to work with a graphic tablet. Drawing with a mouse is possible, but it’s hard, time consuming and very frustrating. On the other hand, there exists another product of the same company – Illustrator. And while Photoshop (and every other raster drawing software) favors tablet users, Illustrator doesn’t mind creating with a mouse. Do you want to learn why?
Vector vs Raster
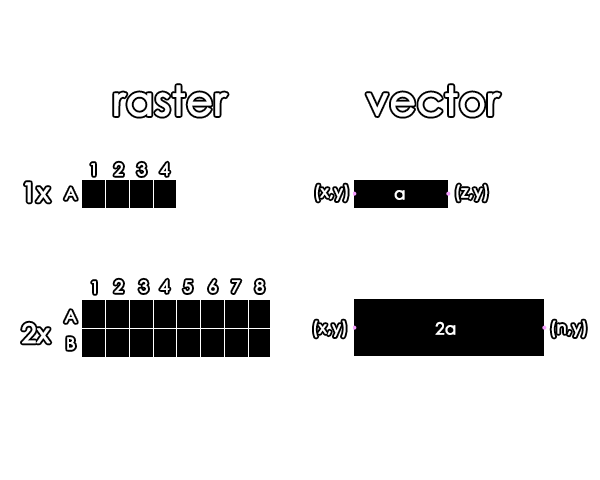
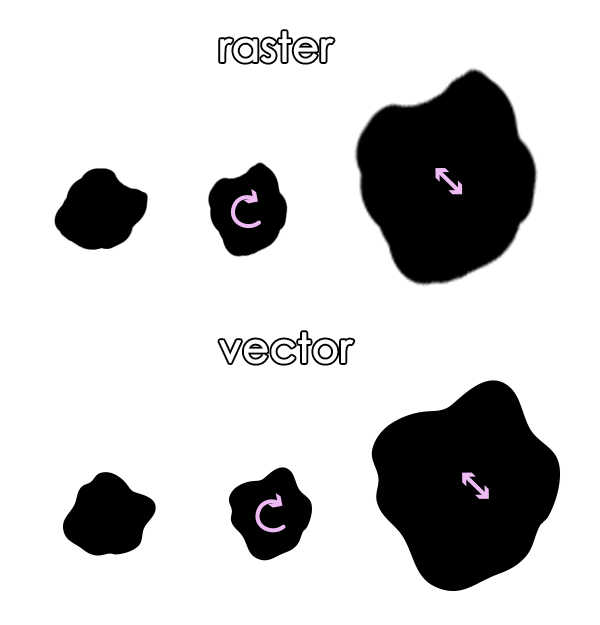
Let’s start with most obvious difference. Photoshop (and Gimp, Paint.NET, PaintTool SAI, Microsoft Paint) are raster editors. It means the picture is saved as a constant set of pixels. This set can’t be changed without any loss in quality – when you resize a raster picture, every dot becomes bigger too. After resizing it’s not a pixel anymore – it’s a square with visible, hard edges. Hence, a “pixelated” result.
Vector programs (like Illustrator, Inkscape, CorelDRAW) save their files as a set of rules. We can say a line is saved as start point, end point and its width. When you move one of the points, the line is rendered once again without any loss. Vector graphics are scalable. Newer versions of Photoshop have some vector options too, but you can’t hide it wasn’t really designed for this.
What Does it Change?
The different methods of saving the content lead to different ways of drawing too. In raster editors you draw with dots – no matter if it’s a line, a square or a hyper realistic portrait of your cat, it’s all dotted.
With every stroke you’re creating a splash of pixels. Later these pixels can only be removed one by one (with an eraser) or covered with another splash, being lost forever (if it’s the same layer). Take the layers and undo’s, and you’ve got a method identical with traditional drawing.
What does it mean for us? To draw digitally in an editor like this, we need a tool created for traditional drawing – with its digital equivalent being a tablet pen.
It’s totally different with vector editors. Here pixels aren’t constant, they’re re-rendered whenever you change something. Therefore, you draw with objects. You can draw a line, then cover it with a square, and put a cat on the top without creating any new layer, and what happens? The line is still there, unharmed, and so is the square.
Vector drawing is more like building – every object is a block that can be removed and modified at any time without affecting the rest of the picture. While raster editors are based on a natural, free movement of your hand (that can’t be imitated too well by a mouse), vector ones don’t need it – all they’re interested in is you give them points to base on. That’s the reason why vector drawings are usually very clean and refined – they’re not based on fast, pressure-variable strokes, but on precise clicks.
There’s another advantage of vector files. Even the biggest of them are really small in comparison to big raster files. The reason for this is simple – vector files are full of mathematical rules instead of huge arrays of pixel coordinates.
So, are you ready to learn what advantages Adobe Illustrator can give a mouse user? Keep on reading!
You Can Draw With Paths
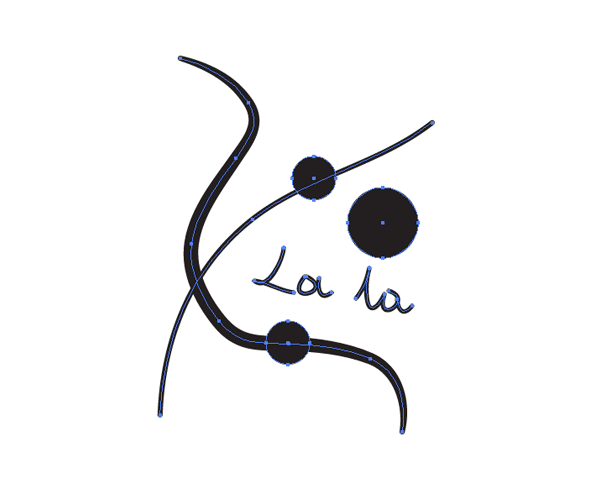
Do you remember paths from Photoshop? The ones created with the Pen Tool, that let you create curves and can be modified without problems? Well, in Illustrator everything is a path.
Seriously, every shape, every line is based on anchor points. You can use the Pen Tool to draw paths, but the most interesting thing is that every line drawn with a brush is a path too. Does this ring a bell? That’s right! When your clumsy mouse will lead the line somewhere else that you wanted, you don’t need to undo or erase it. You just click the points it’s made of and fix the shape.
There’s an even better thing! Ladies and gentlemen, let me introduce you to the feature that attracted me to Illustrator in my “tabletless” times: Line Fidelity. That’s something that can help simulate natural movements of the hand, fixing all the mistakes coming from an unprecise mouse (of course, the level of precision can be adjusted). Looks like it will be all you need, huh?

What About Pen Pressure?
Pen pressure is something you may really miss when you use a mouse. Luckily, Illustrator lets you simulate this effect too! There’s a tool called the Width Tool. With it, you can change thickness of any point of the line. In fact, it’s even more precise than drawing with a tablet pen!
The Width Tool, though very useful, has some disadvantages. First, it takes away the spontaneity from the drawing process – you need to create dull, rigid lines and fix them later. Second, this tool appeared for the first time in CS5 version, so not everyone will have a chance to try it.
Another way to draw smooth, fast, variable width lines is to create a brush for it. It’s very easy and effective – it’s the second thing that will make your drawing in Illustrator so much smoother than in any raster editor.
Learn how to create simulated pressure by checking out tutorial on creating your own Width Profile brushes.

What Do You Need Paths For?
First of all, paths are easy to modify. In raster programs, a line once drawn, is finished. You can try to fix it by erasing parts of it and redrawing them, but in fact you’re just creating more lines covering the wrong one.
In Illustrator every line, as an object, is accessible even when you cover it with a hundred of new shapes. Let’s give an example: you’re drawing very fast, and suddenly you see you’ve drawn a messy looking line some time ago. In Photoshop you’ll need to spend some time carefully erasing bad parts, trying not to touch the right lines. In Illustrator you just select the line and edit it!


And you know what it means to “select” something in Illustrator? It’s just a matter of click, no matter what layer you’re on and what else there is on the same layer.

Since every line is a vector object, there’s no problem if you want to change its shape or position. Vector rotation or resize is lossless. Totally. That’s nice for animation, too.
Using colors in Illustrator couldn’t be easier. You can select an object and change its color at any time. Also, you can fill the area bordered with strokes with any color in a matter of seconds, losslessly.
What About Painting?
That’s a good question. Painting is connected strictly to traditional media, and by definition it’s impossible to paint in Illustrator.
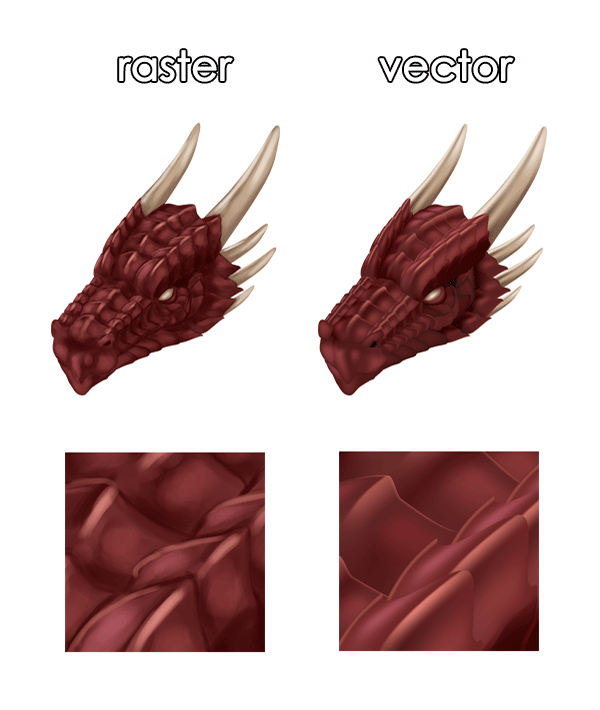
Just as we’ve discussed before, it’s raster editors that use splashes, and what’s painting about if not splashes of colors? So that’s right, you can’t paint in Illustrator. But you can do something different, and maybe even more amazing. Something that has no equivalent in traditional art, something between 2D and 3D. It’s called Gradient Mesh.
Gradient Mesh is about changing colors of chosen points on a shape. It may not sound very interesting, but when you notice that there’s color being calculated automatically between two points, well… that changes everything! Just imagine you’re drawing a face and adding a blush on the cheek. You select one point on the cheek, change its color to red and voila! It’s nicely blurred without any other tricks.

Most people say Gradient Mesh is hard to learn. Maybe, but I guess that learning to paint realistically with a mouse is even harder! Moreover, “painting” with Gradient Mesh is faster once you understand it. Just imagine drawing those in Photoshop, even with a tablet:

What Is So Special About Vector Brushes?
One word: colorful brushes. That’s right! In Illustrator you can draw with flowers, with fully shaded grass, even with puppies, while in Photoshop you can create only black-and-transparent brushes. Furthermore, they’re very easy to create and manage. Just imagine how much time it will you save!

So Join Us on the Scalable Side!
So is Illustrator a perfect tool? Of course not, nothing is. But when you want to create and you’re limited with a universal tool – a mouse – you should definitely take a look at vector editors. If you’re familiar to Photoshop, coming to Illustrator will be easier, since they have almost the same interface and shortcuts. You can also try alternatives, like free Inkscape and see if it suits you. Start using your mouse for the kind of art that it’s more suitable for and you’ll see it can be great too! For a start you can take a look at one of these great, in depth guides to Illustrator tools.
Considering getting a tablet? Why not check out our article on whether a Graphics Tablet is right for you.