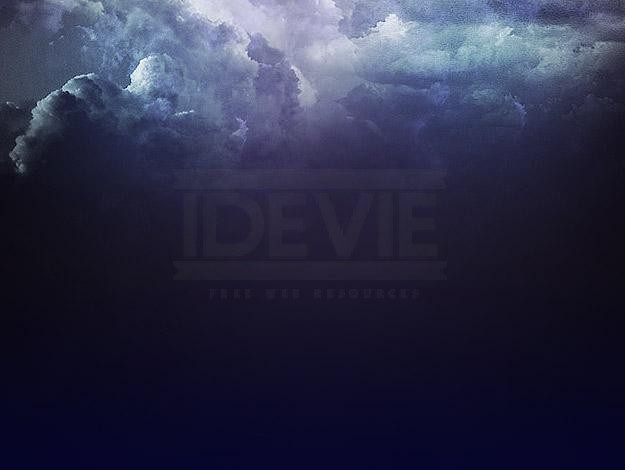
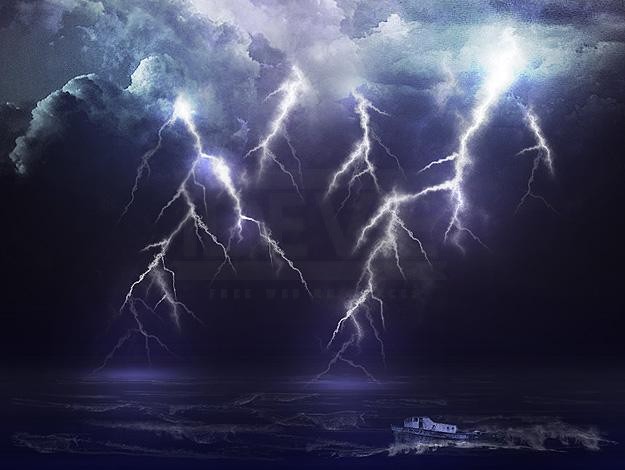
In this tutorial you will learn how to create a perfect storm scene. The tutorial is divided into 4 different parts, each teaching you how to create one of the 4 elements needed for the final image: Clouds, Lightning, Rain and Ocean. For this tutorial I preferred to create my original image much larger and at the end scale it to 3/4th of its size, correct the color scheme and sharpen it up. Doing this greatly increased the quality of my final image, so keep in mind that your final image will be smaller than your original. Bellow is what you’ll be able to create by the end of the tutorial.

Step 2: Clouds
Start a new document around 800×600 or any other different size as long as its pretty big and follows that proportion. Fill the background using your Paint Bucket Tool with the color #201b30. Next, on a new layer above it, fill the whole layer with the color black #000000. Select your eraser tool and with a feathered brush (From the Basic Brushes) around 800 pixels or so, press once to erase the top middle part of the layer filled up with black. Next, lower the alpha of the black layer to around 80%. Create a new layer on top of it and with a Foreground to Transparent Gradient, add some dark blue (#050429) on the lower part of your background. This is where your ocean will be. That’s it for creating the background. Your image should be similar to the following:

Now that we have a background resembling the colors of a night on the ocean ready, its time to add the clouds! I’ve used many custom brush sets in the past and as far as clouds go, I’ve found one that I’ve enjoyed above all others. Google “Cloud Brushes by Blazter [JavierZhX]” to get yourself a free copy.
Here’s a link where you can find them: [url=”http://javierzhx.deviantart.com/art/Cloud-Brushes-34277964″]http://javierzhx.dev…rushes-34277964[/url] . Just in case the link is broken, remember, Google is your friend!Take a little bit of time and play with these brushes and color white to create a really beautiful sky. Use as many of the brushes as you can fit, put each of them on a separate layer and play with each layer’s alpha if you feel its needed. At the end, create a new layer on top of all the previous ones, and using a large feathered brush around 600 px add some color to the clouds by placing the brush stroke couple of times with the color blue #60edf1. Change the layer’s mode to Overlay and reduce the alpha as much as its needed (30%). Here’s what I was able to come up with:
Here’s a link where you can find them: [url=”http://javierzhx.deviantart.com/art/Cloud-Brushes-34277964″]http://javierzhx.dev…rushes-34277964[/url] . Just in case the link is broken, remember, Google is your friend!Take a little bit of time and play with these brushes and color white to create a really beautiful sky. Use as many of the brushes as you can fit, put each of them on a separate layer and play with each layer’s alpha if you feel its needed. At the end, create a new layer on top of all the previous ones, and using a large feathered brush around 600 px add some color to the clouds by placing the brush stroke couple of times with the color blue #60edf1. Change the layer’s mode to Overlay and reduce the alpha as much as its needed (30%). Here’s what I was able to come up with:
Step 3: Lightning
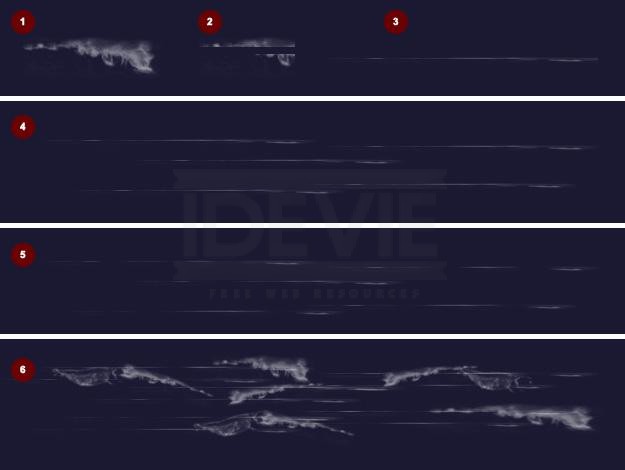
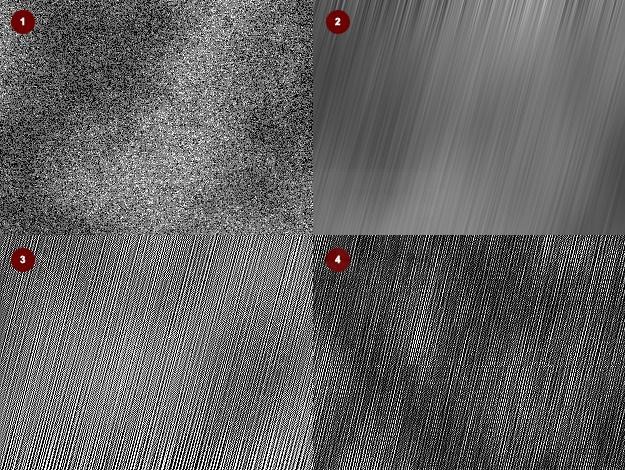
Next in line, we gotta create those mean lightning bolts coming down. Bellow is a diagram of what we’ll be doing step by step, from 1 to 7.
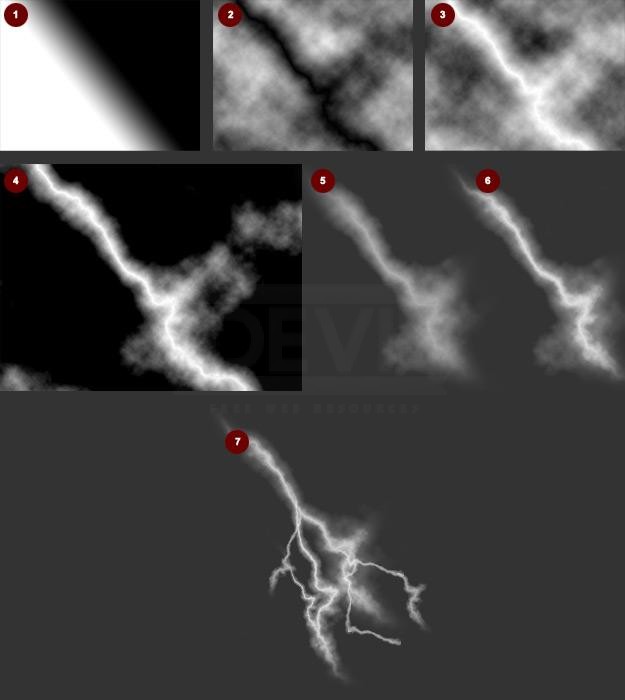
Start by creating an oblique gradient from black to white as shown in the diagram at #1 on a new layer. Next go to Filter > Render > Difference Clouds and you should obtain now the image in #2. Press CTRL+I to invest black to white and you should now be looking to something similar to the image in #3. Next press CTRL+L and a window should pop on your screen. Where it says “input levels” at the bottom of that graph you should have 3 arrows: a black one, a gray one and a white one. Move the black arrow from left to right until your image looks similar to #4 in the above diagram. Next, change the blending mode of the layer you’re working on to Screen and lower the alpha to 60%. You should now have something similar to #5 but with sharp edges. Use your eraser tool and a feathered brush and smooth out the rough edges so that it looks like the image in #5. Next duplicate the layer from #5 and press CTRL+L again. Move the black arrow again from left to right enough where you can see a thinner lightning bolt in the middle and everything around it looks more like a glow. These are pretty much the basics of creating the lightning bolts. To go from #6 to #7 all you have to do, is duplicate both layers that you’ve now created, rotate and scale them multiple times so you can shape your lightning bolt to look more like “tree roots”. To make it look even better, you can repeat the first steps again, so that you have lightning bolts of various shapes.
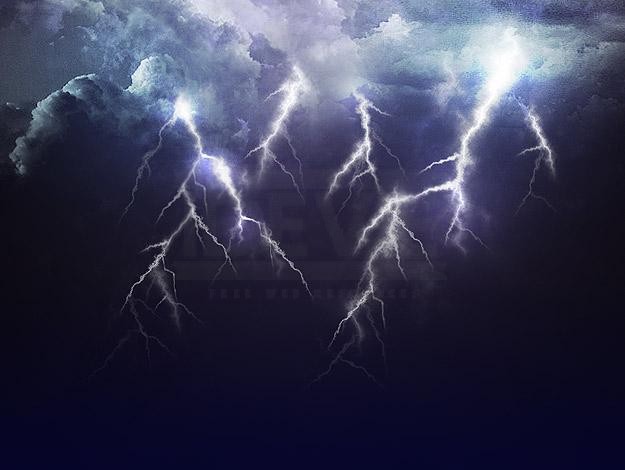
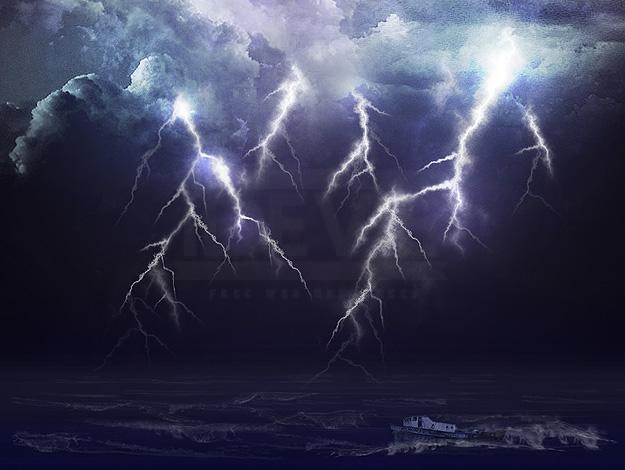
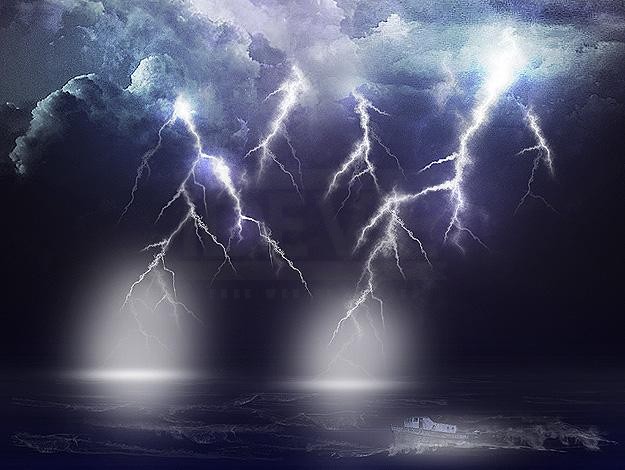
After creating several different lightning bolts on your sky, create a new layer on top of everything else. We’ll need to make some glow spots where the lightning starts. Use a feathered brush ~60px or so and press once at the top of each lightning bolt. Change the layer’s mode to Overlay and play with its Alpha until it is to your liking. Here’s my result:
After creating several different lightning bolts on your sky, create a new layer on top of everything else. We’ll need to make some glow spots where the lightning starts. Use a feathered brush ~60px or so and press once at the top of each lightning bolt. Change the layer’s mode to Overlay and play with its Alpha until it is to your liking. Here’s my result:
Step 4: Creating The Ocean
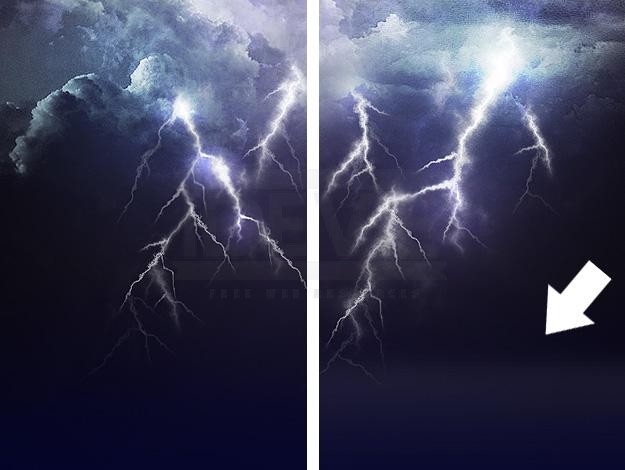
We’re going to start first by adding a little depth to the ocean. In the diagram bellow you can see what I mean by that. Creating that, is pretty simple. All you have to do, is to create a new layer, using your Rectangular Marquee Tool create a selection where your ocean should be and with a Foreground To Transparent Gradient with the color white, create a gradient from the top to the bottom. Next, go to Filter > Blur > Gaussian Blur and choose a number around 10 or so. Play with the alpha of the layer until it looks like in the diagram bellow. My layer’s Alpha was set to 60%.
Next, to create the waves we’re going to use some brushes. Download Water Photoshop & GIMP Brushes from [url=”http://www.obsidiandawn.com/water-ii-photoshop-gimp-brushes”]http://www.obsidiand…op-gimp-brushes[/url] . The diagram bellow is what I’ll be explaining shortly.
So, off we start in #1 with just applying the brush stroke. Next, using the Rectangular Marquee Tool cut portions of it as shown in #2. Resize your layer and make it wide and thin just like in #3. Next duplicate the shape from #3 multiple times just like in #4. This will act as the base for your waves. Since no waves are this long, use your eraser tool with a feathered brush to make the lines more “dotted” just like in #5. Now that we have a strong foundation for our waves, we just need to add the tips of it. Use the brushes to add a little texture, such as the one in #1, until you get something similar to #6. To make your job easier, here are the brushes I used for the texture: 2304px, 1878px, 792px. Make sure to use the transform tool to incline the brush strokes, creating richer waves. You pretty much want to use 2 waves at a time, creating an upside down V. This is what my picture looks like:

Step 5: Details On The Ocean
Now that we got our ocean ready, its time we add some more details to it, to make it fit the big picture. We’ll start by adding a boat! Any boat will really do, one of your own pictures or one off Google. Here’s a picture of a boat I found on Google:
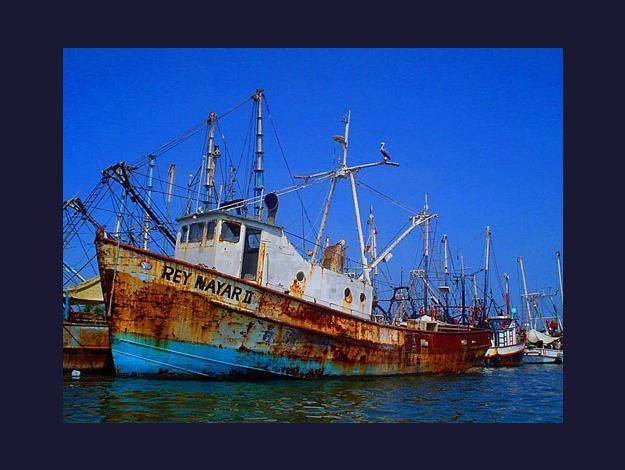
Use your Polygonal Lasso Tool and crop the boat out of the picture. In case you dont know how to do that, just use the tool and make an outline of the boat, then press CTRL+J to have that outline sent to a new layer. You can use ALT and/or SHIFT to substract/add to your selection. Press CTRL+U and reduce the saturation to -100 to have your boat in grayscale. Resize it, put it on a nice wave and then, on top of it, towards the bottom add another Wave Brush Stroke. You want your boat to be fighting through the waves pretty much. Here’s my result:
Next, we need to add some dark spots and some light spots on the ocean. We need to have the portions of the ocean where the lightning bolt hits the water and where the boat is a little lighter, so they stand out. We’ll do that, by creating a new layer and with a large feathered brush, adding blured circles on top and then changing the layer’s mode to Overlay. To make these stand out even more, we’ll add dark spots everywhere else. First you can see teh brush strokes without the layers on overlay and next, you can see the result of the overlay. Make sure to play with the layer’s Alpha until you get a result you like.
Step 6: Adding The Rain
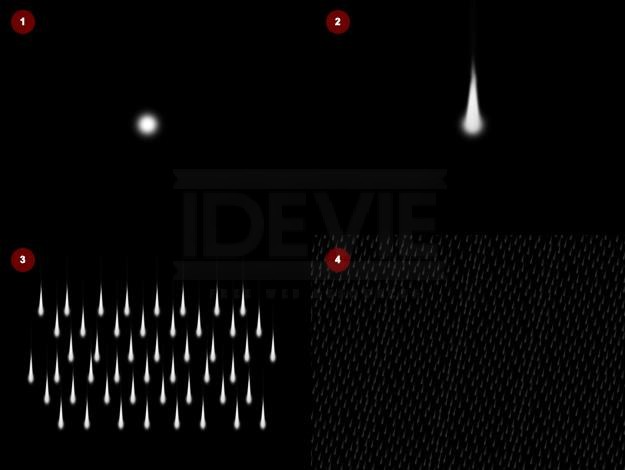
We are going to add two types of rain. Small rain that just fades off in the background, and the actual rain drops that you can see. Adding both types of rain, will give the image a sense of depth. First we’ll start with the background rain. Create a new layer and then go to Filter > Render > Clouds. If your clouds don’t have too many contrast areas go to Filter > Render > Difference Clouds several times until you do. Next go to Filter > Add Noise > Noise with 94%, Uniform and with Monochromatic unchecked. Press CTRL+U and reduce the Saturation to -100 to have it black and white. You should have something similar to #1 in the diagram bellow. Next to go Filter > Blur > Motion Blur with a 75 angle and 70px distance. Press CTRL+F to apply the effect again. You should now have something similar to #2. Next, go to Filter > Sharpen > Sharpen, repeat this step until your image looks like in #3. To increase the contrast area press CTRL+L and move the black arrow under the graph to the right until it looks like in #4.
Change the layer’s Alpha to 10%. Your image should now look like the following:

Next, it’s time to add the rain drops on top of the background rain. Bellow is what we’ll be doing:
We’ll start off with a feathered brush and one simple dot. Next, using the smudge tool and a feathered brush about 2/3 its size, start smudging vertically until you have something similar to #2. Next, resize the drop shape so that its smaller and duplicate it several times like in #3. Resize everything again so its smaller, multiply it so it covers your entire screen and then using the Free Transform Tool (CTRL+T) tilt it so that its at the same angle with the background rain. Change the layer’s Blending Mode to Overlay and reduce the Alpha to about 50-60% based on your liking. I also happened to have a Brush Set with moons made by hawksmot so I added a moon in my top left corner of the image. This is my result:
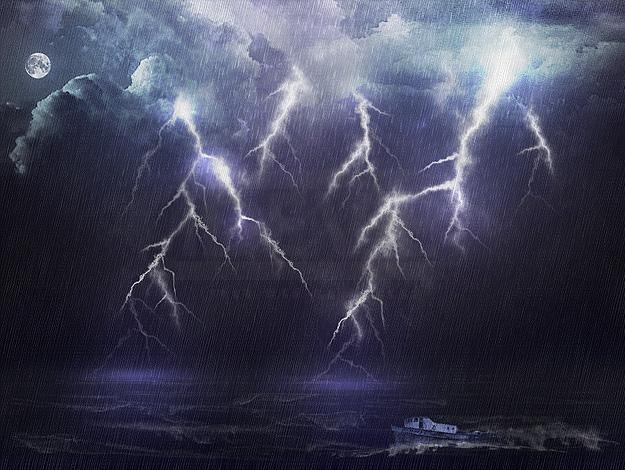
If you like your result, you can stop here. I decided to do a little more work on the color scheme and dark/light spots. I opened the JPG of my final product and then selected the areas I wanted to recolor using my Marquee Rectangular Tool. To make sure to color transitions are smooth, I went to Select > Modify > Feather and chose 10 for my value. This is my final result: