In this tutorial, we’ll build a simple login form and add front-end validation with vanilla JavaScript. The overarching goal is to provide helpful feedback to the end-user and ensure the submitted data is what we want!
info
This tutorial is written so that beginners can follow along—but some basic JavaScript knowledge and understanding of coding principles will certainly help!
Live Demo of Our JavaScript Form Validation
Check out the pen below to test our JavaScript form validation—fork it, feel free to copy snippets of the code, and follow the tutorial to see how it was created!
Why Modern JavaScript Works Well Enough
Thanks to the recent advancements in JavaScript, we can confidently use modern JavaScript to accomplish form validations without any dependencies.
However, some frameworks out in the wild simplify the validation strategy. We won’t be using any dependencies for this tutorial to make everything function.
It’s also worth mentioning in many situations, HTML5 has built-in validations that might work well enough for your projects. These can be handy if you aren’t interested in creating your custom validations or lack the extra time. This tutorial will leverage the custom route to make the experience more branded.
1. Add the Markup
Starting with the HTML, I created a simple account creation form displayed in the center of a page. The form features four input fields (username, email, password, password confirmation) and a submit input button.
Within the markup, we’ll add some additional elements to provide validation feedback to the end-user. These include some SVG icons (sourced from heroicons.com and some empty <span> tags. These are to provide actionable instructions if a field isn’t passing a validation.
<div class="container">
  <h2 class="title">Create a new account</h2>
  <form action="#" class="form">
    <div class="input-group">
      <label for="username" class="label">Username</label>
      <input id="username" placeholder="John Doe" type="text" class="input" />
      <span class="error-message"></span>
      <svg class="icon icon-success hidden" xmlns="https://www.w3.org/2000/svg" width="24" height="24" viewBox="0 0 24 24"><title>check-circle</title><g fill="none"><path d="M9 12l2 2 4-4m6 2a9 9 0 1 1-18 0 9 9 0 0 1 18 0z" stroke-width="2" stroke-linecap="round" stroke-linejoin="round"></path></g></svg>

      <svg class="icon icon-error hidden" xmlns="http://www.w3.org/2000/svg" width="24" height="24" viewBox="0 0 24 24"><title>exclamation-circle</title><g fill="none"><path d="M12 8v4m0 4h.01M21 12a9 9 0 1 1-18 0 9 9 0 0 1 18 0z" stroke-width="2" stroke-linecap="round" stroke-linejoin="round"></path></g></svg>
    </div>

    <div class="input-group">
      <label for="email" class="label">Email</label>
      <input id="email" type="email" class="input" autocomplete placeholder="[email protected]" />
      <span class="error-message"></span>
      <svg class="icon icon-success hidden" xmlns="http://www.w3.org/2000/svg" width="24" height="24" viewBox="0 0 24 24"><title>check-circle</title><g fill="none"><path d="M9 12l2 2 4-4m6 2a9 9 0 1 1-18 0 9 9 0 0 1 18 0z" stroke-width="2" stroke-linecap="round" stroke-linejoin="round"></path></g></svg>

      <svg class="icon icon-error hidden" xmlns="http://www.w3.org/2000/svg" width="24" height="24" viewBox="0 0 24 24"><title>exclamation-circle</title><g fill="none"><path d="M12 8v4m0 4h.01M21 12a9 9 0 1 1-18 0 9 9 0 0 1 18 0z" stroke-width="2" stroke-linecap="round" stroke-linejoin="round"></path></g></svg>
    </div>

    <div class="input-group">
      <label for="password" class="label">Password</label>
      <input id="password" type="password" class="input" />
      <span class="error-message"></span>
      <svg class="icon icon-success hidden" xmlns="http://www.w3.org/2000/svg" width="24" height="24" viewBox="0 0 24 24"><title>check-circle</title><g fill="none"><path d="M9 12l2 2 4-4m6 2a9 9 0 1 1-18 0 9 9 0 0 1 18 0z" stroke-width="2" stroke-linecap="round" stroke-linejoin="round"></path></g></svg>

      <svg class="icon icon-error hidden" xmlns="http://www.w3.org/2000/svg" width="24" height="24" viewBox="0 0 24 24"><title>exclamation-circle</title><g fill="none"><path d="M12 8v4m0 4h.01M21 12a9 9 0 1 1-18 0 9 9 0 0 1 18 0z" stroke-width="2" stroke-linecap="round" stroke-linejoin="round"></path></g></svg>
    </div>

    <div class="input-group">
      <label for="password_confirmation" class="label"
        >Password Confirmation</label
      >
      <input id="password_confirmation" type="password" class="input" />
      <span class="error-message"></span>
      <svg class="icon icon-success hidden" xmlns="http://www.w3.org/2000/svg" width="24" height="24" viewBox="0 0 24 24"><title>check-circle</title><g fill="none"><path d="M9 12l2 2 4-4m6 2a9 9 0 1 1-18 0 9 9 0 0 1 18 0z" stroke-width="2" stroke-linecap="round" stroke-linejoin="round"></path></g></svg>

      <svg class="icon icon-error hidden" xmlns="http://www.w3.org/2000/svg" width="24" height="24" viewBox="0 0 24 24"><title>exclamation-circle</title><g fill="none"><path d="M12 8v4m0 4h.01M21 12a9 9 0 1 1-18 0 9 9 0 0 1 18 0z" stroke-width="2" stroke-linecap="round" stroke-linejoin="round"></path></g></svg>
    </div>

    <input type="submit" class="button" value="Create account" />
  </form>
</div>
Things to note at this point:
- Each input field is grouped in a
divelement with a class ofinput-group. We’ll use CSS to add some space between each field. Within each grouping, we have a set of SVG icons, a span field, and an input field. We will use SVG icons to provide a visual cue whether the input is valid or invalid. - We’ll use CSS to initially hide each icon from view. Then we can leverage JavaScript to hide and show them relative to the user’s input.
- I also plan to display a helpful message within the
spantag with a class oferror-messageshould the form’s validations be triggered to execute. There is a singlespantag per input grouping. - Finally, notice that each input has an id assigned. The id attribute is vital for the tutorial’s JavaScript portion.
2. Styling the Form With CSS
To make the form much easier to use and more accessible, we’ll add some CSS.
I linked to a Google Fonts Specimen called Inter (which you may recognize from Tuts+). It’s a great sans-serif font face adaptable to many use cases.
If you’re using CodePen and following along, you can find our font linked in the head tag options inside the HTML pane of the editor.
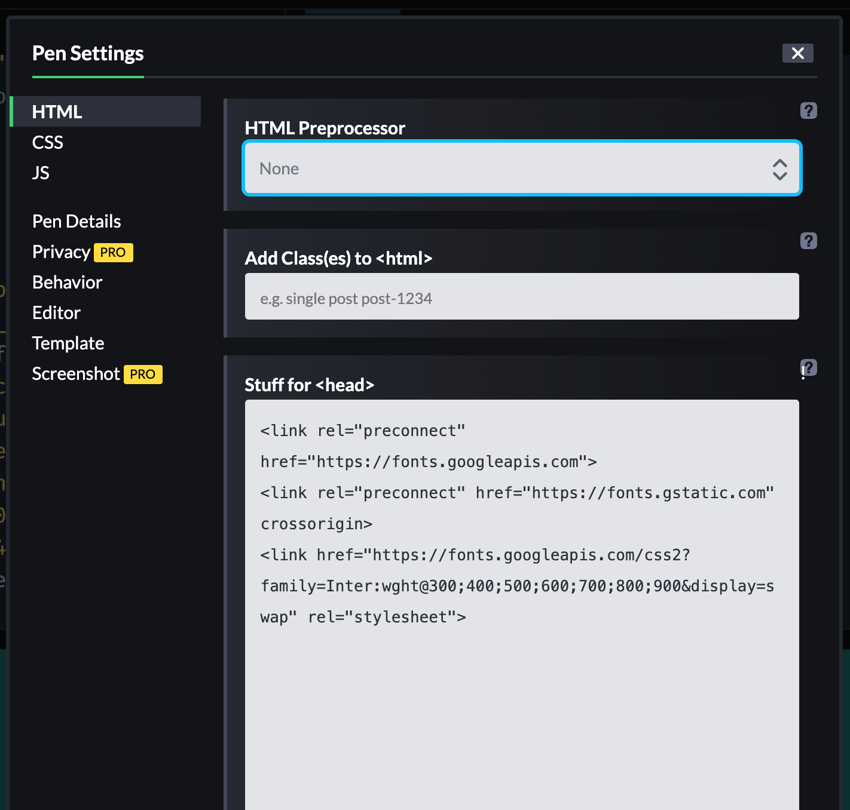
The CSS is relatively straightforward. We are using CSS to hide all icons on the initial load, and we’ll be toggling the state of them with JavaScript coming up.
* {
  box-sizing: border-box;
}

body {
  background-color: teal;
}

.title {
  margin-bottom: 2rem;
}

.hidden {
  display: none;
}

.icon {
  width: 24px;
  height: 24px;
  position: absolute;
  top: 32px;
  right: 5px;
  pointer-events: none;
  z-index: 2;
}

.icon.icon-success {
  stroke: teal;
}

.icon.icon-error {
  stroke: red;
}

.container {
  max-width: 460px;
  margin: 40px auto;
  padding: 40px;
  border: 1px solid #ddd;
  border-radius: 10px;
  background-color: white;
  box-shadow: 0 20px 25px -5px rgba(0, 0, 0, 0.1), 0 10px 10px -5px rgba(0, 0, 0, 0.04);
}

.label {
  font-weight: bold;
  display: block;
  color: #333;
  margin-bottom: 0.25rem;
  color: #2d3748;
}

.input {
  appearance: none;
  display: block;
  width: 100%;
  color: #2d3748;
  border: 1px solid #cbd5e0;
  line-height: 1.25;
  background-color: white;
  padding: 0.65rem 0.75rem;
  border-radius: 0.25rem;
}

.input::placeholder {
  color: #a0aec0;
}

.input.input-error {
  border: 1px solid red;
}

.input.input-error:focus {
  border: 1px solid red;
}

.input:focus {
  outline: none;
  border: 1px solid #a0aec0;
  box-shadow: 0 1px 3px 0 rgba(0, 0, 0, 0.1), 0 1px 2px 0 rgba(0, 0, 0, 0.06);
  background-clip: padding-box;
}

.input-group {
  margin-bottom: 2rem;
  position: relative;
}

.error-message {
  font-size: 0.85rem;
  color: red;
}

.button {
  background-color: teal;
  padding: 1rem 2rem;
  border: none;
  border-radius: 0.25rem;
  color: white;
  font-weight: bold;
  display: block;
  width: 100%;
  text-align: center;
  cursor: pointer;
}

.button:hover {
  filter: brightness(110%);
}
3. Plugging in the JavaScript
Now on to the feature presentation! Adding JavaScript is what is going to make or break this form.
I mentioned a few goals before, but here is the entire list in an outline:
- Ensure the correct data is entered into each field.
- Display helpful feedback if a field is valid or invalid
- Don’t allow the form to be submitted if any fields are invalid
- Validate the form in real-time as a user types or clicks Create account.
Thinking Modularly
With the onset of ES6 and further support of JavaScript in modern browsers, we can leverage some newer features that allow the code we write to be more reusable.
With that in mind, I’ll be using JavaScript’s constructor pattern and create a new Class that can be used for future forms if necessary.
These patterns stem from backend programming concepts, though, in JavaScript, it’s more of extraction since JavaScript isn’t a traditional programming language. I’d recommend reading more about the inner-workings of classes and constructors if you want to understand more behind how they work.
I should mention that the final code isn’t 100% modular, but the idea is to shift it that way as much as possible. As your application or website scales, it might make sense to entertain the idea of a JavaScript framework since frameworks tend to extract repeated logic. These frames of thought allow you to reuse code and keep things more organized.
Start With a New Class
To kick things off, we’ll create a new class called FormValidator.
class FormValidator {}
We’ll add a constructor function inside the class and accept two arguments. You can think of this function as the one you get for free with any class in JavaScript. The idea is to be able to call the class later on somewhere else and pass in arguments for reuse. That might not be 100% clear yet, but as we progress, it should make more sense.
class FormValidator {
  constructor(form, fields) {
    this.form = form
    this.fields = fields
  }
}
We’ll initialize new values to instances in the FormValidator class inside the constructor function. These values allow us to use them anywhere within the scope of the class, thanks to the this keyword. In this case, this refers to the scoped class FormValidator, but this can always change based on its scope.
The constructor function initializes a form and the fields within the form. My goal is to have the FormValidator extract the logic away, so all we have to do is pass references to a given form and its field by their identifiers or names. That will make more sense in a bit.
Target Form Elements
Next up, I’ll create some variables that query the DOM for the elements we will target. Those, of course, include the form and its fields.
With those in place, we can set up a new instance of our FormValidator class.
const form = document.querySelector(".form")
const fields = ["username", "email", "password", "password_confirmation"]

const accountForm = new FormValidator(form, fields)
The form variable is responsible for querying the DOM to find the form element on the page with a class of .form. The fields variable is an array of names referenced by each form field’s id attribute. The names in your HTML must match the contents of the array values for proper targeting. We’ll use the array values inside the FormValidator class to query for each field as necessary.
The accountForm variable is our reference to a new instance of the FormValidator class. We pass in the form and fields variables which initializes those inside the class for use wherever we need them.
At this point, nothing gets called from the class, so we need to add some more code to kick that action off.
class FormValidator {
  constructor(form, fields) {
    this.form = form
    this.fields = fields
  }

  initialize() {
    console.log(this.form , this.fields)
  }
}

const form = document.querySelector('.form')
const fields = ["username", "email", "password", "password_confirmation"]

const accountForm = new FormValidator(form, fields)

accountForm.initialize()
I added an initialize function to the FormValidator class below the constructor function. You can name this function whatever you wish, but I’ll commonly use initialize as a preference.
Inside the initialize function, I wrote a simple console.log() statement and passed in the values we set up within the constructor function. If all goes well, this should log the instance of our form and the array of field ids I mentioned prior.
At the end of the file, I’m calling the initialize() function directly.
accountForm.initialize()
That should log something like the following in your browser’s console.
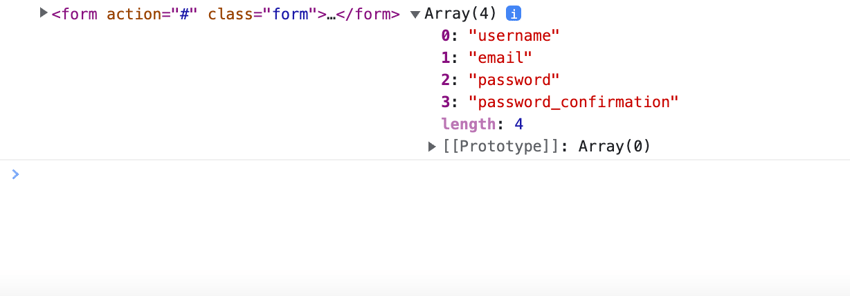
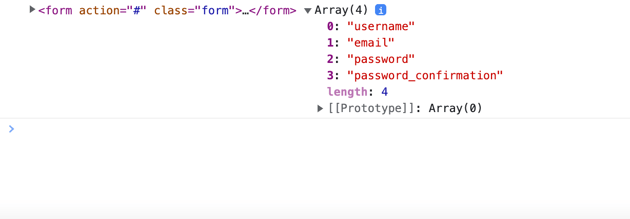
Success! We know the code so far is accurate thanks to those values outputting what we expect.
4. Add Form Validations on User Input
Listening to a user’s input will help us preemptively validate each field. We can hook into the JavaScript addEventListener() method to do just that. You can listen to various events, and in this section, we’ll pay attention to the input event specifically.
I’ll make a new function in the class called validateOnEntry().
class FormValidator {
  //... previous code omitted for brevity

  validateOnEntry() {
    let self = this
    this.fields.forEach(field => {
      const input = document.querySelector(`#${field}`)

      input.addEventListener('input', () => {
        // extracted logic to a new function
        self.validateFields(input)
      })
    })
  }
}
A lot in these few lines of code is likely confusing. Let me explain in greater detail.
Understanding Scope
First, we create a variable called self and assign it to this.
Setting this variable up acts as a way to target the value of this relative to the scope of the overarching class (FormValidator) from within other nested scopes.
The reason I included the self variable is so we can have access to the core class FormValidator inside the addEventListener() method since the scope changes if you nest any code inside the function. Read more about Scope on MDN.
Looping Through
To properly validate each field, we’ll need to loop through each array property inside the fields variable we set up using the constructor function. The code outputs each field name we want to target using the forEach() method.
During the loop, we use backticks to dynamically query the document (DOM) to find the appropriate field identified by the id attribute.
Finally, we use each dynamic field, assign it to an input variable and call the addEventListener() function. We listen for an input event and call a new function we’ll create named validateFields. This function accepts a single input for validation purposes.
I chose to extract the validation logic into a new function called validateFields() because much of the code is reusable. Removing the code to a new function also aids in legibility from a developer’s point of view.
5. Validating Each Field
To validate the form fields, we’ll need some conditional statements along with some bells and whistles to make the interface react in real-time.
Before we write the logic for the validateFields function, I’ll write another function responsible for the design portion. We can reuse this function later, so it makes sense to extract it to a single set of logic, which I called setStatus.
class FormValidator {
  // previous code omitted for brevity

  validateOnEntry() {
    let self = this
    this.fields.forEach(field => {
      const input = document.querySelector(`#${field}`)

      input.addEventListener('input', () => {
        // extracted logic to a new function
        self.validateFields(input)
      })
    })
  }

  validateFields() {
    // logic to come
  }

  setStatus(field, message, status) {
    const successIcon = field.parentElement.querySelector('.icon-success');
    const errorIcon = field.parentElement.querySelector('.icon-error');
    const errorMessage = field.parentElement.querySelector('.error-message');

    if (status === "success") {
      if (errorIcon) { errorIcon.classList.add('hidden') }
      if (errorMessage) { errorMessage.innerText = "" }
      successIcon.classList.remove('hidden')
      field.classList.remove('input-error')
    }

    if (status === "error") {
      if (successIcon) { successIcon.classList.add('hidden') }
      field.parentElement.querySelector('.error-message').innerText = message
      errorIcon.classList.remove('hidden')
      field.classList.add('input-error')
    }
  }
}
The setStatus function accepts three parameters: the field we are targeting, a message if needed, and the validation status.
Inside the function, we begin with three variables. successIcon, errorIcon, and errorMessage.
If you recall, each form grouping has a set of these elements in the markup. Two are SVG icons, and the other is an empty span that takes responsibility for displaying text content if validation fails. The field parameter will be how each repeated icon and span tag is targeted relative to its positioning in the DOM.
Below the variables are two conditional statements that check for string status values we’ll add to the validateFields function.
One statement checks for "success" and the other for "error" state denoted by a status parameter that gets passed through to the setStatus function.
Within each conditional, you’ll find more logic that toggles icon classes and resets the error messages to any message passed through to the setStatus function. The logic in this code is all happening in real-time as a user types into a field.
Ensuring Fields Aren’t Empty
With the setStatus function authored, we can now put it to use by performing the validations on each field. Depending on your forms, you may require unique validations if you have individual form fields. Maybe you don’t want any fields to be blank, for example.
We’ll start with that goal and ensure each field isn’t blank.
class FormValidator {
  // code omitted for brevity
  validateFields(field) {
    if (field.value.trim() === "") {
      this.setStatus(field, `${field.previousElementSibling.innerText} cannot be blank`, "error")
    } else {
      this.setStatus(field, null, "success")
    }
  }

  setStatus(field, message, status) {
    // code omitted for brevity
  }
}
The code above takes the field argument and targets its value. Using the trim() method in JavaScript, we can remove any white spaces and check if the value is an empty string.
If the input is empty, we’ll use the setStatus function and pass the field, the query statement to find the .error-message span tag relative to the field, and the status of "error".
If the input is not empty, we can use the same setStatus function within the FormValidator class to display a success state. No message is necessary for this state so we can pass null for the message argument.
Ensuring an Email Address is Valid
When creating your own JavaScript form validation, checking for valid email addresses is an art in itself! Here’s how we’ll go about it:
class FormValidator {
  // code omitted for brevity
  validateFields(field) {
    // Check presence of values
    if (field.value.trim() === "") {
      this.setStatus(field, `${field.previousElementSibling.innerText} cannot be blank`, "error")
    } else {
      this.setStatus(field, null, "success")
    }

    // check for a valid email address
    if (field.type === "email") {
      const re = /S+@S+.S+/
      if (re.test(field.value)) {
        this.setStatus(field, null, "success")
      } else {
        this.setStatus(field, "Please enter valid email address", "error")
      }
    }
  }

  setStatus(field, message, status) {
    // code omitted for brevity
  }
}
Firstly, we’ll make sure the field type defined with the JavaScript API is an email type.
We’ll then leverage some REGEX patterns to ensure the email entered matches our expectations. The test() method allows you to pass in a REGEX pattern to return a boolean (true or false value) by “testing” it against what value is given.
If the value makes the cut, we’ll again use our setStatus functions to display feedback to the user. We can customize the message value to whatever makes sense for the validation.
Password Confirmation
Last but not least is the password confirmation validation. The goal is to ensure the password field matches the password confirmation field, and we’ll do this by comparing both values.
class FormValidator {
  // code omitted for brevity
  validateFields(field) {
    // Check presence of values
    if (field.value.trim() === "") {
      //...
    }

    // check for a valid email address
    if (field.type === "email") {
      //...
    }

    // Password confirmation edge case
    if (field.id === "password_confirmation") {
      const passwordField = this.form.querySelector("#password")

      if (field.value.trim() == "") {
        this.setStatus(field, "Password confirmation required", "error")
      } else if (field.value != passwordField.value) {
        this.setStatus(field, "Password does not match", "error")
      } else {
        this.setStatus(field, null, "success")
      }
    }
  }

  setStatus(field, message, status) {
    // code omitted for brevity
  }
}
We need to go one step further to validate multiple edge cases for the password confirmation field. The password confirmation, of course, can’t be a blank field, and we also need to ensure it matches the password input’s field value.
For each case, we display the appropriate status.
6. Validation on Submit
Our JavaScript form validation is almost complete! But we have yet to account for the submit button, a critical piece of the form itself. We’ll need to repeat the process we did for the input event for the submit event using another addEventListener() function.
That will come from another function I’ll call validateOnSubmit().
class FormValidator {
  // code omitted for brevity
  validateOnSubmit() {
    let self = this

    this.form.addEventListener("submit", (event) => {
      event.preventDefault()
      self.fields.forEach((field) => {
        const input = document.querySelector(`#${field}`)
        self.validateFields(input)
      })
    })
  }
}
In the validateOnSubmit() function we’ll target the form instance we set up on the constructor function previously. The form gives us access to the event listener type known as submit since those elements are tied together in HTML.
Using an addEventListener() function, we’ll listen for the submit event and pass the event through to the function’s body.
Inside the function body we can use the preventDefault() method to keep the form from submitting in its default manner. We want to do this to prevent any nasty data from passing if validation is not passing.
We’ll again set a self variable assigned to this so we have access to the higher level of scope in our FormValidator class.
With this variable, we can loop through the fields instance initialized within the FormValidator class. That gets performed from within the addEventListener() function.
Each field we loop through is assigned to an input variable and finally passed through the validateFields function we created previously.
A lot is happening here, but luckily we can reuse a lot of code from before to accomplish the same goals!
Clicking the Create account button ensures each field is valid before making it through.
7. Calling the Validations
The last piece of the JavaScript form validation puzzle is calling both the validateOnEntry() and validateOnSubmit() functions. If you recall, we called the initialize() function at the beginning of this tutorial. I’ll use it to call the two functions.
class FormValidator {
  constructor(form, fields) {
    this.form = form
    this.fields = fields
  }

  initialize() {
    this.validateOnEntry()
    this.validateOnSubmit()
  }

  //code omitted for brevity...
}
The Final Result
With all our validations and functions in place, here’s the final JavaScript form validation code for reference. Much of this code is reusable, and you can always add additional field types.
class FormValidator {
  constructor(form, fields) {
    this.form = form
    this.fields = fields
  }

  initialize() {
    this.validateOnEntry()
    this.validateOnSubmit()
  }

  validateOnSubmit() {
    let self = this

    this.form.addEventListener("submit", event => {
      event.preventDefault()
      self.fields.forEach((field) => {
        const input = document.querySelector(`#${field}`)
        self.validateFields(input)
      })
    })
  }

  validateOnEntry() {
    let self = this
    this.fields.forEach((field) => {
      const input = document.querySelector(`#${field}`)

      input.addEventListener("input", () => {
        self.validateFields(input)
      })
    })
  }

  validateFields(field) {
    // Check presence of values
    if (field.value.trim() === "") {
      this.setStatus(field, `${field.previousElementSibling.innerText} cannot be blank`, "error")
    } else {
      this.setStatus(field, null, "success")
    }

    // check for a valid email address
    if (field.type === "email") {

      const re = /S+@S+.S+/

      if (re.test(field.value)) {
        this.setStatus(field, null, "success")
      } else {
        this.setStatus(field, "Please enter valid email address", "error")
      }
    }

    // Password confirmation edge case
    if (field.id === "password_confirmation") {

      const passwordField = this.form.querySelector("#password")

      if (field.value.trim() == "") {
        this.setStatus(field, "Password confirmation required", "error")
      } else if (field.value != passwordField.value) {
        this.setStatus(field, "Password does not match", "error")
      } else {
        this.setStatus(field, null, "success")
      }
    }
  }

  setStatus(field, message, status) {
    const successIcon = field.parentElement.querySelector(".icon-success")
    const errorIcon = field.parentElement.querySelector(".icon-error")
    const errorMessage = field.parentElement.querySelector(".error-message")

    if (status === "success") {
      if (errorIcon) {
        errorIcon.classList.add("hidden")
      }

      if (errorMessage) {
        errorMessage.innerText = ""
      }

      successIcon.classList.remove("hidden")
      field.classList.remove("input-error")
    }

    if (status === "error") {
      if (successIcon) {
        successIcon.classList.add("hidden")
      }

      field.parentElement.querySelector(".error-message").innerText = message
      errorIcon.classList.remove("hidden")
      field.classList.add("input-error")
    }
  }
}

const form = document.querySelector(".form")
const fields = ["username", "email", "password", "password_confirmation"]

const validator = new FormValidator(form, fields)
validator.initialize()
A Word of Warning!
If a user toggles off JavaScript in their browser, you risk letting insufficient data into your website or application. This problem is the downside to using only front-end form validation.
I would advise adding a fallback solution for form validations using something like backend code.
I write a lot of applications using front-end and backend code using a web application framework like Ruby on Rails. The framework handles a lot of these problems for me along with enhanced security features.
Even if I add front-end validation, I’ll almost always take the extra initiative to add backend validations to an application or website.
Adding backend validations ensures that if JavaScript happens to be disabled in a browser or maybe a fluke incident occurs, I can still depend on the backend code (typically on a server) to keep insufficient data out.
Closing Thoughts
While there are many enhancements we can make to this sample account creation form, I hope the approaches taken in this tutorial have shed some light on ways you can enhance your own forms with simple JavaScript validation.
Remember, front-end validations are only part of the piece of properly validating form submission data.
A backend solution or some intermediary step to filter the data is a significant barrier to keeping the nasty data from reaching wherever you store your data. Happy coding!
Learn More Front End JavaScript
We have a growing library of front-end JavaScript tutorials on Tuts+ to help you with your learning: