Introduction
SceneKit is a high-level 3D graphics API that has been available in OS X since version 10.8 (Mountain Lion) and was introduced on iOS with the release of iOS 8. In this tutorial, I show you the major improvements and new capabilities the framework has gained with the release of iOS 9 and OS X 10.11 El Capitan.
Prerequisites
To follow along with me, you need to have Xcode 7.2 or later installed on your machine. This version of Xcode includes Swift 2.1 and the latest iOS 9 and OS X El Capitan SDKs. I’m also going to assume that you are already familiar with the SceneKit framework. If you are new to SceneKit, then I recommend reading my introductory tutorial first.
1. Xcode Scene Editor
The most significant addition to SceneKit in iOS 9 and OS X El Capitan is the ability to create and edit scenes using a visual editor built into Xcode.
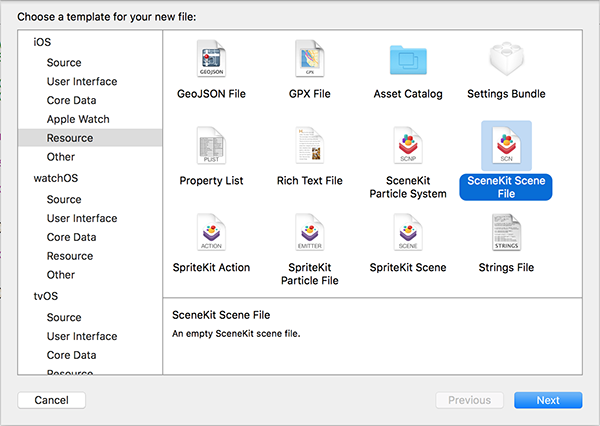
Create a new Xcode project by choosing the iOS > Application > Single View Application template. Create a new file and choose the iOS > Resource > SceneKit Scene File template. Name the new file MainScene.

When you select the new file, Xcode presents you with a screen similar to the following:
Before adding any objects to your scene, you should first become familiar with navigating the new scene editor. Here are all the basic movement mechanics you can utilize:
- Clicking and dragging rotates the view around the point you are currently looking at.
- Scrolling pans the scene across the view.
- Pressing Alt or Option and scrolling vertically allows you to zoom the scene in and out. Note that this is also possible by pinching on a trackpad.
Once you are comfortable navigating your scene, click the Point of View menu at the bottom left of the scene editor and change it from Free camera to camera.
This resets your point of view to the camera that is added to the scene by default.
Open the Object Library on the right. It includes a variety of objects you can add to your scene. For now, we are only going to create a basic scene. Search for Sphere in the Object Library and drag an instance to your scene. When you select the sphere you added, a set of controls appear at its center.
These controls enable you to move the object around in your scene. You can also click and drag on any of the colored curves between the arrows to rotate the object.
From the Object library, add a Directional Light to your scene. Using the rotation controls, click and drag on the green curved line to rotate the light until your sphere is lit as shown in the following screenshot.
In addition to moving and rotating objects in your scene, you can also configure a range of properties to eliminate the need for scene setup code in your project. Select the sphere you added earlier, open the Attributes Inspector on the right, and change the sphere’s Radius to 0.5.
If you look through the Attributes Inspector, you will see that you can also edit various other properties of the sphere’s geometry.
Now that we have a basic scene set up, it is time to load this into an actual functioning app. Open ViewController.swift and replace the contents of the file with the following code:
import UIKit
import SceneKit
import SpriteKit

class ViewController: UIViewController {

    var sceneView: SCNView?
    var mainScene = SCNScene(named: "MainScene.scn")

    override func viewDidLoad() {
        super.viewDidLoad()
    }

    override func viewDidAppear(animated: Bool) {
        super.viewDidAppear(animated)

        self.sceneView = SCNView(frame: self.view.frame)
        self.sceneView?.scene = mainScene

        self.view.addSubview(self.sceneView!)

        let button = UIButton(type: .System)
        button.tintColor = UIColor.blueColor()
        button.setTitle("Transition", forState: .Normal)
        button.sizeToFit()
        button.addTarget(self, action: "didPressTransition", forControlEvents: .TouchUpInside)
        button.center.x = self.view.center.x
        button.frame.origin.y = self.view.frame.height - button.frame.height - 12
        self.sceneView?.addSubview(button)
    }

    func didPressTransition() {

    }

    override func didReceiveMemoryWarning() {
        super.didReceiveMemoryWarning()
    }
}
The first things to note are the mainScene property and the initializer, init(named:), we invoke to instantiate the SCNScene instance. With this initializer, all you have to pass in is the name the scene file you created a moment ago.
We also create and set up a button in the view controller’s viewDidLoad() method. We will use that button a bit later in this tutorial.
When you run your app, you should see your scene appear on screen just as it looked in the scene editor in Xcode.

2. Self-Illuminating Materials
SceneKit materials can now specify an Illumination component to illuminate an object without the need for any extra lights. This self-illumination is most visible where the object is not being hit directly by another light, for example, where our sphere is black in our current scene.
Open MainScene.scn, select the sphere you added earlier and open the Materials Inspector on the right. Scroll down and set the Illumination property to a red color.
You will see that your sphere now has a red tint to it, even when no light is hitting it.
You can accomplish the same result in code by adding the following code:
let material = SCNMaterial()
material.selfIllumination.contents = UIColor.redColor()
sphereNode.material = material
3. Scene Transitions
By using SpriteKit’s SKTransition class, you can now also add animated transitions between SCNScene objects. Open ViewController.swift and replace the implementation of the didPressTransition() method of the ViewController class with the following:
func didPressTransition() {
    let transition = SKTransition.pushWithDirection(.Right, duration: 1.0)
    self.sceneView?.presentScene(SCNScene(), withTransition: transition, incomingPointOfView: nil, completionHandler: nil)
}
You can use any SKTransition object with the presentScene(_:withTransition:incomingPointOfView:completionHandler:) method. Browse the documentation of the SKTransition class to check out all the possible transitions.
Build and run your app again. This time, when you press the Transition button, the sphere should animate to the right as a new, blank scene is animated on screen.
4. Audio Nodes
Another major addition to SceneKit is the ability to play audio on a node-by-node basis. In addition to this, by moving around these audio nodes, you can also create a 3D audio effect so that the user can experience sounds that appear to be surrounding them.
To create this 3D audio effect, every object that conforms to the SCNSceneRenderer protocol (that is, every SCNView) has an audioListener property that specifies a node where the sounds should be heard from. By default, this property is always the camera within a scene.
Creating an audio node can be done with the following code:
let audioNode = SCNNode()
let audioSource = SCNAudioSource(fileNamed: "AnAudioFile.mp3")!
let audioPlayer = SCNAudioPlayer(source: audioSource)

audioNode.addAudioPlayer(audioPlayer)

let play = SCNAction.playAudioSource(audioSource, waitForCompletion: true)
audioNode.runAction(play)
Keep in mind that the audio doesn’t play automatically. This needs to be done through an SCNAction instance as shown in the example above. Browse the Multimedia Programming Guide for a list of compatible audio file types.
If you don’t want to take advantage of this positional audio, for example, with music, you can easily create ambient audio nodes. This is done by setting the positional property of the audio source to false. You can also continually loop a sound by setting the source’s loops property to true.
5. Metal Adoption
In addition to OpenGL ES, SceneKit now also supports Apple’s Metal graphics API for rendering its graphics, resulting in dramatically better performance on newer devices. This also means that, if you are familiar with the Metal shading language, you can now utilize custom SCNProgram and SCNTechnique objects to take advantage of new Metal features.
By default, SceneKit uses Metal on newer devices and OpenGL ES on older devices. If, for whatever reason, you want to only use one of these rendering APIs, you can change the renderingAPI property on any SCNView object.
Conclusion
The additions to SceneKit in iOS 9 and OS X El Capitan have made the framework even more capable and more suitable for casual 3D games. In addition to the new features added to the SceneKit framework, the new Xcode Scene Editor allows you to easily create scenes without having to set up everything programmatically.
As always, please be sure to leave your comments and feedback in the comments below.