Step 1 – Preparing Sky
Download all the images listed as Tutorial Resources. Create a new document in Photoshop and drag a photo of “sky 1″ into it. Place it in the top left corner and name in LEFT SKY.
Note: I really recommend to name all the layers in your photo manipulations. It makes the orientation easier and quicker. You’ll know once you have to work with 50+ layers!
Right click on LEFT SKY and duplicate the layer. Name the new layer RIGHT SKY and move it to the top right corner. You should get something similar to the picture below.
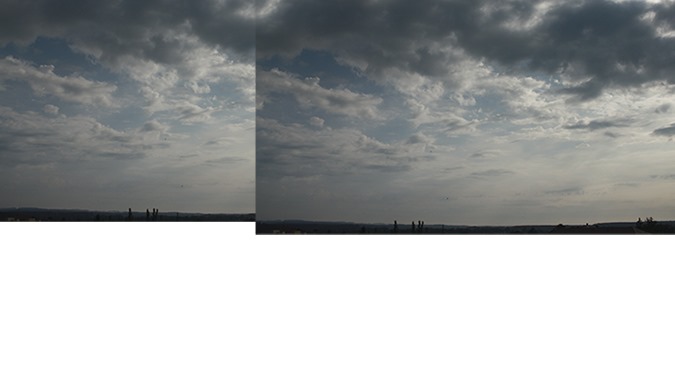
Now you need to blend these two layers together. Add a layer mask to RIGHT SKY. You can find the button “Add layer mask” on the bottom part of your Layers palette (if you don’t see this palette simply press F7 on your keyboard and it will appear). You can see the button on the picture below.


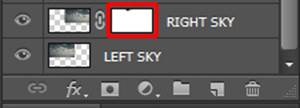


Note: You can get similar effect with the Eraser Tool (E) by simply erasing all the necessary parts. But beauty of using layer masks lies in fact that the edit is nondestructive and you can always go back and adjust whatever you want. It’s a good practice and made doing photo manipulations lot easier!
Step 2 – Adding Ground
Drag a photo of the ground into your new photo manipulation and place the layer on the top of all layers. Name this new layer GROUND and resize it if necessary.
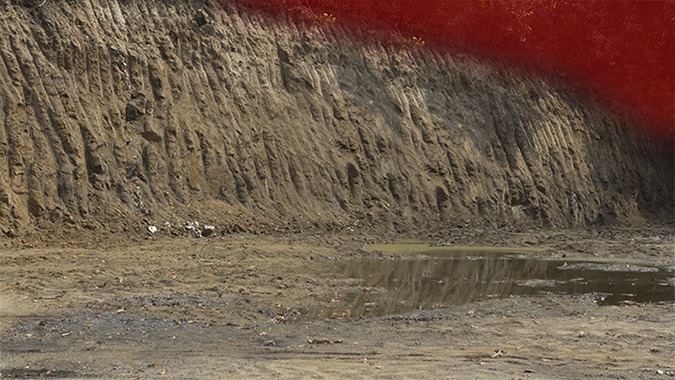
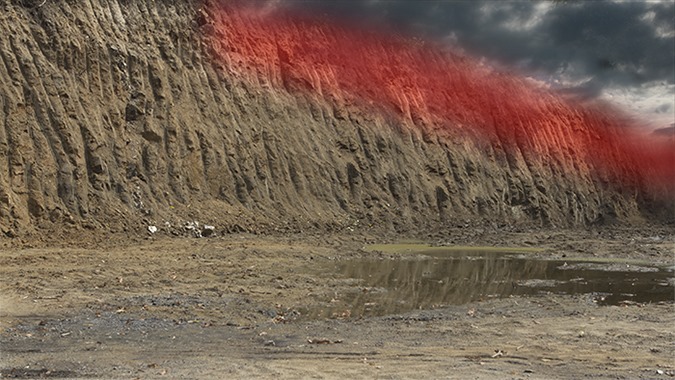
As you can see there is no visible sky which you’ve added in previous step. You’ll fix it by adding layer mask to the GROUND. The process is exactly the same as in the previous step.Grab the Brush Tool (B). Set its Hardness on 0%, Opacity on 100% and pick black color. Paint over the upper part where sky should be visible. On the picture below you can see what area I mean. It’s highlighted with red color.




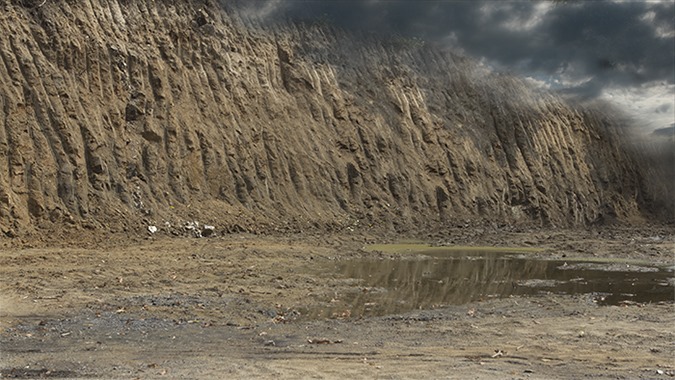


Step 3 – Cleaning the Ground
There are some distracting elements on the ground and mountains. You’ll get rid off them in this step. You can see them on the picture below.
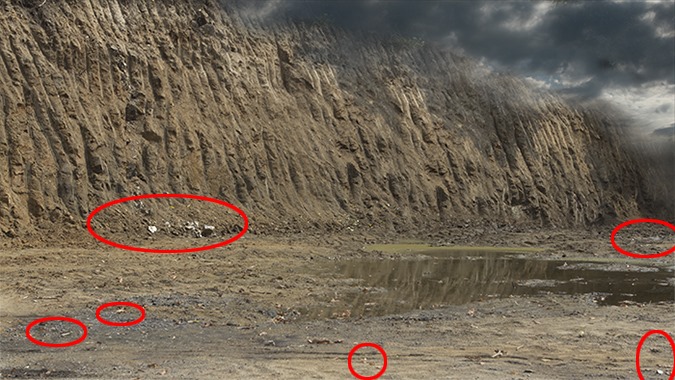


Note: You could start cloning on the GROUND layer directly. But if you add new empty layer above you’ll always be able to change or hide anything on that layer. It’s the same “non destructive” philosophy as using layer masks instead of the Eraser Tool (E).
Step 4 – Balancing Lightness
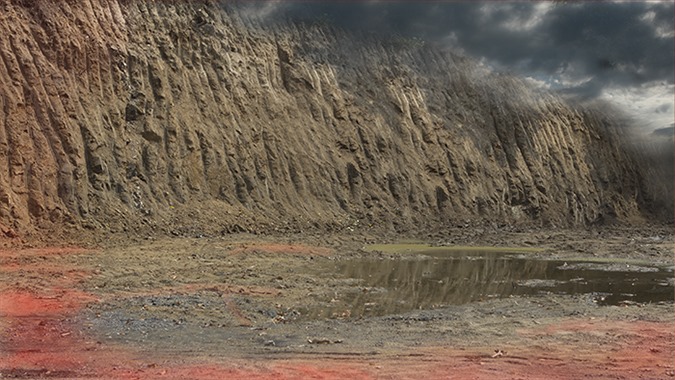
If you look at the photo of the ground you notice the bottom part is lighter than the upper part. It causes that the photo looks flat and perspective isn’t distinctive enough. You’ll fix this problem in this and some of the following steps.
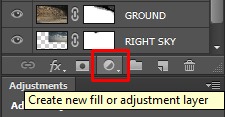
Let’s focus on darkening bottom part of the GROUND. Add new adjustment layer Levels on the top of all layers. (You can find the button “Add adjustment layer” on the bottom part of your Layer palette next to the “Add layer mask” button you’ve used in some of the previous steps.)


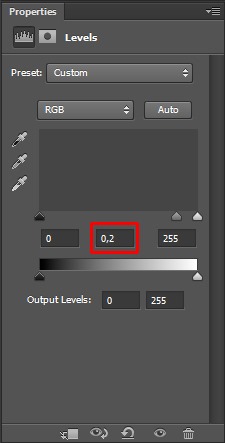




Step 5 – Adding Vignette
To add more dimension to your photo manipulation you’ll add vignette in this step.
Note: Adding vignette is a great way to add dimension to your photo manipulations. But don’t over do it! There should always be very smooth transition between darker edges and central part of the image.
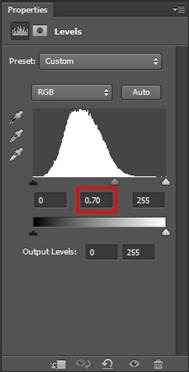
Add adjustment layer Levels on the top of all layers and this time set the Input Levels on 0; 0,7; 255.


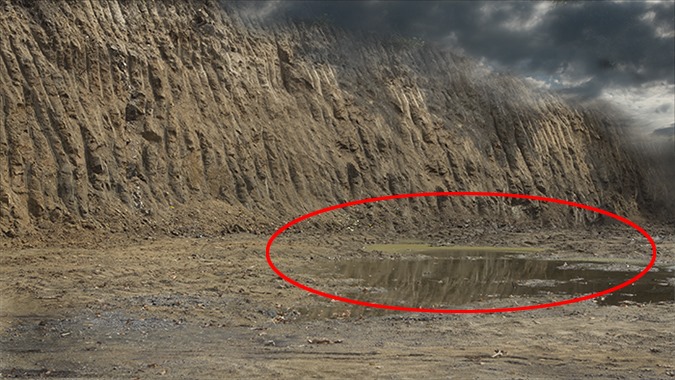


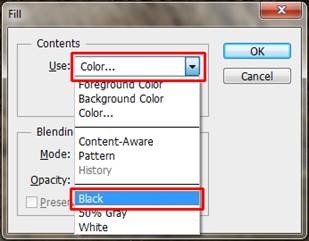
Now press Shift+F5 on your keyboard to activate Fill window and select Black in Use list. Press OK.


On the following picture you can see how your photo manipulation should look like so far.
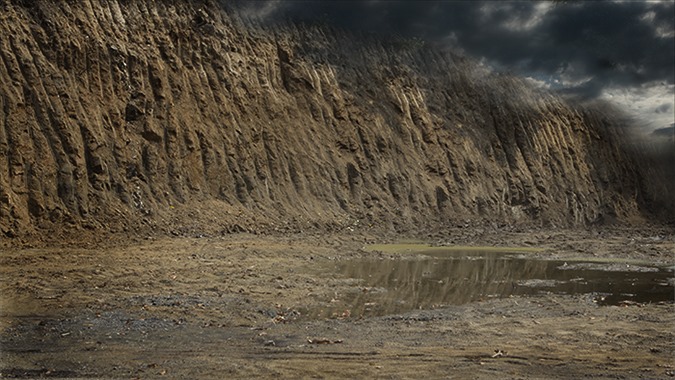


Step 6 – Adding Mist
If you read some of my previous tutorials you surely know how much I love using fog in my photo manipulations. It adds great magical atmosphere in a minute.
Download the fog brushes listed in the beginning of the tutorial and install them in Photoshop. The ones I used are paid but feel free to use any fog brushes you’re comfortable working with. If you don’t know how to install brushes into Photoshop you can take a look at this tutorial.
Add new layer on the top of all layers and name it FOG. Grab the Brush Tool (B) and select one of the fog brushes you’ve just installed. Hold Alt on your keyboard to activate the Eye Dropper Tool and pick some very light bluish color from the picture.
Note: Try to avoid using pure white or black in your pictures. Both colors look harsh and rarely look realistic. Try using e.g. very light yellows or dark browns instead.
Now simply paint some mist. Don’t overdo it because it wouldn’t look realistic. On the photo below you can get the inspiration of how much you should paint.

Note: The trick of doing good looking photo manipulations is to do more gentle changes instead of one big. Yes, it’s more time consuming but it gives you much more realistic results.
Step 7 – Increasing Contrast
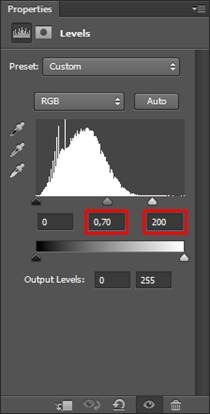
In this step you’ll add more drama to your picture by increasing its contrast. How? Simply add new adjustment layer Levels on the top of all layers and set the Input Levels on 0; 0,7; 200.

If you look at your image now you see that some parts of it are too dark and it doesn’t look nice and some details stop being visible.
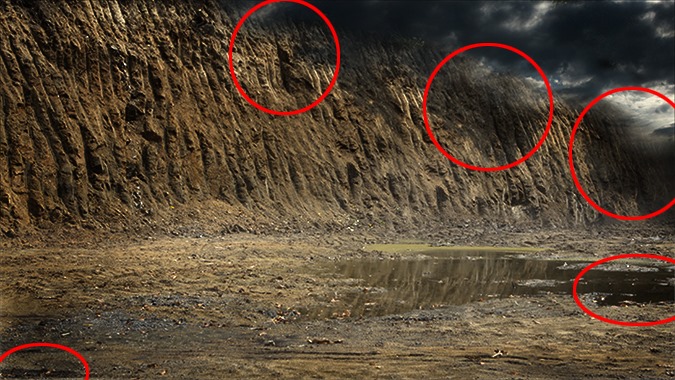

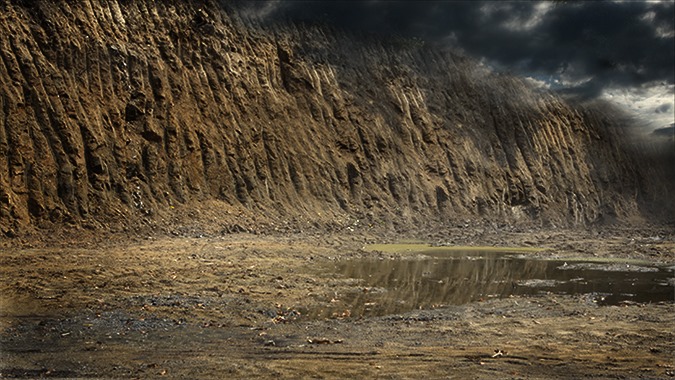
To correct that grab the Brush Tool (B). Select some soft round brush, lower its Opacity on about 40% and pick black color. Click on the layer mask of this adjustment layer and start painting over the areas where you want to make the adjustment less visible. You should end up with something similar as on the following picture.

Step 8 – Changing Light and Shadows
As I said before we want drama in your picture! Another way how you can achieve it is by adding more interesting lighting. Right now the photo manipulations looks quite flat with no difference between lights and shadows. You’ll fix it in this step.
Add new empty layer on the top of all layers and name it LIGHTS&SHADOWS. Grab the Paint Bucket Tool (G) and pick mid grey color (#808080). Fill the layer with it.
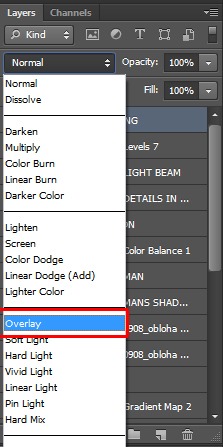
Now you need to change its Blending Mode from Normal to Overlay to blend this new layer with the rest of the layers and make the picture invisible again.
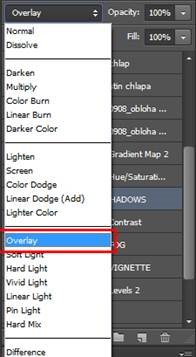

Why have you done something like that? Because now you can use this layer to lighten and darken some parts of the image to make it more dimensional! Simply grab the Brush Tool (B), pick some soft round brush, lower its Opacity on 10% and start painting over the areas that should be lighter. Than use black colored brush for darkening.
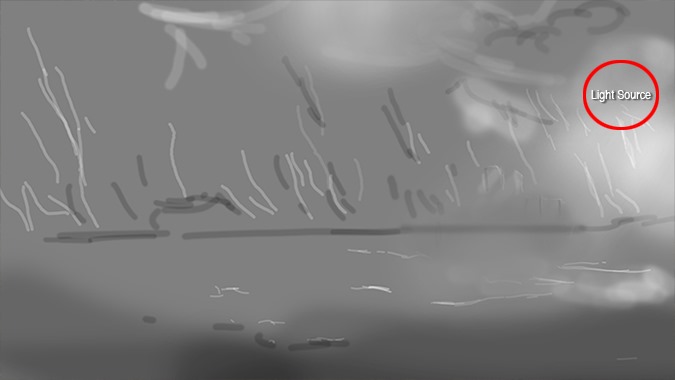
Generally you should lighten those parts of mountains which are facing to the light source and darken those on the opposite side. After you’re done with mountains move on clouds and ground applying the same principle as before.
On the picture below you can get the exact idea of where you should paint with black and white.

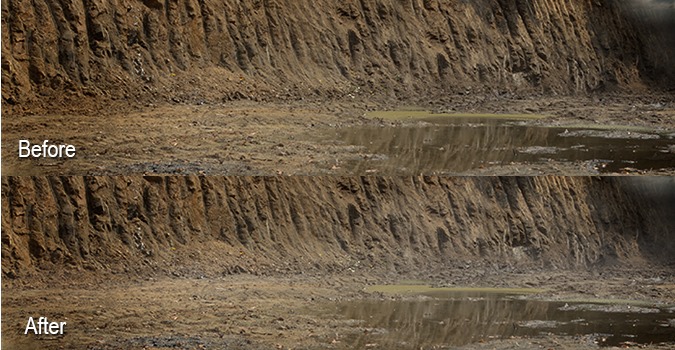
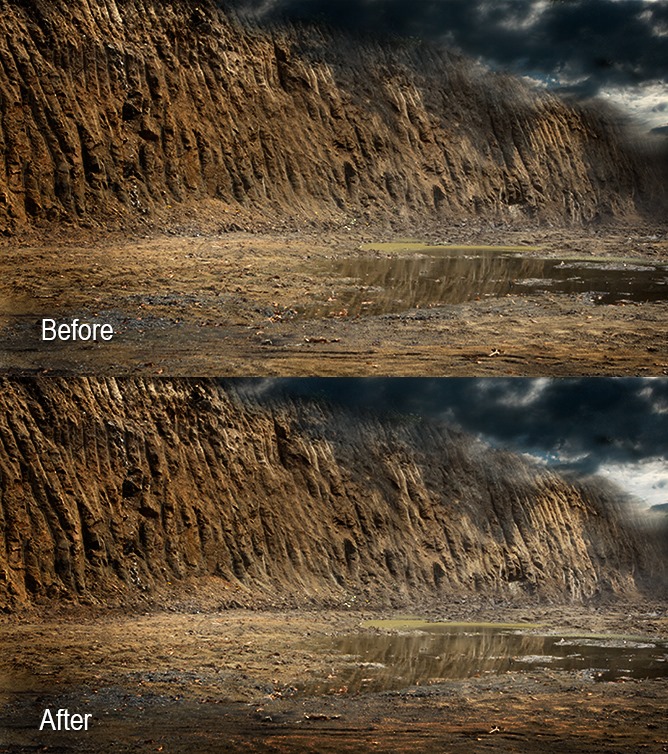
On the following picture you can compare how the photo manipulation looks before and after this step.

Step 9 – Desaturation
In this step you’ll start building stronger atmosphere by slightly desaturating your photo manipulation.
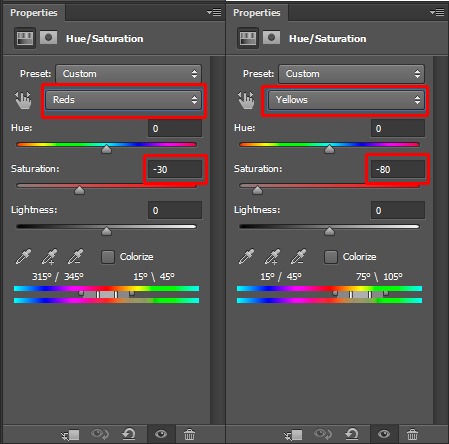
Firstly add new adjustment layer Hue/Saturation on the top of all layers. Choose Reds and set the value Saturation on -30. Then choose Yellows and set the value Saturation on -80. This way you desaturate only red and yellow tones and e.g. sky still remains blue/cyan.

To create even more dramatic atmosphere you’ll add some dark blue tones to the shadows of the picture. Add new adjustment layer Gradient Map on the top of all layers. In the Gradient Editor in Presets menu choose gradient named Foreground to Transparent and then choose some light cyanish color as you foreground color. Press OK.
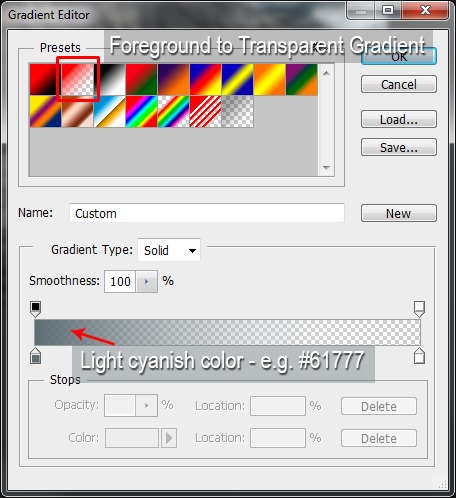

To achieve the effect mentioned above change its Blending Mode from Normal to Multiply.
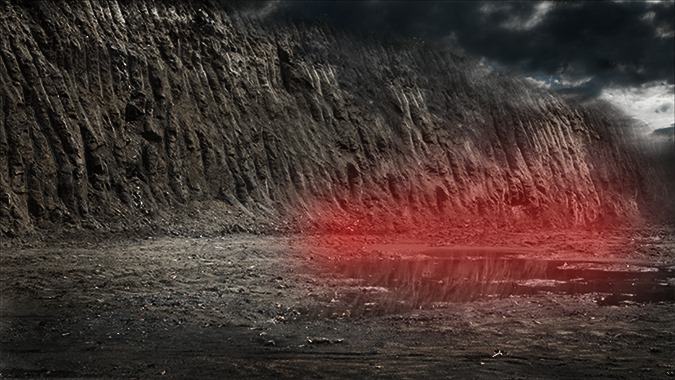
The area of the ground where light from sky hits the ground should remain lighter than the rest of the image. To achieve simply grab the Brush Tool (B), select some soft round brush, set the Opacity on about 40% and pick black color. Click on the layer mask of Gradient Map adjustment layer you’ve just added and paint black over the parts which should stay lighter. On the picture below these parts are highlighted with red color.

Step 10 – More Fog
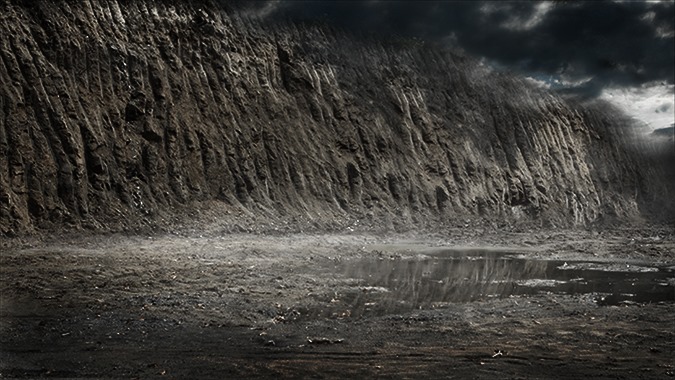
If you look at your photo manipulation now you see there isn’t much fog on the horizon even though you’ve already added some in previous steps. It’s time to add more!
Add new empty layer on the top of all layers and name it MORE FOG. Grab the Brush Tool (B), select some of the fog brushes you’ve installed recently and paint some more mist same way you did few steps ago. After you’re done your image should be similar to the one below.

Looks much better, isn’t it?
Step 11 – Adding a Man
Drag photo of a man listed in the beginning of the tutorial into Photoshop. Place it on the top of all layers and name it MAN. Press Ctrl+T on your keyboard and resize it on proper size. Cut out the background around man with whatever tool you’re comfortable working with. You can use e.g. the Lasso Tool (L), the Pen Tool (P) or the Eraser Tool.
After you’re done go to Image>Adjustments>Hue/Saturation and lower the Saturation on about -80. You may also use the adjustment layers as in all previous steps. But this adjustment is so small that I believe it’s not necessary. But it’s totally up to you!
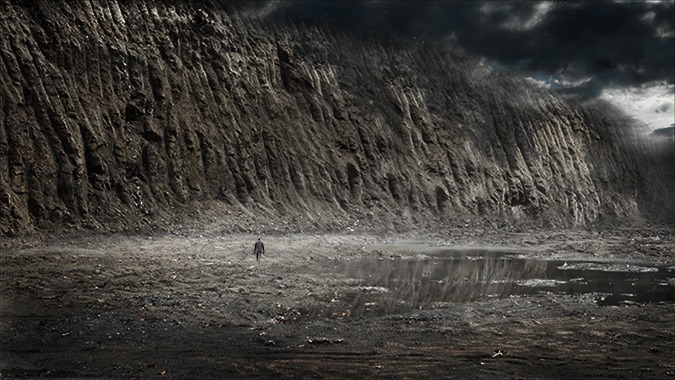

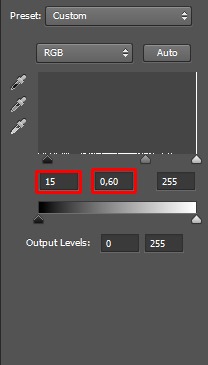
As you can see on the photo above man is too bright and it doesn’t look realistic. To darken it go to Image>Adjustments>Levels and set the Input Levels on 15; 0,6; 255 to darken it.

Step 12 – Adding Shadow to Man
Right now there is no shadow on the ground casted by a man you’ve added in previous step and because of that it doesn’t look realistic. But you’ll fix it in this step.
Right click on the layer MAN and select the option Duplicate Layer. Place the new layer under MAN and name it MAN’S SHADOW. Press Ctrl+T on your keyboard to activate the Free Transform Tool and follow instructions of the picture below to get the right shape and direction of the shadow.
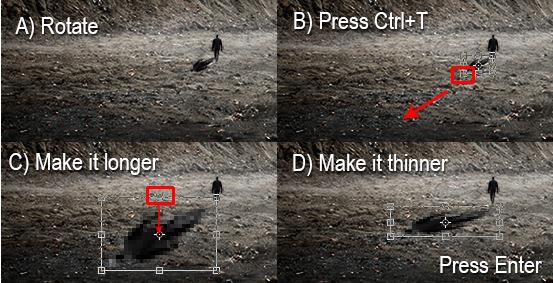

After you’re done press Enter on your keyboard to confirm your changes.
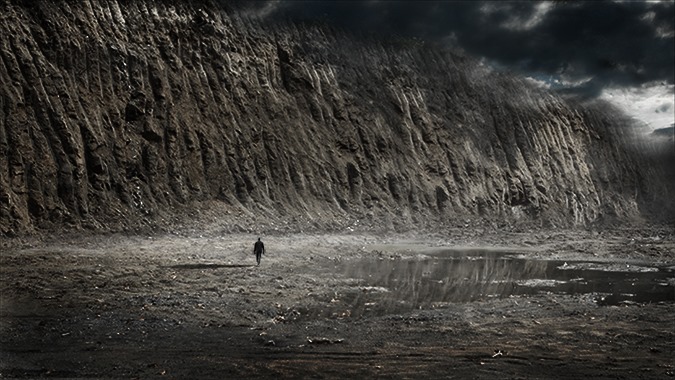
As you can see there are some light parts of the shadows. To get rid of them grab the Brush Tool (B), pick dark brown color of the shadow and paint carefully over the lighter areas.
Your photo manipulation should be similar to the picture below after this step.

Step 13 – Adding Colder Tones
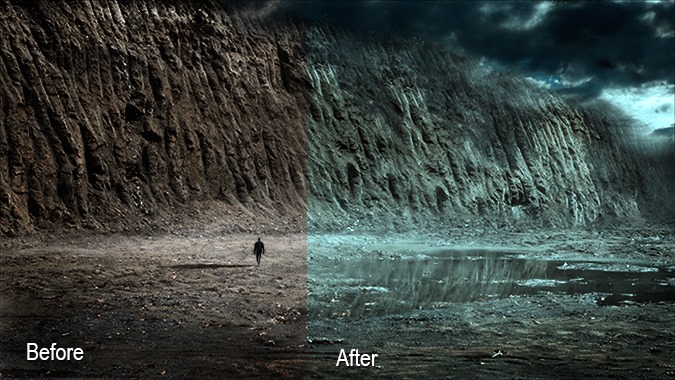
When I was doing this photo manipulation I kept the hollow landscape of the Moon in my mind and tried to achieve its atmosphere. You’ll do it too in this step.
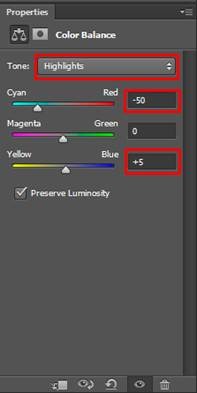
In my imaginations there is very cold lighting on the Moon. To achieve that effect add new adjustment layer Color Balance on the top of all layers. In Tone palette choose Highlights and set the colors as shown on the following picture.

On the picture below you can compare the atmosphere of the photo before and after this adjustment.

Step 14 – More Magical Atmosphere
If there isn’t so harsh transition between clouds and mountains the whole picture would have more magical atmosphere. You’ll take care of that in this step.
Add new empty layer on the top of all layers and name it e.g. TRANSITION. Grab the Brush Tool (B), select some soft round brush and set its Opacity on about 15%. Pick some light cyanish color and gently paint over the parts of the image where mountains and sky meet. On the following photo you can get the idea where to paint and how much color you should add.
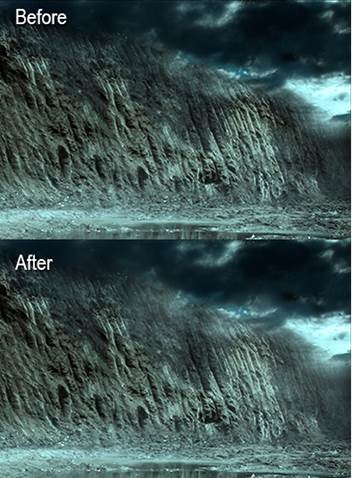

As I already said before it’s all about making small changes that produce believable results.
Step 15 – Adding Details to Clouds
Right now there is very few details on the clouds and therefore they look quite uninteresting. To fix that grab the second photo of sky listed in the beginning of the tutorial and place it on the top of all layers and name it DETAILS IN SKY. Press Ctrl+T on your keyboard and resize on proper size. Press Enter. Right now the sky should look like the one below.
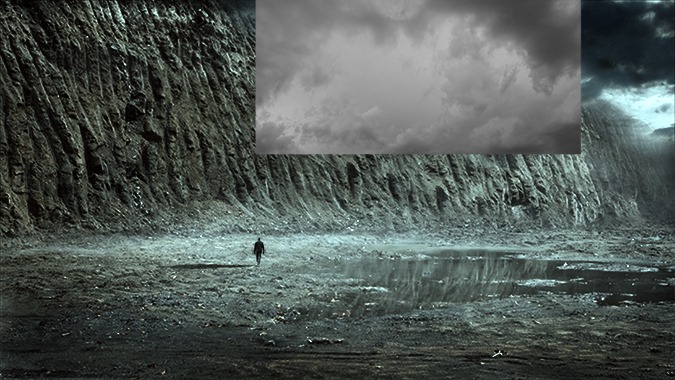

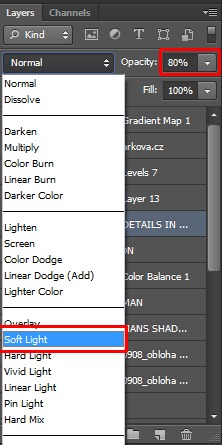
To blend the layer properly with the rest of the image change its Blending Mode from Normal to Soft Light and lower its Opacity on about 80%.

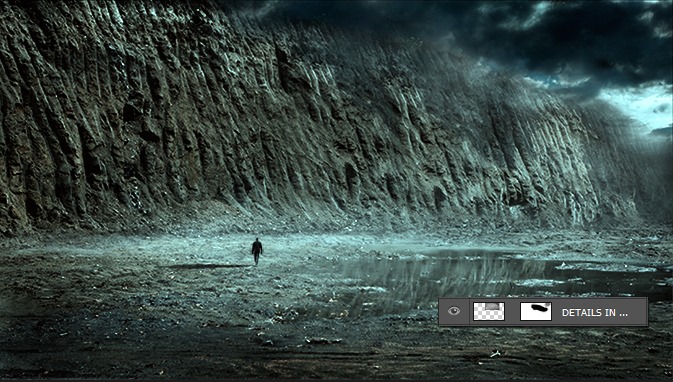
To blend the edges of this layer even better add layer mask. Grab the Brush Tool (B), select some soft round brush, set the Opacity on about 80% and pick black color. Then paint over the edges of this layer.

Step 16 – Adding Light Beam
In this step you’ll add the main light source of the whole image – light beam coming from sky down on the man.
Add new empty layer on the top of all layers and name it LIGHT BEAM. Grab the Line Tool (U). Set the Weight on about 40px and pick some very light cyan color.
![]()
![]()
Draw the line coming from the upper right corner down on the man similarly as on the following picture.
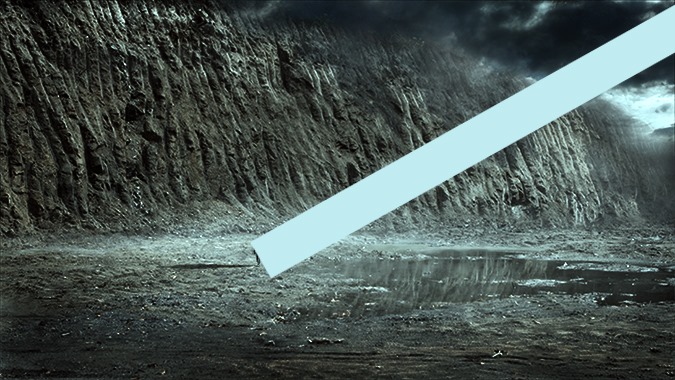

Doesn’t look like light, does it?
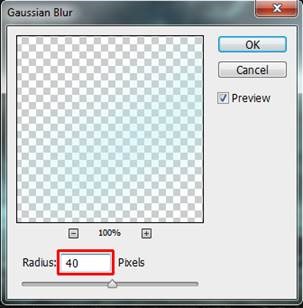
To fix it go to Filter>Blur>Gaussian Blur and set the value Radius on 40 pixels. Press OK.

There is another problem – right now it looks like light is coming from somewhere above the sky which doesn’t make sense. To make it realistic looking add layer mask to LIGHT BEAM. Drag the Brush Tool (B), set the Opacity on 40% and pick black color. Paint over the clouds to make that part of light disappear. On the following picture you see where to paint with black. It’s highlighted with red color.
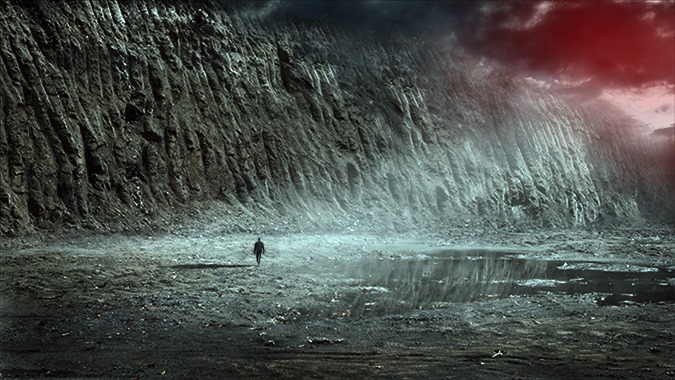

Step 17 – Adding Vignette
To create more depth you’ll add one more vignette in this step.
Grab the Elliptical Marquee Tool (M) and select the central part of the image. You want to have smooth transition between dark edges and the rest of the images. To achieve that you need to feather the selection. Go to Selection>Modify>Feather or press Shift+F6 to activate the tool. Set the Feather Radius on 50 pixels and press OK.


Invert the selection by pressing Ctrl+Shift+I on your keyboard or go to Select>Inverse.
Now add new adjustment layer Levels on the top of all layers and set the Adjustment Levels on 0; 0,80; 255.
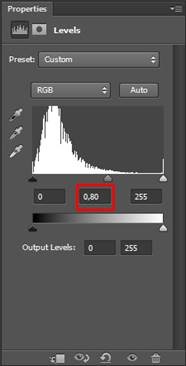

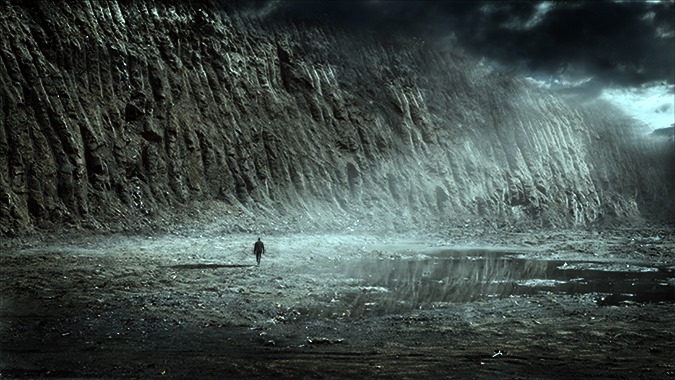
Thanks to active mask only edges of the photo manipulations are darker.
On the following picture you can see how you photo manipulation should look like.

Step 18 – Sharpening
Only one last step remains – sharpening. It helps to add couple more details to the image.
Press Ctrl+A on your keyboard to select the whole picture. Go to Edit>Copy Merged or press Ctrl+Shift+C on your keyboard to copy merged image (=not only the active layer but all the layers you’re working with). Then go to Edit>Paste or press Ctrl+V to paste merged image. Place this new layer on the top of all layers and name it SHARPENING.
Go to Filter>Other>High Pass and set the value Radius on 0,5 pixels.
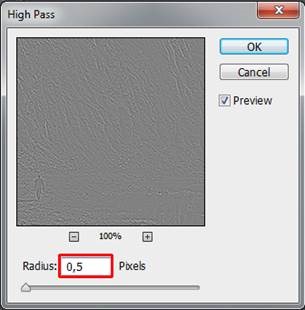

After pressing OK you should see grey image where only gentle edges of the picture are visible.
Note: High Pass is great tool for sharpening but be aware of oversharpening your images. You should always see only very thin, almost invisible edges to get the best, most realistic results!
To blend the layer properly with the rest of the image change its Blending Mode from Normal to Overlay.

Congratulations! You’ve just finished your photo manipulation. On the following photo you can see the final result!
Final Results
![image002[1] image002[1]](https://cdn.idevie.com/wp-content/uploads/2013/07/675x380ximage00211.jpg.pagespeed.ic_.Yh5cFQWtUR.jpg)
![image002[1] image002[1]](https://cdn.idevie.com/wp-content/uploads/2013/07/675x380ximage00211.jpg.pagespeed.ic_.Yh5cFQWtUR.jpg)
