In this tutorial, you’ll learn how to create a cozy winter flower image in Adobe Illustrator. Using different tools such as the warp tool and warp effect, we’ll create a unique design and bring the scene to life. Follow along step by step to design a charming winter flower drawing that’s perfect for any seasonal project!
Get inspired and elevate your creativity with endless resources and tutorials from Envato, designed for creators at every level. Envato stands out by offering a wide range of assets, making it easy for you to access high-quality assets without breaking the budget.
What you will learn in this winter flower tutorial
- How to create a winter floral background
- How to use the Warp Tool
- How to use the Warp Effect in Illustrator
- How to use the Rotate Tool
- How to use the Reflect Tool
- How to draw in Adobe Illustrator
- How to create a winter flower image
- How to draw in Illustrator using basic shapes
1. How to create the background in Illustrator
We’ll start with a background for our winter flower drawing. Create a rectangle with the Rectangle Tool (M). Click on the artboard and enter 850 x 950 px. Press OK and make its fill color R=226, G=229, B=242.
Place the background in the middle of the canvas.


2. How to create a window in Illustrator
Step 1
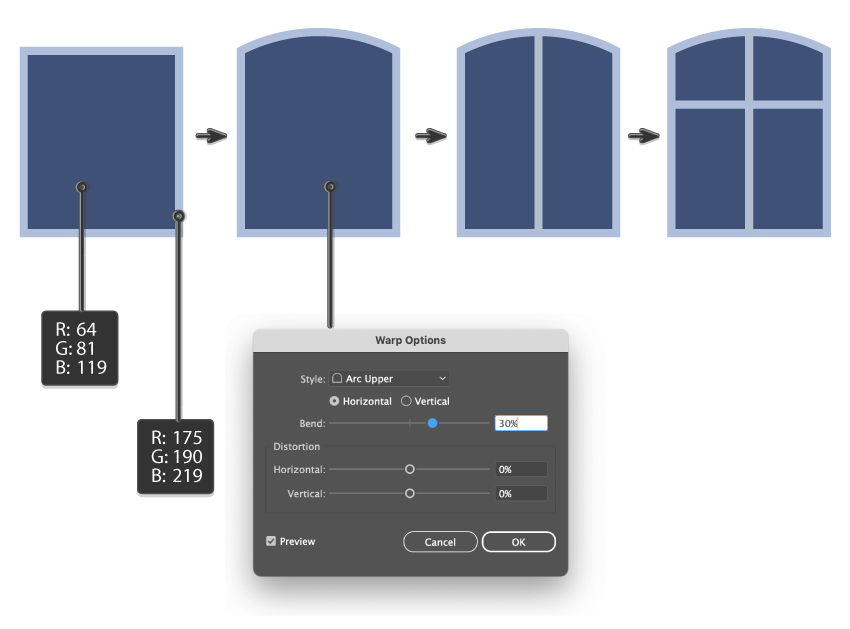
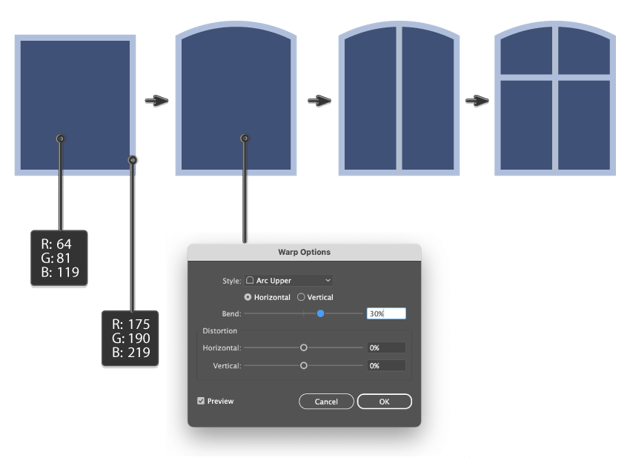
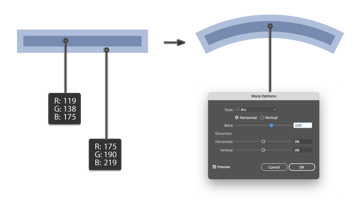
Draw a rectangle with a fill color of R=64, G=81, B=119 and a stroke color of R=175, G=190, B=219. On the Stroke panel (Window > Stroke), you can adjust the stroke Weight depending on how thick you want the window frame. In my illustration, I set it to 20 px.
Then we need to use a Warp Effect. Go to Effect > Warp > Arc Upper, and in the new dialogue window, enter the options you see below. Press OK.
Next, delete the fill color and leave the same stroke color. Use the Line Segment Tool (\) to create a vertical line in the middle of the window. Then, draw a horizontal line to create a window frame.
Group the whole window (right-click > Group) to make it easy to move.

Place the window on the background.


Step 2
Let’s make our window more interesting. Using the Rectangle Tool (M), draw a horizontal rectangle. The fill color is R=119, G=138, B=175, and the stroke color is R=175, G=190, B=219. The stroke Weight should remain the same.
Go to Effect > Warp > Arc, and in the new dialogue window, enter the options you see below and press OK.
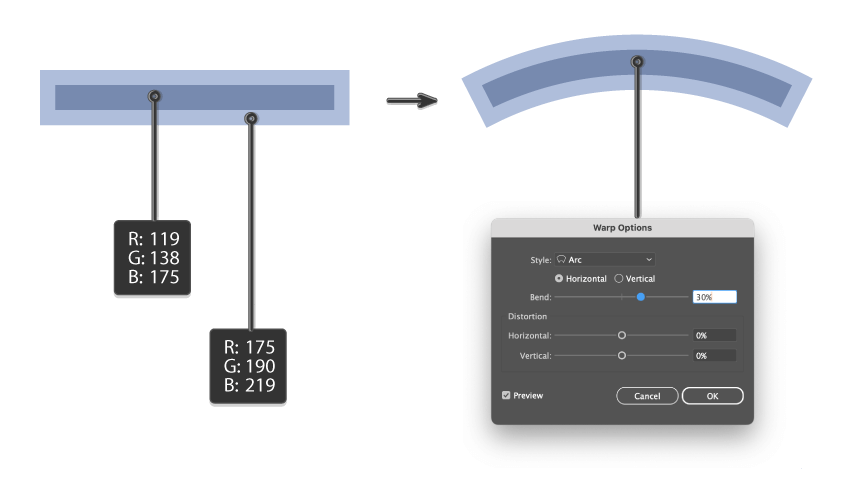
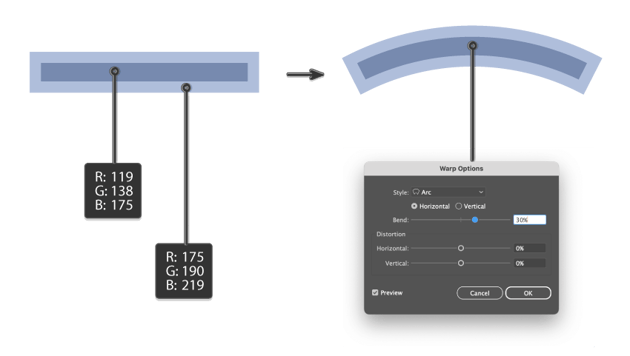
Place this shape on top of the window.


Step 3
Now let’s add a window sill. Delete the stroke color and make the fill color R=175, G=190, B=219. Draw a rectangle under the window using the Rectangle Tool (M).


Step 4
Continue creating the window sill. Use the Rectangle Tool (M) to draw a rectangle. Change the fill color to R=119, G=138, B=175.
Place it under the upper window sill: cut it (Control-X) and place it behind everything (Control-B).


3. How to create a primrose flower in Illustrator
Step 1
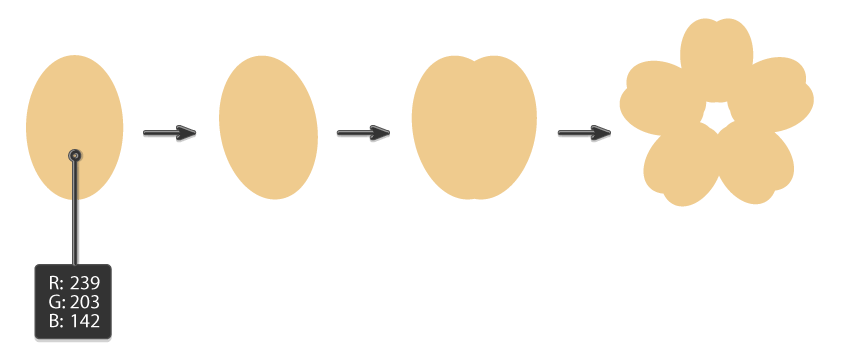
We’ll start with a yellow ellipse (fill color R=239, G=203, B=142). Use the Selection Tool (V) to rotate it a little to the left.
Then create a reflection. To do this, select the first one, take the Reflection Tool (O), and while holding the Alt key, click on the right side of the yellow ellipse. A new pop-up window will appear, called Reflect. You want to choose Axis: Vertical, Angle: 90 degrees, and press Copy.
This is one petal, so make sure to group it (right-click > Group). We need five of them to create a nice flower. The Rotate Tool (R) will help us here. Be sure the yellow petal is selected, and then grab the Rotate Tool (R) and click underneath the petal while holding Alt. A new window called Rotate will pop up where you want to enter 72 degrees and press Copy.
Now you’ve created the second petal, but you still need three more. So press Control-D three more times to repeat your last action.


Step 2
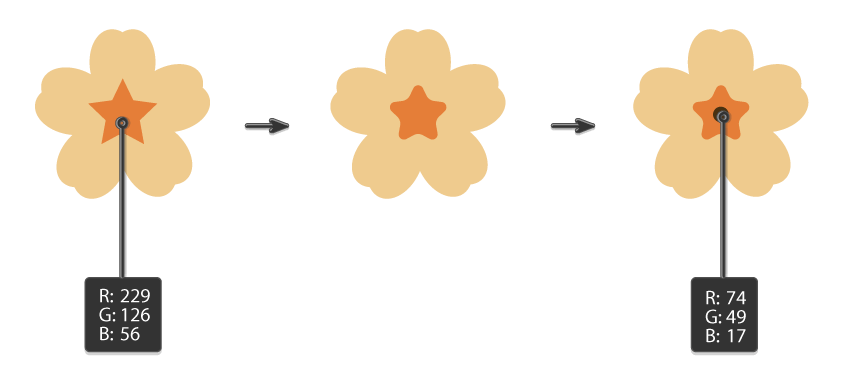
To create the typical primrose middle part, we’ll use the Star Tool. Change the fill color to R=229, G=126, B=56, and create a star to cover up the empty space between the petals.
Now go to View > Show Corner Widget, since this feature allows you to make the corners of any shape rounded. Now you can see a little circle with a dot inside each corner of the star. Drag these circles towards the inside to make the star corners rounded. After that, add a tiny circle inside the flower (fill color R=74, G=49, B=17).
Group the whole flower.


Step 3
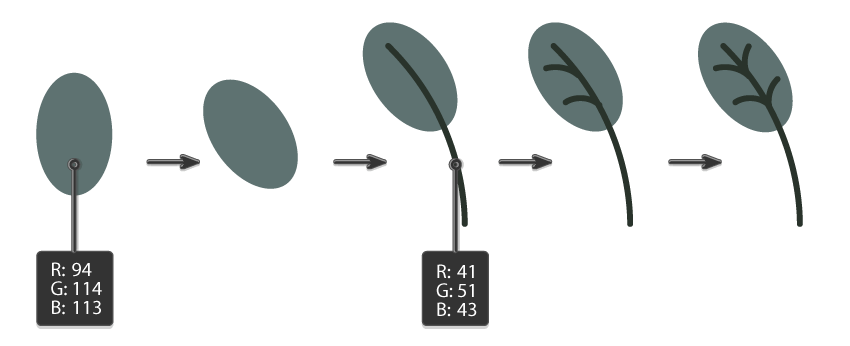
Now, we need to create a leaf for the primrose. Use the Ellipse Tool (L) to draw an ellipse (fill color R=94, G=114, B=113). Use the Selection Tool (V) to rotate it to the left.
Let’s make a stalk for the leaf. Make sure the leaf is not selected, press the Swap Fill and Stroke (Shift-X) button, and change the stroke color to R=41, G=51, B=43. Using the Arc Tool, draw the stalk of the leaf. On the Stroke panel, you can adjust the stroke Weight however you like—it depends on how big the leaf is. Also, in the Cap section, make sure you select Round Cap.
Using the Arc Tool again, create the left and then the right veins of the leaf. After that, group the whole leaf.


Step 4
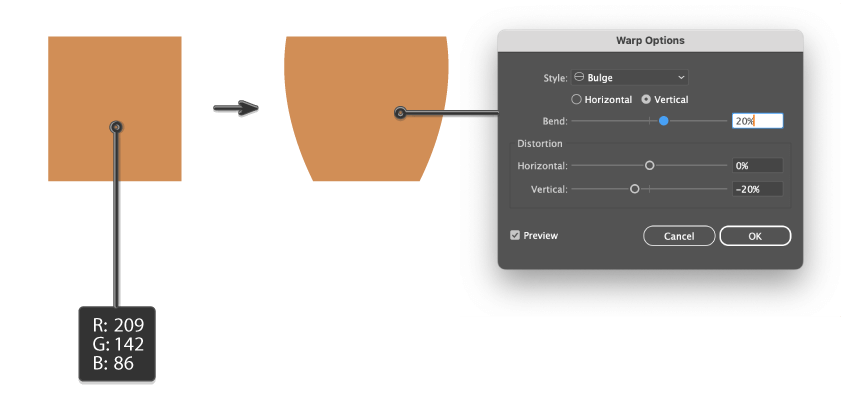
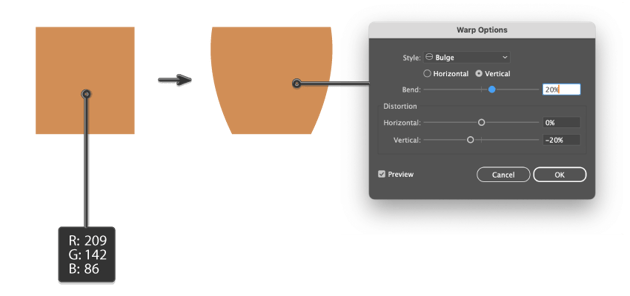
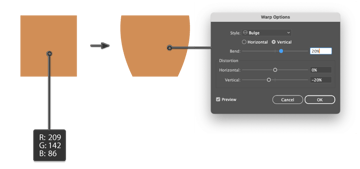
Let’s create the flowerpot for our primrose using the Rectangle Tool (M)—the fill color is R=209, G=142, B=86.
Then, go to Effect > Warp > Bulge, OK, because we want to create a corresponding shape for our flower pot. Enter the options you see in the image below, and expand this shape (Object > Expand Appearance).
Step 5
So far, we have the flower, the leaf, and the flowerpot, so let’s put them together. Place a few copies of the primrose above the flowerpot.
Using the Arc Tool, add a few stalks to the flowers. You can use the Eyedropper Tool (I) to take the same stroke color from the leaf stalk.
Add the leaf you created before to our winter flower drawing. Then, create some more copies of the leaf.


Group the whole winter flower drawing and place it on the window sill.


4. How to create snowdrop flowers in Illustrator
Step 1
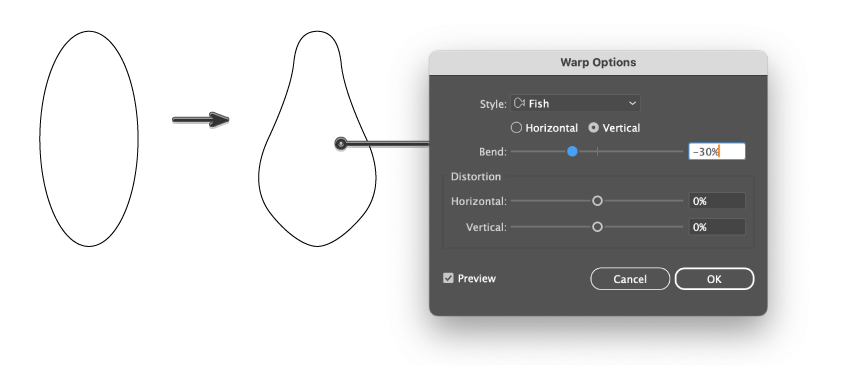
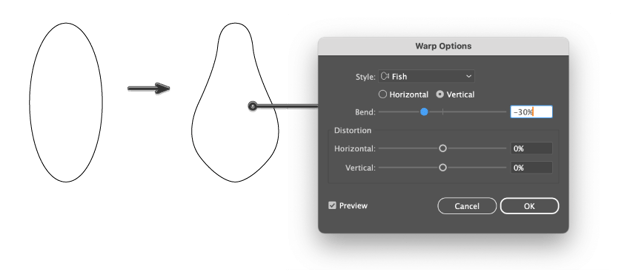
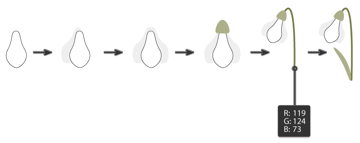
Now, let’s create a cute little snowdrop! Once again, use the Ellipse Tool (L) to create an ellipse. Make sure its fill color is white. The black outline you see in the image below is just for better visibility—you don’t actually need it.
With the ellipse still selected, go to Effect > Warp > Fish. In the Warp Options dialogue window, enter the options you see below and press OK.
Expand the shape (Object > Expand Appearance). This is the first petal of the snowdrop.

Step 2
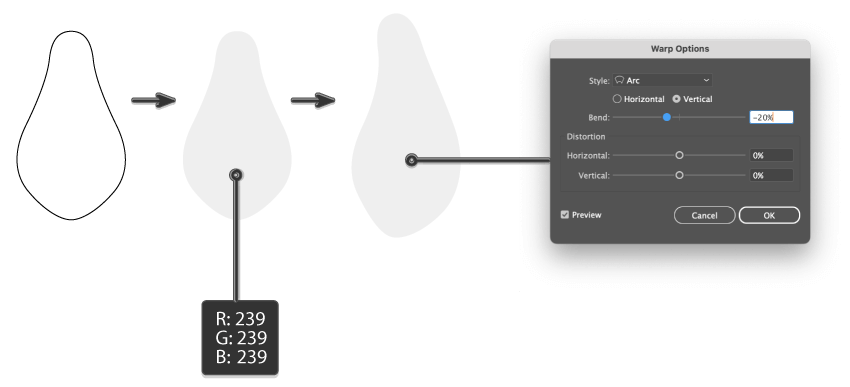
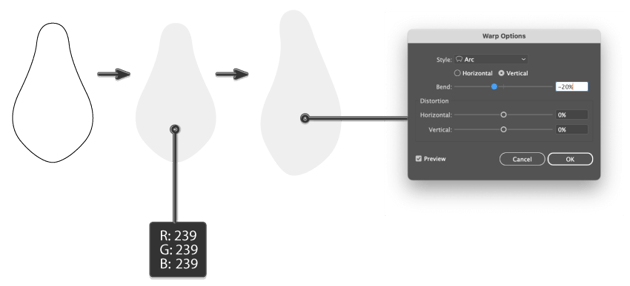
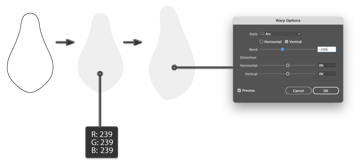
Create a copy of this deformed ellipse and change its fill color to R=239, G=239, B=239.
Again go to Effect > Warp > Arc. In the new Warp Options dialogue window, enter the options you see below and press OK.
Expand the shape (Object > Expand Appearance). This is another petal of the snowdrop.
Step 3
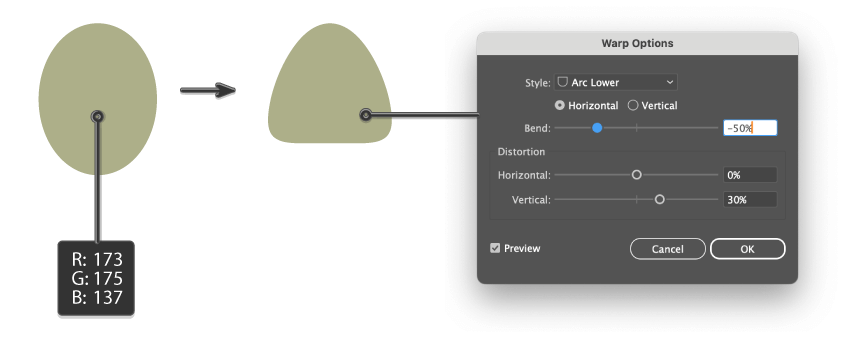
Let’s create the flower part where all the petals start to grow. In biology, this part is called a receptacle. Draw a green ellipse. The fill color is R=173, G=175, B=137. Again, go to Effect > Warp > Arc Lower, and enter the options you see below.
Finally, expand this shape (Object > Expand Appearance) so it won’t lose its shape.


Step 4
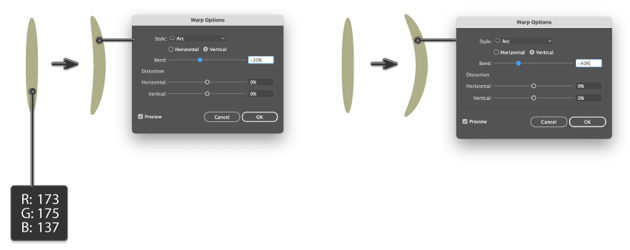
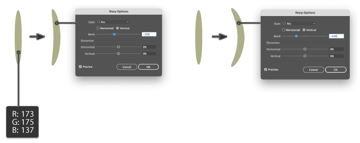
Let’s create the leaves. Draw a long vertical ellipse. Set the fill color to R=173, G=175, B=137. Go to Effect > Warp > Arc, OK. Then draw another long vertical ellipse with the same fill color. Go to Effect > Warp > Arc, OK.
Finally, expand those two shapes: Object > Expand Appearance. These are the two leaves.

Step 5
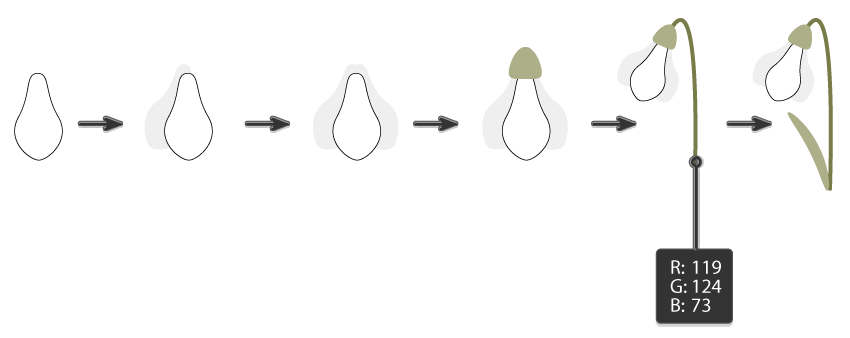
Now, we want to put all the snowdrop parts together. To do so, take the first white petal (without the black outline). Then, place the second one (gray) on the left side of the white one, and be sure it stays behind the first one.
After that, use the Reflection Tool (O) to create a new copy of the gray petal on the right side of the white one. To do this, take the Reflection Tool (O) and, while holding the Alt button, click in the middle of the white ellipse. A new pop-up window will appear, called Reflect. You want to choose Axis: Vertical, Angle: 90 degrees, and press Copy.
Add the green part of the snowdrop, where all the petals start to grow. Delete the fill color and set the stroke color R=119, G=124 B=73. Using the Arc Tool, create the stalk for the snowdrop. Using the Direct Selection Tool (A), move the handles of the anchor points of this stalk to achieve the shape you want.
Finally, add one of the leaves you created before.

Step 6
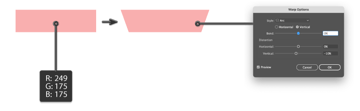
Let’s create a flowerpot for the snowdrops using the Rectangle Tool (M)—the fill color is R=249, G=175, B=175.
Then, go to Effect > Warp > Arc, OK. Expand the shape.


Step 7
Create many snowdrops and put them in the flowerpot, making sure that the flowers stay behind.


Group the snowdrops and the flowerpot and place them on the window sill.


5. How to create a crocus in Illustrator
Step 1
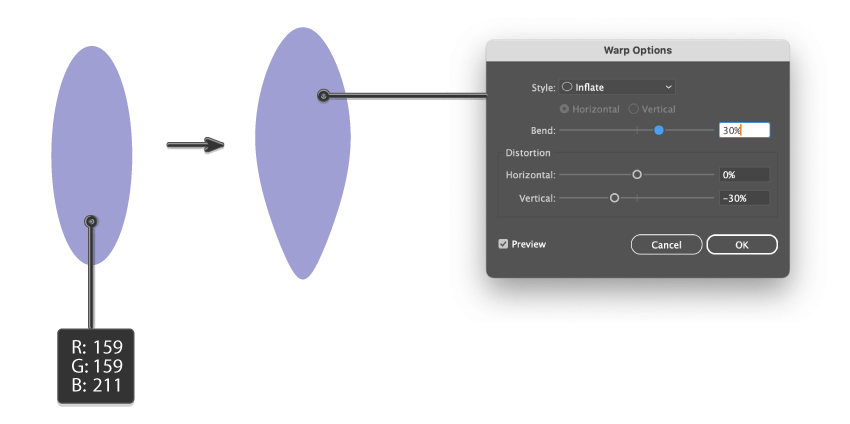
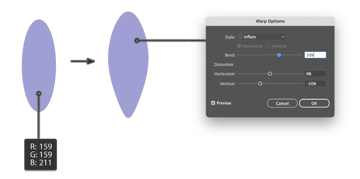
Let’s make the first petal of the crocus. Set the fill color to R=159, G=159, B=211. Draw a vertical ellipse.
With the ellipse still selected, go to Effect > Warp > Inflate, OK. Expand this shape.

Step 2
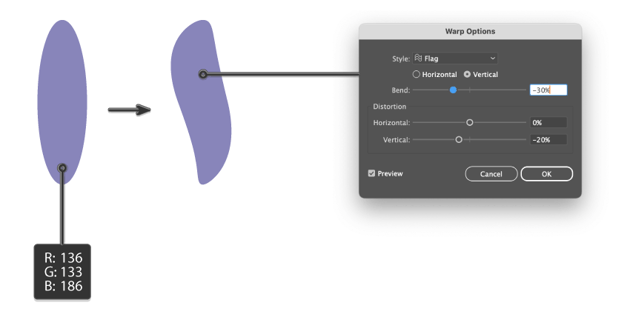
Create a darker ellipse (fill color R=136, G=133, B=186). Then go to Effect > Warp > Flag, OK.
Expand the shape.


Step 3
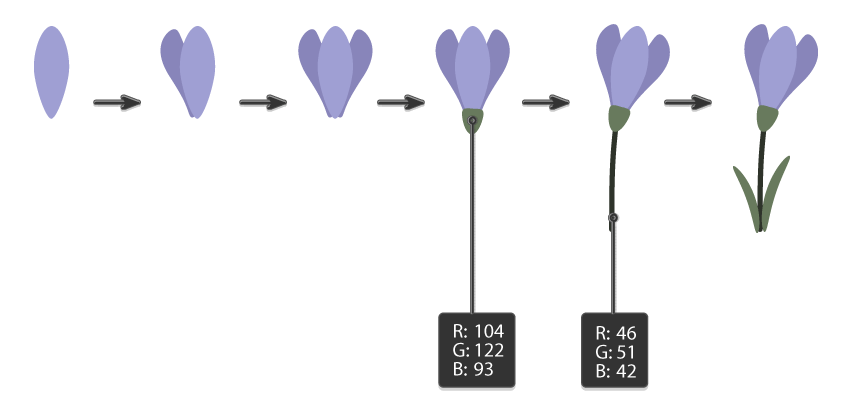
Let’s put the whole crocus together. This time, you don’t need to create everything from scratch as you have some parts from the previous flowers.
Creating a crocus is similar to how we created the snowdrop. First, place the first light violet petal. Then add the second darker petal on the left side. Using the Reflect Tool (O), create a third petal on the right side.
Create a copy of the receptacle (the part of the flower where all the petals start to grow from) from the snowdrop. Change its fill color to R=104, G=122, B=93, and place it at the base of all the petals.
Delete the fill color and make the stroke color R=46, G=51, B=42. Use the Arc Tool to create the stalk. Move the handles of the anchor points with the help of the Direct Selection Tool (A) to achieve the shape you want.
Finally, create a copy of the leaves from the snowdrops, and change their fill color by taking it from the receptacle with the help of the Eyedropper Tool (I). And the crocus is ready!


Step 4
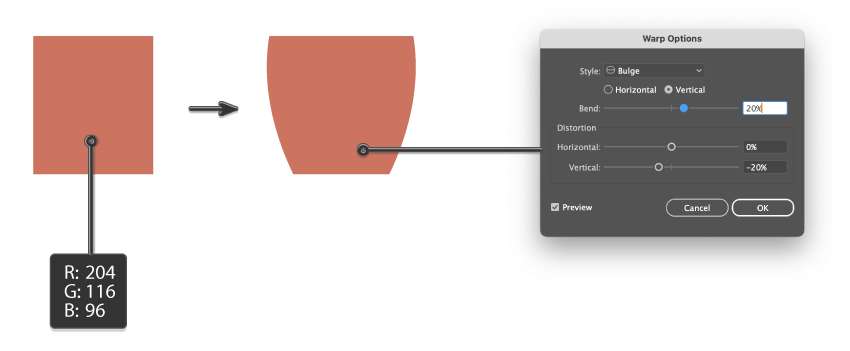
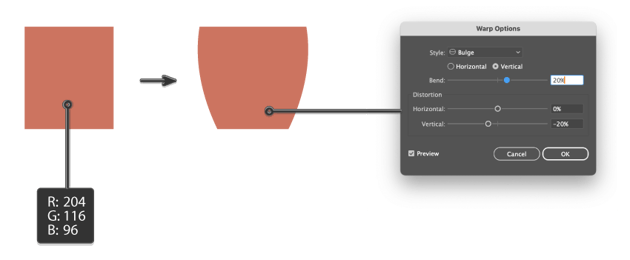
Now we want to create the flowerpot for the crocus. Use the Rectangle Tool (M)—the fill color is R=204, G=116, B=96. Then, go to Effect > Warp > Bulge, OK.

Step 5
Make a few more crocuses and place them in the flowerpot.


Group the potted flowers and place them on the window sill.


6. How to create snow in Illustrator
Step 1
Start by creating some white ellipses. Place them where you want to have some snow.


Step 2
To make the white ellipses look like snow, we need the Warp Tool (Shift-R). You can keep the default options, or you can double-click on this tool to open the Warp Tool Options window and make the Width and Height smaller or bigger.
Select the first ellipse that you just placed, and start to spread it over the window frame.
Make sure to select the object before you use the Warp Tool (Shift-R), otherwise you will spread other objects surrounding it.
Continue with the other ellipses using the same method: select the ellipse, take the Warp Tool (Shift-R), and spread it over the window frame.
See how natural and organic the plant drawing looks, perfectly enhanced by the frosted winter scene!


Congratulations!
Great job! You’ve learned how to draw in Adobe Illustrator using the Warp Tool, how to use the Warp Effect in Illustrator, and how to work with basic shapes. You created a beautiful winter floral background. With these techniques, you can design beautiful and unique illustrations effortlessly. Keep experimenting, and enjoy bringing your creative ideas to life!
Recommended resources from Envato
Explore these stunning design resources from Envato to elevate your creative projects with unique, versatile, and high-quality elements. This one-stop shop provides access to professionally crafted designs that effortlessly bring your ideas to life!
1. Watercolor Spring Snowdrops (PNG)


This delightful collection of spring watercolor flowers features snowdrops, leaves, and a dragonfly, making it perfect for your creative projects. Use this set for cards, patterns, wedding invitations, and more. Let your imagination run wild with ready-made wreaths and seamless patterns to enhance your designs.
2. Winter Garden, Gouache Flowers (PNG)


Try this charming hand-painted set of floral images, which includes flowers, leaves, and fruit. It was created with gouache for a beautiful, textured finish—it’s perfect for adding a touch of artistry to your projects, from cards to patterns and more. Each image is a high-quality, separate PNG file, ready to inspire your creativity.
3. Winter Dreams Arrangements (PNG)


Transform your holiday projects with the enchanting “Winter Dream” collection. This set includes beautifully crafted watercolor elements like pine branches, flowers, a deer, and a bird, all in a stunning blue Christmas theme. Perfect for holiday cards, invitations, and seasonal designs, these illustrations will bring a magical wintry touch to any creation. Start designing with this captivating collection!
4. Christmas Leaves and Flowers Collection (AI, EPS, PNG)


Start crafting your perfect holiday designs with the festive magic of the “Christmas Leaves and Flowers Collection.” This vibrant vector illustration set features beautifully designed holiday elements, perfect for cards, invitations, patterns, and more. With editable colors and 100% vector graphics, this collection offers the ultimate flexibility for all your creative projects.
5. Crocus Clipart, Spring Flowers (PNG)


The “Crocus Watercolor Clipart” collection brings the charm of spring to your creative projects. Featuring 11 hand-painted elements with transparent backgrounds, this set is perfect for crafting unique compositions. High-resolution and beautifully detailed, these illustrations are ideal for cards, invitations, patterns, and more.
Take a look at these tutorials
Level up your skills with Envato Tuts+ tutorials, designed for creators of all experience levels. Whether you’re just starting out or looking to refine your expertise, these tutorials will help you grow your abilities and tackle exciting new projects with confidence.