

In today’s
tutorial, we’re going to learn how to make a pattern in Affinity Designer. We’ll explore three different methods in order to
see which one is the best.
Also, don’t forget you can always expand your pattern library by heading over to Envato Elements, where you’ll find a great selection of vector patterns.
That being said, grab a fresh cup of that hot bean juice, and let’s create an Affinity Designer pattern fill!
Follow along with us over on our Envato Tuts+ YouTube channel:
1. How to Set Up a
New Project File for an Affinity Designer Repeat Pattern
To create a pattern tool, we’re going to start by setting up a New Document by heading over to File > New (or by using the Control-N
keyboard shortcut), which we will adjust as follows:
-
Type:
Web -
Document
Units: Pixels -
Create
artboard: checked -
Page
Width: 514 px -
Page
Height: 514 px - DPI: 72

2. How to Create
the Main Repeating Pattern Segment
Now that we’ve
finished creating our project file, we’re going to start working on the
repeating pattern segment, which we will use later on in order to compare the
three pattern building methods.
Step 1
Create the main shape for the background using a 514 x 514 px square, which we will color using #1F2433 and then
center align to the underlying page using the Arrange panel’s Align Center
and Align Middle options.

Step 2
Start working on the inner section of the center decorative circle by creating
a 6 x 6 px circle with a 2 pt thick Stroke (#F72F2F), which we will center align to the page as we did
with the background.
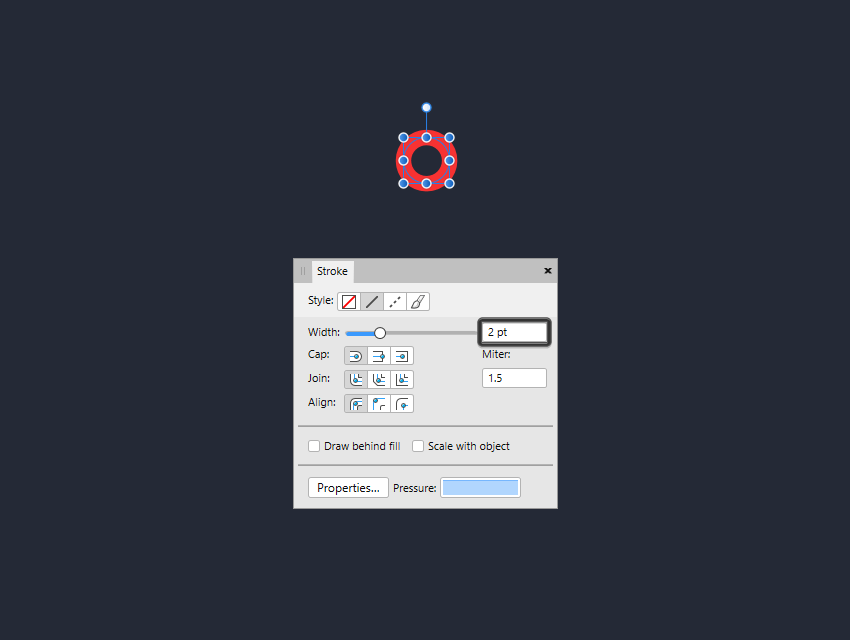
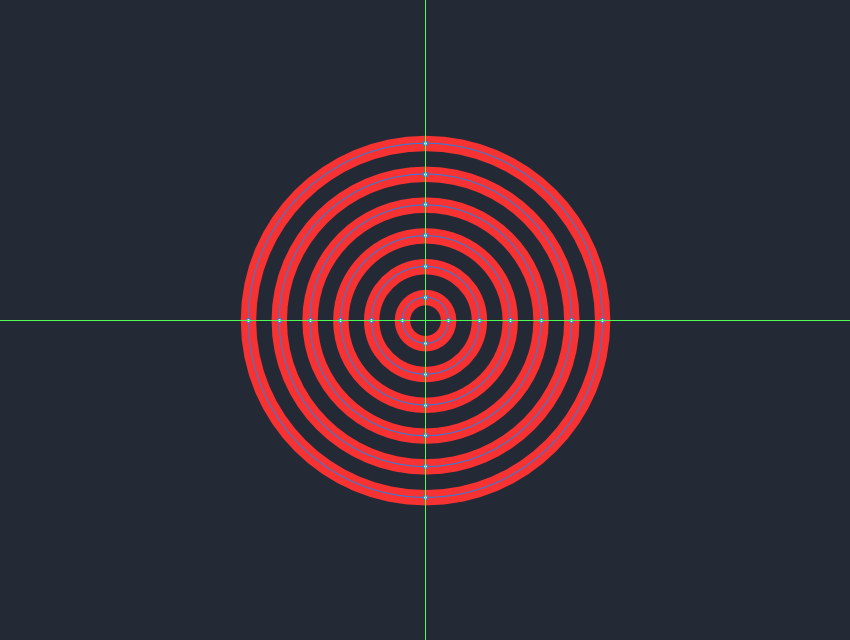
Step 3
Create five 2 pt thick
concentric circles (#F72F2F), making sure to maintain a 2 px gap (which is the thickness of the actual circles) between
them, as seen in the reference image. Once you’re done, select and group all six
of them together using the Control-G
keyboard shortcut.
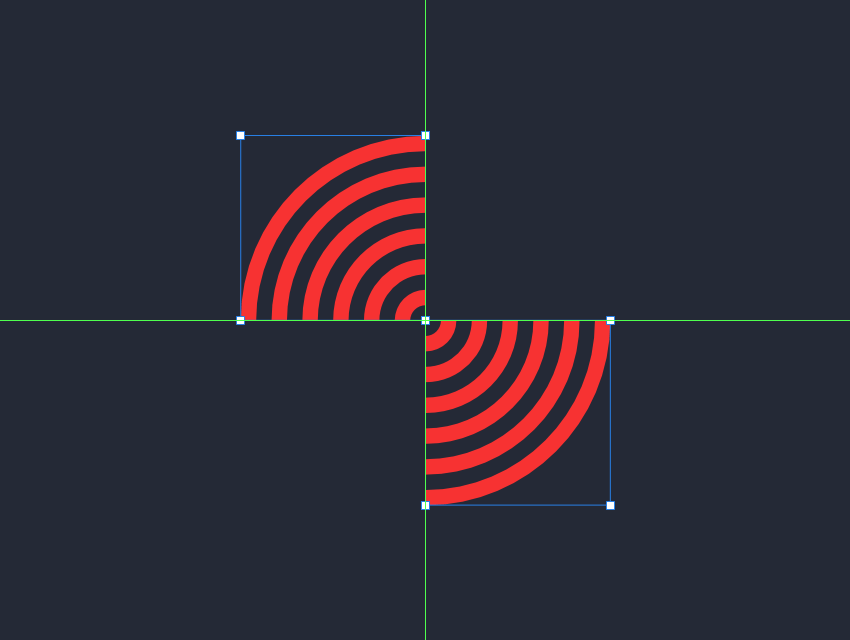
Step 4
Next, we’re going to need to create the clipping mask for the circles’
top-left quarters, using a 24 x 24 px square
(highlighted with green) which we will align to the outer circle’s left and top
edges.

Step 5
Once we have the mask in place, all we have to do is open up the Layers panel and drag the grouped
circles onto the shape (the green square), which will produce the following
result.

Step 6
Since we want the mask to be completely see-through, we’re going to
first select it in the Layers
panel and then remove its Fill from the Color panel.

Step 7
Create a copy (Control-C >
Control-V) of the section that we’ve just masked, and then position it as
seen in the reference image, making sure to adjust it by flipping it both
horizontally and vertically (Transform
> Flip Horizontal & Flip Vertical).
Step 8
Next, we’re going to grab the Pen
Tool (P) and use it to draw two groups (Control-G) of six 24 px wide
2 pt thick horizontal stroke lines
(#F72F2F), which we will vertically stack 2 px from one another and then position on the sides of the
circle quarters so that they overlap, as seen in the reference image.

Step 9
Mask the horizontal lines that we’ve just created using a 48 x 48 px circle, by opening up the Layers panel and then simply dragging
them over the larger shape. Once you’re done, select and mask all of the
current section’s composing shapes using the Control-G keyboard shortcut, making sure to give the resulting
group a descriptive label so that you can easily identify it later on.

Step 10
Start working on the decorative circle’s outer section, by creating the
bottom-left quarters using 24 2
pt thick concentric circles (#F72F2F), starting with a 70 x 70 px one and going all the way up to a 254 x 254 px one. Once you have all the shapes, group (Control-G) and then center align them
to the page, making sure to mask them using a 128 x 128 px square.

Step 11
Create the top-right quarter using a copy (Control-C > Control-V) of the one that we’ve just masked, which
we will adjust by flipping it both horizontally and vertically (right click > Transform > Flip
Horizontal & Flip Vertical) and positioning it as seen in the reference
image.

Step 12
Add the horizontal detail lines using two groups (Control-G) of 32 128
px wide 2 pt thick Stroke lines (#F72F2F), which we will
vertically stack 2 px from one
another, making sure to position them over the quarters so that they overlap.

Step 13
Create the clipping mask for the horizontal lines using a 256 x 256 px circle (highlighted with
green) which we will center align to the page and then adjust by cutting out a
smaller 68 x 68 px circle
(highlighted with red) from its center using the Subtract shape operation.

Step 14
As soon as you’ve created the mask,
open up the Layers panel and then
simply select and drag the two groups of horizontal lines on top of its shape,
making sure to remove its fill afterwards from within the Color panel. Once you’re done, select and group all of the current
decorative circle’s composing sections using the Control-G keyboard shortcut.

Step 15
Create four copies (Control-C
> Control-V four times) of the shapes that we’ve just grouped and then position
them at the center of the page’s corners, as seen in the reference image.

Step 16
Start working on the smaller decorative circle by creating three concentric circles: one 6
x 6 px circle with a 2 pt thick Stroke (#FFEBD9), followed by a 14 x 14 px one (#FFEBD9) and another
slightly bigger 22 x 22 px one (#FFEBD9). Then select and group all three of them together using the Control-G keyboard shortcut.

Step 17
Mask the circles’ top left quarters using a 12 x 12 px square, making sure to add the bottom-right ones using a
copy (Control-C > Control-V) of
the resulting mask, which we will adjust by flipping it both horizontally and
vertically (right click > Transform
> Flip Horizontal & Flip Vertical) and then positioning it as seen
in the reference image.

Step 18
Add the horizontal detail lines using two groups of three 12 x 12 px Strokes (#FFEBD9) with a 2 pt Width, vertically stacked 2 px from one another, which we will
overlap with the top and bottom quarters, making sure to mask them afterwards
using a 24 x 24 px circle. Once
you’re done, select and group all of the current section’s composing shapes
using the Control-G keyboard
shortcut.

Step 19
Create four groups of four concentric circles with a 2 pt thick Stroke (#FFEBD9): one 30 x
30 px, followed by a 38 x 38 px one,
a 46 x 46 px one and a larger 54 x 54 px one. Then position them around the previous section, as seen in the reference image.

Step 20
Take a couple of moments and mask the shapes that we’ve just created
using a 60 x 60 px circle, by simply
dragging them over the larger shape from within the Layers panel.

Step 21
Add the outer rings using a group of three
concentric circles with a 2 pt thick
Stroke (#FFEBD9): one small 66 x 66 px one, followed by a 74 x 74 px one and a slightly bigger 82 x 82 px one. Then center
align them to the shapes that we’ve just masked.

Step 22
Create the horizontal detail lines using two groups of four 104 px wide 2 pt thick Strokes (#FFEBD9)
vertically stacked 2 px from one
another, followed by the vertical ones using two groups of 104 px tall 2 pt thick Strokes (#FFEBD9) horizontally
spaced 2 px from one another,
which we will position so that they overlap the paths of the masked circles.

Step 23
Mask the resulting shapes using a 96 x 96 px circle, which we will adjust
by cutting out a smaller 88 x 88 px one
using the Subtract shape operation.

Step 24
Add the outer rings using three concentric
circles with a 2 pt thick Stroke (#FFEBD9): one 96 x 96 px one, followed by another 104 x 104 px one and a slightly bigger 112 x 112 px one. Then position them as seen in the reference image. Once you’re done, make sure
you select and group all of the decorative circle’s composing sections using
the Control-G keyboard shortcut.

Step 25
Finish off the pattern segment by adding three copies (Control-C > Control-V three times)
of the shapes that we’ve just grouped, which we will position in the center of
the page’s remaining edges.

Step 26
Now that we’ve finished putting together all the different sections of
our little pattern, we’ll want to select and group (Control-G) them together, making sure to mask them afterwards using
a 514 x 514 px square.

3. How to Make a Pattern Design Using the Copy-and-Paste Method
So up to this point, we’ve been putting together the
repeating pattern segment. Now we’re going to put it to work and see how we can
create a pattern in Affinity Designer using the first method.
Step 1
You’ll want to start by creating a New Document by heading over to File > New (or by using the Control-N keyboard shortcut) and then
entering the desired Width and Height values (I went with a
1600 x 1600 px square).

Step 2
To create a pattern tool, make a copy (Control-C) of the pattern segment that we’ve just masked, and then paste
it (Control-V) within the new
document, which should by default align it to the page’s top-left corner.

Step 3
Next, we’re going to populate the page with a couple of horizontal and
vertical copies. Normally, I would use the click-and-drag method where you
create the copy by selecting the shape that you want to duplicate and then
holding down Alt (to create the
copy) and Shift (in order to drag in
a straight line) while dragging using the mouse.
The problem is that, when you do this, the software won’t properly snap
the copy to the original segment’s edges, which is what we want it to do. To
fix this, you’ll have to create the copy using the Control-C > Control-V keyboard shortcuts, and then select and
drag it until it snaps into place.
Also, don’t worry about the pattern being all over the place, since we’re
going to fix that in the next step.

Step 4
Select all of the pattern segments using the Control-A keyboard shortcut, and then group them together using the
Control-G keyboard shortcut, making
sure to center align the resulting group to the underlying page which will
ensure that the pattern will be uniformly applied.

Step 5
While the Copy-and-Paste method is really easy to
use, it can sometimes prove not to be your best choice, especially if you want to
make adjustments to one of the composing segments, since the software won’t
carry them across the entire pattern. This means that if you need to change the
color or size of an element, you’ll have to take the time and adjust each of the
pattern’s composing segments in order for the change to be uniformly applied.
The next method overcomes this problem using a simple solution, as we
will see in the following moments.

4. How to Create an Affinity Designer Seamless Pattern Using the Symbols Method
If you plan on
adjusting the pattern later on, this second method of creating an Affinity Designer pattern should prove to be a better choice,
since it allows you to do that in a very simple manner.
Step 1
Start out by creating a 1600 x
1600 px document, onto which we will paste (Control-V) a copy of the repeating pattern segment.

Step 2
Instead of
immediately starting to populate the page with copies of the pattern segment as
we did a few moments ago, we’re going to turn it into a symbol which will allow
us to carry out any desired adjustment at a global level. To do this, you first
have to enable the Symbols panel, by
heading over to View > Studio where
you’ll want to click on Symbols.
Now that the panel is visible, you’ll want to select the pattern segment
and then simply click Create, which
should turn it into a symbol. This will be indicated on the Layers panel.

Step 3
Once we’ve turned our pattern segment into a symbol, we can take the
time to populate the page using a couple of horizontal and vertical copies (Control-C > Control-V) as we did
with the previous method, making sure to group (Control-G) and then center align the resulting pattern using the Arrange panel’s Align Horizontally and Vertically
options.

Step 4
If you ever need to make adjustments to the resulting pattern, you can
easily do so by adjusting one of its composing segments, and the software will
carry them out across all the other ones.

5. How to Create
the Affinity Designer Pattern Fill Using the Power Duplicate Method
This third and
last method is probably the best one, since it allows you to
populate the page a lot faster compared to the Copy-and-Paste method, while letting you easily edit it as you can with the Symbols method.
Step 1
As we did with all the previous methods, start by creating a 1600 x 1600 px document and then
pasting (Control-V) a copy of the
repeating segment onto it.

Step 2
Quickly turn the pattern segment into a symbol, so that you can carry
out adjustments later, when and if you need to.

Step 3
With the pattern segment selected use the Control-J keyboard shortcut to create a duplicate, which we will then position on the original’s right side,
by clicking and dragging while holding down the Alt and Shift keys.

Step 4
Quickly create the first row of copies by using the Control-J keyboard shortcut twice instead of the more manual
copy-and-paste method, which will duplicate the first action of positioning the
pattern segment using the same spacing value.

Step 5
Once you have the first row, create a duplicate after it using the Control-J keyboard shortcut, and then
drag and position the copies below the original row, filling in the page by
pressing the Control-J shortcut
twice.
Then, simply group (Control-G) and center align the resulting pattern to the underlying
page.

Great Job!
As always, I hope
you had fun working on the project and managed to learn something new and
useful along the way.
That being said, if you have any questions, feel free to post them within
the comments section, and I’ll get back to you as soon as I can!

Awesome Collection of Affinity Designer Repeat Patterns and Much More
In case you are looking for a high-quality Affinity Designer seamless pattern collection, check out these awesome resources available on Envato Elements:
Vibrant Watercolor Patterns (EPS, JPG, PNG)

This pattern Affinity Designer pack is full of colorful abstract shapes handcrafted with watercolor paints, suitable for creating vintage-style 90s fashion or decorative elements. This Affinity Designer seamless pattern collection is brought to you in both vector and bitmap formats.
Tropical Patterns (AI, EPS, JPG)

Floral patterns and elements are always on-trend! This Affinity Designer repeat pattern package contains nine different seamless patterns in three different file formats. All the elements are hand-drawn, and they would be perfect for your invitations, advertisements, greeting cards, and any other DIY projects. Just fill the shape with a pattern from the Affinity Designer tropical pack, and see how lovely they become.
Dotted Vector Patterns & Tiles (AI, EPS, JPG, PNG)

This Affinity tile design pattern collection is the best choice if you are looking for simple and neat geometric patterns made by hand. It could be used for backgrounds, fabrics, fashion apparel, and much more! All the patterns are fully editable and come in both vector and raster file formats.
50 Abstract Doodle Seamless Patterns (JPG, PNG, AI, EPS)

Do you want to boost your design tool collection with a pack of 50 Affinity Designer seamless patterns? Check out these fully editable doodles suitable for creating awesome backgrounds, wallpaper, and websites. This is a great selection of different shapes, from geometric polygons to topographic maps and wavy stripes, to give you great creative opportunities.
Ceramic Glaze Pattern Kit (AI, PSD, PNG)

Here’s another pattern Affinity Designer pack with hand-painted elements in modern styles of pottery and ceramic design. These patterns are suitable for branding projects, product design, and even for creating backgrounds. All patterns are fully editable and come in three file formats.
Pop 3D Geo Patterns (EPS, JPG, PDF, PNG, SVG)

This pack of Affinity tile designs is one of my favorites, as it contains amazing modern geometric patterns with different shapes in funky colors. You could use these patterns for creating fabric and art prints, postcards, gift wrap, and much more. The 12 patterns come in both raster and vector file formats.
Colorful Chaotic Rounded Shapes Seamless Patterns (AI, EPS, JPG, PNG)

Want to learn how to make a pattern design for wrapping paper to make your product stand out of the crowd? Check this cool bundle of three patterns in different styles: polka dots, organic rounded lines, and rounded sticks. These vintage-looking patterns are also useful for graphic and web design, and you could easily customize the colors.
Toffee Patterns (EPS, PNG, JPG)

Looking for a simple and cute Affinity Designer pattern fill? We’ve got this toffee pattern pack for you! These hand-drawn graphics are perfect for any print design as well as for digital art. They look really great on the white background and give you this cool pastel look. The eight patterns come in three different file formats, and besides that, you will also find 20 PNG flowers in the archive.
Water Plants Patterns (PAT, PNG)

Water Plants Patterns is a real treasure for lovers of botanical design! Carefully handcrafted, these patterns featuring high-detailed plants could be a great tool for creating posters and different types of printable cards. The patterns come in PNG and PAT file formats, but you should not be worried about it, as the resolution of each pattern is 4000 x 4000 px and 300 dpi.
Tea Time Patterns (PNG, AFDESIGN)

Planning a tea party with your friends? Then try to create a greeting card with an unusual and interesting form, and then fill the shape with a pattern from this Affinity Designer pack of cakes, teapots, and cups! “Tea Time Patterns” includes six seamless patterns and 16 PNG files with all the elements of the patterns.
Want to Expand Your Affinity Designer Skills?
If you want not only learn how to make a pattern in Affinity Designer but also expand your skills and know more tips and tricks, then check out these awesome tutorials:
-

The A to Z of Affinity Designer
-
Transitioning From Adobe Illustrator to Affinity Designer
-
How to Set Up Grids in Affinity Designer
-
How to Create an Autumn Leaves Pattern in Affinity Designer


