What is cybersigilism?
Cybersigilism is an emerging digital art movement that blends ancient symbology, futuristic design, and cyber-inspired aesthetics. It often incorporates elements of sharp, geometric patterns, bold lettering, and metallic textures, much like the chrome 3D text effect we’re creating in this tutorial. Cybersigilism draws inspiration from mystical symbols, tribal art, and modern technological themes, creating a unique fusion of the old and the futuristic.
![Metallic Chrome Text Effect](https://cdn.idevie.com/wp-content/uploads/2024/10/chrome_effect_44.jpg)
![Metallic Chrome Text Effect](https://cdn.idevie.com/wp-content/uploads/2024/10/1728367918_881_chrome_effect_44.jpg)
![Metallic Chrome Text Effect](https://cdn.idevie.com/wp-content/uploads/2024/10/1728367919_969_chrome_effect_44.jpg)
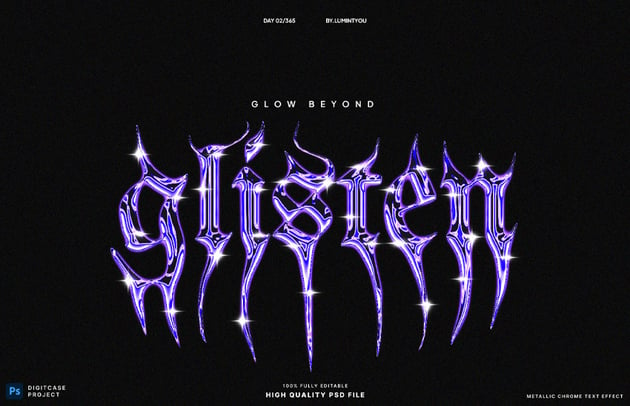
This art style is closely tied to the Y3K aesthetic, which revolves around visions of technology and design from the late 90s and early 2000s. In cybersigilism, the use of metallic finishes like chrome, intricate patterns, and sharp, bold text are key features that fit perfectly with the neotribal design we’re exploring in this tutorial. So now you know what cybersigilism is, let’s get started with the tutorial!
Tutorial assets
To create this 3D text effect, you’ll need the following resources to complete this project and learn how to make a bold, neotribal 3D chrome text effect:
1. Creating the neotribal designs in Adobe Illustrator
Step 1
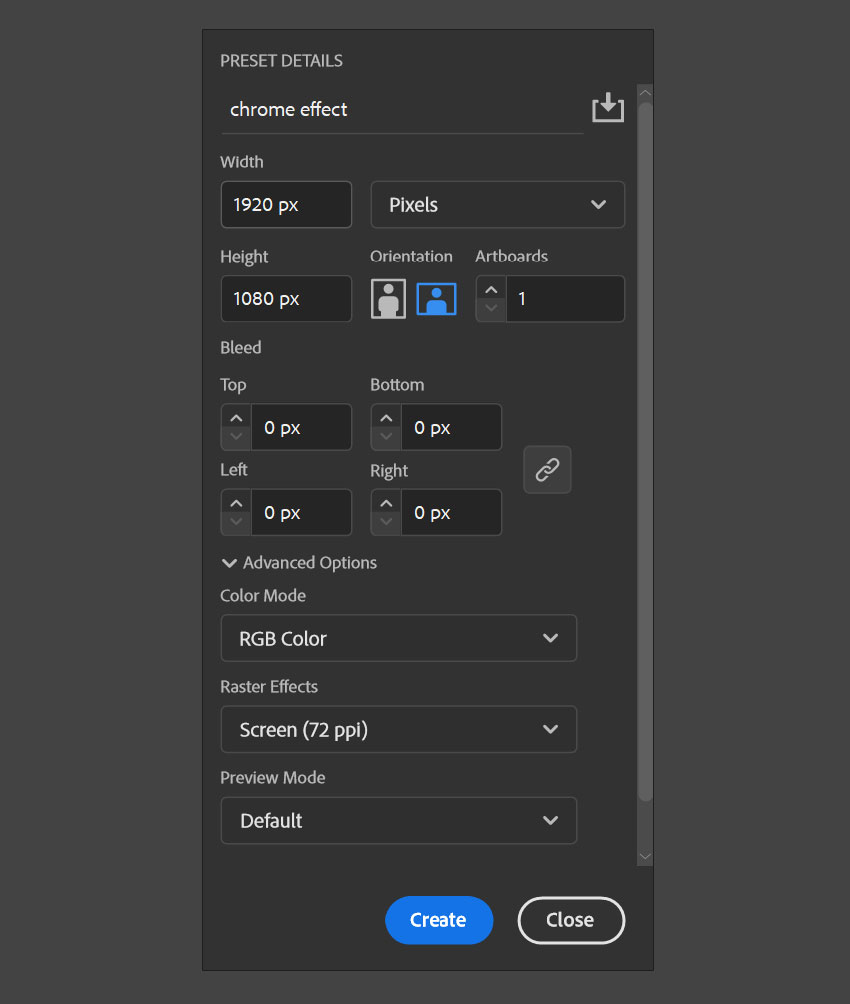
Open Adobe Illustrator and create a new document (File > New). Set the dimensions to A4 size or 1920 x 1080 pixels with a 72 dpi Resolution.
Ensure the Color Mode is set to RGB, which will give us the best compatibility as we move into Blender and Photoshop later in the tutorial.
![create a new document in Adobe Illustrator](https://cdn.idevie.com/wp-content/uploads/2024/10/chrome_effect_02.jpg)
![create a new document in Adobe Illustrator](https://cdn.idevie.com/wp-content/uploads/2024/10/1728367919_805_chrome_effect_02.jpg)
![create a new document in Adobe Illustrator](https://cdn.idevie.com/wp-content/uploads/2024/10/1728367920_886_chrome_effect_02.jpg)
Step 2
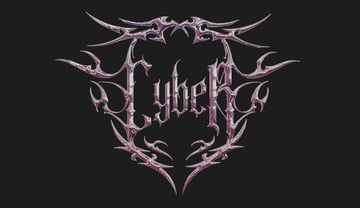
To create our neotribal designs, we’ll be using the Nortnoh metal modern typeface, which has the aesthetics we are going for and is available to download from Envato. Use the Type Tool (T) to write out the words for your design.
![create your neo tribal design](https://cdn.idevie.com/wp-content/uploads/2024/10/chrome_effect_03.jpg)
![create your neo tribal design](https://cdn.idevie.com/wp-content/uploads/2024/10/1728367920_52_chrome_effect_03.jpg)
![create your neo tribal design](https://cdn.idevie.com/wp-content/uploads/2024/10/1728367920_651_chrome_effect_03.jpg)
Step 3
To enhance the design, we’ll be using Neo-tribal shapes, which you can also download from Envato. This pack includes all sorts of sharp lines, swirls, and geometric shapes inspired by tribal tattoos and heavy metal fonts.
Incorporate these into the design by opening the pack in Adobe Illustrator and then clicking and dragging them into place.
![add more neo tribal shapes](https://cdn.idevie.com/wp-content/uploads/2024/10/chrome_effect_04.jpg)
![add more neo tribal shapes](https://cdn.idevie.com/wp-content/uploads/2024/10/1728367921_257_chrome_effect_04.jpg)
![add more neo tribal shapes](https://cdn.idevie.com/wp-content/uploads/2024/10/1728367921_833_chrome_effect_04.jpg)
Step 4
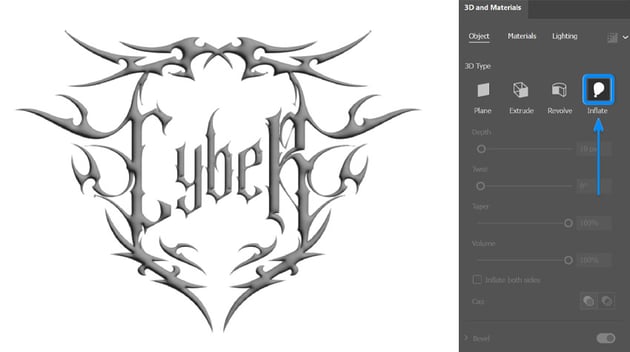
Now, we’re ready to convert these shapes into a 3D object. Select all the shapes and group them by pressing Control-G on the keyboard.
Go to the 3D and Materials panel (Windows > 3D and Materials) and select the Inflate button. To see the effect on your design, you will have to choose a light color such as grey.
![make the text design 3D](https://cdn.idevie.com/wp-content/uploads/2024/10/chrome_effect_05.jpg)
![make the text design 3D](https://cdn.idevie.com/wp-content/uploads/2024/10/1728367922_484_chrome_effect_05.jpg)
![make the text design 3D](https://cdn.idevie.com/wp-content/uploads/2024/10/1728367922_259_chrome_effect_05.jpg)
Step 5
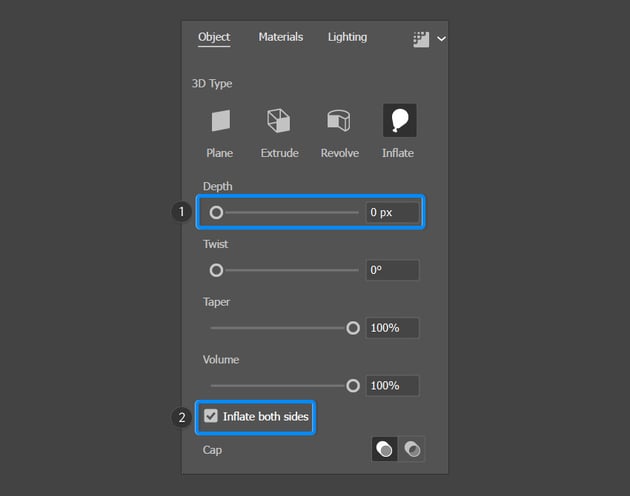
Reduce the Depth value to 0 pixels and check the box to Inflate both sides.
![reduce the depth and inflate both sides](https://cdn.idevie.com/wp-content/uploads/2024/10/chrome_effect_06.jpg)
![reduce the depth and inflate both sides](https://cdn.idevie.com/wp-content/uploads/2024/10/1728367922_559_chrome_effect_06.jpg)
![reduce the depth and inflate both sides](https://cdn.idevie.com/wp-content/uploads/2024/10/1728367922_712_chrome_effect_06.jpg)
Step 6
Go to the Asset Export panel (Windows > Asset Export) and click and drag your design into the space provided.
Select OBJ as the format so that we can use it in Blender, and then export the file to your desired location.
![export the design](https://cdn.idevie.com/wp-content/uploads/2024/10/chrome_effect_07.jpg)
![export the design](https://cdn.idevie.com/wp-content/uploads/2024/10/1728367923_649_chrome_effect_07.jpg)
![export the design](https://cdn.idevie.com/wp-content/uploads/2024/10/1728367923_625_chrome_effect_07.jpg)
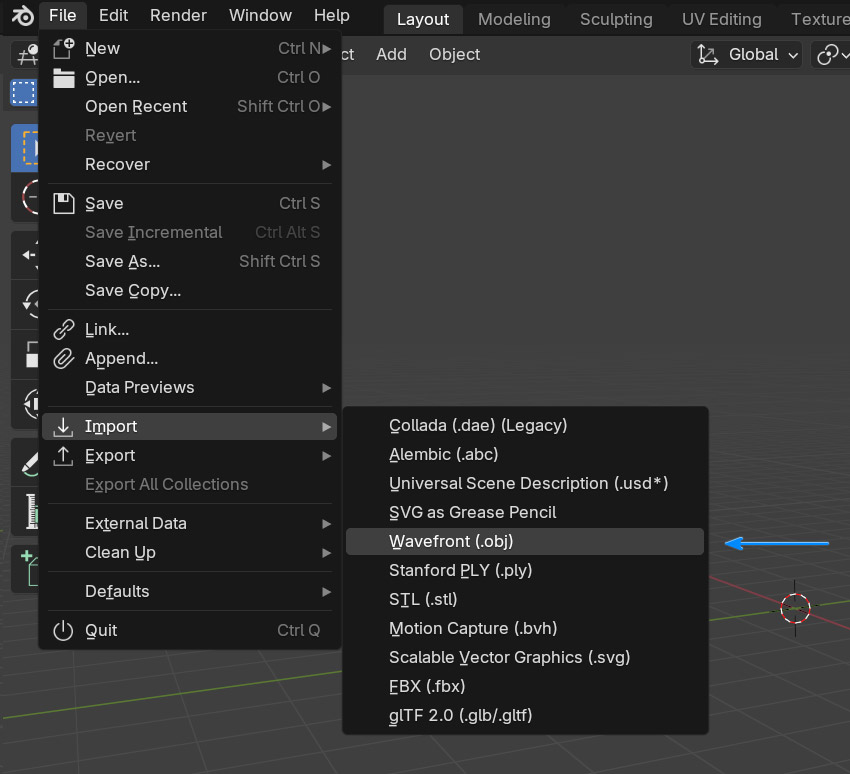
2. How to import the 3D text effect into Blender
Step 1
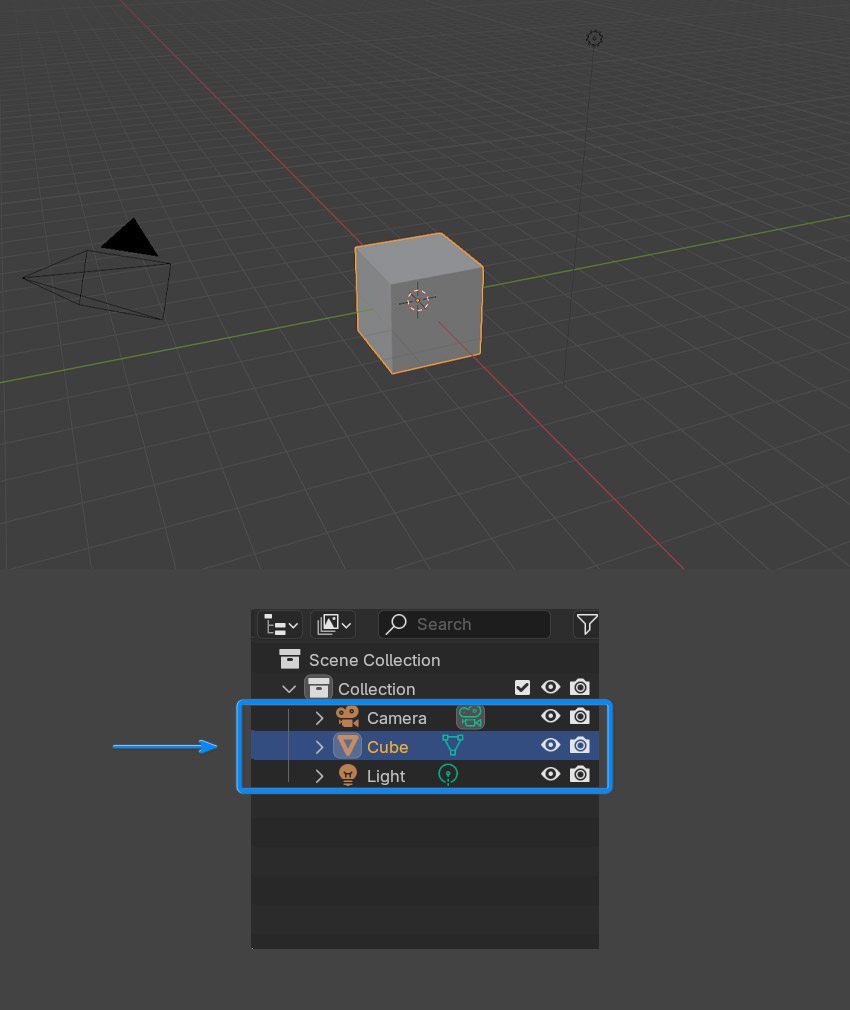
Open Blender and delete the default cube, camera, and light.
![delete default objects](https://cdn.idevie.com/wp-content/uploads/2024/10/chrome_effect_08.jpg)
![delete default objects](https://cdn.idevie.com/wp-content/uploads/2024/10/1728367924_532_chrome_effect_08.jpg)
![delete default objects](https://cdn.idevie.com/wp-content/uploads/2024/10/1728367924_627_chrome_effect_08.jpg)
Step 2
Import your OBJ file by going to File > Import > Wavefront (.obj).
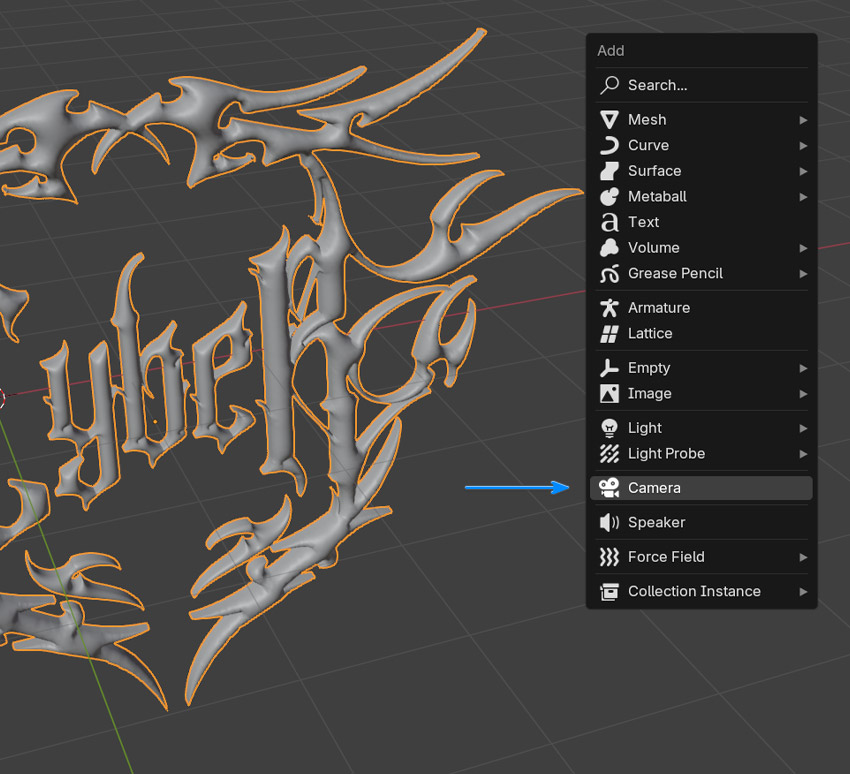
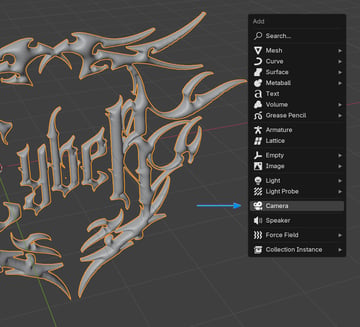
![import design](https://cdn.idevie.com/wp-content/uploads/2024/10/chrome_effect_09.jpg)
![import design](https://cdn.idevie.com/wp-content/uploads/2024/10/1728367925_438_chrome_effect_09.jpg)
![import design](https://cdn.idevie.com/wp-content/uploads/2024/10/1728367925_253_chrome_effect_09.jpg)
Step 3
To view and render your design properly, you’ll need to set up a camera. Press Shift-A and select Camera from the menu.
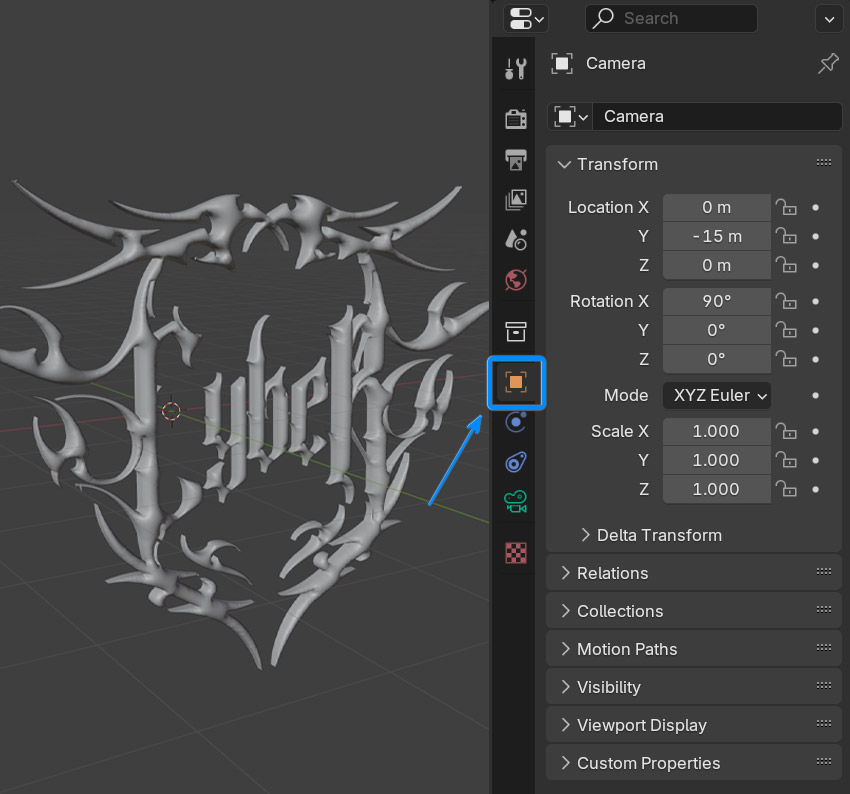
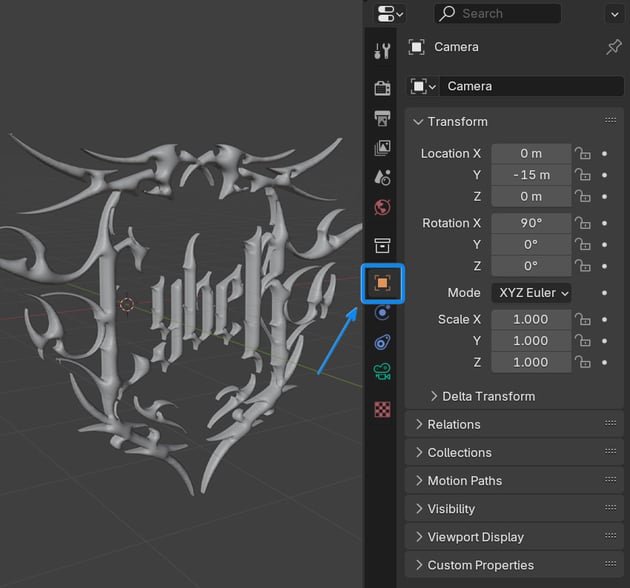
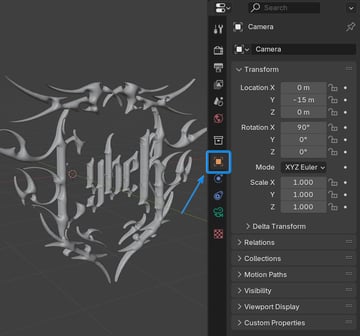
![create new camera](https://cdn.idevie.com/wp-content/uploads/2024/10/chrome_effect_10.jpg)
![create new camera](https://cdn.idevie.com/wp-content/uploads/2024/10/1728367926_260_chrome_effect_10.jpg)
![create new camera](https://cdn.idevie.com/wp-content/uploads/2024/10/1728367926_490_chrome_effect_10.jpg)
Step 4
In the Object Properties panel, set the transform location settings to the following:
And change the rotation values to the following:
![camera object properties](https://cdn.idevie.com/wp-content/uploads/2024/10/chrome_effect_11.jpg)
![camera object properties](https://cdn.idevie.com/wp-content/uploads/2024/10/1728367927_897_chrome_effect_11.jpg)
![camera object properties](https://cdn.idevie.com/wp-content/uploads/2024/10/1728367927_36_chrome_effect_11.jpg)
Step 5
Switch to the camera view by pressing Numpad 0 (or go to View > Camera).
![camera view](https://cdn.idevie.com/wp-content/uploads/2024/10/chrome_effect_12.jpg)
![camera view](https://cdn.idevie.com/wp-content/uploads/2024/10/1728367927_129_chrome_effect_12.jpg)
![camera view](https://cdn.idevie.com/wp-content/uploads/2024/10/1728367928_784_chrome_effect_12.jpg)
Step 6
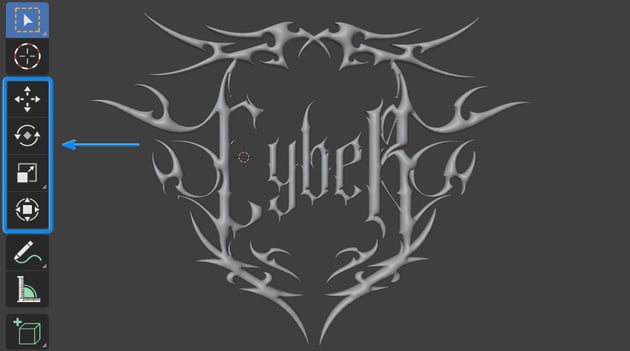
Scale and move your 3D design so that it fits the camera frame. You can do this by selecting the design and then using the Move (G) or Scale (S) tools that are located on the left side of the screen.
![transform tools](https://cdn.idevie.com/wp-content/uploads/2024/10/chrome_effect_13.jpg)
![transform tools](https://cdn.idevie.com/wp-content/uploads/2024/10/1728367928_312_chrome_effect_13.jpg)
![transform tools](https://cdn.idevie.com/wp-content/uploads/2024/10/1728367928_550_chrome_effect_13.jpg)
3. How to create the realistic 3D chrome effect material
Step 1
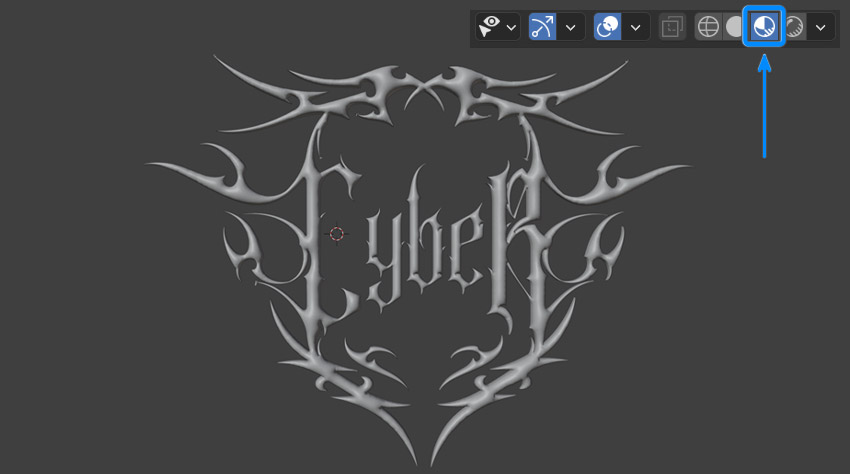
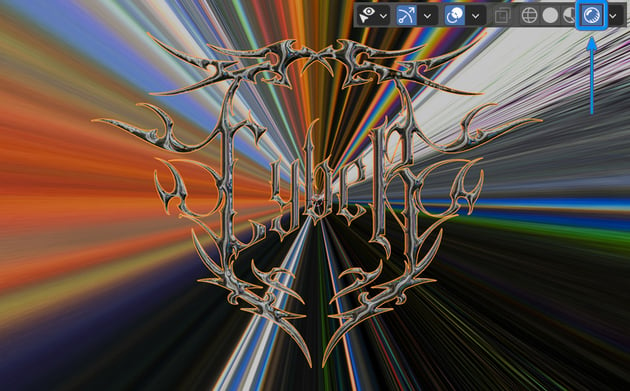
To preview how your materials and lighting interact with the scene, switch to Material Preview Mode by clicking the Shaded Sphere icon in the top right of the 3D viewport (or pressing Z and selecting Material Preview).
Material Preview allows you to see how materials, lighting, and textures look in real time without having to render the scene. This is useful for adjusting the chrome effect and reflections on your text before doing a final render.
![material preview mode](https://cdn.idevie.com/wp-content/uploads/2024/10/chrome_effect_14.jpg)
![material preview mode](https://cdn.idevie.com/wp-content/uploads/2024/10/1728367929_404_chrome_effect_14.jpg)
![material preview mode](https://cdn.idevie.com/wp-content/uploads/2024/10/1728367929_210_chrome_effect_14.jpg)
Step 2
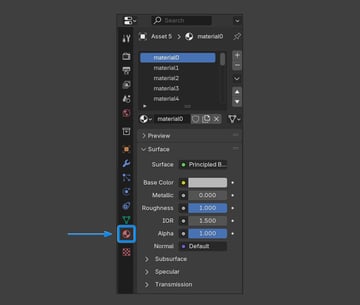
Select your 3D design and then go to the Material Properties panel.
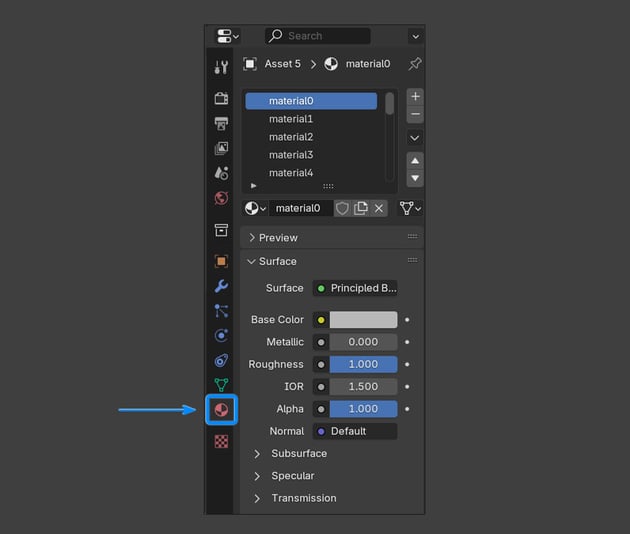
![material properties panel](https://cdn.idevie.com/wp-content/uploads/2024/10/chrome_effect_15.jpg)
![material properties panel](https://cdn.idevie.com/wp-content/uploads/2024/10/1728367930_492_chrome_effect_15.jpg)
![material properties panel](https://cdn.idevie.com/wp-content/uploads/2024/10/1728367930_335_chrome_effect_15.jpg)
Step 3
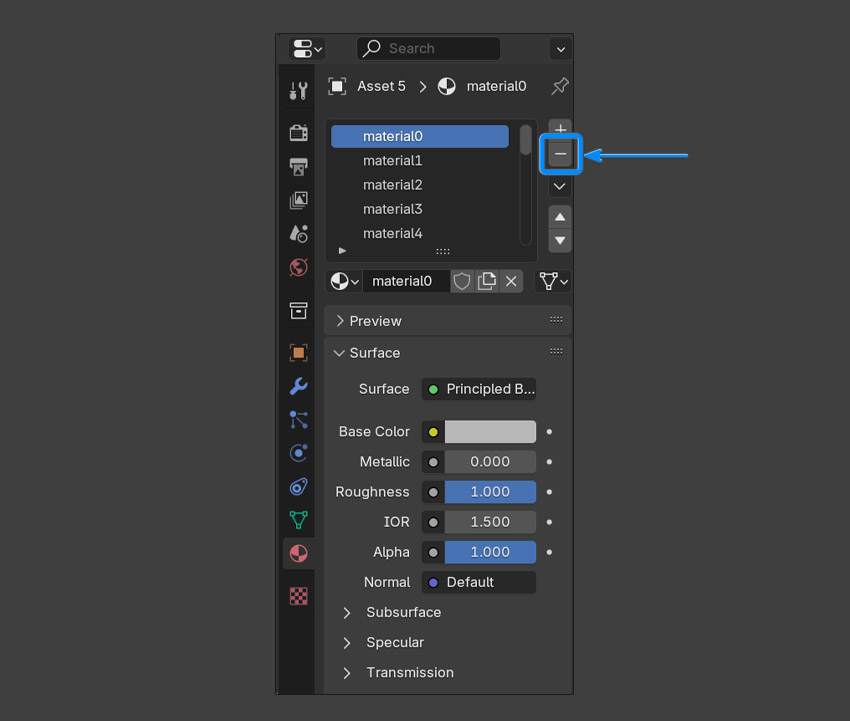
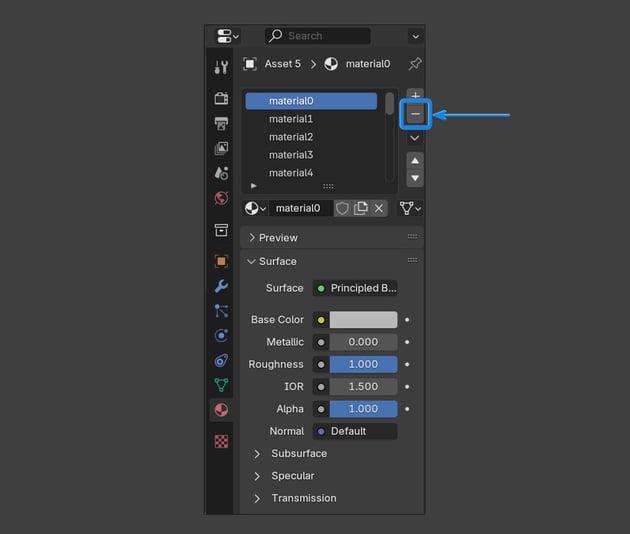
Remove all the standard materials as we will be replacing them with the chrome material. To delete them, simply select each one from the list and then click on the Remove Material Slot button.
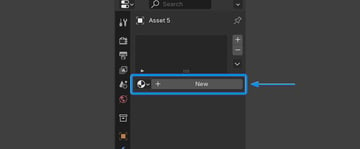
![remove materials](https://cdn.idevie.com/wp-content/uploads/2024/10/chrome_effect_16.jpg)
![remove materials](https://cdn.idevie.com/wp-content/uploads/2024/10/1728367931_250_chrome_effect_16.jpg)
![remove materials](https://cdn.idevie.com/wp-content/uploads/2024/10/1728367931_56_chrome_effect_16.jpg)
Step 4
Click on the New Material button to create a new material and name it “Chrome”.
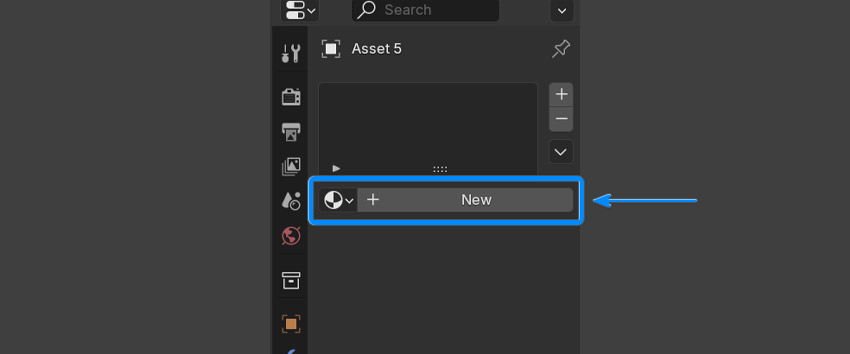
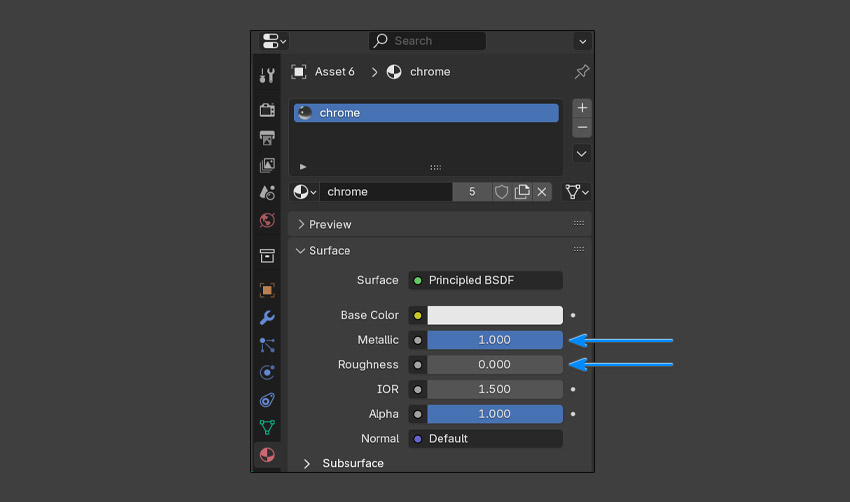
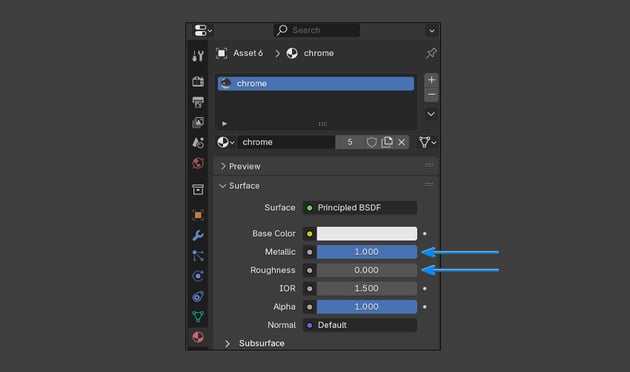
![create new material](https://cdn.idevie.com/wp-content/uploads/2024/10/chrome_effect_17.jpg)
![create new material](https://cdn.idevie.com/wp-content/uploads/2024/10/1728367932_346_chrome_effect_17.jpg)
![create new material](https://cdn.idevie.com/wp-content/uploads/2024/10/1728367932_894_chrome_effect_17.jpg)
Step 5
Now we need to adjust the Surface settings so that our material looks correct:
- Metallic: 1.000
- Roughness: 0.000
![material properties](https://cdn.idevie.com/wp-content/uploads/2024/10/chrome_effect_18.jpg)
![material properties](https://cdn.idevie.com/wp-content/uploads/2024/10/1728367932_3_chrome_effect_18.jpg)
![material properties](https://cdn.idevie.com/wp-content/uploads/2024/10/1728367933_341_chrome_effect_18.jpg)
4. How to create the reflections for the chrome text effect
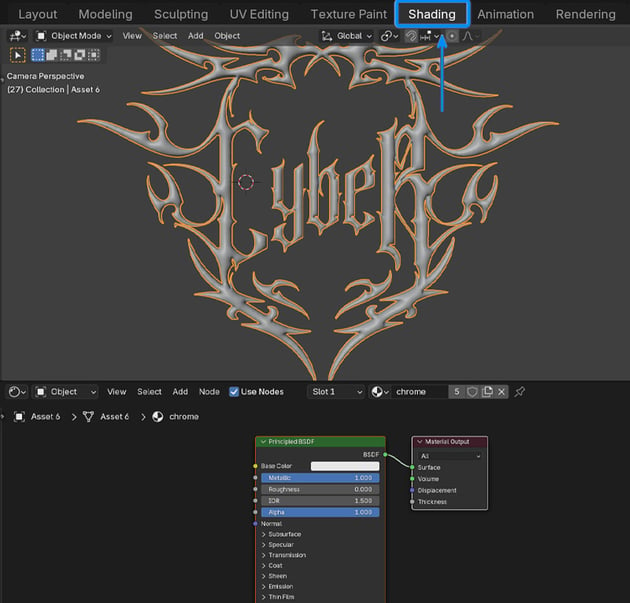
Step 1
Switch to the Shading Workspace by clicking on the button at the top of the screen. This workspace is where you can use node-based materials to control the appearance of your 3D objects and environment.
The Shading Workspace splits the screen into two main areas: the 3D Viewport (where you can see the results of your final design) and the Shader Editor (where you can add, connect, and modify material nodes to alter the look of your design).
![shading workspace](https://cdn.idevie.com/wp-content/uploads/2024/10/chrome_effect_19.jpg)
![shading workspace](https://cdn.idevie.com/wp-content/uploads/2024/10/1728367933_599_chrome_effect_19.jpg)
![shading workspace](https://cdn.idevie.com/wp-content/uploads/2024/10/1728367933_69_chrome_effect_19.jpg)
Step 2
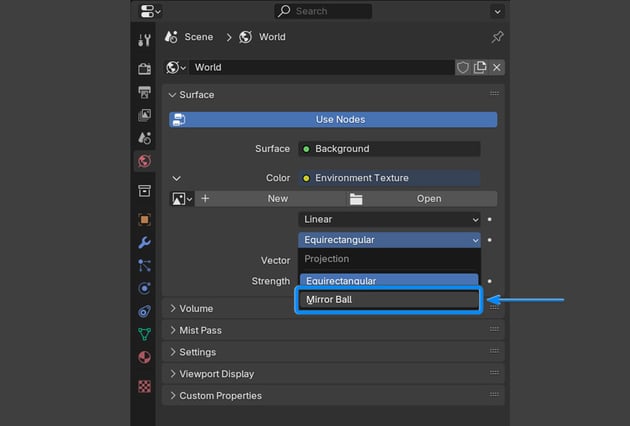
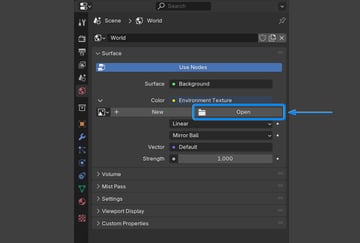
Go to the World Properties panel and click on the Color input button, and then select Environment Texture.
![world properties](https://cdn.idevie.com/wp-content/uploads/2024/10/chrome_effect_20.jpg)
![world properties](https://cdn.idevie.com/wp-content/uploads/2024/10/1728367934_68_chrome_effect_20.jpg)
![world properties](https://cdn.idevie.com/wp-content/uploads/2024/10/1728367934_397_chrome_effect_20.jpg)
Step 3
Then select Mirror Ball from the dropdown menu.
![select mirror ball](https://cdn.idevie.com/wp-content/uploads/2024/10/chrome_effect_21.jpg)
![select mirror ball](https://cdn.idevie.com/wp-content/uploads/2024/10/1728367934_23_chrome_effect_21.jpg)
![select mirror ball](https://cdn.idevie.com/wp-content/uploads/2024/10/1728367935_143_chrome_effect_21.jpg)
Step 4
Click on the Open button and then select the Silver hologram textile background that you downloaded from Envato. This texture image will provide realistic reflections on the chrome material, giving it a more dynamic and polished look.
![open the texture](https://cdn.idevie.com/wp-content/uploads/2024/10/chrome_effect_22.jpg)
![open the texture](https://cdn.idevie.com/wp-content/uploads/2024/10/1728367935_919_chrome_effect_22.jpg)
![open the texture](https://cdn.idevie.com/wp-content/uploads/2024/10/1728367935_75_chrome_effect_22.jpg)
Step 5
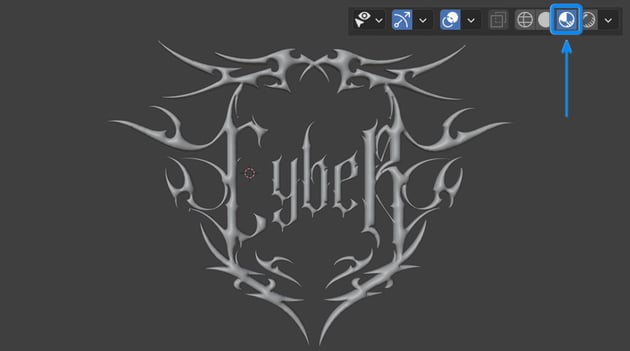
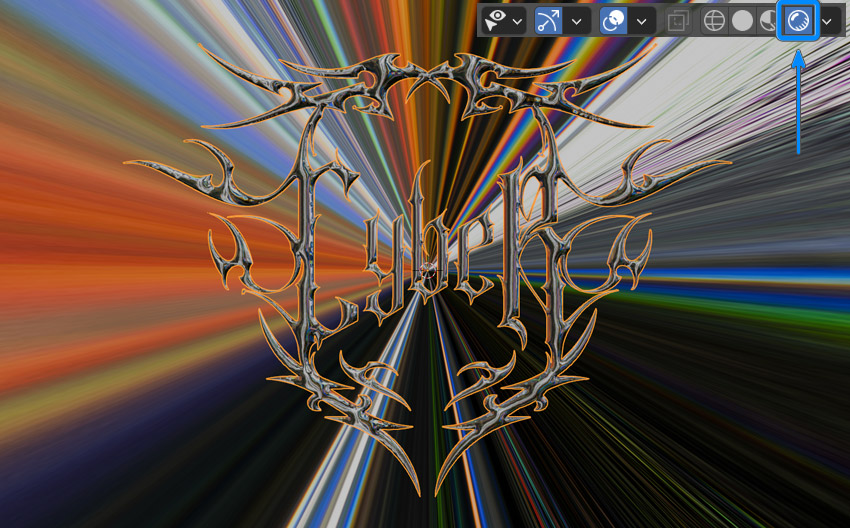
In order to see the reflections, we need to switch to Rendered Preview by clicking the Shaded Sphere icon in the top right of the 3D viewport (or pressing Z and selecting Rendered).
Rendered Preview Mode shows you how the scene will look when fully rendered, including all light interactions, reflections, and materials. This is a great way to check your chrome text effect with the reflections and tweak any lighting or material settings before doing a full render. Keep in mind that this mode may slow down your viewport, depending on the complexity of the scene.
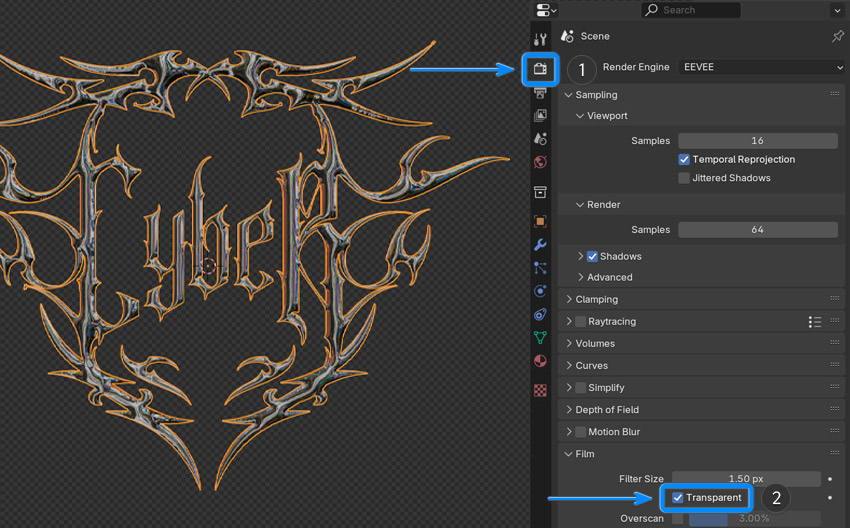
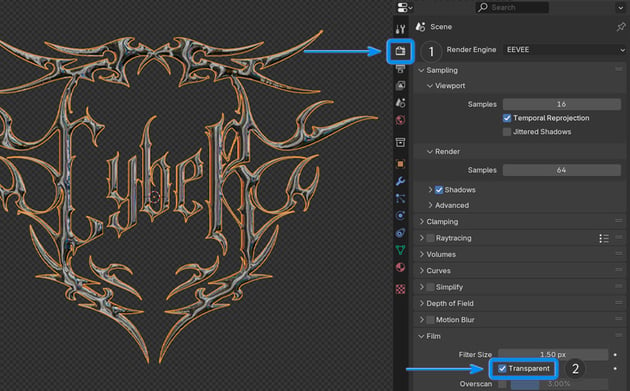
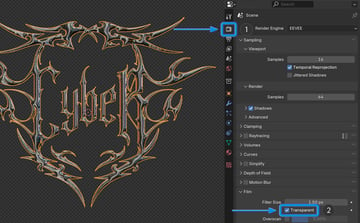
![rendered preview mode](https://cdn.idevie.com/wp-content/uploads/2024/10/chrome_effect_23.jpg)
![rendered preview mode](https://cdn.idevie.com/wp-content/uploads/2024/10/1728367936_817_chrome_effect_23.jpg)
![rendered preview mode](https://cdn.idevie.com/wp-content/uploads/2024/10/1728367936_301_chrome_effect_23.jpg)
Step 6
Go to the Render Properties panel, and then under the Film option we want to check the Transparent box. This will remove the texture image from the background of your viewport.
![render properties](https://cdn.idevie.com/wp-content/uploads/2024/10/chrome_effect_24.jpg)
![render properties](https://cdn.idevie.com/wp-content/uploads/2024/10/1728367937_76_chrome_effect_24.jpg)
![render properties](https://cdn.idevie.com/wp-content/uploads/2024/10/1728367937_756_chrome_effect_24.jpg)
5. How to customize your reflections
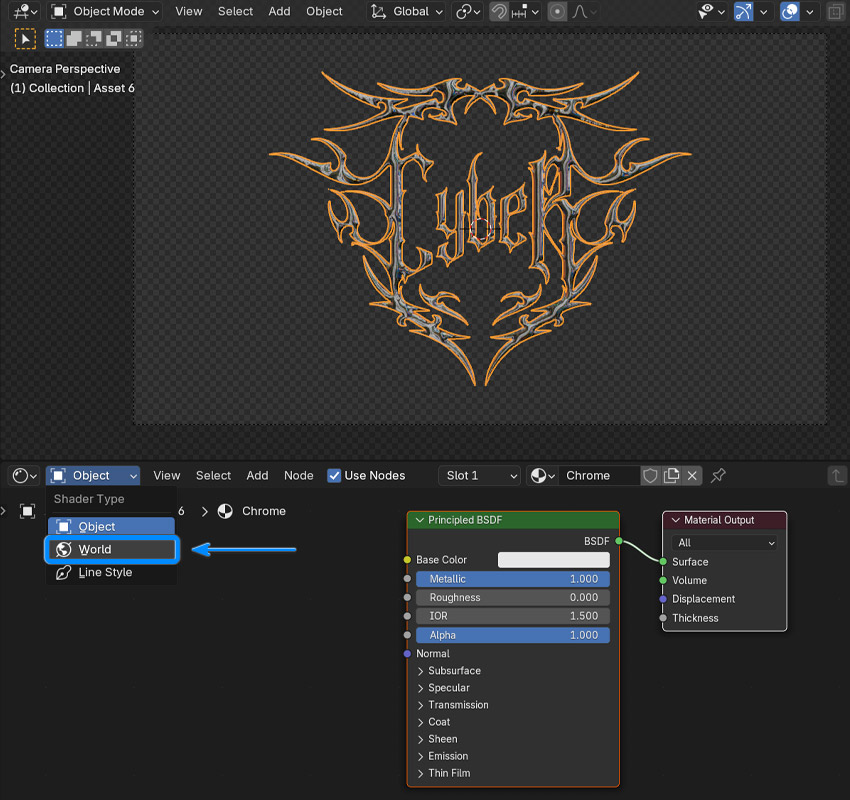
Step 1
In the Shader Editor, switch the shader type from Object to World. This will allow us to modify the global lighting and reflections in the scene.
![switch the shader type from Object to World](https://cdn.idevie.com/wp-content/uploads/2024/10/chrome_effect_25.jpg)
![switch the shader type from Object to World](https://cdn.idevie.com/wp-content/uploads/2024/10/1728367937_219_chrome_effect_25.jpg)
![switch the shader type from Object to World](https://cdn.idevie.com/wp-content/uploads/2024/10/1728367938_382_chrome_effect_25.jpg)
Step 2
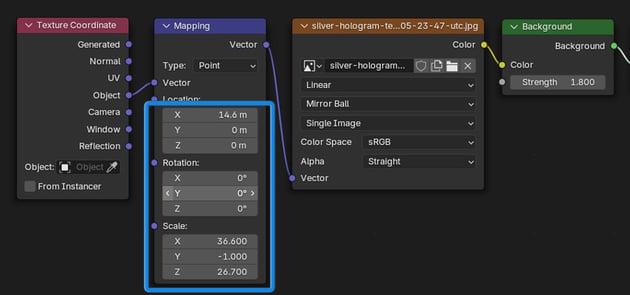
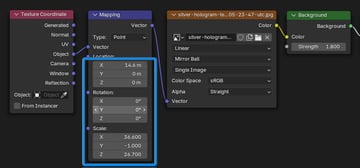
Press Shift-A to bring up the Add menu, and then navigate to Vector > Mapping. This node will help us control the scale, rotation, and position of the texture for more accurate reflections.
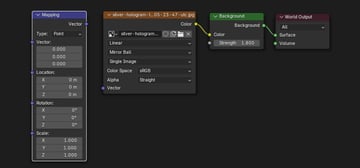
![mapping node](https://cdn.idevie.com/wp-content/uploads/2024/10/chrome_effect_33.jpg)
![mapping node](https://cdn.idevie.com/wp-content/uploads/2024/10/1728367938_635_chrome_effect_33.jpg)
![mapping node](https://cdn.idevie.com/wp-content/uploads/2024/10/1728367939_232_chrome_effect_33.jpg)
Step 3
Next, press Shift-A again, and go to Input > Texture Coordinate. This node will allow us to feed the correct coordinate information into the Mapping node, ensuring the texture aligns properly with the 3D space.
![texture coordinate node](https://cdn.idevie.com/wp-content/uploads/2024/10/chrome_effect_32.jpg)
![texture coordinate node](https://cdn.idevie.com/wp-content/uploads/2024/10/1728367940_915_chrome_effect_32.jpg)
![texture coordinate node](https://cdn.idevie.com/wp-content/uploads/2024/10/1728367940_240_chrome_effect_32.jpg)
Step 4
Now, connect the Object output from the Texture Coordinate node to the Vector input of the Mapping node.
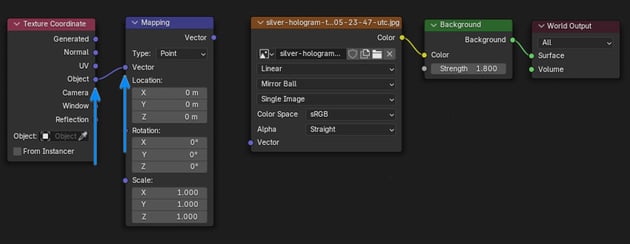
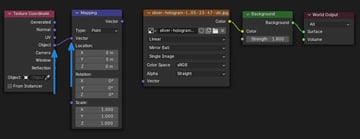
![connect nodes](https://cdn.idevie.com/wp-content/uploads/2024/10/chrome_effect_30.jpg)
![connect nodes](https://cdn.idevie.com/wp-content/uploads/2024/10/1728367940_603_chrome_effect_30.jpg)
![connect nodes](https://cdn.idevie.com/wp-content/uploads/2024/10/1728367941_796_chrome_effect_30.jpg)
Step 5
Then, link the output of the Mapping node to the Vector input of the Environment Texture node.
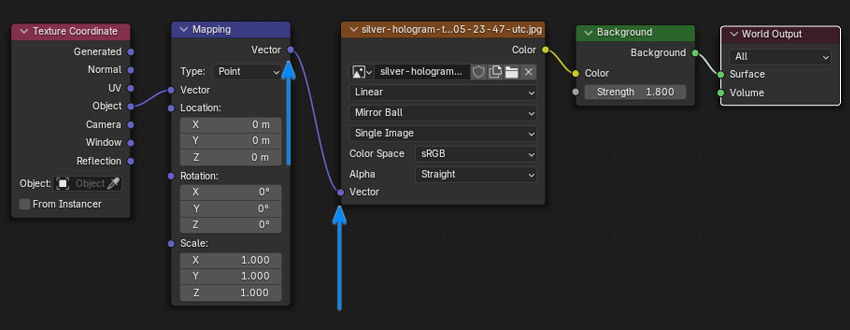
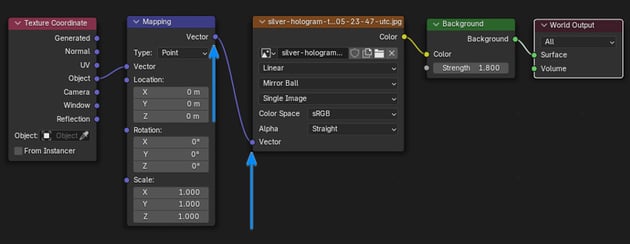
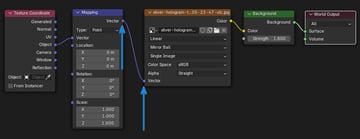
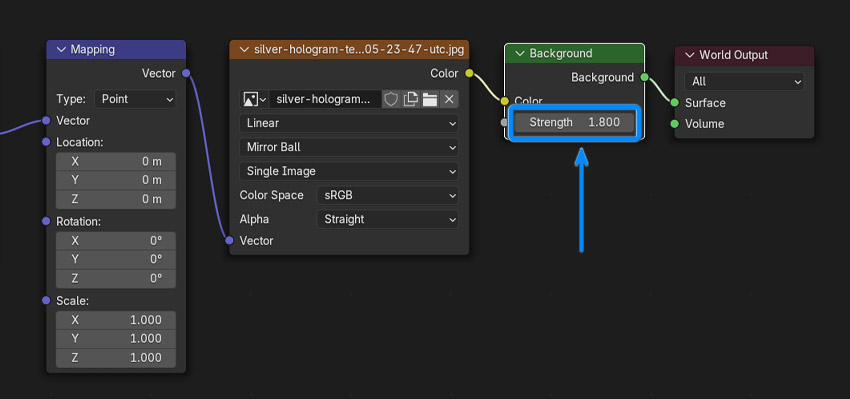
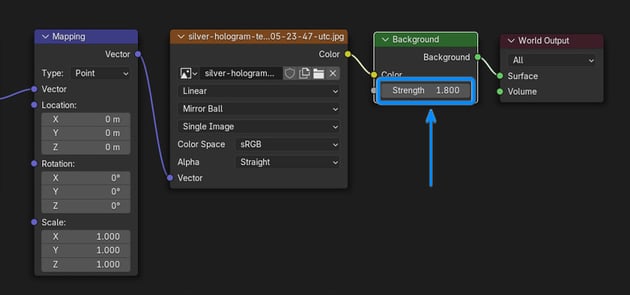
![connect nodes](https://cdn.idevie.com/wp-content/uploads/2024/10/chrome_effect_29.jpg)
![connect nodes](https://cdn.idevie.com/wp-content/uploads/2024/10/1728367941_337_chrome_effect_29.jpg)
![connect nodes](https://cdn.idevie.com/wp-content/uploads/2024/10/1728367941_916_chrome_effect_29.jpg)
Step 6
To increase or decrease the strength of the light, edit the Strength value in the Background node. For this tutorial, we will use a value of 1.800.
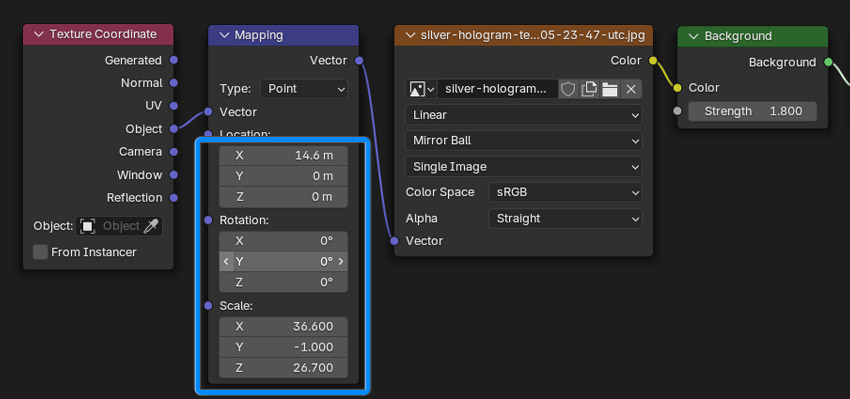
![increase strength](https://cdn.idevie.com/wp-content/uploads/2024/10/chrome_effect_34.jpg)
![increase strength](https://cdn.idevie.com/wp-content/uploads/2024/10/1728367942_118_chrome_effect_34.jpg)
![increase strength](https://cdn.idevie.com/wp-content/uploads/2024/10/1728367942_183_chrome_effect_34.jpg)
Step 7
Once we’ve got everything set up, we can start adjusting the parameters of the Mapping node to create different reflective effects on the chrome material. By tweaking these values, you can shift the reflection pattern on the chrome material.
Play around with different settings while viewing the scene in Rendered Preview Mode to get real-time feedback on how your adjustments affect the overall look.
![tweaking mapping node values](https://cdn.idevie.com/wp-content/uploads/2024/10/chrome_effect_35.jpg)
![tweaking mapping node values](https://cdn.idevie.com/wp-content/uploads/2024/10/1728367943_690_chrome_effect_35.jpg)
![tweaking mapping node values](https://cdn.idevie.com/wp-content/uploads/2024/10/1728367943_279_chrome_effect_35.jpg)
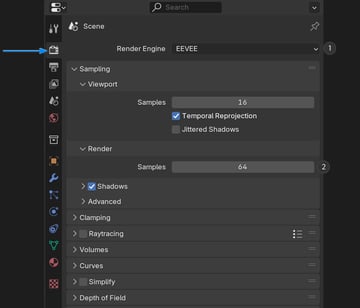
6. How to render the final image
Step 1
Now that the materials, reflections, and camera are all set up, it’s time to render your scene and bring your chrome letters to life.
Before rendering, we’ll need to adjust a few settings to ensure high-quality output. Go to the Render Properties tab and adjust the following:
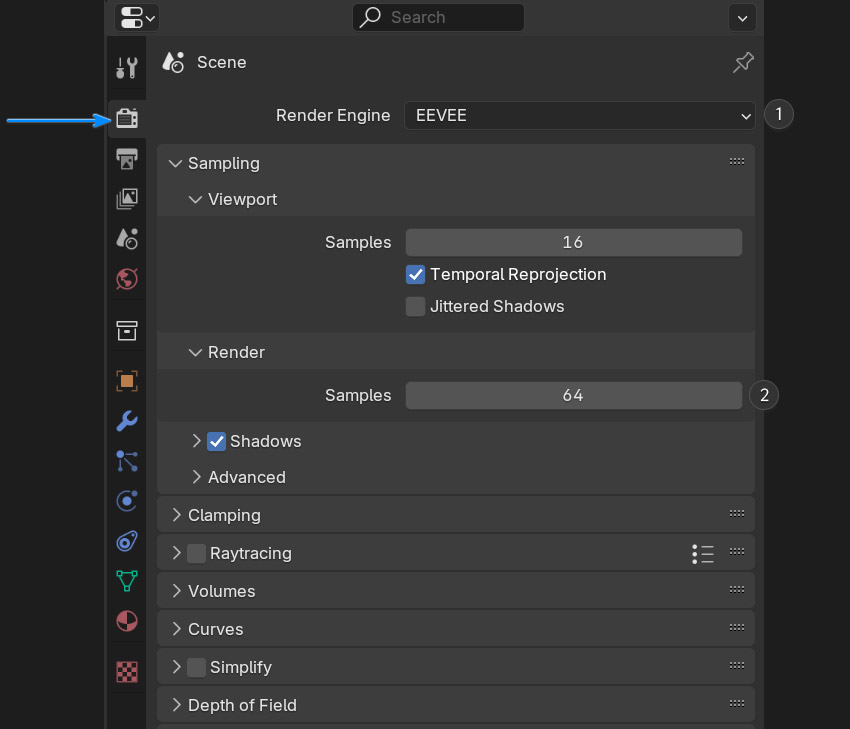
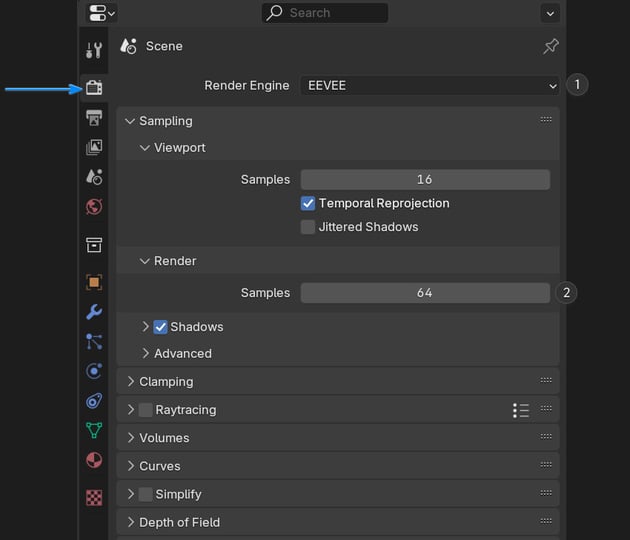
- Render Engine: You can choose either Eevee or Cycles. Each engine has its strengths and limitations, and the choice will affect the quality and speed of your final render. Switch to Eevee for a quick preview and render to see if it meets your expectations. Switch to Cycles for a final render if you’re after photorealistic reflections and high-quality output, especially for a chrome effect.
- Sampling > Render: In the Sampling section, increase the Render Samples value. The higher the sample count, the smoother the final image will look. However, a higher value will increase the time it takes to render.
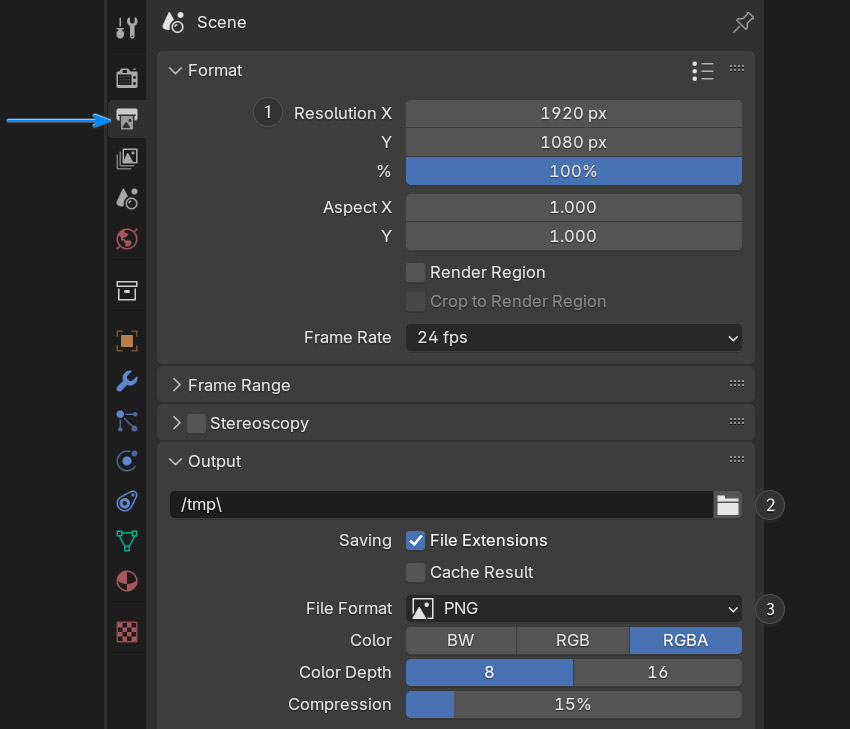
![render properties](https://cdn.idevie.com/wp-content/uploads/2024/10/chrome_effect_39.jpg)
![render properties](https://cdn.idevie.com/wp-content/uploads/2024/10/1728367943_780_chrome_effect_39.jpg)
![render properties](https://cdn.idevie.com/wp-content/uploads/2024/10/1728367944_328_chrome_effect_39.jpg)
Step 2
In the Output Properties tab:
- Set the resolution of your image under the Format section.
- In the Output section, select where you want to save your final render by clicking the folder icon.
- For a transparent background, choose PNG and check the RGBA option (to include alpha transparency).
![output properties](https://cdn.idevie.com/wp-content/uploads/2024/10/chrome_effect_38.jpg)
![output properties](https://cdn.idevie.com/wp-content/uploads/2024/10/1728367944_452_chrome_effect_38.jpg)
![output properties](https://cdn.idevie.com/wp-content/uploads/2024/10/1728367944_2_chrome_effect_38.jpg)
Step 3
Once everything is set, it’s time to render. Go to the top menu and click Render > Render Image (or press F12 on your keyboard). Blender will start processing the scene based on your settings, and you’ll see the image come to life in the Render window.
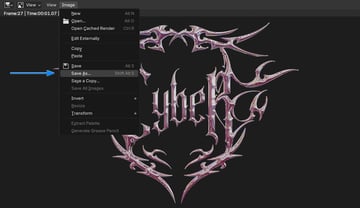
![rendered image](https://cdn.idevie.com/wp-content/uploads/2024/10/chrome_effect_41.jpg)
![rendered image](https://cdn.idevie.com/wp-content/uploads/2024/10/1728367945_104_chrome_effect_41.jpg)
![rendered image](https://cdn.idevie.com/wp-content/uploads/2024/10/1728367945_484_chrome_effect_41.jpg)
Step 4
When the render is complete, save your image by going to the Image menu in the Render window and selecting Save As. Choose your file format (PNG for transparency or JPEG for a regular image), and then select a location on your computer to save the final file.
Once that’s done, we can then take our chrome effect into Photoshop!
![save image](https://cdn.idevie.com/wp-content/uploads/2024/10/chrome_effect_42.jpg)
![save image](https://cdn.idevie.com/wp-content/uploads/2024/10/1728367946_200_chrome_effect_42.jpg)
![save image](https://cdn.idevie.com/wp-content/uploads/2024/10/1728367946_608_chrome_effect_42.jpg)
7. Final touches in Adobe Photoshop
Step 1
In this section, you’ll learn how to make text 3D in Photoshop. Import your final chrome effect into Photoshop and add the Texture technical fabric with rubber coating as a background layer. You can also transform and increase the brightness/contrast of your design to make it pop out even more.
![import image into photoshop](https://cdn.idevie.com/wp-content/uploads/2024/10/chrome_effect_43.jpg)
![import image into photoshop](https://cdn.idevie.com/wp-content/uploads/2024/10/1728367947_979_chrome_effect_43.jpg)
![import image into photoshop](https://cdn.idevie.com/wp-content/uploads/2024/10/1728367947_311_chrome_effect_43.jpg)
Step 2
Use the flares from 70 custom light glow effect & lens flare kit to add some flares to the design. Set the blending mode of the flares to Screen for the best results.
![add lens flares](https://cdn.idevie.com/wp-content/uploads/2024/10/chrome_effect_00.jpg)
![add lens flares](https://cdn.idevie.com/wp-content/uploads/2024/10/1728367947_141_chrome_effect_00.jpg)
![add lens flares](https://cdn.idevie.com/wp-content/uploads/2024/10/1728367948_47_chrome_effect_00.jpg)
8. Conclusion
Congratulations! You’ve successfully created a bold, neotribal 3D chrome text effect by combining the power of Adobe Illustrator, Blender, and Photoshop. By mastering these techniques, you can now produce eye-catching chrome effects and explore new ways to blend different tools for creative design. Whether you prefer Cycles for its photorealistic rendering or Eevee for quick previews, you’re equipped to experiment with different materials, lighting setups, and textures to create unique Y3K aesthetic designs.
Now that you have the basics of how to make text 3D in Photoshop, try customizing your own neotribal chrome letters or experimenting with other 3D text styles, materials, and image textures. Apply the skills you’ve learnt to new projects to make them stand out!
5 premium chrome effects from Envato
Looking for a quick way to make a 3D chrome text effect? Well, look no further than Envato, where you’ll find a wide range of different and imaginative fonts, logos, graphics, and much more. You can download as many as you want with a simple subscription. Let’s take a look!
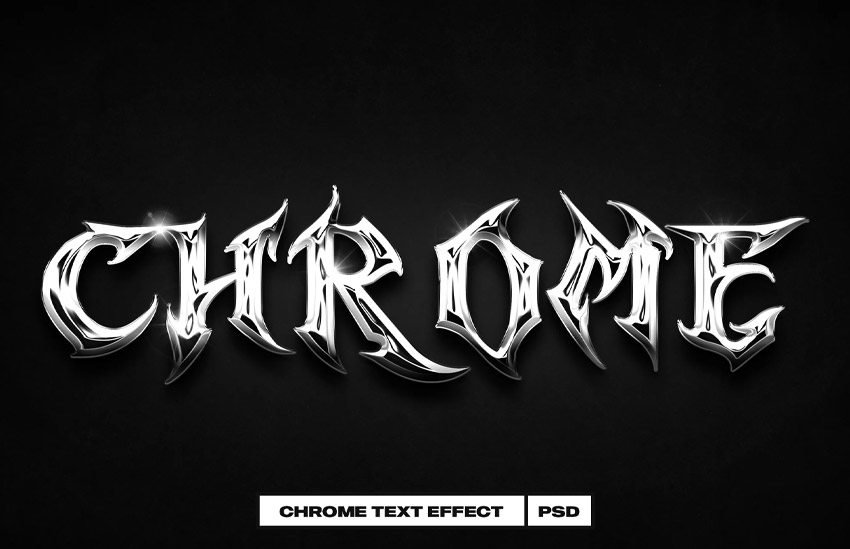
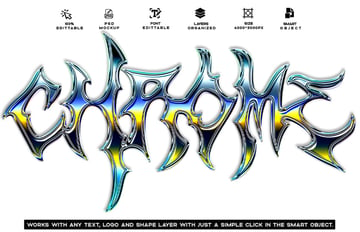
Chrome text effect (PSD)
This chrome text effect package from Envato offers a quick and easy way to transform your text into sleek, high-quality chrome lettering with just a few clicks. Perfect for adding a bold, metallic finish to your designs, it’s fully customizable and ideal for a variety of creative projects.
![Chrome text effect](https://cdn.idevie.com/wp-content/uploads/2024/10/chrome_effect_45.jpg)
![Chrome text effect](https://cdn.idevie.com/wp-content/uploads/2024/10/1728367948_17_chrome_effect_45.jpg)
![Chrome text effect](https://cdn.idevie.com/wp-content/uploads/2024/10/1728367949_340_chrome_effect_45.jpg)
Metallic chrome text effect (PSD)
This metallic chrome text effect from Envato provides a polished, professional chrome finish for your text in seconds. With its high level of customization, you can easily achieve striking, reflective metallic designs.
![Metallic Chrome Text Effect](https://cdn.idevie.com/wp-content/uploads/2024/10/chrome_effect_44.jpg)
![Metallic Chrome Text Effect](https://cdn.idevie.com/wp-content/uploads/2024/10/1728367918_881_chrome_effect_44.jpg)
![Metallic Chrome Text Effect](https://cdn.idevie.com/wp-content/uploads/2024/10/1728367919_969_chrome_effect_44.jpg)
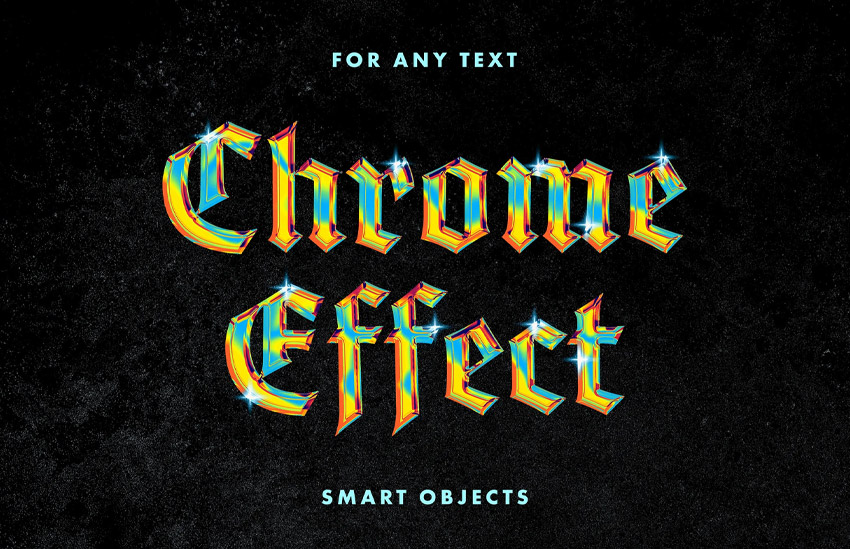
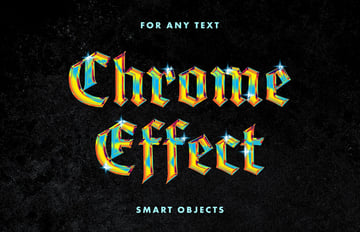
Holographic chrome effect (PSD)
Add a vibrant, futuristic touch to your text and designs with this holographic chrome effect. Thanks to its smart object layers, you can quickly replace the placeholder text by double-clicking the thumbnail and saving your changes. Perfect for branding, logos, or presentations!
![Holographic Chrome Effect](https://cdn.idevie.com/wp-content/uploads/2024/10/chrome_effect_46.jpg)
![Holographic Chrome Effect](https://cdn.idevie.com/wp-content/uploads/2024/10/1728367949_778_chrome_effect_46.jpg)
![Holographic Chrome Effect](https://cdn.idevie.com/wp-content/uploads/2024/10/1728367950_333_chrome_effect_46.jpg)
Glossy chrome text effect PSD vol 2 (PSD)
Give your text a sleek, polished chrome look with a high-shine finish using the glossy chrome text effect from Envato. High-quality and highly detailed, these styles are created in 4000×3000 resolution. So you can use the styles in your work without worrying about a drop in the quality. Versatile and perfect for any project, they’re ideal for logos, social media banners, album covers, T-shirts, and more.
![Glossy Chrome Text Effect PSD Vol 2](https://cdn.idevie.com/wp-content/uploads/2024/10/chrome_effect_47.jpg)
![Glossy Chrome Text Effect PSD Vol 2](https://cdn.idevie.com/wp-content/uploads/2024/10/1728367950_135_chrome_effect_47.jpg)
![Glossy Chrome Text Effect PSD Vol 2](https://cdn.idevie.com/wp-content/uploads/2024/10/1728367951_391_chrome_effect_47.jpg)
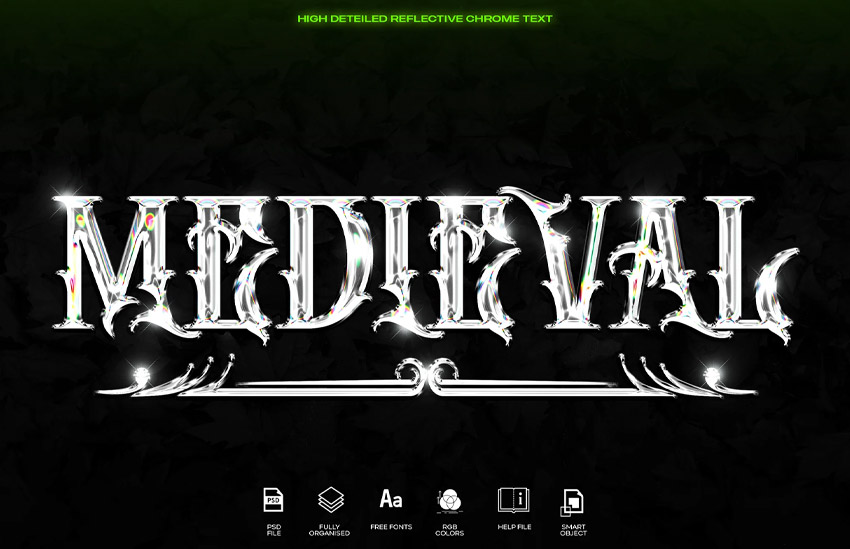
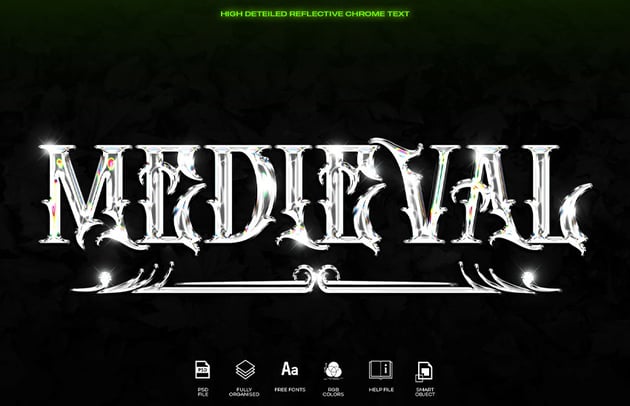
Medieval chrome reflective text effect (PSD)
Elevate your designs with the Medieval chrome reflective text effect from Envato. This digital product infuses your text with a reflective chrome finish, perfect for your medieval text effect in games, posters, and book covers. It combines historical charm with modern flair, offering a simple way to add sophistication to your projects.
![Medieval Chrome Reflective Text EFFECT](https://cdn.idevie.com/wp-content/uploads/2024/10/chrome_effect_48.jpg)
![Medieval Chrome Reflective Text EFFECT](https://cdn.idevie.com/wp-content/uploads/2024/10/1728367951_354_chrome_effect_48.jpg)
![Medieval Chrome Reflective Text EFFECT](https://cdn.idevie.com/wp-content/uploads/2024/10/1728367952_738_chrome_effect_48.jpg)
Want to learn more text effect skills?
I hope you enjoyed our tutorial on how to make text 3D in Photoshop and Blender. If you’re looking for more text effect skills, take a look at some of these similar tutorials on Envato Tuts+ that teach you a variety of useful techniques and skills using Adobe Photoshop or Adobe Illustrator.